Elementor Editor
General
I only need to build one website. Which plan should I get?
Elementor Pro empowers you to build complete WordPress websites.
The Essential plan includes all the capabilities required to build a basic website. You will get access to over 50 Pro widgets, the Theme Builder to edit the header, footer, and other theme parts. This plan also includes basic marketing tools using the Form Builder, so you can stay connected with your website visitors.
The Advanced Solo plan includes 85 Pro widgets, and enables you to create ecommerce and professional websites. In addition to all the features available in the Essential plan, it also includes advanced marketing features like form integrations to integrate with your marketing software, the popup builder, ACF / CPT support for greater dynamic content support. This plan also includes ecommerce features with the full WooCommerce Builder, and integrations to PayPal and Stripe.
The Elementor One plan gives you access for all Elementor features and apps including AI generated code and content, Image optimization, site accessibility, email deliverability and site management.
What is the difference between Elementor Website Builder Plugin and Elementor Host?
The Elementor plugin allows you to access all the amazing features of Elementor Pro website builder. To use it, you’ll need to purchase a hosting service with a WordPress installation and then download and install the Elementor plugin. Elementor Host provides website hosting and is a great place for you to install the Elementor Website Builder.
How can I change between the different Pro plans?
You can switch your Free or Pro plan at any time from within your Elementor account. In your Elementor account, click “Upgrade Now,” select the plan you’d like to switch to, and immediately get access to the new features. Your Elementor account can grow with you, as there’s always a plan to fit your needs.
Can I transfer the Elementor Pro license key from one domain to another?
Yes. You can transfer the Pro license key by deactivating Elementor from your previous domain and activate it on the new one. For more details, see Transfer your license between websites. Switching it over is easy with no hassle or hidden fees.
Can I migrate my Elementor plugin based website to Elementor Host?
Of course. You can follow the following step-by-step migration guide to migrate your website, or contact our support to help you migrate your website to Elementor Host in no time, for free. During this migration process, your entire website will be transferred to a new Host subscription which is required before migration. It’s always recommended to backup and save a copy of your website for safety.
You can also use Elementor’s Import/ Export tool to export your existing website as a kit and import it to an Elementor hosted website. Please note that the tool has some limitations, which means you may be required to do additional work once the import process is complete.
What payment methods do you accept?
We accept all major credit cards and PayPal.
What payment methods do you accept?
We accept all major credit cards and PayPal.
Do you offer a free trial?
There is no trial period but there is a 30-day money back guarantee with no strings attached.
Why does it say my Elementor One license isn’t found?
For Elementor One, “License not found” usually means the site is connecting through the wrong entry point, not that your subscription is missing. Follow these steps on the site showing the error:
|
I already have Elementor One, but I’m seeing a Get One
Even if you have Elementor One, the ‘Get One’ prompt may appear if your site wasn’t activated correctly. This can cause a mismatch where the backend thinks your website is connected, but your WordPress dashboard does not. As a result, it may seem like you have no available slots left on your Elementor One plan.
To fix this, follow these steps:
Log in to your my.elementor.com account dashboard.
Go to the Subscriptions tab: https://my.elementor.com/account-settings/purchases/subscriptions/
Find your Elementor One plan and click the “Manage this subscription” button.
Locate your website in the list and click the detach (unlink) icon next to it to remove the connection.
After detaching, go to your WordPress Admin dashboard, navigate to Elementor → Home, and follow the prompts to connect and activate your website to your Elementor One plan. For more details: https://elementor.com/help/install-and-connect-elementor-one/
I upgraded to Elementor One, but my sites aren’t showing as connected.
After upgrading to Elementor One, manually connect each site via Elementor>Home. Existing Pro sites do not auto-migrate.
Here’s how: https://elementor.com/help/install-and-connect-elementor-one/
Why am I getting an error in Site Planner about too many pages?
You see an error in Site Planner about too many pages because it supports up to 25 pages per project. If your brief or sitemap exceeds this limit, reduce the number of pages to proceed. Trim your project to 25 pages or fewer to resolve the error.
I can’t export or import my Site Planner kit anymore. What should I do?
The .zip export feature for Site Planner kits has been removed. Use the following workarounds:
- When creating the website, select “Launch a fully hosted website.” instead of “Import kit to a site,”. This provides a 14-day trial on a fully hosted site. Use this to isolate server configuration issues, then export the website kit from there.
Alternatively, create a test site using tools like tastewp.com. Import your brief into the test site, then export the website kit to get the ZIP file.
For details, see: https://elementor.com/help/import-and-export-elementor-website-templates/
I'm trying to import the AI Site Planner brief to my website, but I get a Site Permission error.
If you get a Site Permission error when importing your AI Site Planner brief, check that you are logged into the correct Elementor account and have the necessary website permissions. Also, ensure your site does not exceed the 25-page limit for Site Planner projects. You can follow these troubleshooting steps: https://elementor.com/help/resolve-a-site-permission-error-in-ai-site-planner/ |
If we add custom CSS, can we know in advance if it conflicts with existing local or global styles in the Atomic Editor (V4)?
In the Atomic Editor(V4), there is no built-in feature that automatically detects CSS conflicts before applying them. However, conflicts can occur when the class name in your custom CSS matches a global class in the Atomic Editor, as your custom CSS might override the global class styling. Conversely, if your custom CSS tries to apply styles that overlap with a local class styling, those styles may not take effect, because local classes always have higher priority. In most cases, the local styles will prevail unless you explicitly override them using !important in your custom CSS. |
If a mistake is made, is it possible to reset the default styles, especially for Local variables, back to their original settings, or do you have to manually go through everything to find and fix it?
Currently, the Atomic Editor does not have a universal ‘reset to original’ button for all default styles or variables, including Local variables. If you make a change and want to revert it, you’ll need to reset the style for each element individually.
With the Atomic Editor introducing variables, is it true that global colors from the legacy editor cannot be migrated into the Atomic Editor? If variables can be used in the legacy editor, why isn’t there a way to migrate legacy global settings to the Atomic Editor, especially since the legacy editor offers more built-in options?
You can sync color variables and typography global classes with the legacy system however, the process does not work in reverse. A full, automatic migration is not available due to architectural differences between the legacy editor and the Atomic Editor. The Atomic Editor introduces a new design system built around variables and classes that are native to Atomic Elements. In contrast, legacy widgets use their own styling structure and do not support the new styling capabilities. This separation is intentional, as it helps maintain stability and ensures backward compatibility for existing sites.
Can I share my One/Angie License with other users on the site?
Currently, there’s no option to share License credits with other users on the site.
But we’re always looking for ways to improve the product by listening our users.
Other Admin/Editor users can’t use Angie on my site. They see a ‘You’re signed out’ message.
In order for other Admins or Editors on your site to enjoy Angie, they need to create an Elementor account to sign in and use this.
For details, see Create your account.
I’m not entirely happy with the AI-generated content on my site.
If you’re using long prompts to generate complex portions of content, try using multiple very-specific prompts to generate every portion of content instead.
Once I ask Angie for anything to be generated it goes to “processing” and then stays on that screen permanently
If you’re using long prompts to generate complex portions of content and think Angie is taking too long, try using multiple very-specific prompts to generate every portion of content instead.
How can I create a custom widget using Angie?
To create a custom widget with Angie, open the Elementor Editor and enter a detailed description of your desired widget into the Angie side panel. After Angie generates the widget in Test Mode, verify the design and functionality on the canvas, then click the Publish button to save the widget to your live site library.
For details, see How to create custom widgets using Elementor Angie AI.
Is there any way to roll-back, or test the widgets created with Angie to avoid problems/downtimes on my site?
Angie has a Test Mode that will prevent your site from having critical issues with Angie-generated widgets.
It activates automatically when creating new elements, isolating changes in “Test Mode” state until you manually select the Publish to Live button in the Angie> Snippets menu accessible from WP Admin.
For details, see How to use Angie Test Mode for Elementor widgets and snippets.
Why is the “Edit with Elementor” button missing?
If you don’t see the “Edit with Elementor” button, try these steps:
From WP Admin, navigate to Elementor>Settings
Ensure all post types are checked, then save changes.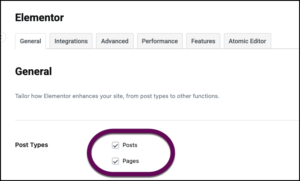
Open the page from the WordPress editor and check if the button appears.
If it’s still missing:
Back up your website
Update Elementor and Elementor Pro
Deactivate all plugins except Elementor and Elementor Pro
Try a different browser or incognito mode
Temporarily switch your theme to Hello Elementor.
To learn more, see The Edit with Elementor link has disappeared.
The Elementor editor is endlessly loading. What should I do?
If the Elementor editor is loading endlessly, please try the following:
For more troubleshooting steps, see I can’t edit with Elementor. |
I’m using the Loop Grid widget with Atomic Elements inside a Loop Item template. Everything looks correct in the editor, but on the frontend the layout appears broken or misaligned. What could be causing this discrepancy?
In the editor, Atomic Elements may still appear correctly during preview because the editor rendering engine is more flexible and can display components that are still under development or partially supported.
However, on the frontend, the Loop Grid widget does not currently fully support Atomic Elements. As a result, the live site cannot properly process and render these elements, which leads to layout issues such as misalignment or broken structure.
For now, we recommend using legacy widgets in the Loop Item templates used with the Loop Grid widget. Legacy widgets are fully compatible with the Loop Grid and ensure consistent rendering between the editor and frontend. This should resolve the layout issues until full support for Atomic Elements is introduced in a future update.
Running Elementor Core and Pro
If I purchase Elementor Pro, should I delete the Free plugin after I install the Pro plugin?
You should not delete the Free plugin. Elementor Pro is an addon to the Free version. The Elementor Pro plugin cannot function without the Free plugin.
I had a problem, and support advised me to deactivate or delete the Elementor plugin(s) and reactivate or reinstall them. Will that destroy all the hard work I did?
The work you did with Elementor will not be deleted when the plugin is deleted. When you reactivate or reinstall the Elementor plugin, all your designs will still be available just as they were before you deleted the plugin. Of course, we do recommend always having a recent backup of your site, in case anything ever goes wrong. This is best practice for any situation.
What happens if I delete the Pro version but keep the Free version? Will my site lose any of the advanced designs I made using Pro features?
If you deactivate or delete Elementor Pro, your site will be unable to display the advanced designs you created with Elementor Pro. Any designs created with the standard free version of Elementor will still work. If you reactivate or reinstall Elementor Pro, however, your designs created with Pro will show up once again.
What happens if I don't renew my license after one year? Will Elementor Pro still work?
Your existing project will remain intact, as is, for now, but you will no longer receive support, updates and access to premium templates which require renewal.
Grid containers
I tried to add a widget to a cell but it put it in a different cell.
In a Grid Container you must add widgets to the cells in order. If you try to add a widget to a cell out of order, it will automatically be put in the proper cell. Below are the layouts for a 3×2 grid container with column and row settings.
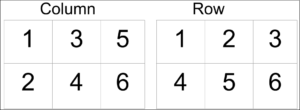
You can switch between the columns and rows by changing the Auto-Flow setting in theItems section of the Layout tab.
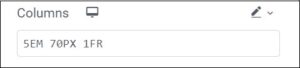
Can I make rows and columns of different heights and widths?
Yes you can customize the height or width by choosing Custom. Enter any custom measurement or even CSS grid property for the column or row. You can even use different measurement types for each column or row. Following is an example of customizing a grid with three columns where the first column will be 5EM, the second 70PX and the third 1FR:
Can I create a Grid Container with a blank cell?
For some designs you may want to have one blank cell within a grid. In theory, you must have an element in a cell before you can add an element to the next cell. However, there is a workaround. You can add a contentless widget (the Spacer widget is recommended) to a cell and then add an element to the next cell. This will appear as a blank space in your grid.

Can I create more advanced layouts with uneven grid layouts?
You can achieve that by heading to the Columns and Rows unit size selector and changing it from FR to Custom (pencil icon). Then, in the custom field, you can use CSS Grid properties to create more complex layouts.
Can I use Flexbox and Grid simultaneously for my page layout?
Sure, you can enjoy both worlds and use each layout’s features and flexibility to create unique and complex structures.
The Grid Outlines disappear when not focused on the container widget or live preview. Why?
The Grid Outlines are only for editing purposes to help you visualize the grid layout better, when you’re focused on a different element on the page, we don’t want to overload the Editor with unnecessary guides. We also don’t want to show the outline in the preview or live page.
Elementor Host
What is an Elementor Host website?
Elementor Host websites offer high speed hosting optimized for use with the Elementor plugin.
Because the Elementor Host servers are optimized for Elementor, building a site with Elementor is faster and easier than ever.
What is the difference between Elementor Website Builder Plugin and Elementor Host?
The Elementor plugin allows you to access all the amazing features of Elementor Pro website builder. To use it, you’ll need to purchase a hosting service with a WordPress installation and then download and install the Elementor plugin. Elementor Host provides website hosting and is a great place for you to install the Elementor Website Builder.
Is Elementor Host shared or VPS hosting?
Neither. Elementor Hosting operates on a cloud infrastructure, providing you with the ideal hosting solution. It offers a certain amount of flexible resources that auto-scale according to your website’s needs. This ensures your website remains fast and runs smoothly even during high volumes of site visitors. Enjoy the benefits of a robust and efficient cloud-based hosting environment with Elementor Hosting.
Do you provide email services?
While Elementor doesn’t provide business email accounts, you can send up to 100 emails daily using our server. Additionally, we’ve introduced the ability to authenticate your domain, allowing you to send emails that appear to come from your domain, enhancing your brand identity.
We’ve partnered with Zoho, Google, Microsoft, offering easy setup and integration for professional email boxes. Our seamless integration between your website and email guarantees that everything functions harmoniously.
Can I transfer my Elementor Host website to another hosting provider?
Yes, your website is completely transferable between hosting providers. We have even simplified this process with our export and import process. However, please note that you must have WordPress installed on the new host and if you’re using Elementor Pro functions, you must have the Elementor Pro plugin installed in the new host.
What themes do Elementor Host websites work with?
Elementor Hosting websites work with all themes which are compliant with WordPress coding standards as set by its Codex. We’ve tested it on hundreds of themes, making sure everything works perfectly, down to the last pixel.
I want to cancel my subscription
Before cancelling, we can try to resolve the issues you’re facing.
Elementor Host provides massive built-in value that often costs extra elsewhere, including enterprise-grade Cloudflare CDN, daily automated backups, and a brand-new AI Assistant.
Right now from your dashboard, your AI Assistant allows you to instantly Clean cache, Scan vulnerabilities, Create staging environments, and Turn on site lock without needing to install or pay for extra third-party plugins.
If you still want to cancel, see Cancel a subscription.
My website is infected with malware
An infected website can be extremely stressful. Fortunately Elementor Host is equipped with powerful recovery and security tools directly in your dashboard.
If your site has been compromised, the fastest way to get it back online is to restore a clean backup from a date before the issue started. You can do this directly from your My Elementor Dashboard.
Here is how you can use your dashboard tools to take control right now:
- Open your AI Assistant next to the Edit Site button from your my.elementor.com dashboard after selecting your hosting website, and click the Scan vulnerabilities quick action to identify potential security gaps.
- Use the AI Assistant to Create backup once your site is clean, ensuring you have a safe restore point moving forward.
-
If restoring a backup doesn’t solve the issue, we also offer a professional Malware Cleanup service. Would you like to try restoring a backup first?
👉 How to Restore a Previous Version of Your Website
I want to increase my Memory Limit Request to 512 MB
Good news! Your Elementor Hosting plan is already configured with a PHP Memory Limit of 1024 MB by default—which is double the 512 MB you requested.
You can verify your current server settings directly in your dashboard by following the steps outlined here:
Since your limit is already set very high, are you seeing a specific error message or experiencing slowness? This might indicate a plugin conflict rather than a lack of memory.
I need to edit my .htaccess file.
Elementor Hosting uses NGINX for superior performance, which means it doesn’t use .htaccess files. However, most things you’d do there (like redirects) can be managed directly in your hosting dashboard using Web Rules.
https://elementor.com/help/manage-site-traffic-with-web-rules/
I need root access to the server.
To maintain the stability and high performance of our infrastructure, root access is restricted on all Elementor Hosting plans.
However, you still have full control over your site via SFTP and Database access through your My Elementor dashboard.
For details, see Access the files of your Elementor Host site.
I'm trying to import a kit but my Elementor Host website is timing out.
Site timeouts during kit imports are usually caused by the Max Execution Time setting.
Because importing a kit makes major changes to your site’s design and structure, we highly recommend securing your current layout first. Using Elementor Host, you can do this in seconds:
- Log in to your my.elementor.com dashboard and select your hosting website.
- Open your AI Assistant next to the Edit Site button.
- Click the Create backup quick action.
Once backed up, you can safely increase your execution time to allow the import:
- Move over to Advanced tab > PHP Configuration > PHP Settings.
- Increase the Maximum Execution Time temporarily.
For details, see Temporarily increase the maximum execution time of your Elementor Hosted site.
My staging website is being indexed by Google
From WP Admin, you can navigate to Settings>Reading and enable the Discourage search engines option. However, Google may still show your site in search results for a short period.
Since you are using Elementor Host, you have a much more robust option to completely hide your site while you build it. You can easily lock it down using your AI Assistant:
- Log in to your my.elementor.com dashboard and select your hosting website.
- Open your AI Assistant next to the Edit Site button.
- Click the Turn on site lock quick action.
For details, see Privacy Mode.
I’m locked out of the website after enabling a plugin.
Being locked out usually happens due to a plugin conflict, but don’t worry—you can fix this without needing access to your WordPress admin area.
You can deactivate the problematic plugin directly from your My Elementor dashboard:
- Log in to my.elementor.com and select your website.
- From the side panel, click the Plugins tab.
- Find the plugin you just enabled, click the three dots (⋮), and select Deactivate.
For details, see Manage your plugins with the My Elementor dashboard.
My changes are not showing on the website.
This is most likely caused by a caching conflict.
As an Elementor Host customer, your site is already equipped with a built-in Advanced Caching system powered by NGINX. This means you don’t need third-party caching plugins, which can often cause “double-caching” and broken layouts.
The fastest way to force your new changes to appear is to use your AI Assistant:
- Log in to your my.elementor.com dashboard and select your hosting website.
- Open your AI Assistant next to the Edit Site button.
- Click the Clean cache quick action.
For details, see How do I clear my Elementor Host website cache?
Alternatively, you can clear the Server Cache directly from your WP Admin bar.
If you specifically changed design elements, go to WP Admin and navigate to Elementor>Tools and click Clear Files & Data.
For details, see Clear Files & Data.
I need to restart the server my website is on, but I only have WordPress access.
It’s not possible to restart the server, however you can start the website over from scratch. Since you currently only have WordPress Admin access, we recommend the following:
- Request Team Access: Ask the site owner to add you as a Team Member within their Elementor account. This will give you your own login to manage hosting settings safely. Guide: Managing Team Members.
I am trying to save my Mega Menu, but the changes disappear. I read I need to increase max_input_vars in my .htaccess file on Elementor Host.
Elementor Host runs on a high-performance NGINX stack, which means it does not use or support .htaccess files. Additionally, max_input_vars is a server-level PHP configuration that cannot be modified manually by users in a managed environment.
However, a disappearing Mega Menu is usually just a sync issue. Since you are an Elementor Host customer, you can clear server-level cache instantly.
To refresh your server data using your AI Assistant:
- Log in to your my.elementor.com dashboard and select your hosting website.
- Open your AI Assistant next to the Edit Site button.
- Click the Clean cache quick action.
For details, see How do I clear my Elementor Host website cache?
If the issue persists, certain third-party plugins can conflict with Elementor and Elementor Pro. Try disabling them one by one temporarily.
My site is slow. I want to increase my WP Memory Limit to 2GB to fix it.
A slow website can be frustrating. The good news is that because you are using Elementor Host, your plan is already configured with a massive WP Memory Limit of 1024 MB by default.
Increasing it to 2GB typically won’t improve loading speeds, as the bottleneck is usually related to heavy plugins or unoptimized images. Instead, you can utilize your built-in server tools to instantly speed things up.
Your Elementor Host environment includes an Advanced Caching system. The fastest way to clear it is using your AI Assistant:
- Log in to your my.elementor.com dashboard and select your hosting website.
- Open your AI Assistant next to the Edit Site button.
- Click the Clean cache quick action.
For details, see How do I clear my Elementor Host website cache?
I made changes to my header but they aren't showing up. I installed 'WP Super Cache' to fix it, but now the site looks broken.
It looks like you’ve run into a “double-caching” issue, which happens when a third-party caching plugin conflicts with your server.
Elementor Hosting comes with a highly optimized, built-in Advanced Caching system powered by NGINX, so you don’t need extra plugins like ‘WP Super Cache’.
To fix your site, deactivate WP Super Cache. Then, clear your server cache using your AI Assistant:
- Log in to your my.elementor.com dashboard and select your hosting website.
- Open your AI Assistant next to the Edit Site button.
- Click the Clean cache quick action.
For details, see How do I clear my Elementor Host website cache?
As an Elementor Host customer, you have the option to create a staging environment so that next time you want to test out a new plugin or make major header changes, you can do it safely without breaking your live site. Just open your AI Assistant and click Create staging.
For details, see Create a staging site.
I moved my site to a new domain and now all my images are broken. I installed 'Better Search Replace' to fix the links.
This issue sounds like your database still references your old domain. While plugins like ‘Better Search Replace’ are common, Elementor has a built-in Replace URL tool specifically designed to update these links across your layouts and CSS files safely.
To fix your broken images, follow these steps:
- Use the Elementor Tool: Go to Elementor > Tools > Replace URL.
- Enter the Domains: Enter your Old URL and your New URL exactly as they appear (including https://), then click Replace URL.
- Regenerate CSS: After replacing the URLs, stay in the Tools menu and click Regenerate Files & Data to refresh your site’s styling.
For details, see URL change disrupts Elementor functioning.
Sync the Hosting Dashboard: Ensure your new domain is correctly assigned and set as “Primary” in your My Elementor dashboard under the Subscriptions & Hosting section.
For details, see Troubleshooting My domain is not connected to my website.
I can't upload a video file. It says "exceeds the maximum upload size for this site."
For large video files, we highly recommend hosting them on a dedicated video platform (like YouTube, Vimeo, or VideoPress) and embedding them.
Hosting large videos directly on your server consumes your bandwidth and storage quickly, which can slow down your site for visitors. Embedding ensures fast playback and keeps your site light.
Alternatively, you can use SFTP to upload larger files without any issues.
Use SFTP to transfer files to your Elementor Static Website | Elementor
I get a "Destination folder already exists" error when installing a plugin
This message usually means a previous installation failed.
To fix this:
- Access your site via SFTP.
For details, see Transfer files to an Elementor Host site. - Navigate to wp-content/plugins/.
- Find the folder with the name of the plugin you are trying to install.
- Delete that folder.
Once deleted, go back to your WordPress Dashboard and try installing the plugin again.
Website owners aren't receiving my form submissions.
This is often because the default WordPress email function (wp_mail) is unauthenticated and blocked by many email providers (like Gmail/Yahoo) to prevent spam.
To fix this reliably, we recommend setting up SMTP (Simple Mail Transfer Protocol). This routes your emails through a dedicated provider so they actually land in the inbox.
We highly recommended Elementor’s Site Mailer solution, which comes with a free trial for testing purposes.
For details, see Site Mailer: SMTP replacement, email deliverability & logs
I connected my domain but the site still shows the old Elementor URL.
Make sure you set the custom domain as primary domain in your Elementor Host Dashboard.
Set a Custom Domain as Primary | Elementor
If this is currently not possible on your dashboard, please note that when you update DNS records (A Records or CNAME), it can take anywhere from 1 to 48 hours for those changes to update across the entire internet. This is outside of Elementor’s control.
Please double-check your settings:
- A Record: Should point to 162.159.137.9 (or the IP provided in your dashboard).
- CNAME (www): Should point to your default Elementor address (e.g., yoursite.elementor.cloud).
If your records are correct, you likely just need to wait a bit longer. You can check the status using a tool like DNSChecker.org.
I am getting an "Error Establishing a Database Connection".
This message means WordPress can’t talk to your database.
If you haven’t changed any files recently, this might be a temporary hiccup. However, if you recently edited your wp-config.php file or changed your database password, that is likely the cause.
The fastest fix is to restore a backup from yesterday (before the error started).
For details, see Restore previous version of your website.
While Elementor Host automatically takes daily backups behind the scenes, you also have the power to manually create safe restore points before making any big changes.
Here is how to create an instant backup using your AI Assistant:
- Log in to your my.elementor.com dashboard and select your hosting website.
- Open your AI Assistant next to the Edit Site button.
- Click the Create backup quick action.
For details, see Back up your Elementor Host website.
I need to run a manual SQL query.
Elementor Hosting provides direct database access for advanced management.
.[/callout]
To create a backup first using your AI Assistant:
- Log in to your my.elementor.com dashboard and select your hosting website.
- Open your AI Assistant next to the Edit Site button.
- Click the Create backup quick action.
Once backed up, you can access your database by looking to the right side of the panel in your dashboard and clicking “Open database”.
For details, see Access the database of your Elementor Host website.
I want to transfer this website to my client's account.
Elementor Host transfer website feature offers a quick, efficient way for creators to build a site and then transfer it to their clients.
For details, see Transfer an Elementor Host website | Elementor
I get a "403 Forbidden" error only when I try to save my page on Elementor Host.
This is likely a security false positive. Sometimes, the Web Application Firewall (WAF) mistakenly thinks your text or code snippet is a malicious attack (like an SQL injection) and blocks the save.
To ensure your site’s security hasn’t actually been compromised, you can run a quick check using your AI Assistant:
- Log in to your my.elementor.com dashboard and select your hosting website.
- Open your AI Assistant next to the Edit Site button.
- Click the Scan vulnerabilities quick action.
If the scan comes back clean, try removing any custom HTML or JavaScript you recently pasted to see if the page saves.
- If you are using a security plugin (like Wordfence), try enabling “Learning Mode” or temporarily deactivating it.
- If you are pasting custom HTML or JavaScript, try removing it to see if the page saves.This would point towards custom code being present on the page which might be incorrectly added.
Can I change my server location?
While you cannot change the physical location of your origin server (which is located in our high-performance data center in Belgium), this does not affect your site’s speed for international visitors.
Here is why:
- Global CDN: We use an enterprise-grade Cloudflare CDN (Content Delivery Network) with servers all around the globe.
- Smart Delivery: When a visitor accesses your site (e.g., from New York or Tokyo), they don’t have to connect all the way to Belgium. Instead, they download your images, scripts, and content from the Cloudflare server nearest to them.
This ensures lightning-fast load times regardless of where your main database lives.
I need to access the server via SSH (Terminal).
We do not offer SSH access.
For security reasons, direct Shell/Terminal (SSH) access is disabled on Elementor Hosting.
However:
- For File Management: You can use SFTP.
For details, see Transfer files to an Elementor Host site. - For Database Management: You have full phpMyAdmin access.
For details, see Access the database of your Elementor Host website.
For WP-CLI: You cannot run raw commands, but you can perform most maintenance tasks (clearing cache, resetting users, debugging) directly via the My Elementor Dashboard tools.
How do I change the name of my website?
You can update your site’s core identity in seconds using your built-in AI Assistant:
- Log in to your my.elementor.com dashboard and select your hosting website.
- Open your AI Assistant next to the Edit Site button.
- Click the Change site title quick action.
The assistant will handle updating the database records for you safely.
I need to update WooCommerce and my theme, but I'm afraid it will break my site.
It is smart to be cautious before running major updates. Plugin and theme updates can occasionally cause conflicts, but as an Elementor Host customer, you have the perfect safety net.
Instead of risking your live site, You can use your staging environment. This creates an exact clone of your site where you can run updates safely.
Here is how to set it up instantly:
- Log in to your my.elementor.com dashboard and select your hosting website.
- Open your AI Assistant next to the Edit Site button.
- Click the Create staging quick action.
For details. see Create a staging site.
Are there any vulnerabilities on my WordPress site?
Security is a top priority, and we’ve got you covered. Elementor Host runs on a highly secure cloud infrastructure with a built-in firewall, but outdated plugins can sometimes introduce risks.
You don’t need to install heavy security plugins to check your site’s health. You can run a comprehensive security audit right now using your AI Assistant!
Here is how to check your site:
- Log in to your my.elementor.com dashboard and select your hosting website.
- Open your AI Assistant next to the Edit Site button.
- Click the Scan vulnerabilities quick action.
The AI will review your active plugins and themes and alert you if anything needs your attention.
How do I hide my site from the public while I redesign it?
You can absolutely keep your redesign under wraps.
While many WordPress users have to install third-party “Maintenance Mode” plugins to do this, your Elementor Host plan includes a server-level site lock. This is much more secure and won’t slow down your WordPress admin area.
You can instantly restrict public access using your AI Assistant:
- Log in to your my.elementor.com dashboard and select your hosting website.
- Open your AI Assistant next to the Edit Site button.
- Click the Turn on site lock quick action.
When you are ready to show off your new design, simply ask the AI Assistant to unlock it.
For details, see Privacy Mode.
I am about to hand over the website to my client and want to save a copy
While Elementor Host automatically takes daily backups for you, it is always best practice to create an immediate, manual save point right before transferring ownership.
You can secure your milestone instantly using your AI Assistant:
- Log in to your my.elementor.com dashboard and select your hosting website.
- Open your AI Assistant next to the Edit Site button.
- Click the Create backup quick action.
Once your backup is complete, you can safely use the built-in transfer feature to download the .zip file of your backup to your device and move the site to your client’s account.
For details, see How to download your Elementor Host website files as a ZIP and Transfer an Elementor Host website.
My site went live too early, how do I hide it?
Don’t panic, you quickly hide your site.
Your Elementor Host dashboard gives you the power to lock down your site at the server level instantly.
Quickly restrict public access using your AI Assistant:
- Log in to your my.elementor.com dashboard and select your hosting website.
- Open your AI Assistant next to the Edit Site button.
- Click the Turn on site lock quick action.
For details, see Privacy mode.
This will instantly put up a barrier so visitors and search engines cannot see your unfinished work.
My client says they can't see the new pictures I uploaded, but I see them on my computer.
This can happen because browsers and servers save (or “cache”) older versions of websites to load them faster.
Your Elementor Host plan includes a premium, high-speed Advanced Caching system. To ensure your client sees the newest version of the site, you just need to flush that server cache.
You can clear the cache globally in one click using your AI Assistant:
- Log in to your my.elementor.com dashboard and select your hosting website.
- Open your AI Assistant next to the Edit Site button.
- Click the Clean cache quick action.
For details, see How do I clear my Elementor Host website cache?
My visitors are complaining about weird pop-up ads or getting redirected to other sites. Is my website hacked?
Elementor Host has robust firewalls in place, but sometimes outdated third-party plugins can let sneaky ad-scripts slip through. With Elementor Host tools, you don’t need to manually hunt through your files or hire a developer to find the culprit.
To run a deep diagnostic scan right now using your AI Assistant:
- Log in to your my.elementor.com dashboard and select your hosting website.
- Open your AI Assistant next to the Edit Site button.
- Click the Scan vulnerabilities quick action.
The AI will flag any compromised or outdated plugins that might be causing the redirects.
I need to pause a website until an invoice is paid.
If you need to temporarily restrict access to a site without deleting any of your hard work or messing with WordPress user roles, your Elementor Host plan has the perfect server-level feature for this.
You can instantly restrict public access using your AI Assistant:
- Log in to your my.elementor.com dashboard and select your hosting website.
- Open your AI Assistant next to the Edit Site button.
- Click the Turn on site lock quick action.
This puts up an immediate barrier. Only you (or anyone you share the bypass pin with) will be able to see the site. When you are ready to reactivate their site, simply ask the AI to turn the lock off.
For details, see Privacy mode.
Elementor Host website domain name
What is a domain name?
A domain name is the unique, virtual address of a website, e.g. www.example.com
Can I use my own domain name?
Yes. You can replace the temporary domain that was automatically assigned when you first created your site simply by adding a custom domain at any time. See full instructions for adding your own domain name here.
The instructions mention DNS Propagation. What is DNS Propagation?
DNS Propagation is the amount of time it takes for DNS changes to be updated around the world, across the internet. DNS stands for Domain Name System. DNS is like an address book for the Internet. It is like a directory of names (domain names) matched up with their addresses (IP addresses), which lets users navigate websites via human-readable names rather than having to remember an IP address for every website. The directory is shared and stored among DNS servers around the world to split up the load. These DNS servers periodically check for updates and these updates take time to propagate across the world. Once you’ve added your custom domain, you’ll need to wait a short period of time for all the world’s DNS servers to know about the change.
How long does it take for DNS to propagate and why does it sometimes take so long?
A change to a DNS record can take up to 72 hours to propagate worldwide although it typically takes only a few hours.
DNS servers across the world periodically check for any changes to the DNS records. If you change your DNS records, it takes time for those changes to be checked and noted by each DNS server around the globe.
In addition, every DNS record has a Time to Live (TTL) value, which is the amount of time that DNS servers should store that record in their cache. So even when you change a record, DNS servers will continue working with its formal value from cache until this time has passed. If your registrar allows this, you can set your record’s TTL value to a low number, which will help speed up the process.
Regardless of the TTL value, each server has its own schedule and some take longer than others to update their records. Until they update, they will continue to use the old records that they have cached. This means that if you’ve pointed a domain name to a new IP address, for example, then for a period of time, some places will be seeing your old site (using your old DNS records), and some places will be seeing your new site.
How can I check to see if my site has propagated around the world?
There are several free online tools that make it easy to see if your site is propagating around the world. DNS Checker is one such tool Enter your domain name (e.g. example.com) into the DNS Checker and click Search. Servers across the world will check to see which IP address is serving your domain at that moment. If a server lists your new IP address (from your Elementor hosted website), then you know that your DNS changes have propagated to that server and users in that area will likely be seeing your new site. This is a quick spot check to see how quickly propagation takes place across the world, but of course, it is only representative of a few DNS servers.
Should I use example.com or www.example.com?
There isn’t one right answer for this question. The best answer is to choose one as your canonical address, and redirect the other to it, so you avoid confusing search engines that may think they are two separate sites with different content. If you plan to use a CDN, you may need to use the www version as it is often required. Some CDNs, such as Cloudflare, now have workarounds that allow you to use a non-www URL, but not all do. In general, a example.com is easier and less cumbersome to share with users, but the www version does have some advantages, such as the ability to use CNAME records which propagates DNS changes more quickly than A records, and the ability to set cookies specifically for that subdomain. If none of this makes any sense to you, and you don’t plan to use a CDN, then just go with whichever you prefer. There is no difference in terms of SEO, as long as one redirects to the other. Choose one and stick with it. If you’d like to read a more in-depth discussion about this, click here.
Elementor One
General
Why does my WP Admin show two Elementor sections?
If you purchased Elementor One via elementor.com it will not automatically transfer your old Elementor Pro account to your Elementor One account. If you want to transfer your Elementor Pro account, you’ll need to do so manually. See Install and activate Elementor One for details.
Credits and quotas
Do my unused credits roll over to the next month?
Credits are renewed on a monthly basis during your subscription period. Please note that credits leftover at the end of the month will not rollover to the next one.
How can I keep track of how many credits I have left?
Your Elementor dashboard includes a dedicated credit management/subscription card. This provides real-time credit usage info, so you always know exactly how many credits you used across all included capabilities.
Upgrades and transitions
I already have a Pro subscription; how do I switch to One?
We’ve made the transition simple through the Pro upgrade path. Existing Pro subscribers can upgrade to a One plan with prorated pricing, ensuring you only pay the difference for the elevated experience and added credits.
Can I upgrade my Elementor One tier if I need more credits?
Yes. Elementor One is designed to be a scalable growth engine. You can upgrade to a higher tier (e.g., from Small to Medium) at any time to increase your monthly credit pool as your site’s needs for AI, image optimization, email delivery, or any other needs grow.
Can I "downgrade" to a lower tier or a standard Pro plan?
Elementor doesn’t offer ‘downgrades’ on existing subscriptions.
Refunds and cancellation
What is the refund policy for Elementor One?
For annual plans, we offer a 30-day money-back guarantee. Monthly plans available in One Agency are non-refundable.
Future-proofing and the ecosystem
What happens when Elementor releases new capabilities or features?
New capabilities and features will be integrated into your One subscription as we release them, giving you instant access to our latest innovations.
If I start using a new feature included in One, will it cost extra?
No. New features are included in your subscription automatically. As you adopt these new tools, they simply draw from your shared credit pool. This allows you to explore and grow your site’s capabilities without friction or new purchase hurdles.
Support and service level
What kind of support do I get with Elementor One?
Elementor One subscribers receive our highest tier of service. One is designed for users managing critical, revenue-driving sites. You receive priority assistance from our support team to ensure your business stays up and running without delay.
Does this include human support?
Yes. While standard Pro subscribers receive responses during business days, Elementor One users have access to round-the-clock priority assistance. Our expert team is available to provide the high-level responsiveness and care that professional builders require.
Activation and connectivity
How do I activate the different products included in One?
Activation is unified and seamless through a Single Zip download and Single “Connect”. Once connected, you’ll be able to activate all the additional capabilities from within the Editor.
Template Library
General
What is the Elementor Template Library?
The Elementor Template Library is a library which contains over 30 pre-designed page templates, as well as templates that were saved by the user. The library allows you to quickly create designed pages and customize them to be your own, saving you from building all pages from scratch.
Pick any template from the library and add it to your page with one click. It saves you time and energy.
For tutorials about the Elementor Template Library, check this guide. Check out the Hero kit templates we previously released.
Why do I need to connect to my Elementor account?
A connection is required to enable us to add smart features to the library in the future including personalization features such as ‘favorites’ and ‘recently used’ views, as well as other enhancements that will make the Template Library more than just a place to store templates. As a user, you will gain better control over who uses your account and website and get added security.
Where can I find my saved templates?
All the templates that you saved can be found under Templates in your WordPress Admin Dashboard.
These templates are also available, along with the pre-designed templates, in the library that is accessible from the Elementor panel.
I build sites for clients using my Expert license. Will I have to give all my clients access to my account? I don't want to share my credentials or allow clients to have access to my account in any way.
Don’t worry. Your clients will not access your account at all and you won’t need to share your credentials with them. Each of your clients will create their own individual, free accounts during the initial one-time process of connecting, if they don’t already have an account. In addition, each WordPress user on a website will need their own account if they intend to access the library.
What happens if I decide not to connect?
You will be unable to access the templates that Elementor provides via the Template Library. Your previous work remains intact. The connection only authenticates you as a user and doesn’t have any impact on your saved templates.
If I don't connect, can I still use my own Saved Templates?
Yes, you’ll always have access to your own saved templates, whether you decide to connect to the Template Library or not.
Troubleshooting
What happens if an error occurs when I try to connect?
If you receive an error that says An error occurred. The following error(s) occurred while processing the request: Connecting to the Library failed. Please try reloading the page and try again, make sure that the Site Address (URL) and WordPress Address (URL) are the same. Check this from WP Admin by going to Settings>General and making sure the URLs are exactly the same.
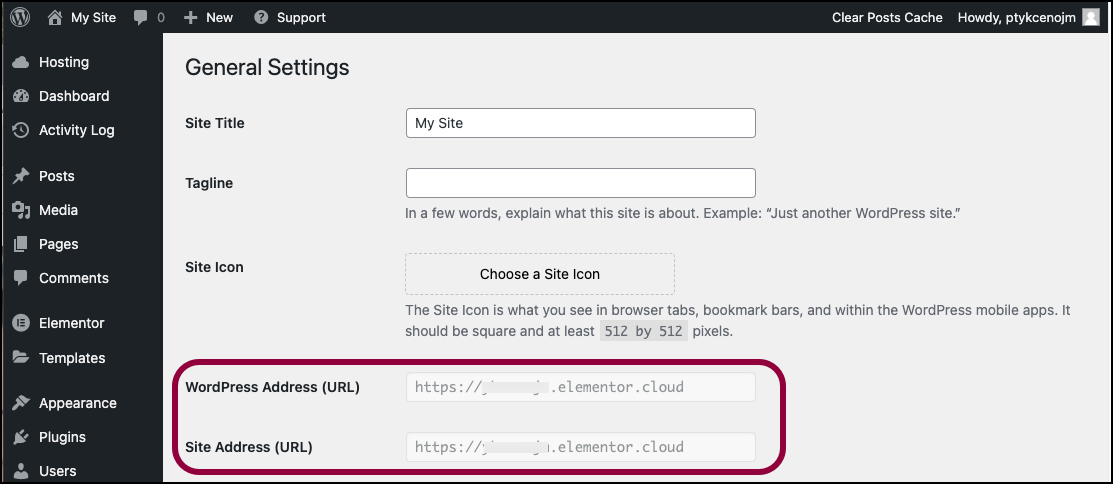
Also, this URL must correspond to the URL on your web browser’s address bar.
If you made any changes, you may need to resynch your license. For details, see Disconnect and reconnect your Elementor account.
What do I do if the template library is empty?
The template library must be connected to your Elementor account. To connect your account, see Connect to the template library.
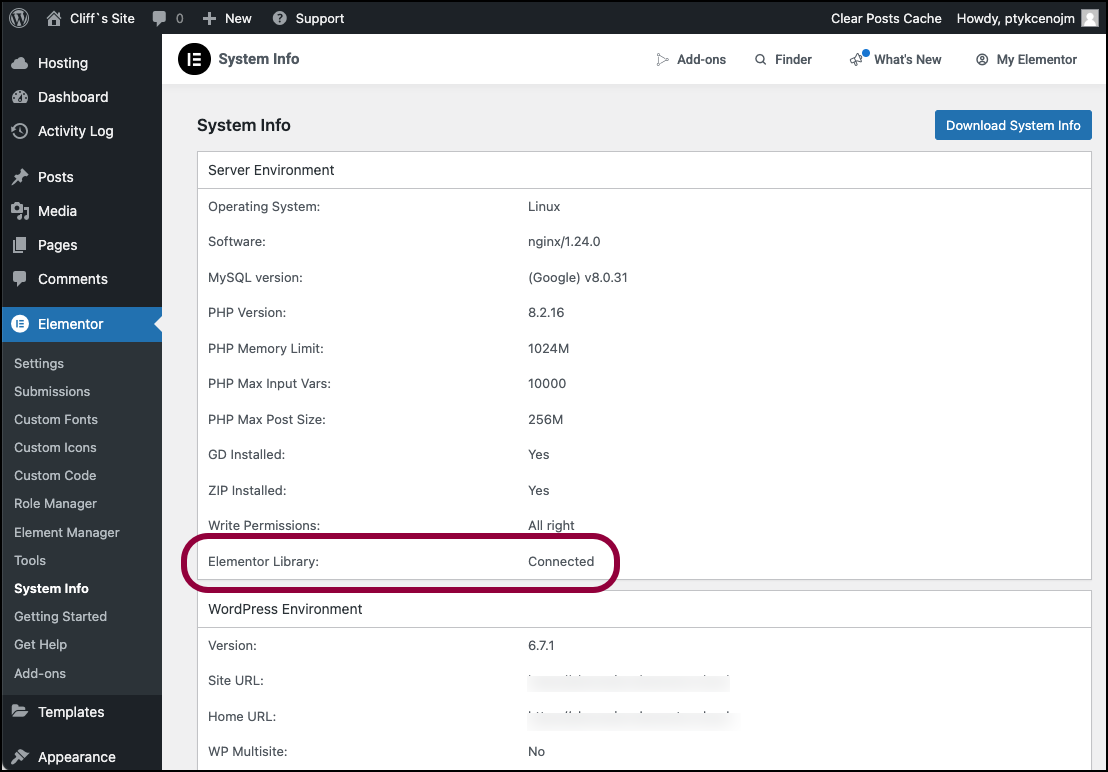
I am trying to save several templates to my Templates library but, for some reason, I can't. What is the problem?
Go to Elementor > System Info in WP Admin and confirm that the Elementor Template Library is connected.
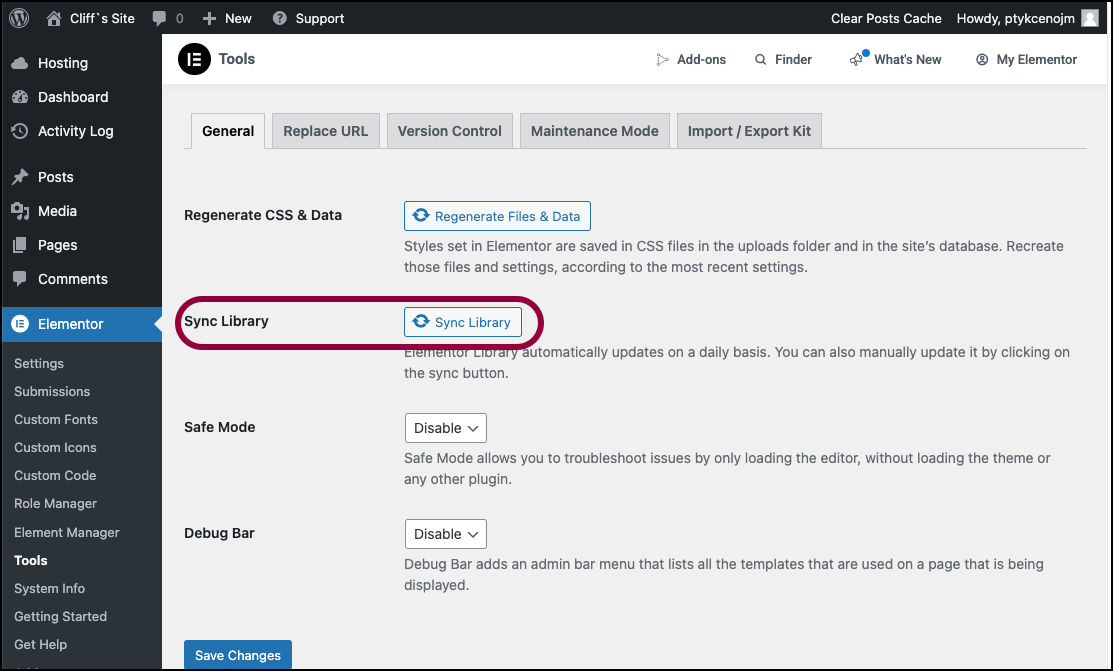
Go to Elementor > Tools in WP Admin and click Synch Library.
If it still doesn’t work, please contact your hosting company and ask them to set this configuration: allow_url_fopen
I cannot load templates, what can I do?
Go to Elementor > System Info in WP Admin and confirm that the Elementor Template Library is connected.
Go to Elementor > Tools in WP Admin and click Synch Library.
I purchased Elementor Pro but when I try to use a Pro template I am required to go pro, what can I do?
This happens when Elementor does not recognize that you have a Pro license key.
In this case, from WP Admin, go to Plugins>Installed Plugins and update Elementor Pro.
When I try to load a template I receive the error cURL ERROR 7? What should I do?
In this case, you have to contact your hosting company so that they can change the configuration of your server that blocks the request.
The predesigned templates in the library do not load for me, why?
This is generally due either to a memory issue or to the configurations of your server (file permission issues).
Verify if you meet the requirements of Elementor regarding the WP memory limit and check via your console browser if you receive 403 errors.
If you cannot open the library, contact your hosting company and ask them to verify the configurations set on your server.
Cloud Template Library
Access and eligibility
Who’s eligible for a Cloud Template Library?
Any new & existing Elementor Pro user.
Will my clients get the access to my Cloud Template Library?
It’s important to distinguish between an “Elementor license,” an “Elementor user,” and a “WordPress user.”
We recommend giving clients their own WordPress user account, which allows them to connect to the website using the same Elementor license as the creator who built the site, but does not give them access to the same features as the Elementor user.
Cloud Templates are linked to the Elementor user account, so simply connecting the site to the creator’s Elementor license does not grant the client access to the templates.
However, if (in addition to connecting the Elementor license) the client logs into the site using the Elementor user account of the freelancer, then they will gain access to the templates, since these are tied to the Elementor account.
What do I need to start
An Elementor account along with an Elementor Pro subscription.
How come my colleague and I have access to different cloud libraries, even if we're logged into the same site?
The Cloud Template Library is associated with your Elementor user name. Therefore, only that specific user can access their cloud templates.
Can I increase the maximum number of templates in my library by purchasing several subscriptions?
No, your template quota is based on your highest ranked subscription and the quota associated with it.
Example #1: If an Advanced plan gets you 120 templates, and you have 3 Advanced subscriptions, your total quota is 120.
Example #2: If an Expert plan gets you 10K templates, and you have 1 Advanced and one Expert subscriptions, your total quota is 10K.
Can I access my cloud library from a site that only has the Elementor Core plugin?
Yes, as long as you are using an Elementor account that is eligible for a Cloud Template Library.
What happens when I reach my cloud library storage limit?
You are blocked from saving any more templates once reaching max usage.
What happens if I downgrade my Pro plan?
Since storage limits differ from one subscription to another, downgrading a plan most likely means changing these limits.
If, after downgrading, you have fewer templates than your new storage limitations, then nothing happens.
If, after downgrading, you have more templates than your new storage limits, your account will be treated as if it has reached storage capacity. You will still be able to access the library but will not be able to store any more templates in the cloud library.
In the future, we will lock all of the excess templates by order of creation date (last created will be locked), blocking users from doing anything with them other than deleting.
What happens to my cloud templates if all my Pro plans expire?
If a user saved any cloud templates and then lost all eligibility for the cloud library by not having any active pro plans – we will save the templates for 90 days. After 90 days you will be prompted to renew your Pro subscription, and if you choose not the renew, the templates are permanently deleted.
Can I add more storage to my Cloud Template Library?
Unfortunately no, we currently only support storage limits based on a user’s Elementor Pro plan. That might change in the future.
Can a free user access use cloud templates?
No, however free users still have access to Site templates.
Usability
What happened to all my previously saved My Templates?
The My Templates tab is renamed Templates.
The templates you saved under My Templates are now stored locally under the Site Templates tab – and are available for use on the site where you stored them.
How can I quickly transfer my locally saved templates to my cloud template library?
There are a few ways to quickly transfer all of your locally saved templates to your cloud library, depending on where are they stored.
Site Templates – If there’s a single site that hold most of the templates you’d like to transfer, log on to the site using your Elementor account. The follow the procedures outlined in Transfer a site template to the cloud template library.
Not in Elementor – On a laptop, drive etc. – Compress all the templates you want to save into a zip file. into a zip all of the desired templates, open up your cloud template library and use the import button to add the file to your library.
Can I copy/move folders to Site templates?
No, Site Templates do not support folders. The easiest way to move multiple templates into the Site Templates, is to select all (or multiple) templates in a folder and use the bulk action bar to move or copy.
How can I restore deleted cloud templates?
After deleting a template, a notification windows appears. This notification has an undo op[tion. In addition, Ctrl or Cmd Z are avaialble for a few seconds after deletion as long as you didn’t close the window or perfrom another action such as moving another template.
Why can’t I find a certain template/ folder using the search bar?
Make sure you’re searching in the correct library. Searches in Site Templates will not find templates in the Cloud Template Library and vice versa. Also remember, the search only checks template names, not the template contents.
Why are the Move and Copy bulk actions are sometimes active and sometimes disabled?
Currently we do not support move and copy on folder items, if you selected templates along with folders, the Move and Copy options are disabled. Deselecting the folder9s0 will allow you to move and copy templates.
Angie
What is Angie?
Angie is an agentic AI for all WordPress sites.
Built specifically for professional web creators, Angie goes beyond chat-based suggestions. It understands how your WordPress site is structured, including themes, plugins, custom fields, and Elementor components, and takes real action inside your environment.
Angie can write clean, production-ready code, generate custom Elementor widgets from scratch, extend existing widgets with new functionality, and create backend and front-end snippets tailored to your needs. From interactive UI behaviors to complex WordPress admin customizations, it builds functionality that integrates directly into your workflow.
With Angie, you don’t just generate ideas. You generate production-ready widgets, code, and fully functional site assets, built for review, refinement, and real-world use.
You have full control and editing capabilities with Angie. This is AI that builds with you, not just for you.
Is Angie free?
Yes. Angie offers a free plan with daily-renewing AI credits, so you can start exploring its AI-powered tools right away. During this time, you cannot purchase additional Angie credits.
How is Angie different from Elementor AI?
Angie is a separate plugin from Elementor AI and can act independently from Elementor. However, Angie is built to to work with Elementor and take advantage of Elementor features. |
Do I need the Elementor Editor to use Angie?
Angie offers powerful AI features that work on any WordPress website, whether you use Elementor or not. You can use it with Elementor’s drag-and-drop editor.
You don’t need the Elementor Editor to get started, but logging in requires an Elementor account. This makes it easy for WordPress users to access all AI features within a single workspace.
Who can use Angie?
At this time only Site admins can use Angie. This restriction is in place because Angie can make significant changes to your site, changes that only admins should have authority to conduct.
I have an Elementor AI subscription. Do I lose my subscription?
No you won’t lose anything. Your current plan and benefits stay the same, you’ll simply migrate to the new MCP Plugin, which gives you the same tools plus a smarter, more streamlined workflow. We’re also offering a free tier that will let you try out Angie. Over time, all Elementor AI features will be removed from the existing Elementor plugin, so this change ensures you’re set up for the future with more capability and less friction. No surprises, just a better way to work.
Will this complicate my workflow?
Actually, the opposite. Many users told us Elementor AI felt fragmented, different places for structure, text, images, and code. This plugin brings everything into one smart interface, with site awareness and voice/text control.
Do I have to restructure my website to be compatible with Angie?
No, Angie installs into your website as is, with only one click.
Are there limits on the files I upload to Angie?
Yes. Only certain files can be uploaded to Angie. See What kind of files can be uploaded to Angie for details.
In addition, individual files are limited to 4MB and users are limited to uploads of up to 100MB.
Why can't other Admins on my site use Angie?
Angie requires each user to have their own Elementor account to access and use Angie.
If other Admins on your site don’t have an Elementor account, they won’t be able to use Angie, even if they have access to the website itself.
To enable Angie for additional Admins, simply make sure each Admin creates (or logs into) their own Elementor account.
What is Angie code?
Angie Code, is your developer on demand. It transforms plain-language prompts, screenshots, or URLs into clean, integrated code that works seamlessly within your workflow. Everything is fully editable, reusable, and under your control.
Angie operates in a secure test environment, so you can preview and iterate before anything goes live. No black box. No lock-in. Full ownership.
What can you create with Angie Code?
Angie Code generates specialized, production-ready items that integrate directly into your WordPress site:
- Custom Elementor widgets: built from scratch or extending existing widgets with new controls and behaviors
- WordPress admin snippets: customize dashboard views, add settings panels, or refine the WP admin experience
- Custom Post Types and Fields: define and manage structured content across your site
- Website snippets (CSS & JavaScript): add interactive behaviors, animations, hover effects, or immersive UI elements
- Visual front-end apps: build quizzes, calculators, custom 404 pages, store locators, and more
Every output behaves like a native part of your site. You can edit it directly in the Elementor Editor or refine it through conversation with Angie.
Is Angie compatible with all Elementor elements?
No. Angie does not work with sections so you’ll need to be using containers for your site. In addition, Angie does not work with V4 elements and you cannot create custom V4 elements.
.
Elementor AI Site Planner
What is Elementor’s Site Planner?
Elementor’s Site Planner is an AI-powered tool that helps web creators streamline their website planning. It is part of Elementor’s AI Website Builder suite of tools, automatically generating a detailed website brief, site plan, and wireframe based on your project’s needs, saving you time and effort. The wireframe is pre-populated with AI-generated content. The layout and design can be fully customized using Elementor’s drag-and-drop editor.
Is Site Planner free?
Yes, Elementor’s AI-powered Site Planner is currently available for free, allowing you to quickly generate site briefs and wireframes. You can fully explore the tool and its capabilities without any initial cost.
How do I create a website with AI?
Creating a website with AI is seamless using Elementor’s AI Website Builder, specifically its Site Planner tool. Start by engaging in an AI-led conversation, where you’ll provide details about your website project. The Site Planner will generate a comprehensive brief, a sitemap that gives you a bird’s-eye view of your site’s architecture and layout, and a wireframe pre-filled with relevant, AI-generated content. Once the initial framework is ready, you can customize every detail using Elementor’s intuitive drag-and-drop editor, ensuring the final design matches your unique vision.
What other AI tools are available from Elementor?
Elementor’s AI Website Builder offers a full suite of tools to enhance every stage of your workflow:
- AI Site Planner: Streamlines the initial planning phase, helping you align with clients and create a solid foundation for your website.
- AI Text Tools: Craft high-quality copy effortlessly with text generation, editing, and instant translation features. These tools also simplify shortening, expanding, or refining content to fit your design perfectly.
- Image Features: Generate images, create variations, remove backgrounds, and clean up visuals with precision.
- Custom Code Suggestions: Use free text input to generate custom HTML, custom Code and CSS directly in the editor, giving you complete control over your site’s design.
- Layout Tools: Quickly build and refine site structures with AI-powered layout tools. Or, leverage AI Copilot for predictive wireframe layout recommendations to jumpstart your projects.
Each tool is purpose-built to save you time, reduce complexity, and keep your creativity flowing—no matter where you are in the web creation process. Learn more about Elementor’s AI here.
Who can use the AI Site Planner?
The AI Site Planner is designed for web creators of all skill levels. Professionals can use it to streamline their workflow and deliver high-quality websites faster, while beginners benefit from a structured first draft that simplifies the process. You are encouraged to make sure you’ve downloaded and installed WordPress and Elementor’s Page Builder Plugin, Free version or Pro version, as final customizations to your site take place within Elementor’s intuitive editor.
Can I customize the design to match my vision or my client’s needs?
Absolutely! The AI Site Planner, part of Elementor’s AI Website Builder, creates a strong foundation with a sitemap and wireframe built on website best practices. From there, you have full control to adjust layouts, content, and designs to match your or your client’s needs. Elementor’s editor makes it easy to customize every detail while keeping the process efficient and intuitive.
When I’m ready to launch, can I use my own domain with the AI Site Planner?
Absolutely! You can connect your own domain when you’re ready to launch your website. Don’t yet have a hosting provider? You can choose an Elementor Hosting 14-day free trial to help you get started quickly and easily. This option includes Elementor Pro as well as provides seamless integration along with reliable performance, robust security, and the convenience of managing everything in one place.
Do I need Elementor Pro to use Site Planner?
No, Elementor Pro is not required for planning. You can create site briefs and wireframes without it. However, to import your plan directly to your website, we recommend Elementor Pro, as it ensures compatibility with Pro elements and simplifies the process. Without it, you may need to replace some theme parts and Pro features.
Google Meet sounds so intriguing. Will it understand me if I’m speaking in a different language?
Google Meet’s AI Notetaker can understand and transcribe multiple languages, saving you time by automatically generating accurate meeting notes. It currently supports the following languages:
English
- Spanish
- French
- German
- Italian
- Portuguese
- Dutch
- Hindi
- Japanese
- Chinese
- Finnish
- Korean
- Polish
- Russian
- Turkish
- Ukrainian
- Vietnamese
Does the AI support languages other than English, and will it generate output in those languages?
The AI already supports multi-language input, allowing you to converse with it in languages other than English, making it more accessible to a global audience. Currently, the final output is generated in professional-grade English. We are actively working on expanding language support to include output in the same language you write in, as well as accommodating languages written from right to left, such as Arabic and Hebrew.
Build with Elementor AI
Create containers with Elementor AI
Is Elementor trying to replace the web creator’s work?
Absolutely not. On the contrary, Elementor is dedicated to empowering web creators by offering cutting-edge tools that enhance efficiency and innovation. Our AI technology, covering structure, layout, design, and content, is designed to save time and effort, providing an abundance of creative possibilities. Far from replacing, Elementor is leading the charge in redefining the web creation experience, ensuring web creators have the freedom to customize every aspect of their website within this new era.
What widgets can I use for building containers with AI?
All Elementor widgets will be available for building containers with AI. Note that the possibility of using generated layouts depends on your Elementor subscription. If you are using the Elementor free version you will only be able to use layouts with available widgets. These layouts will be available entirely if you upgrade your account to Elementor Pro or Host.
What if I already have a site created with sections and columns and now I want to use Elementor AI for containers?
First, you need to set containers as the default setting. Do not worry, your existing design will remain intact. This is done by going to WP Admin and navigating to Elementor > Settings > Features. Then activateboth Flexbox containers and Grid containers. Once this is set, you can still continue editing your site with its existing sections and columns, while new layouts will be created with containers. This will also allow you to use AI with existing sections. If you prefer, you can also choose to convert all of the existing sections and columns into containers.
What's the best way to create prompts?
The key to a good prompt lies in providing as many details as possible. When generating containers it’s best to provide a descriptive idea of the layout, style, colors, widgets and purpose of the container you would like to create. In addition, Elementor AI offers a prompt enhancer that will help fill in details you may have overlooked. Click the enhancer to expand your prompt and then check it to see if the added details represent the content you want. You can also use the suggestions provided when you enter a slash (/) before the prompt or consult our Prompts library.
What is the difference between the three variations?
AI isn’t flawless, and we recognize the importance of giving you options. We provide three variations for you to choose from. This diverse selection allows you to get the layout that best suits your website. As we continue, we’ll learn and optimize the results based on your preferences and needs.
Why are the variations not exactly what I requested?
Elementor utilizes AI technology that encompasses a range of elements including structure, layout, design, and content. Unlike templates that offer specific layouts, AI-generated results are produced based on its interpretation. For more precise outcomes, providing a comprehensive prompt with explicit details is crucial.
I got three variations - will each cost me with credits or only the one I use?
You do not use credits when you generate the three variations. You can explore each variation and assess how it fits your needs. Only when you select “Use Layout” for one of the variations will you use credits for the prompt generation.
I got three variations and regenerated the prompt for more variations - will it be charged for credits as one prompt or two?
Submitting a prompt incurs credit charges based on the prompt type (text, image, code, etc.). You won’t be charged for reviewing the three generated variations, but you can only choose one per submission. Regenerating or editing the prompt for new variations will result in additional credit charges.
Can I use all the three variations I got?
Among the three variations, you will need to select the one that best aligns with your vision and requirements. Ultimately, you’ll choose and use only one of the provided variations. A future feature, AI history, will allow you to go back and use a previously generated container variation.
What if I generate another prompt and then prefer the variations from the previous one can I restore those variations?
Currently, the AI history feature is unavailable for building with AI, so there is no option to revert to previous variations once you have generated a new prompt. The generated results are specific to the prompt and iteration they were created for.
What amount of credits do I need to create these prompts?
With our easy-to-use credit system you get an annual allotment of prompts to spend on the mix of structure, layout, design, and content you wish to generate. These are the credits needed for each type of prompt you write.
1 Text prompt = 1 credit
1 Code prompt = 1 credit
1 Container prompt = 40 credits
1 Image prompt = 33 credits
Keep in mind when generating text, code, images or containers, you may want to use multiple prompts until you reach your desired result.
How many containers can I generate with each of the paid plans?
It really depends on how you use your plan’s credits.
The AI starter plan provides you with 18K credits, and the AI power plan provides you with 50k credits per year Both plans allow you to generate 4 types of prompts – text, code, images and containers.
These are the credits needed for each type of prompt you write.
1 Text prompt = 1 credit
1 Code prompt = 1 credit
1 Container prompt = 40 credits
1 Image prompt = 33 credits
Keep in mind when generating with AI, you may want to use multiple prompts until you reach your desired result.
How many free prompts do I have?
The free trial is meant to give you an opportunity to experience what you can achieve with Elementor AI. The amount of prompts you can generate with the free trial will depend on the type of prompts and volume of content, images and containers you generate. You will be notified within the product, and via dedicated email when you’ve used 80% of your allotted requests in your free trial, and again when you’ve reached 100% of your allotted requests.
How will I know when I’ve used up my subscription?
We will notify you within the Editor when you’ve reached 80% of your plan’s consumption, and continue reflecting how much you’ve used from that point onwards.
Edit containers with Elementor AI
The variation button is not showing up when I right-click a container - what can be the problem?
-
Ensure you have the latest Elementor version installed.
-
Confirm that you have selected a container for the variation.
The results are not exactly what I expected. What should I do?
-
Utilize the best result as a starting point and make manual adjustments.
-
Consider rephrasing and emphasizing your desired outcome using an enhanced prompt.
Will Elementor AI for containers work on 3rd party widgets?
AI will not replace the content and style of 3rd party widgets.
Create containers based on existing webpages
Does the web-based container feature infringe on copyrights?
Rest assured, our process doesn’t involve copying layouts. We draw inspiration from the structure only, and fill in relevant data that’s based on your prompt, ensuring compliance with copyright concerns.
The preview of the web-based container feature is not correctly presenting the URL I added. What can be done?
If the preview is not displaying the added URL correctly, it may be due to site compatibility issues. Unfortunately, not all sites are compatible.
The layout of the web-based container feature that was generated doesn’t contain all of the widgets I need.
We are actively working on expanding coverage to include more widgets in the generated layouts.
Is the generated web-based container responsive?
Currently, basic responsiveness is supported. You can further adjust responsiveness based on your specific needs.
I don’t see the possibility of generating containers with AI, where can I find it?
AI for containers is a Feature that should be activated by default, so if you don’t see the AI icon in your new element area, that means the feature has not been activated. To learn more about activating features, see Elementor experimental features.
Image Optimizer
Why do I need to optimize images on my website?
Image optimization can significantly improve your website’s loading time, which is crucial for user experience and SEO. It reduces the size of your images without compromising their quality, leading to faster page load times and better performance scores.
I already use third-party image optimization plugins. Why should I consider this module?
The Image Optimizer plugin does the “heavy lifting” of converting and compressing images on a dedicated server, so your own server won’t suffer from any downtime or the need to keep the tab open. It offers on-the-fly optimization and WebP conversion. In addition, it is designed specifically for Elementor-created websites, ensuring seamless integration and performance improvements. It offers on-the-fly optimization, WebP conversion, and other features tailored to Elementor users’ needs.
Will the original version of my images be lost after compression?
No, the module will save both the original and the compressed versions of your images. You can restore the original image if needed. The only exception is if you decide to delete the original version.
Are there any risks associated with image compression?
When using lossy compression, there’s a slight reduction in image quality. However, this module provides options for both lossless and lossy compression, allowing you to choose based on your preferences. You also have the option to keep an original of the image and always remember to backup your website before making significant changes.
What happens to my compressed images if I cancel my subscription?
If you cancel your subscription, all your previously compressed images remain available on your website. However, you won’t be able to compress new images unless you renew your subscription or stay within the subscription limit.
What is WebP?
WebP was developed by Google as a media format optimized for use on the web. It tries to strike a balance between making images as light as possible while still retaining the high quality web users expect. It has excellent compression efficiency, supports transparency and animation, improves website performance and is supported by most major browsers.
What is AVIF?
AVIF (AV1 Image File Format) is an image format based on the AV1 video codec, designed to provide superior compression efficiency and image quality compared to existing formats like JPEG and PNG. It supports features such as high dynamic range (HDR), wide color gamut, and lossless compression, making it suitable for web use and various multimedia applications.
Can Image Optimizer compress AVIF images?
No. The Image Optimizer can compress JPEG, PNG, WEBP, or GIF format images and convert them into AVIF files, but cannot compress files already in this format.
What is the difference between lossless and lossy compression?
Lossless compression retains the original quality of the image while reducing its file size. On the other hand, lossy compression reduces the file size by eliminating some image data. This can slightly reduce image quality. The choice between the two depends on your needs: if image quality is paramount, go for lossless; if file size is more critical, consider lossy.
What is Exif metadata?
Digital images contain the data defining the image and data about the picture. This information is called Exif metadata and can include:
- Camera angle
- Camera settings
- GPS location
- Exposure settings
- Description
- Dimension
- Resolution
- Filesize
Much of this information is not needed for most websites but their presence makes the images heavier and slower to load. By default, Image Optimizer plugin strips out unnecessary metadata.
What do I do if I get the error "Image Optimizer isn't running because the next required PHP extensions are missed: exif"?
This happens when your website host has not installed the proper media metadata extension to their PHP file. If you receive this error message, you need to contact your hosting company to correct the error.
Can I choose which images to compress?
Absolutely! You can either compress images in bulk or select specific media files for optimization. See Optimize images for more details.
I hit my image limit - what can I do?
If you’re using the free version of Image Optimizer plugin, you can upgrade to a paid version by clicking the Upgrade button above the control panel.
What images can be optimized?
- The original image must be less the 10MB.
- The image must be in JPEG, PNG, WEBP, or GIF format.
Does Image Optimizer work with WordPress multisites, subdirectories or multilingual sites?
No. Trying to use Image Optimizer with these setups will result in an error message.
Forms
How can I save Elementor Form submissions in a database?
With the Elementor Form Submissions feature, you can backup your form submissions data, access it whenever you want, and manage it all from one place. Having your submission’s info allows you to gather insights, analyze a campaign’s data, or manage your submissions from within WordPress Admin.
Where do files go after uploading?
Uploaded files are saved in a dedicated directory under ‘uploads/elementor/forms/’.
Why does the file name change after upload?
File names are set randomly, for security reasons (we don’t want users uploading ‘yo_mama.jpg’ now do we?).
I’ve set the number of Max. Files, but I’m still not able to upload as many files as the number I set. Why?
This setting does not override your host’s server setting. This option limits the number of files that can be uploaded from the form itself, but only if this limit value does not exceed the PHP’s “max_file_uploads” value. If you need more, contact your Hosting support to have the “max_file_uploads” value raised for your site.
How do I customize the date and time design in my forms?
The Date and Time fields can be styled using Custom CSS. On mobile, the browser’s native HTML5 design is used. You can switch on Native HTML5, so the browser’s design is used on all devices. Once you choose Date or Time, you’ll see the Native HTML5 switch.
Why can’t I see the placeholder of the date/time field on some mobile browsers?
The labels for date/time inputs are not properly supported by all browsers, especially browsers on mobile devices. This is why the placeholder may not always be visible.
There is a workaround outlined in our article, Troubleshooting – Date and Time placeholders do not appear on mobiles.
How can I place dynamic metadata into a form field?
- In the Content tab, click the form field you want to edit.
The form field opens. - Click the form field’s Advanced tab.
- Click the dynamic icon to the right of the Default Value field.
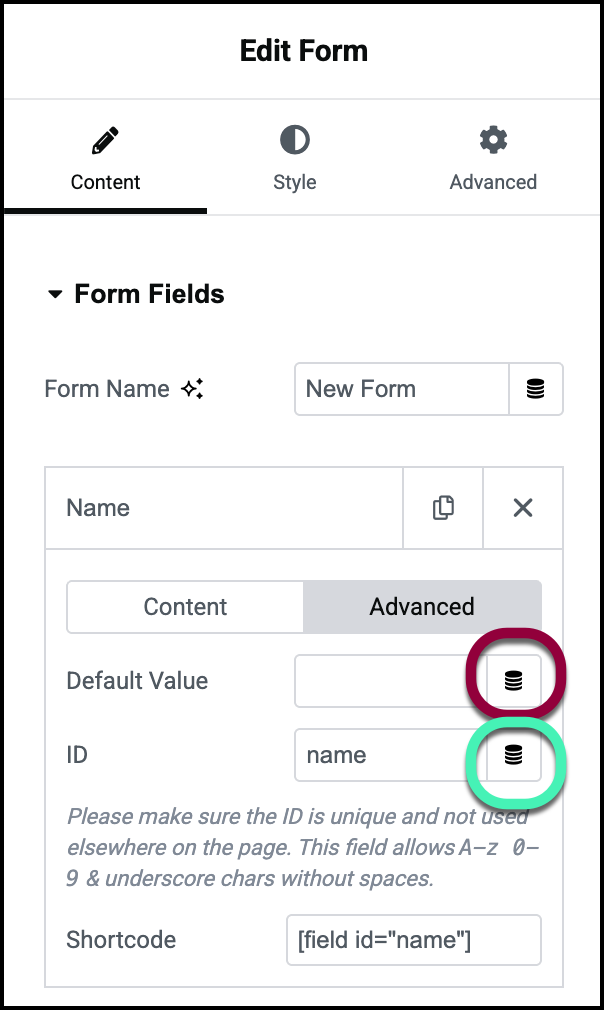
- Select the desired metadata from the dropdown list.
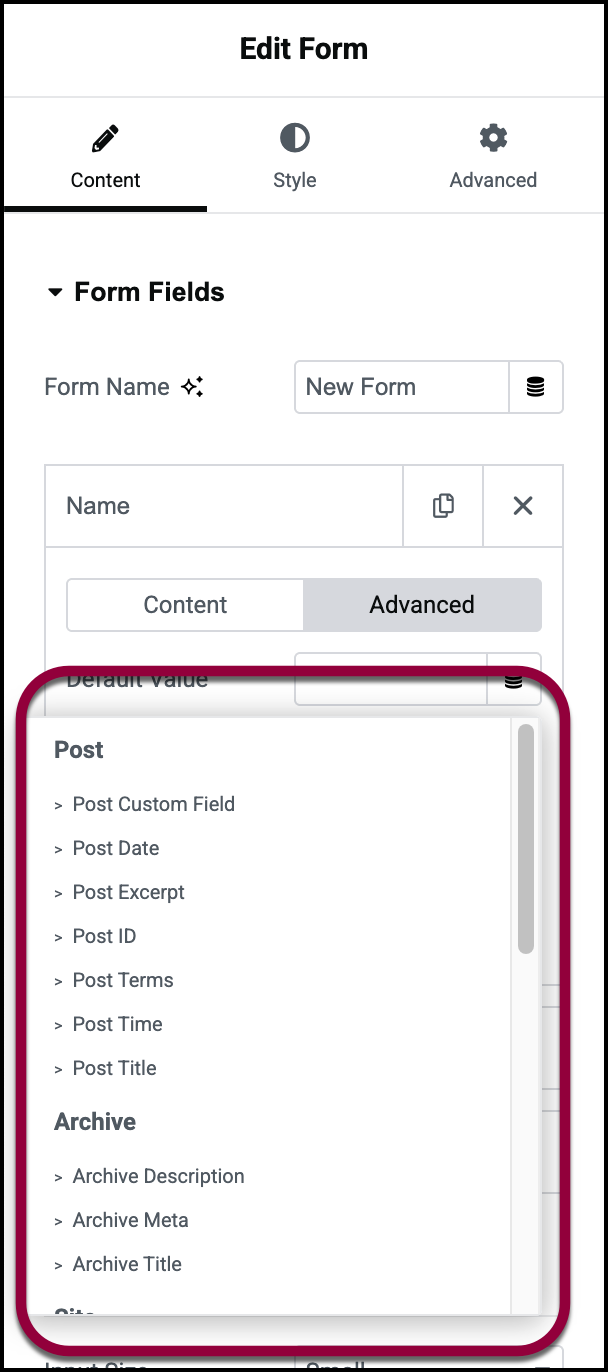
Why is the Redirect not working?
Redirecting the user to a designated Thank You page is always a good idea. It takes them to the next step, enabling you to upsell, track user funnels, and give a good experience.
To activate Redirect: Go to Actions After Submit, add Redirect, and paste the full URL of your Thank You page.
For details, see Redirect visitors after they submit a form.
If your redirect didn’t work, try these troubleshooting steps:
- Make sure you didn’t paste in an empty character by mistake.
- Be sure you pasted the full URL and not a Relative URL. (‘/thank_you/’)
- Remove any JavaScript from the page and try again. You can check for JavaScript errors in the developer tools.
- Deactivate other plugins and try again.
Which Custom Messages Can I Modify in Forms?
Forms include 3 different types of messages:
- Browser messages – These are sent from the browser and can not be customized. For instance, if you don’t enter a correct email address, you receive a message saying “Please include an @ in the email address”. These messages appear if the form was not filled in correctly before the form is sent.
- Server messages are sent from the server. You can format as you need, using custom CSS. These messages appear after the form is sent. There are a few custom options including Success, Error, Invalid, etc. Example: The form was sent successfully! You can always alter the content of the custom messages by going to Form > Additional Options, switch-on Custom Messages and locate the relevant message.
- Third-party servers. Error messages from Email Marketing service companies such as MailChimp cannot be modified. Please note that some error messages sent by these third-party products are shown to the admin only (you and not the subscribers) and this is not something Eleemntor can control.
How do I track form submissions and conversions using Google Analytics and Tag Manager?
Add your tracking code to a thank you page and redirect your form to that page after submission.
There is also a JavaScript event that the form triggers automatically after submission, which can be used to add to your custom tracking code. These are added externally to Elementor, using functions.php for example.
Here is a base snippet you can build on:
//The event is submit_success so you can catch it for example:
jQuery( document ).ready(function( $ ){
	jQuery( document ).on('submit_success', function(){
		// form has been submitted do your tracking here...
	});
});
Make sure you replace the comment above “// form has been submitted, do your tracking here … ” with your custom tracking code. Otherwise, the snippet won’t do anything.
How can I integrate another service with webhook and field mapping?
Elementor has a webhook option under Actions After Submit. By default, our webhook sends each field with the label as a name, or all fields in a single array when Advanced Data is on.
To control the field names, give your form fields a custom ID and use the following snippet.
Be sure to update the form name and your webhook URL.
Below is an example of customizing your webhook, where field IDs are sent instead of names.
add_action( ‘elementor_pro/forms/new_record’, function( $record, $handler ) {
//make sure its our form
$form_name = $record->get_form_settings( ‘form_name’ );
if ( ‘MY_FORM_NAME’ !== $form_name ) {
return;
}
$raw_fields = $record->get( ‘fields’ );
$fields = [];
foreach ( $raw_fields as $id => $field ) {
$fields[ $id ] = $field[‘value’];
}
wp_remote_post( ‘HTTP://YOUR_WEBHOOK_URL’, [
‘body’ => $fields,
]);
});
How can I troubleshoot issues with forms that are not sent?
This happens generally because of server errors or fields not properly mapped. For troubleshooting tips, check out this guide.
What does the error message “There’s something wrong. The form is invalid” mean?
If you receive an error message such as “There’s something wrong. The form is invalid”, it could be that the form has been added as a widget inside another widget via a shortcode. This is an unofficial and unreliable method of adding a form to a page, so this should be avoided.
Why do some users receive a red X after submitting a form?
MailChimp integration with the Elementor form widget only acts as a ‘sign up form’. Re-subscription via an Elementor form widget is not possible as the MailChimp API does not allow this. Re-subscription to a list is only through MailChimp hosted signup forms. This same situation may apply to other services that integrate with forms.
To handle these types of users, put a note somewhere below the form that mentions that if they were previously signed up to the list, then they cannot resubscribe this way. Give them a link to redirect them to the MailChimp hosted signup forms instead, so they can resubscribe there.
Popups
Design
Can I display the Popup in any corner on the screen?
Yes, you can control the horizontal (left, center, right) and vertical (top, middle, and bottom) positions of the Popup window.
Are there pre-designed Popup templates to choose from?
Yes! Check out our template library for predesigned popups.
Can I place a form in a Popup?
Yes, placing an Elementor form into a Popup is one of the most common uses of Popups. However, third-party form scripts may not work in the Popup Builder by default. If you are using a third party form, such as Contact Form 7, for example, please contact your plugin’s development team and let them know that they can resolve this by implementing the code mentioned in this developer’s guide. Also note this code example.
Can I place any Elementor widget in a Popup?
Absolutely! Design your Popup in the same way you would design any page using Elementor. Include forms, widgets, templates, and other elements as you wish.
Occasionally, Popup margins don't work the way I set them? Why?
There are some edge cases where the margins you set for popup windows will be overridden. This is because the flexbox grid system’s flex alignment is stronger than the margin, so it takes precedence. If you are attempting to add a positive right margin, for example, and it isn’t taking effect, try adding a negative left margin instead.

Can I design the Popup window itself?
Yes. Elementor Popups feature the most advanced Popup design capabilities ever. Set color, image or gradient backgrounds for Popups, or design transparent Popups. You can also set borders and box shadows for the frame of the Popup window. The overlay options for the external area outside the Popup includes color, image and gradient background options. Even the close button can be fully customized. This includes position (inside or outside), vertical and horizontal positioning, color, background color and size. Almost all these styling features also include mobile editing, making it easy to customize Popups for different devices.
I’ve designed my Popup’s content, so I see the content settings in the Elementor Panel. How do I view and edit the Popup settings again?
Click the gear icon in the top toolbar to view and edit the Popup settings again.
Control
Can I trigger the Popup from anywhere on my page?
Yes, we have various triggers, rules, and conditions that determine when a Popup occurs. You may “manually trigger” Popups via Dynamic Actions or Form Actions After Submit or “automatically trigger” Popups via Conditions, Triggers, and Advanced Rules.
I don’t want a Popup to appear on all devices? Can I control that?
Yes, you can choose to only display Popups on Desktop, Tablet, and/or Mobile devices via Publish Settings > Advanced Rules > Show on Devices.
Can I display a few pop-ups on the same page?
Yes, but too many popups can alienate your visitors.
If I create several Popups for different scenarios, can I prevent more than one being shown to a user?
Yes, use Popup Settings > Advanced > Avoid Multiple Popups.
Can I prevent users from scrolling the screen behind the Popup?
Yes, use Popup Settings > Advanced > Disable Page Scrolling.
Can I control how and when the Popup closes?
- Yes, there are several ways to control this.
- You can either show or hide the Close button, or set it to only be shown after a set of amount of time after the Popup loads.
- You can allow the user to close the Popup by clicking outside the window, on the background overlay.
- You can allow the user to close the Popup by clicking the Close button.
- You can set the Popup to automatically close after a set amount of time.
- You can use a form’s Action After Submit option to close a Popup
- You can use an element’s Dynamic Action to close a Popup
Can I only show a Popup if the user is leaving the page?
Yes, the On Page Exit Intent is a very popular Trigger. Setting this will display the Popup when the user’s mouse activity indicates intent to exit the page. Exit intent does not work on Mobile devices, however, as mobile devices do not have mouse hover ability.
Can I show a Popup if the user arrives to the page from a search engine?
Yes, several Advanced Rules allow you to control the display of Popups based on where the user arrives from, including arriving from a URL that you specify, or from search engines, external links, and internal links.
Do I have to set Conditions, Triggers, and Advanced Rules?
No, you don’t have to set any Publish Options. However, if you don’t set a Trigger, you will need to assign a Dynamic Action to Open Popup on an element’s link, such as a button’s link. Without a Trigger or an Open Popup Action assigned, the Popup will never be shown. See How Do I Create My First Popup to learn how to trigger a Popup when a button is clicked.
Can I open a Popup after a form is submitted?
Yes. From the form’s “Actions After Submit” options, choose “Open Popup”, and then select which Popup to show after the form has been submitted.
My form is in a Popup. Can the Popup be automatically closed once the form is submitted?
Yes. Add a form inside a Popup, and then from the form’s “Actions After Submit” options, click “Close Popup”.
What’s the difference between a Trigger and an Advanced Rule?
Triggers function as direct user actions that initiate, or “trigger”, the display of a Popup (i.e. clicking or scrolling), whereas Advanced Rules determine the requirements that must be met for the Popup to appear regardless of direct user actions (i.e. the user visited page at least two times).
What is a Condition?
Conditions determine where to display the Popup (i.e. the entire site, all archives, on a specific URL, etc.). Learn more about Conditions.
What is a Session?
A session starts when the user visits the website and ends when the user closes the browser.
Other
Do you have a A/B testing feature?
We do not currently support A/B testing, as this is a field that needs massive attention. We are currently not in the phase of building a stand-alone feature, so we recommend using one of the many available external dedicated services for this.
Can I export and import Popups between sites?
Yes, Popup templates can be imported and exported just like all of Elementor’s templates.
Is it possible to create a Tooltip Popup?
No, not at this time.
I have a multi-language site. Can I create different Popups for each language?
Yes. you can also create translations for each Popup.
Does your Popup feature meet the GDPR Requirements?
Our Popup feature does not store any cookies. It does leverage the browser’s local storage to track your visitor habits or patterns in order to trigger the Popup. This means the data is stored only on the visitor’s local browser. Learn more about GDPR.
Can I include a Popup on my Woocommerce product page?
Of course, you can also add upsales and offers to your users throughout all of the purchase flow.
Does it integrate with marketing platforms and if so, which one?
Elementor integrates with several marketing platforms. See the full list here.
Does it work with older iOS versions?
Popups may encounter layout issues with iOS 10 or below.
Does it work with the Internet Explorer browser?
No. Popups are not compatible with Internet Explorer.
Accounts
General
Why was I sent a code in order to login to my Elementor account?
In order to ensure the security of your website, Elementor is implementing two-factor authentication (2FA). This will protect you and the sites you have created from brute force password attacks.
I didn’t receive a code. What should I do?
If you didn’t get an email during the authentication process, we suggest first checking whether you’re using the correct email address for your Elementor account. If it’s the correct one, please check your spam folder. In case all above haven’t worked, contact our support using the chat on elementor.com.
What if I don’t have access to my registered email?
Free users:
Free accounts cannot be restored without a valid email address. Disconnect your account and connect a new one. Switching accounts will not affect your website or saved templates.
Pro users:
Contact support through the chat channel and provide details regarding your account and license as requested.
Can I opt-out of 2FA?
2FA improves the security of your account. Since we want to ensure the security of all our users, you cannot opt-out of 2FA. However, you can register for Elementor using a Google account instead of using an email address.
Can I get the code by text or some other way?
At the moment we are using only email as a verification channel. However, you can register for Elementor using a Google account instead of using an email address.
Legacy Subscriptions
What are legacy plans?
As Elementor Pro grows and develops, so have our subscription plans. Sometimes users prefer to stick with their existing plans and in many cases Elementor allows users to maintain these plans.
How long can I keep my legacy plan?
Currently, owners of legacy subscription plans can keep their plans provided they renew their subscriptions annually. If you fail to renew a legacy plan, you’ll have to purchase a new plan under the new terms. It’s important to note that owners of legacy plans may not necessarily benefit from new features. For example, owners of an Essential legacy plan will not have access to new features available in higher tiered plans.
What happens if my renewal fails?
If you have trouble with renewing your subscription, please contact Elementor support for assistance.
Will I still get support for the features I currently have in my legacy plan?
Yes, you can continue getting support for all the features available in your subscription plan.
Elementor Essential legacy plans
What is an Essential legacy plan?
Prior to December 4, 2023, the Elementor Essential plan includes access to all Elementor elements. On December 4th, the Essential subscription will be modified to be made more appropriate for beginner web creators and those who don’t need all of Elementor’s professional features. If you owned an Essential subscription prior to this change, you will not lose access to any elements and these elements will continue to benefit from future updates.
What will happen to my existing Essential legacy plan?
Your existing plan will remain as is, and you will get all new updates that are part of the new Essential plan. To enjoy any new capabilities that are added to features that are now part of a higher plan, you can upgrade to a higher plan.
What updates will my Essential plan get?
Your Essential plan will continue to get regular updates to existing features in your plan whenever available, this includes features and security updates.
What happens if I stop paying for my legacy Essential license?
If you don’t renew your subscription upon expiration, you will lose your Legacy subscription. If you choose to purchase a new subscription at a later date, your new subscription will be subject to the plan and feature breakdown on the day of your new purchase.
What happens if my renewal fails? Will I have to upgrade to a higher plan to have access to the same features I already had?
If you have trouble with renewing your subscription, please contact Elementor support for assistance.
I am using a legacy plan, will I still get support for the features I currently have, even if they are not part of my plan anymore?
Yes, you can continue getting support for all the features available in your subscription plan.
Is the new Essential Plan a different Elementor Pro plugin?
The Elementor Essential Plan is still part of the Elementor Pro plugin. Features in the Pro plugin will be available based on the plan you purchased.
Hello Theme
Where can I download the Elementor Hello theme?
How do I install the Hello theme if I downloaded the zip file?
- From WP Admin navigate to Appearance>Themes and click Add New.
- Click Upload Theme.
- Click Browse and choose the file you just downloaded, then click Install Now.
- Once it is installed, click Activate.
Will I be notified of theme updates regardless of where I downloaded the theme?
Yes.
Just like any theme or plugin under Dashboard>Updates.
Do you have a child theme I can download?
Yes. You can download a child theme here: https://github.com/elementor/hello-theme-child
To install the child theme:
- Download the Hello child theme from https://github.com/elementor/hello-theme-child
- From WP Admin navigate to Appearance>Themes and click Add New.
- Click Upload Theme.
- Click Browse and choose the file you just downloaded, then click Install Now.
- Once it is installed, click Activate.
How do I customize the child theme?
Edit the style.css file via FTP if you would like to change the Theme URI, Author, and Author URI. Editing this is optional. You can choose to leave it as is, if you prefer.
Theme Name: Hello Elementor Child
Theme URI: https://elementor.com/
Description: Hello Elementor Child is a child theme of Hello Elementor, created by Elementor team
Author: Elementor Team
Author URI: https://elementor.com/
Template: hello-elementor
Version: 1.0.0
Text Domain: hello-elementor-child
Tags: flexible-header, custom-colors, custom-menu, custom-logo, editor-style, featured-images, rtl-language-support, threaded-comments, translation-ready
Add any custom styles after:
/*
    Add your custom styles here
*/
So for example, if you wanted to add some Link and Heading styles, you could add something like this:
/* Link Styling */
a, a:active, a:visited {
color: #000080;
}
a:hover {
color: #ffd700;
}

/* Heading H1-H6 Styling */
h1, h2, h3, h4, h5, h6 {
font-family: Georgia, serif;
color: #3a3a3a;
line-height: 35px;
font-weight:500;
letter-spacing: 1px;
}
h1 {
font-size: 30px;
line-height: 1.2;
}
h2 {
font-size: 28px;
line-height: 1.3;
}
h3 {
font-size: 26px;
line-height: 1.4;
}
h4 {
font-size: 24px;
line-height: 1.5;
}
h5 {
font-size: 22px;
line-height: 1.6;
}
h6 {
font-size: 20px;
line-height: 1.2;
}
.entry-content h1,
.entry-content h2,
.entry-content h3,
.entry-content h4,
.entry-content h5,
.entry-content h6 {
 margin-bottom: 20px;
}
If you need to change any HTML of any of Hello’s files, make a duplicate of the original Hello file, and place the copy into your child theme’s folder. Edit the child theme’s copied file to make any HTML changes you wish. Read more about this here.
How do I globally prevent all page titles from appearing on any page?
Elementor provides a filter called:
hello_elementor_page_title
You can add code that makes use of this filter to your child theme’s functions.php file. Alternatively you can use a 3rd-party plugin such as Code Snippets to add functions to your theme without needing to use a child theme, and without needing to edit your theme’s functions.php file. The code to add to either your child theme’s functions.php file or to your snippets plugin is:
function ele_disable_page_title( $return ) {
   return false;
}
add_filter( 'hello_elementor_page_title', 'ele_disable_page_title' );
I want page titles on most of my pages, but I want to remove them from select pages. How do I do that?
You can choose to hide a page’s title while editing the page with Elementor. Click the page settings gear icon in the top bar to access the Hide Page Title option. Read more about this feature
How do I change the "Search Results for:" archive title for the Search Results page?
You can add code to your child theme’s functions.php file. Alternatively you can use a 3rd-party plugin such as Code Snippets to add functions to your theme without needing to use a child theme, and without needing to edit your theme’s functions.php file. The code to add to either your child theme’s functions.php file or to your snippets plugin is:
add_filter( 'elementor/utils/get_the_archive_title','archive_callback' );
function archive_callback( $title ) {
 if ( is_search() ) {
   return 'Your Custom Message Here: ' . get_search_query() ;
 }
   return $title;
}
Make sure you change Your Custom Message Here: to whatever you prefer.
How do I add the Widgets menu option?
To enable the Widgets menu item in the WordPress admin menu, use the following code:
if (function_exists("register_sidebar")) {
  register_sidebar();
}
You can add this code to your child theme’s functions.php file. Alternatively you can use a 3rd-party plugin such as Code Snippets to add functions to your theme without needing to use a child theme, and without needing to edit the functions.php file.
Once you have the Widgets menu available to you, you can assign Widgets to the Sidebar as usual in Appearance > Widgets. You can then use this Sidebar anywhere on your Elementor page. Simply add a column in a section and drag the Sidebar widget into the column.
If you prefer to register new or custom widget areas via code, instead of using the Sidebar widget (for example, if you need a sidebar on a non-Elementor page), you can find sample code in the official WordPress Widgetizing Themes documentation. Your code may differ from the sample code based upon your particular needs.
Hello Theme Header And Footer Customization
From the site header and footer customization menu you may configure the look of your site header. In addition to choosing the layouts, you can customize the width, background color, menu, appearance and style of each element.
Security
Elementor takes its responsibility to create secure plugins seriously. Our developers are highly trained to write safe, secure code, and we monitor for vulnerabilities. However, as with all software, even with the level of expertise and scrutiny that we employ, vulnerabilities can sometimes occur. As such, there are things that every web creator should know and do to keep their websites as secure as possible.
How does Elementor prevent security issues from happening?
We have specialized professionals who continuously monitor for potential issues. In addition, we may be notified by people in our community channels, findings from security software makers, and of course our own testing procedures.
Do security issues happen often?
Fortifying security is a continuous process, not just a single effort. Whenever we identify a threat, we always remain vigilant and release a fix as soon as possible.
When we first discover a security vulnerability, we start by examining it and understanding it from each angle. In order not to jeopardize our users before issuing the fix, we keep the reported issue discrete. Once we issue the fix, we can go on to inform users about the vulnerability and its resolution.
What can I do, in general, on my end to prevent security issues from happening?
One of the most important steps you can take is to keep WordPress and your plugins up to date, as this will help ensure that any security patches are applied. Other steps include changing your password from time to time, considering the use of security plugins, and being mindful that you only use plugins and themes from known sources such as the WordPress.org repository and established companies that have a strong history of providing quality products. Avoid installing “nulled” plugins and themes as these often contain malicious code, and only keep plugins and themes on your site that you are actively using.
How do I report security bugs to Elementor?
Not only does Elementor encourage reporting security bugs, we offer rewards to people who report particularly important issues. Report a bug or find out more about this program at our Bug Bounty page.
How do I know if and when the security issue has been contained or fixed? Where do I go for the latest updates about security issues?
Follow our social media channels and especially our communities. It will be mentioned there, in our changelog, and when relevant, in a separate email. Please make sure to create an account to receive important updates like these.
Why doesn't Elementor send me a message the moment a vulnerability happens?
We do not want to alert abusers to a problem which could cause them to take advantage of the issue. We focus our efforts on getting a fix out there as soon as possible. When the issue is contained, we quickly inform our users via several channels, including email.
I have an old version of Elementor Pro which was not renewed. Am I still safe?
Always upgrade to the latest version of Elementor. This advice may be applied to nearly all software. New versions contain security updates, bug fixes, and offer new features. If you want to test a new version before updating your live site(s), we recommend creating a staging area.
Elementor Partner Program
What is Elementor’s Partner Program?
Elementor’s Partner Program is a true partnership initiative designed to help agencies and freelancers grow their business. The program consists of a dedicated workspace, exclusive access, co-marketing opportunities, and revenue share, empowering our partners to effectively serve their clients. Joining is cost-free, and applying today will grant you preferential access as the program is still new.
Who can join the Partner Program?
The program is open to agencies and freelancers of all sizes that build for their clients using Elementor. We are looking for partners who share our commitment to quality, performance, and excellence. We aim to build a curated community of the best agencies in the industry.
What are the main benefits of joining?
Partners receive a comprehensive suite of benefits built for scale and designed around four pillars:
| Direct line to Elementor | Get early visibility into the roadmap and a voice in what’s next. Engage directly through Preferred Priority Support and early access to news, demos, professional forums and meetups, insights, and education. |
|---|---|
| Growth through visibility | Build credibility and demand through official partner spotlights, professional interviews, partner listings, and co-marketing opportunities that help clients find and trust your expertise. |
| Dedicated partner workspace | Run all client projects from one dashboard in My Elementor. Create, optimize, and manage with your One Agency plan, hand off projects smoothly, and perform updates, backups, and bulk actions. |
| Added revenue streams | Unlock recurring income from the websites you’ve already built. Make each site handoff count by boosting ongoing earnings without increasing scope, workload, or delivery time. |
How does the program help agencies grow?
Our dedicated area makes getting and serving new clients more efficient and effective.
Our exclusive access grants you a priority in support, in roadmap and in events.
Co-marketing elevates your professional status and get you more leads
And revenue share means you increase revenue from projects without any additional work
What support does Elementor provide to agencies?
You receive the highest level of support available. This includes preferential priority support, and access to a partner manager.
Is there a cost to join the program?
Joining the program has no associated costs. Your progression within the program reflects the work you do for clients using Elementor.
How can my agency apply?
Agencies and freelancers can apply by filling out the form on their My Elementor dashboard. An Elementor representative will review your application to confirm eligibility and guide you through the next steps.
Renewals
Manual renewals and expiration
Can I renew my subscription before the renewal date?
Yes, you can manually renew your subscription ahead of time. Annual plans can be renewed up to 15 days before the expiration date, while monthly plans can be renewed up to 7 days prior.
Will I lose access if I manually renew on the expiration date?
No, you will not lose access to your subscription and features if you renew manually on the expiration date.
How can I renew an expired subscription?
Unfortunately, if the subscription is already in the “canceled” status, it is impossible to renew it, and you will need to purchase a new subscription.
Can I renew for multiple years?
No, it is not possible to renew for multiple years in advance.
Renewal date changes
Can I change or extend my renewal date?
Unfortunately, it’s not possible to extend or change the renewal date. This date is linked to the original purchase date, and there are no options to change it.
Why did my renewal date change to next year even though the payment is still pending?
Your renewal date is showing as next year because auto-renewal is turned on for your subscription. When auto-renewal is enabled, our system automatically creates a new invoice for the current renewal period and moves the renewal date forward.
However, because the payment has not been completed yet or was declined, the subscription is still in pending status. Once the payment is successfully processed, the status of your subscription will move to “active”.
Renewal pricing and discounts
Why is my renewal price different from the original purchase price?
The renewal price differs from the original purchase price because we offer first purchase discounts on some of our plans. However, all renewals are full price.
Why is the renewal more expensive than last year?
It’s possible that we are now obligated to collect taxes in your area, and that this is the reason for the increase in price. Please check your invoice and if it has a tax/VAT charge shown next to the subscription price to confirm.
Why am I seeing a double or triple renewal price in my dashboard?
During the period after your subscription has expired but has not yet been renewed, the amount displayed may look doubled because it includes both the current renewal fee and the next renewal. However, at checkout, the correct amount due will be shown. If you are still seeing the incorrect amount at checkout, please contact us so we can resolve the issue.
Can I get a discount for my renewal?
Unfortunately, we don’t currently offer renewal discounts, as we believe our subscriptions are fairly priced and provide good value for the cost.
Why does the invoice amount differ from the charge on my card?
The difference between the invoice amount and the amount you were charged is due to currency conversion, as the invoice is issued in USD.
Currency and payment questions
Why was my subscription renewed in a different currency?
The currency is determined based on your location. If you were in a different location when you renewed your subscription than when you originally purchased it, this may explain the change in currency.
Can I change the currency used for my renewal?
No, it’s not possible to change the currency manually, as it’s automatically determined by your location.
Can I change my payment method after the renewal was already processed?
No, the payment method cannot be changed after the renewal has already been processed. Payment methods and billing details need to be updated before the renewal takes place.
Billing documents
How can I get a copy of my receipt?
We don’t have the option to send receipts, but invoices are available to download for all purchases.
Can I change the currency used for my renewal?
No, it’s not possible to change the currency manually, as it’s automatically determined by your location.
Can I change my payment method after the renewal was already processed?
No, the payment method cannot be changed after the renewal has already been processed. Payment methods and billing details need to be updated before the renewal takes place.
Elementor apps
Image optimization
How does the free trial work?
The free trial includes credits you can use for image optimization. Each credit covers one optimized image file. By default, WordPress creates several sizes for every uploaded photo, and Image Optimizer will optimize all of them. That means with the default settings, your free trial covers about 50 image files.
Why should I convert my images to WebP or AVIF?
WebP images and AVIF deliver smaller file sizes than traditional PNG images or JPEG images, while preserving image quality. These modern image formats speed up websites. Most web browsers today support these formats; if they don’t, the original backup will be used.
Can I use Image Optimizer for any of my WordPress websites?
Absolutely. Image Optimizer is a flexible, stand-alone image optimization plugin for WordPress that works across all your images, whether you manage portfolios, eCommerce shops, or blogs with many large images.
Connection depends on the available space included in your plan.
How do I know how many images on my website need optimization?
The plugin dashboard provides detailed insights into image optimization, including the number of image files that can benefit from optimization.
How will I know when I’ve used up my subscription?
The plugin includes a straightforward dashboard showing credits used and remaining. You’ll also receive alerts at 80% usage and 100% usage, so that you can plan ongoing image optimization accordingly.
How is credit consumption calculated for image optimization?
Elementor One replaces separate quotas with a single, flexible credit pool that adapts to your workflow. This gives you the freedom to allocate resources exactly where your project needs them most.
Here is the breakdown of credit usage per action:
|
Capability |
Action |
Credits required per action |
|
Editor Pro |
No credits needed |
0 |
|
Accessibility scans |
No credits needed |
0 |
|
Accessibility fixes |
1 AI accessibility fix |
20 |
|
Image optimization |
1 image optimized |
10 |
|
Email deliverability |
1 email delivery |
10 |
|
Cookie consent |
1 consent |
1 |
|
Cookie consent scans |
1 scan |
1 |
|
AO actions (text, code, image and container generation, and other) |
1 AI action |
1-40** |
**: AI Actions measure the usage of generative AI features like text, code, image, and container creation. The exact number of credits for each AI Action varies based on the use case and prompt.
Why am I seeing an optimization error for WebP images?
If the plugin is configured to convert images to WebP, any files that are already in WebP format cannot be converted again, which results in an error. To fix this, try restoring the original image or manually optimizing the files one by one.
Can the Image Optimizer compress AVIF images?
No. While the plugin can convert JPEG, PNG, WebP, or GIF files into AVIF, it cannot compress files that are already in the AVIF format because AVIF already offers superior compression that often exceeds what a conversion back to WebP could achieve.
What should I do if my bulk optimization is stuck or very slow?
Speed is influenced by the WordPress Action Scheduler. If you have a large queue of pending actions, performance will drop. It is recommended to contact your hosting provider to increase the “batch size” for the Action Scheduler so the system can process multiple images simultaneously.
Email deliverability
How does the email deliverability plugin work?
Site Mailer is a WordPress plugin that simplifies transactional email delivery and handles everything automatically. Install the plugin, connect the sender domain, and start sending emails with high email deliverability, real-time email logs, and no need for complex SMTP settings or external SMTP servers.
What is SMTP?
SMTP stands for Simple Mail Transfer Protocol. It’s the standard method email servers use to send messages from a WordPress site to a recipient’s inbox.
Most WordPress emails, like order confirmations, password resets, and contact form submissions, rely on SMTP to be delivered correctly. Without proper SMTP authentication or the right SMTP settings (such as SMTP host, SMTP port, and SMTP username), messages can fail or land in the spam folder.
Unlike a traditional SMTP plugin, Email deliverability removes the complexity of configuring an external SMTP server. Instead, it provides reliable email deliverability out of the box, so your clients’ websites can send emails without hassle.
What are transactional emails?
Transactional emails are different from marketing emails. They are automated messages sent in response to user actions on a WordPress site or app. Examples include order confirmations, password resets, contact form submissions, shipping updates, and account changes. Email deliverability ensures these critical WordPress emails don’t land in the spam folder but reach the recipient’s inbox consistently.
Why do my WordPress emails land in spam or never arrive?
Because many WordPress emails are sent without proper authentication (SPF/DKIM), they’re flagged or dropped by spam filters. Email deliverability handles this automatically, so messages reach inboxes.
How does sender reputation affect email delivery?
Emails sent from shared hosting or generic infrastructure often inherit poor IP/domain reputations, triggering blocks or spam filters. Email deliverability uses a dedicated, professional send infrastructure to improve inbox placement.
What happens if the “From” address doesn’t match my site’s domain?
A mismatch between the sender address and the domain sends red flags to email providers—emails may fail to deliver. Email deliverability guides you through a domain-authenticated setup to ensure alignment.
Does Email deliverability help meet compliance standards like Gmail/Outlook guidelines?
Yes. Email providers require features like “unsubscribe” headers and proper suppression lists to approve mail. Email deliverability automatically adds these elements, reducing delivery failure and improving trust.
Who is this plugin for?
This plugin is critical for anyone managing or creating WordPress websites, especially those handling transactional emails, forms or commerce features. It’s built for agencies, freelancers, and businesses that need reliable WordPress email delivery for WooCommerce orders, instant notifications for user logins and plugin updates, and contact form submissions.
Why do I need a plugin when WordPress already sends emails?
By default, WordPress uses the PHP mail function, which often causes WordPress email delivery issues. Emails may not pass SMTP authentication and can be blocked by providers.
Email deliverability improves reliability by using optimized delivery infrastructure instead of the PHP emails method or a manual SMTP mailer setup. It provides:
- High email deliverability: Email deliverability improves email deliverability by getting emails into the inbox instead of the spam folder. It offers better inbox placement than default WordPress emails.
- Reliability: No failed emails caused by primary connection failures. Default WordPress emails can sometimes fail due to server restrictions or configuration issues. Email deliverability ensures reliable email delivery by using dedicated email servers optimized for sending large volumes of emails.
- Email logs: Email deliverability allows you to monitor email activity with access to detailed insights into email sends, delivery status, performance, and email fails through the WordPress dashboard.
What is the difference between this plugin and other SMTP plugins?
Traditional WordPress SMTP plugins like Easy WP SMTP or WP Mail SMTP require setup with a third party and login credentials. Email deliverability replaces all of this with a built-in, one-step setup wizard, allowing you to send emails instantly without the need for an external SMTP. Read more about this here.
Is there a limit to the number of emails I can send?
Yes, Email deliverability has limits based on your plan. The Elementor One subscription provides you with a shared pool of credits that can be used across Elementor capabilities. Quotas reset monthly, and you’ll be notified instantly if you approach your limit. A free trial lets you send 200 emails to test functionality.
If I want to test Email deliverability, how can I do it?
You can start with the Trial plan, which allows a limited number of WordPress emails. Send test emails to experience Email deliverability’s email delivery, review detailed email logs, and explore how it prevents email fails compared to other SMTP plugins.
Can I add my own custom domain for the sender email?
Yes, and it is highly recommended to do so to improve sender reputation. It’s also at no additional cost. Email deliverability supports custom sender domains with simple verification, ensuring professional-grade email deliverability. Before setup, a default sender address is provided, so you can send emails immediately.
Does the plugin work with all hosting providers?
Yes. Email deliverability works across all hosting environments, from shared hosting to WordPress multisite. Unlike Easy WP SMTP or other SMTP options, it bypasses server restrictions and connects directly to a secure backup mailer service, ensuring consistent email delivery regardless of hosting.
Can I use Email deliverability if I’m not tech-savvy?
Absolutely. With an easy setup wizard, you can configure Email deliverability in just a few minutes. No need for complex SMTP settings, Google Workspace, or Gmail API. Simply install and activate, and any WordPress emails will be routed through a reliable system with built-in backup connection options, if needed.
Do you offer support?
Yes, Elementor provides priority support for Elementor One subscribers and detailed documentation for Email deliverability.
You can contact us via https://elementor.com/contact
Can Email deliverability replace WP Mail SMTP or Easy WP SMTP?
Yes. Unlike a traditional WP mail SMTP plugin or an easy WP SMTP setup, Email deliverability works out of the box with no need to configure an external SMTP mailer. The plugin provides reliable WordPress email deliverability, instant alerts for email fails, and detailed email logs directly in the dashboard.
Can I track deliverability with email reports and failure alerts?
Yes. Email deliverability provides built-in email reports, real-time deliverability statistics, and instant notification for email failure alerts. You’ll see detailed logs of every email sent, so you can quickly spot and resolve WordPress email delivery issues before they impact users.
Does Site Mailer require SPF and DKIM records?
Email deliverability does not require you to set up SPF or DKIM records manually in addition to the DNS records provided in the setup. The service uses advanced IP management to protect your sender reputation automatically through its routing service.
Can I use Email deliverability for marketing campaigns?
No. Email deliverability is specifically designed for transactional emails (such as form submissions, order confirmations, and password resets) sent via WordPress. It is not intended for bulk marketing email purposes.
Can I add a dynamic email address to the Reply to field of Site Mailer?
Right now, it is not possible to use a dynamic email address. However, You can set a custom email address in the “Reply to” field of Email deliverability’s General Settings.
Web accessibility
What is Web Accessibility?
The Web Accessibility accessibility plugin is a free, easy-to-use solution designed to improve web accessibility and make websites more inclusive for people with disabilities. It enhances websites with practical features like improved alt text for images, helping website owners meet accessibility guidelines such as the Web Content Accessibility Guidelines (WCAG) from the World Wide Web Consortium (W3C). Web Accessibility works seamlessly across WordPress and Elementor, supporting screen readers, assistive technologies, and multiple web browsers.
Our goal is to help website owners reduce accessibility barriers during the creative process and deliver website design with accessibility built in to benefit all users.
Is Web Accessibility GDPR compliant?
Yes, Web Accessibility is GDPR compliant. Our handling of personal data, including its transfer across borders, is compliant with the General Data Protection Regulation (GDPR).
The GDPR does not prohibit international data transfers, but rather requires that they are conducted using a valid legal mechanism that ensures your data remains protected.
As outlined in our Data Processing Agreement (DPA) Elementor Data Processing Agreement | Elementor which forms part of the terms of use, our use of US-based sub-processors is a transparent and necessary part of our service. These transfers are secured through recognized legal mechanisms, such as the Standard Contractual Clauses (SCCs), which ensure your data is adequately protected and is in accordance with the DPA.
Why do I need an Elementor account to use Web Accessibility?
Creating an account helps you manage your accessibility settings and ensures a smooth experience as we continue improving Web Accessibility. It also allows us to support future advanced features and provide better assistance tailored to your needs.
What is the Accessibility Assistant?
The Web Accessibility Assistant is an evaluation tool that scans web pages for over 180 potential problems based on WCAG 2.1 AA success criteria. It organizes findings into categories and provides step-by-step guidance. Website owners and creators can fix problems themselves or apply AI suggestions, making web accessibility part of the normal creative process.
This tool supports people with disabilities who rely on screen readers, alternative keyboards, or have visual impairment and ensures images and other elements of web content meet accessibility standards.
Can I scan the same URL more than once?
Yes. You can rescan any web page or website URL as often as needed. Each new scan updates results to reflect your current web content and highlights improvements, helping website owners track web accessibility progress and maintain more inclusive websites.
Why does the Web Accessibility widget increase my page's JavaScript load?
The Web Accessibility widget provides a comprehensive suite of client-side features like contrast adjustment, font resizing, and skip links. These require a bundled JavaScript file that loads on every page where Web Accessibility is active to ensure compatibility for users who rely on these functions.
What are 'Landmark Elements' in the accessibility scan?
Landmarks (like <header>, <nav>, <main>, and <footer>) are HTML5 tags that help screen reader users navigate a page. If content is “outside a landmark,” it might be skipped by assistive technology. You can fix this by wrapping the content in the appropriate landmark tag or using ARIA roles.
What are AI fixes?
AI fixes are smart, automated suggestions that help resolve accessibility barriers more efficiently. For example, Web Accessibility Assistant can propose better alt text for images, suggestions for aria labels, and can provide fixes for any text or code. These automated authoring tools save time in the development process while leaving website owners in full control to edit or roll back changes.
AI fixes are available only on a paid plan and use credits.
Can I customize the widget’s appearance?
Yes, you can fully customize the widget to match your branding. Adjust icon style, size, and color, and personalize the header and footer to match your site’s branding. Choose which accessibility features are available to visitors – such as pausing animations, keyboard navigation, or increasing text size.
You can also choose its placement. Position the widget in any corner, at a custom location, or hide it on mobile or desktop.
Does the widget support multiple languages?
Yes, the widget automatically adapts to your website’s language. This ensures consistent web accessibility across languages, supports screen readers, and provides equal access for people with disabilities using different communication technologies.
In the paid plans, you also add a language selector with multiple language options for global web visitors to enjoy.
How do I set up the widget?
Once installed, the widget appears on your website with default features activated. From the Web Accessibility dashboard, you can customize design and functionality. With the Accessibility Statement generator, you can also generate a dedicated web page with accurate guidelines and language that communicates your accessibility efforts to users and improves social inclusion.
What is an Accessibility Statement, and how do I generate one?
A statement of accessibility communicates your commitment to web accessibility, inclusive website design, and providing equal access for people with disabilities. With Web Accessibility, website owners can quickly generate this declaration. It is automatically published on a dedicated web page, demonstrating your commitment to reducing accessibility barriers across your websites.
How many credits does each action use?
Elementor One replaces separate quotas with a single, flexible credit pool that adapts to your workflow. This gives you the freedom to allocate resources exactly where your project needs them most.
The amount of credits consumed within Web Accessibility AI fix is 20 credits.
Credit consumption remains dynamic and may change, applying to all plans regardless of purchase date.
Can website visitors hide the widget?
Yes, website visitors can temporarily hide the widget. They can choose to dismiss it for the current session, for 24 hours, or even for an entire week.
Can I change the voice used by the Screen Reader?
No, you can change the reader’s language, but the voice is not changeable at this stage.
Cookie consent
Does Cookie Consent make my site fully GDPR- or CCPA- compliant?
Although Cookie Consent is designed to help support your compliance efforts with the GDPR, CCPA, and other applicable privacy regulations, it cannot, by itself, ensure or guarantee full legal compliance. Cookie Consent provides cookie consent tools, including banner display, consent collection, script blocking, cookie categorization, and consent records. Full compliance depends on additional factors specific to your site and operations. You are solely responsible for legal compliance.
Pricing & Plans
What happens if I reach my monthly consent quota?
You’ll receive notifications as you approach your limit so you have time to take action. For now, your cookie banner will continue to function normally even if you exceed your quota, as we are currently in a grace period. However, this will change. Going forward, exceeding your quota may result in your banner being paused or consent recording being stopped. To avoid any disruption, we recommend upgrading your plan well before you reach your limit.
When does my consent quota reset?
Your monthly consent count resets at the beginning of each billing cycle. Every month, your usage starts fresh and consents recorded during the previous cycle won’t carry over or count against your new quota. You can check your renewal date in your subscription details within My Elementor.
How does the free plan work?
The free plan gives you access to the plugin’s core features at no cost, with no time limit. It includes a fully functional cookie banner, customizable styling, a cookie scanner, and up to 800 consents per month for one website. Your consent quota resets each billing cycle, but your scanned pages quota is a one-time total of 25 pages, so once they’re used, no additional pages can be scanned unless you upgrade. Consent logs are retained for 30 days.
If your site grows and you need more consents, additional scans, or access to premium features like multilingual support and white labeling, you can upgrade to Elementor One at any time.
What are consents?
Consent is a visitor’s response to your cookie banner. This is their choice to accept all cookies, reject non-essential ones, or customize their preferences by selecting specific categories such as Analytics or Marketing.
Cookie Consent automatically records each response as a secure, timestamped log entry, giving you proof of every visitor’s decision. This matters because privacy laws like GDPR and CCPA require you to respect those choices and demonstrate that you obtained permission before tracking anyone. You don’t need to manage any of this manually. Cookie Consent handles the recording, storage, and exporting of consent records directly from your WordPress dashboard.
How are consents calculated?
Each interaction with your cookie banner counts as one consent. When a visitor clicks “Accept All,” “Reject,” or “Save Preferences,” that’s one consent. If the same visitor later reopens the banner and changes their choice, that counts as an additional consent.
The banner may also automatically reappear for returning visitors. For example, this can happen if new cookies have been added to your site, if cookies have been moved between categories, or if the consent expiration period has passed. Each time a visitor responds to the banner again, a new consent is recorded.
What are scanned pages and how do they work?
When you run a cookie scan, Cookie Consent visits pages on your site to detect active cookies and scripts. Each page scanned counts as one “scanned page.” For example, scanning your homepage, about page, and contact page uses 3 scanned pages from your quota.
On the Free plan, you get a one-time total of 25 scanned pages. Once they’re used, no additional pages can be scanned unless you upgrade. If you’re on the Free plan, we recommend scanning specific URLs rather than your entire site to make the most of your quota.
Can I use Cookie Consent on more than one website?
Each website requires its own subscription. The exception is Elementor One, which allows you to manage multiple websites (up to 1,000) under a single subscription. If you’re running multiple sites and want everything under one roof, Elementor One may be the best fit.
How long are my consent logs stored?
On the Free plan, consent logs are retained for 30 days. After the retention period ends, older logs are automatically removed and can no longer be accessed. If you need to keep records longer, we recommend exporting your logs regularly or upgrading to Elementor One.
The Cookie banner
What is the "White Label" feature?
White labeling lets you remove Elementor’s branding from the cookie banner and preferences center. It’s ideal for client sites where you want the compliance tools to feel like a seamless, built-in part of the design.
Is multi-language support available on the free plan?
No. The free plan supports your site’s default language only. Multi-language management, which automatically detects and matches the visitor’s browser language, is available on paid plans.
Why did my analytics traffic drop after enabling the banner?
This is expected. In “Opt-in” mode, tracking scripts are blocked until a visitor gives consent. That means visits from users who haven’t accepted cookies won’t appear in your analytics. This behavior ensures you’re only tracking users who have given explicit permission, as required by law.
Does the banner load from an external server?
No. The banner loads directly from your own website, not from a third-party CDN. This local implementation prioritizes both privacy and performance, helping your pages load faster.
Can I design the banner using Elementor?
Yes. Cookie Consent includes full-width and box layouts out of the box, but if you have Elementor Pro, you can design fully custom banners and preference dialogs using Elementor Popups for complete creative control.
What is the difference between Opt-in and Opt-out templates?
- Opt-in (GDPR style): All non-essential cookies are blocked by default until the visitor clicks “Accept.”
- Opt-out (CCPA/US style): Cookies run by default, and visitors see a “Do Not Sell” link to opt out of data sharing.
The template you choose determines the default script behavior and banner logic for your site.
Can I target the banner to specific countries (Geo-Targeting)?
The banner displays to all visitors worldwide based on your selected template. Advanced geo-targeting, which would automatically show different banners based on a visitor’s country, is coming soon.
Is there a way to preview my design before it goes live?
Yes. All styling changes, including colors, typography, and layout, are reflected in a live preview within the admin dashboard. This allows you to perfect the look before publishing anything to visitors.
Can I enable or disable the banner site-wide?
Yes. A master toggle in the settings lets you enable or disable the banner instantly. You can also define a list of specific URLs where the banner should never appear.
When is the cookie banner shown to a visitor?
The banner appears on a visitor’s first visit, after their previous consent expires (configurable from 0 to 365 days), when new cookies are added to your site, or when existing cookie categories are modified.
What is the “Revisit Consent” option?
It’s a floating icon or custom link that lets visitors reopen their preferences and update their consent choices at any time. Giving users ongoing access to their consent settings is a key requirement under GDPR.
How does website scanning work?
The scanner crawls your site to detect active cookies and scripts, then automatically organizes them into categories: Necessary, Functional, Analytics, and Advertisement. You can run a full site scan or target specific pages.
What data is stored in the Consent Logs?
Each log entry includes an anonymized Consent ID, the visitor’s country, their consent status, the categories they selected, and a timestamp. Logs can be filtered and exported as a CSV for legal audits.
Can I export my consent logs?
Yes. You can export your consent logs as a CSV file directly from the Consent Logs section in your dashboard. The export respects any filters you’ve applied, so you can narrow results by date range, consent status, or country before exporting. This is especially useful for compliance audits or for retaining records beyond your plan’s retention period.
How can I manage cookies manually?
From the dashboard, you can add, edit, or delete cookies and move them between categories using a simple drag-and-drop interface.
Is Google Consent Mode v2 supported?
This feature is coming soon. Once available, Cookie Consent will integrate directly with Google’s API to communicate consent states to Google tags, keeping your tracking compliant with Google’s latest requirements.
What happens when a Global Privacy Control (GPC) signal is detected?
If GPC handling is enabled, Cookie Consent treats the browser signal as a “Deny” and automatically blocks non-essential cookies while hiding the banner. This ensures the visitor’s browser-level privacy preference is respected.
How do I manually control third-party scripts?
In the Script Manager, you can define individual scripts and set each one to Always Load, Block Until Consent, or Always Block. This gives you granular control over exactly when each tracking script fires.
Yes. All styling changes, including colors, typography, and layout, are reflected in a live preview within the admin dashboard. This allows you to perfect the look before publishing anything to visitors.