Want to learn faster? Book a 1-on-1 expert session today.
Warning
There are three ways visitors can upload files to your site:
- Email with link: Keeps a copy of the document on the server which makes it easier to track but is less secure.
- Email with attachment: Sends the document to the website owner the document by email without saving a copy to the server. Makes the document more difficult to track but more secure.
- Email with both: Shares the documents both ways, with the advantages and disadvantages of both.
For more details on how to use these upload options, see Receive form submissions by email.
Getting visitors to submit forms to your site is only half the battle. After these forms are submitted, the information needs to be processed and acted on. Some of the most common actions are:
- Collect information for a spreadsheet
- Email the form
- Send the information to a third party (for example, MailChimp, Zapier, Slack)
- Direct visitors to a thank you page
- Add the visitor to an email list
- Open or close a popup
Note: Forms will often need to take several of these actions.
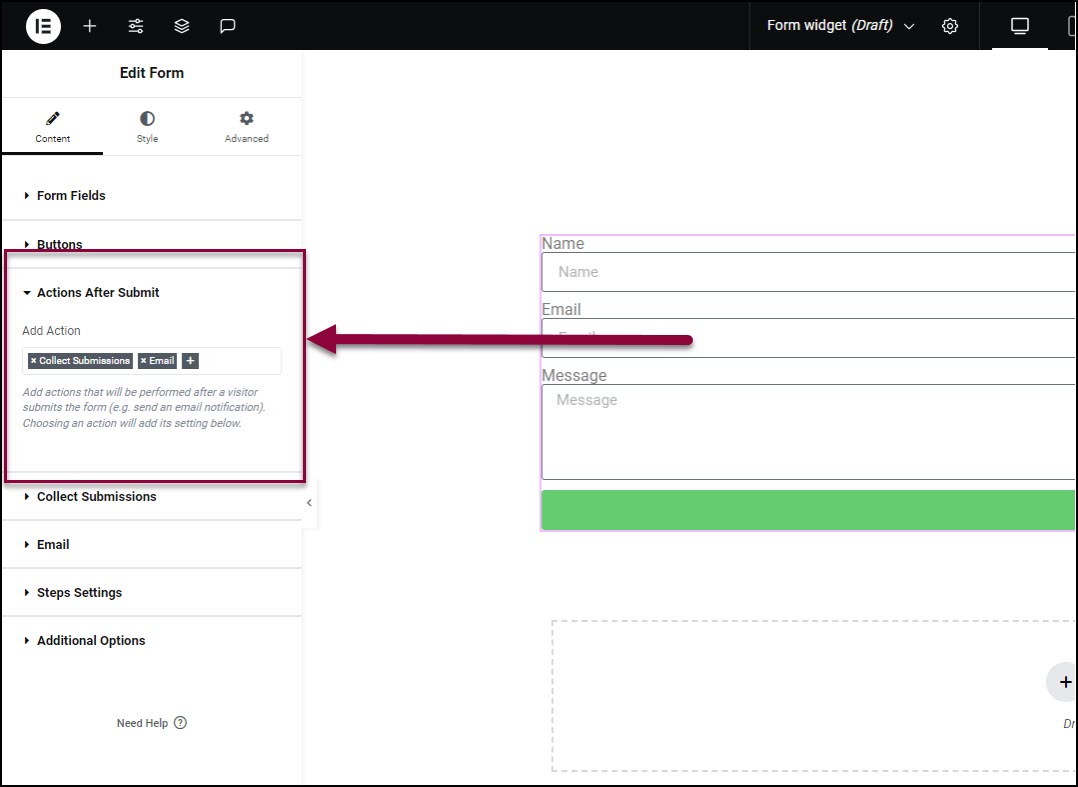
Determine the actions after submit
Setting up the actions after submit is done using the Actions After Submit field, found in the Content tab of the Form widget. For more details, see Form widget.
.
Possible actions that can be taken after a form is submitted
| Collect submission | Sends the information submitted by visitors to your WP-Admin. See Collecting information submitted by visitors for more details. |
| Sends the information submitted by visitors and emails it to this address. See Receive form submissions by email for more details. | |
| Email 2 | Usually used when you want to send an email to the visitor who submitted the form. Form more details, see Send an email confirmation after form submission. |
| Redirect | Will take your users to a different page after they submit a form. For example, you can redirect visitors to a Thank You page. |
| ActiveCampaign | For users of ActiveCampaign, a customer experience automation platform. See Integrate forms with ActiveCampaign for more details. |
| ConvertKit | For users of ConvertKit, an email marketing platform. See Integrate forms with ConvertKit for more details. |
| Discord | Discord is a popular communications platform. You can send visitor submitted information to a discord server. See Discord Integration with Elementor for more details. |
| Drip | For users of Drip, an e-commerce marketing automation platform. See Integrate forms with Drip for more details. |
| GetResponse | For users of GetResponse, an all-in-one online marketing platform. See Integrate forms with GetResponse for more details. |
| MailChimp | For users of Mailchimp, a popular marketing automation platform. See Integrate forms with MailChimp for more details. |
| MailerLite | For users of Mailerlite, an email marketing platform. See Integrate forms with Mailerlite for more details. |
| Slack | Slack is a collaborative communication platform designed for teams. You can send the information submitted by visitors to a Slack channel. See Slack Integration with Elementor for more details. |
| WebHook | Webhooks allow applications to automatically share information with another. In Elementor forms, these webhooks can be used to share the information submitted by users to third-party platforms. One of the most popular platforms to use these webhooks is Zapier, an online automation tool that connects various apps. See Integrate forms with Zapier for more details. |
| AWeber | This option only appears if you have the AWeber plugin installed. For users of AWeber, an email marketing platform. See Integrate forms with AWeber for more details. |
| Popup | Allows you to open or close a popup window after a visitor has submitted a form. |