Why should you use global fonts and colors?
When you’re building a website, your fonts and colors should be the same across your entire site to improve the overall look. If fonts and colors vary among pages or parts, your users can become confused. This can negatively impact user retention and may cost you sales.
You can also use font and color continuity across your site to reinforce your brand and help users remember it. Font and color continuity helps keep your brand relevant and ensures customers will remember and come to you when they need a product or service.
Elementor’s Global Fonts and Colors enable you to update your website fonts and colors from one convenient location. This prevents you from having to repeatedly open website parts and change them individually. In this article, you’ll learn how to do this.
First, let’s look at how to access Global Settings.
How do I access Global Settings?
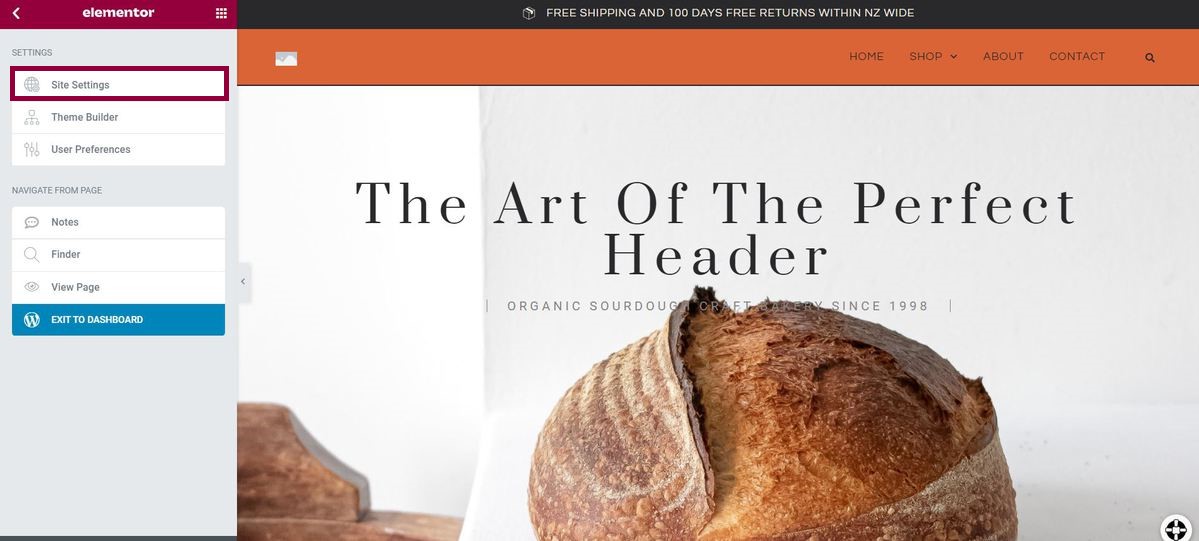
Once you login to Elementor, select Edit with Elementor on the site you want to update.

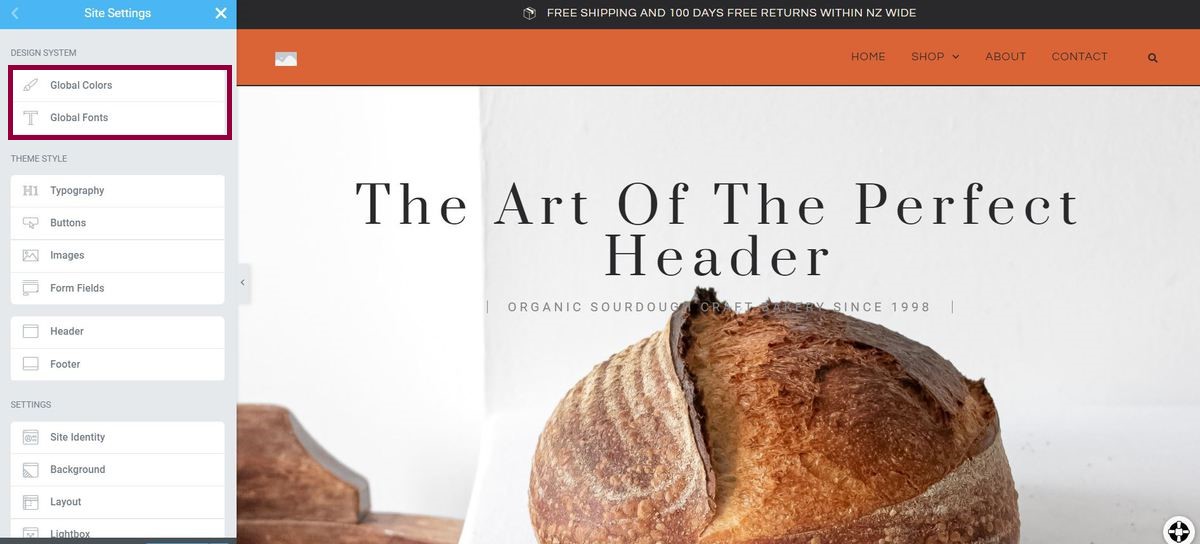
In Settings, select Site Settings.

You can now access either Global Fonts or Global Colors.
Note: If you change the Site Settings, doing so will affect all the same font or color used across your entire website. For example, if you switch the Primary Font Color from red to blue, all text labeled as Primary will become blue.
How do I change Global Fonts and Colors?
There are four default groups of fonts and colors – Primary, Secondary, Text, and Accent.
In the example below, we’ll modify all items labeled Primary on your site.
Change a global font:
1. Click Global Fonts.
2. Go to the font labeled Primary (it’s listed under System Fonts).
3. Select the Pencil icon.
4. Change attributes in the Typography menu.
5. Close the menu.

Change a global color:
1. Click Global Colors.
2. Go to a font label called Primary (it’s listed under System Colors).
3. Click the color swatch to open the Color Picker.
4. Select the color you want from the Color Picker.
5. Close the menu.

How do I add new groups to global fonts and colors?
As noted above, global fonts and colors are divided into four default groups. However, you may also need to add other global fonts and colors. For instance, if your design calls for a lot of headlines, you may want to create a custom color and a custom font group called “Headers,” so that all your headers will look the same.
To do so:
- Click Add Style or Add Color at the bottom of Global Fonts or Global Colors respectively. This will add a new global color with a placeholder name and a blank color.

Click add color, choose a color and then Add color again. - Select the placeholder name and rename it.
- To set a global color, click the color swatch to open the color picker.
- Select a color and click Add Color.
- To set a global font, click the pencil icon and select the font type and size.
Shortcut – How can I use existing elements to add global fonts and colors?
You can actually use elements you’ve already created to edit your global fonts and colors, saving you a step. In the example below we’ll use text to add a new global color and font, but this process will work for any element that contains a color and typography settings.
- Select text that has the color and font settings you want.
- Click the color swatch next to Text Color to open the color picker.

Click the color swatch to open the color picker. - Click the plus button.

Click the plus sign to add a global color. - Type a name for the new group in the Create a New Group pop-up.

Enter the name for your new global color. - Click Create. You’ve now created a new global color group.
- Select the pencil icon next to Typography
- Click the plus button

Click the plus icon to add a new global font. - Type a name for the new group in the Create a New Group pop-up.
- Click Create. You’ve now created a new global font group.
Now you have a global group that you can edit it as described above.
What is the color sampler?
The color sampler allows you to choose colors based on your page content. Learn more about the color sampler.
Final words
It’s no fun spending time changing individual parts of your website. Use the Global Settings to speed up all your website changes!
Now that you know all about Global Settings, take a look at how you can optimize your layouts and improve your productivity.
Another way to save time and effort is to add your own custom switches to the color picker.
To get the most out of Elementor, head over to the Elementor Academy for more helpful learning resources. If you come across any issues or need help, please contact our Support Center.

