The basic logic of containers
A container is a box that holds your web page elements, including widgets and other nested containers to provide the layout you need. You can create containers quickly and save them as recurring templates to streamline your web building process..
The layout of items in a container
Elements within a container can have two different types of properties: how they act as a group, and how they act as individual elements. First, let’s look at how containers act as a group. You can set these properties in the Layout tab.
[/callout type="note"]In addition to widgets, you can place containers inside another (parent) container. This is known as a ‘nested container’.[/callout]
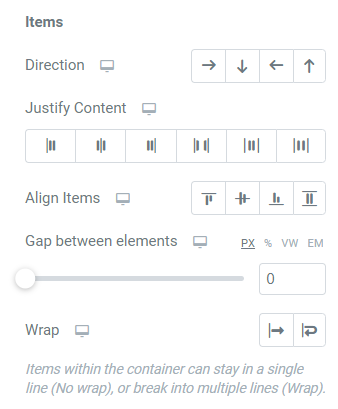
Direction
When you add items to a container, you need to set the direction of the content to either row or column using the direction setting. There are four possible directions for the items in a container:
- Row –

- Column –

- Reverse Row –

- Reverse Column –

Alignment
The alignment setting controls how objects are aligned within the container and depends on whether you set the direction to row or column. If you set your container’s direction to row, alignment determines whether the items are set to the top, middle, or bottom of the container. If you set your direction to column, alignment sets the element to the left, center, or right.
Justification
Justification determines the spacing between items in the container and the items’ distance from the container’s border.
Elements Gap
This setting determines how much space you’ll have between the items in the container. The default Elements Gap 20PX, but you can edit this by going to Layout in Site Settings.
Wrap
The wrap setting determines whether all the items in a row or column will be forced onto one line or whether they overflow to take up additional rows or columns. This ensures all content remains within the container boundary.
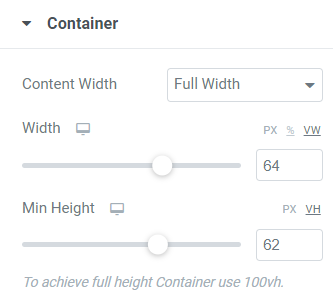
Container width
Container width has two options: Boxed and Full Width.
| Boxed | Full width |
Retains the aspect ratio of the content within the container. As you resize the Container, the box will scale to accommodate the aspect ratio. | Will retain the aspect ratio, but the width will match that of the left and right boundary of the Container. If you resize the container so the height is smaller than the content, the content will spill over at the top and bottom boundary but not at the left and right boundaries. |
For a more detailed look at these, and other settings found in the Layout tab, check out the article on Container layout settings.
How do I change the way items are laid out in a container?
Follow these 3 steps:
1. Select Edit container from the tab or by right-clicking the Container.
2. Navigate to the Layout tab.
3. Edit the desired properties.
Note: You can change these properties after you’ve added elements to see how they’ll react to the edits.
To get started editing your website using Elementor Editor you can take a tour of the features and learn how everything works. Elementor also has numerous guides on how to create your first web page, how to layout your content in Elementor, and how to design a webpage.
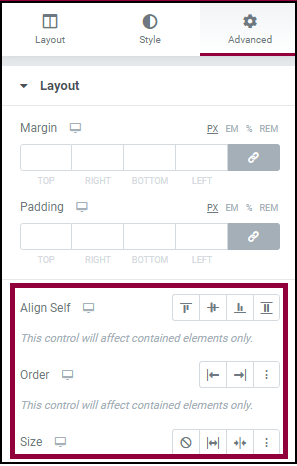
Adding properties for individual elements
In addition to being able to control the group of elements in a container, you can also set properties for individual elements within a container. You can do this by using the following properties:
| Align self | Order | Size |
| Depends on whether you set the direction to row or column. If you set it to row, alignment determines if the element is set to the top, middle, or bottom. If you set it to column, alignment sets the element to the left, right, or center. Stretch will stretch out the size of the widget to occupy the entire row or column. | Allows you to set the order of the elements. You can determine whether an element is the first or last in a row or column, or set numbers for each element. This can be an especially powerful tool in responsive design as it allows you to determine the order in which elements appear and stack in different screen sizes. | Determines how an element will grow or shrink relative to other elements within the container. |
How do I change the individual element properties?
If you want to change individual element properties:
1. Navigate to the element on the canvas you want to modify.
2. Select the Advanced tab.
3. Edit the desired properties.
Final words
Containers provide you with a streamlined approach to laying out web page content. Now that you know how containers work, a great next step is to learn how to change a container’s size and behavior.
To get the most out of Elementor, check out the Knowledge hub for helpful learning resources.