Introduction
In the following tutorial you will learn to make a custom Footer Template using containers. Before starting this tutorial, you should have a basic knowledge of the container properties and UI, if not take the time to review them before continuing.
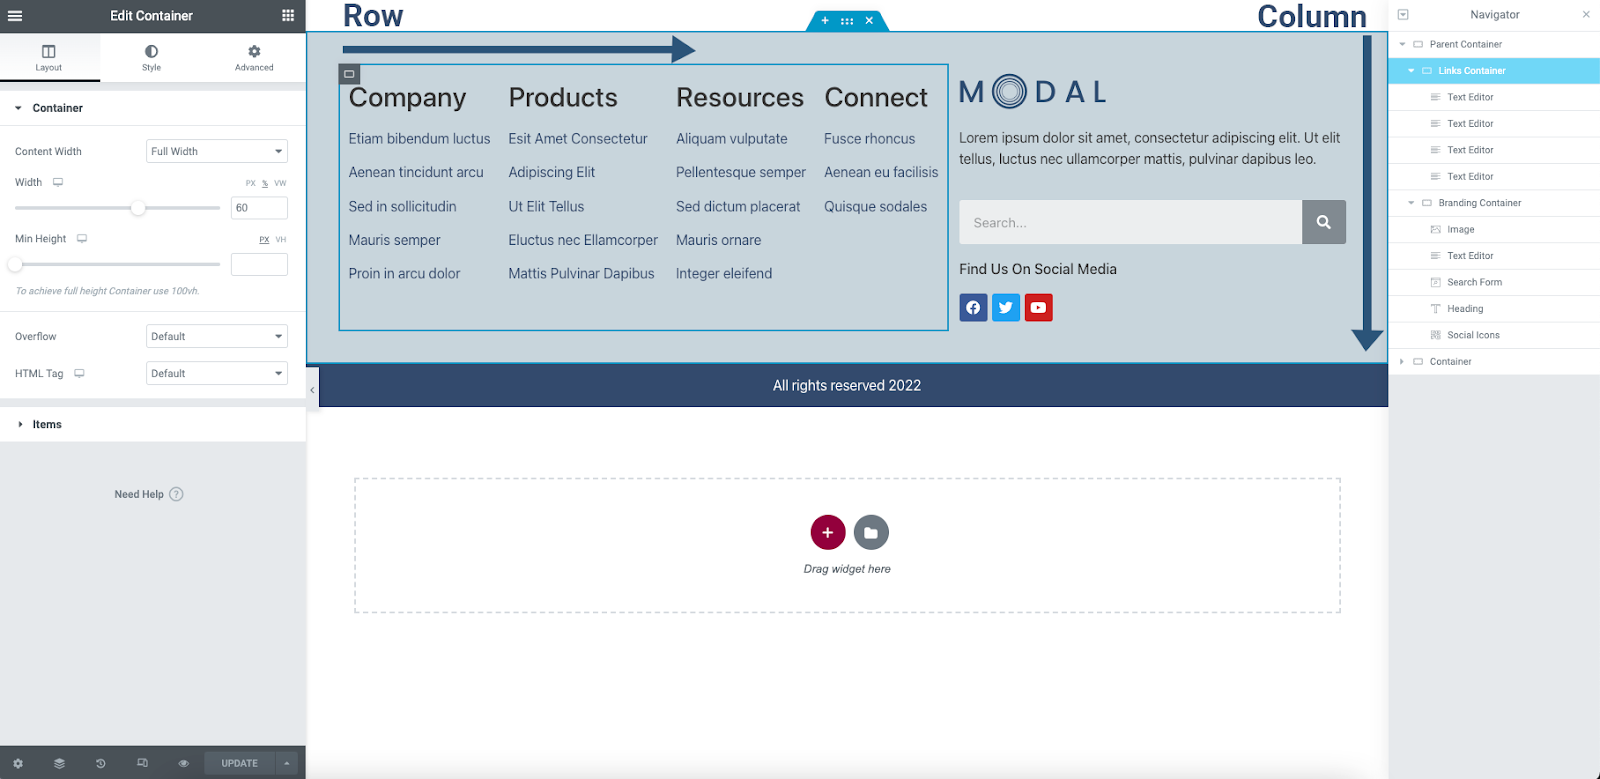
This tutorial will be using a parent container with side by side child containers. The left child container will use the direction of row and a 60% width. The right child container will use the direction of column and a 40% width. A single container will be placed below with a dynamic copyright notice.
Getting started
Creating the parent container layout
You will begin by adding a new container to your template design. This will be referred to as the “Parent Container” in this and other related documents.
- Click the + Icon to add a New Container.
- Select the Two Container layout option from the preset layouts.
- From the Container Width option, select Full Width.
- From the Minimum Height option, select the VH (Viewport Height). and enter a value (example: 40).
- From the Style Tab, select the background color options and choose a desired color (example: use a global color from your Site Settings).
- From the Advanced tab > Padding, enter a desired value (example: 3%).
Setting up the child containers
In this step you will be defining the width and direction of the child containers. Child Containers are placed within the parent container to create columns when required. Keep in mind that the total number of nested elements should be kept to the minimum that is required in order to optimize the performance of your page.
- Select and edit the left side column.
- In the Container Width property, enter a value of 60%.
- From the Items tab, select the direction of Row.
- Select and edit the right side column.
- In the Container Width property, enter a value of 40%.
- From the Items tab, select the Direction of Column (may be default).
Adding content
Adding company links
In this step you will add your company links. You will only be using the text editor widget for this example. For time saving, you should prepare these and have them saved in a word document or notes.
- From the widget panel, drag a Text Editor widget to the left child container.
- Duplicate the Text Editor widget three additional times by using the right click function.
- From your prepared assets, edit the Text Editor widgets. Each should have a heading (example: H3) and links below.
Adding branding and info
In this container, you will be adding the company logo, mission statement, a search box, and social media links. The search box could be switched to a subscription form if desired.
- From the Widgets Panel, drag and drop a Site Logo* widget into the right child container. The image should be left aligned.
- From the Widgets Panel, drag and drop a Text Editor widget below the Site Logo. This may be edited to include the company’s mission statement or other information.
- From the Widgets Panel, drag and drop a Search or Form Widget below the Text Editor
- Next, from the Widgets Panel, drag and drop a Heading widget below. From the HTML tags, select “p.” Edit the text to invite visitors to your social media pages.
- Finally, From the Widgets Panel, drag and drop the Social Icons widget to the bottom of the container. Align these to the left. From the Style Tab, select the Size option and enter a desired value (example: 16px)
*The Site Logo must have a previously assigned image. This is done in the Site Identity settings.
Adding a copyright container
To complete the desktop design, You will now add a dynamic copyright container. If you do not have Elementor Pro, you may simply add your copyright text into the Heading widget used rather than the dynamic functions.
Adding the parent Container
- Add a new Container by clicking the + icon. Select the single container layout option.
- Right click to edit the container properties.
- Set the Container Width to Full.
- From the Items tab choose to Align Items to Center. The default Direction of Column may be kept.
- From the Style Tab, choose a background color or use a Global Style setting.
- From the Advanced tab > Padding, enter a desired value (example:1%)
Adding copyright information
- From the Widgets Panel, drag and drop a Heading widget to the new Container.
- From the Style Tab, change the color to a desired value or Global Color setting.
- Return to the Content Tab. From the HTML tags, select the “p” option to change the heading to body text formatting.
- Next, click the dynamic icon* to open the options. From the list shown, choose the Current Date and Time option.
- To edit the dynamic text, click the small wrench icon.
- In the dropdown time options choose None.
- In the dropdown Date options, select the Custom option. In the value, enter “Y” this will display the current year
- From the Advanced options, enter a © in the before value. In the after value, you may enter your desired text. Remember to add a space before the text in order to properly display.
*If you do not have Elementor Pro, you may skip the dynamic steps and enter a desired copyright text.
Responsive editing
It is now time to check the responsive views of your footer. Select the responsive tools from the bottom of the Editor panel. In the example below we will cover the mobile view.
- In the Parent Container open the Items tab and apply the Wrap option. This will allow the Child Containers to stack on smaller screens such as tablet and mobile.
- In each of the Child Containers change the Container Width to 100%. This will stack the child containers in the viewport.
- If desired, you may change the Order of each container in their Advanced tab. .
Finishing up
Now that your layout is complete, you may edit any links and text that is required. You may also find that some individual widgets need to be edited for better alignment and padding in responsive views.
Next steps
Now that you’re familiar with how to build headers and footers with containers, let’s look at how to create a single page template. This template will be used as the default design for your site’s pages.
To get the most out of Elementor, check out the Knowledge hub for helpful learning resources.