Introduction
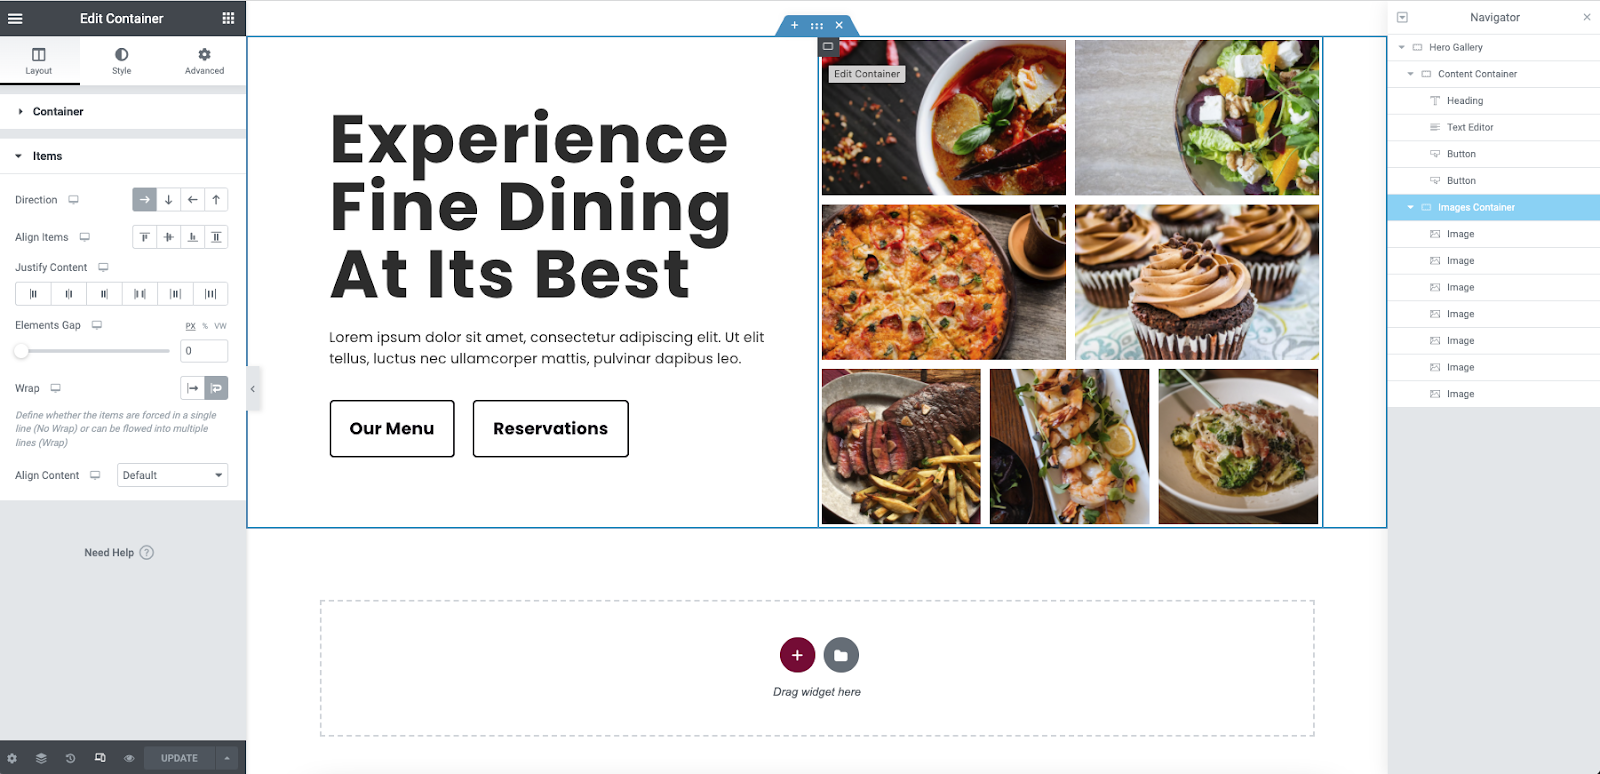
In this tutorial you will learn how to use the container’s flex properties to make an image gallery hero section. For this tutorial you will be using a parent container with two child-containers. The content may be added to the left or right. An image gallery is created in the other. This will help you learn more about the flex properties of the container.
Can I just use a Gallery widget?
Yes, a Gallery widget may be used. However, learning the techniques used here will help you make more advanced designs later on. The Gallery image also cannot link individual images so this will overcome that limitation.
Getting started
Begin by creating a new page on your website or editing an existing one. For this tutorial the page has been set to Canvas.
Add a new container layout
- Add a new container to your page by clicking the + icon
- Select the two container layout
- A margin may be applied to the parent container in the Advanced tab to allow for “white space”
The content container
- Drag a Heading widget to the left child-container and edit the text as needed
- In the Style tab you may adjust the font size in the Typography settings or choose a preset global style
- Next drag a Text Editor widget below the heading and edit its content (you may leave as the placeholder text for now)
- Add two Button widgets to the container and edit their text. You may also link these if you are ready
Note: For this tutorial, two buttons are used so that the Direction and Wrap properties can be demonstrated.
Adjusting the content with flex properties
- Select and edit the content’s container. In the Layout tab, the default Width and Height properties will be kept at this time
- Select the Wrap property option by clicking the icon
- Change the Direction property to row to align the buttons side by side
- A bit of Padding is applied to the container in the Advanced tab (example: 21PX)
The gallery container
- Select and edit the right child container
- In the Layout tab, the container Width and Height properties are left at default
- In the Items section, select the Direction to Row
- In the Gap property set the value to 0px as padding on the images will be used. This will improve the workflow of using 50/50 or 33.3% in the gallery in the following steps (unless you like math)
- Set the Wrap property by clicking the icon
- Once the Wrap property is applied, the Align Content property will appear. Select the Flex Start option from the dropdown menu.
Adding Images
- Drag an Image widget to the gallery container
- In the link options, the image may be set to lightbox by setting the link option to media file, or you may link to a location
- In the Advanced tab, set the Width property to 50% to define the widget’s wrapper width
- Padding is now applied to the image widget. This is used rather than the Gap property for faster workflow when learning (example: 5PX)
- Open the Style tab the image will now be adjusted to allow consistency once duplicated
- From the Width property, increase the slider to 100% or enter the value
- The Height property will be used to keep the images a consistent size
- When the Height property is used, the Object Fit options appear. Select the Cover option.
Note: This will cause some clipping in your images depending on their size but allow the gallery to be consistent without editing each image.
Duplicating and selecting the images
- Right click on your image and duplicate it. For this tutorial, four images will be used
- You may now choose the images from your media library to be added or uploaded from your computer. Since the width, height, and padding properties have been previously set, the images should fit naturally without resizing.
Adding additional image row(s)
- Once again, duplicate the final image from your already added Image widgets by right-clicking
- In the Advanced tab set the Width of the widgets wrapper to 33.3%
- In the Style tab, the height of the image should also be adjusted (example: 125PX)
Duplicating and selecting the images
- Duplicate the image by right clicking. For this gallery three images are used
- Select the desired images from your media library or upload them from your computer
Responsive mode
Select and view the responsive breakpoints. Make minor adjustments as needed. You may find that the flex properties of the container already do most of the heavy lifting for you.
Congratulations
You can now make an image gallery using the container. By using the techniques in the tutorial, you will find making more advanced layout designs in the future to be less confusing.
Level Up
You may also mix and match images with video and other elements to create amazing possibilities.

Next steps
Check out some other layouts you can create with containers:
Creating an Intro Section using Flexbox Containers
Creating a Hero Section using Flexbox Containers