
Table of Contents
Sharing knowledge is a beautiful thing and it comes in various forms, including online courses. Online courses empower those who seek knowledge, but they also empower those who create them. With an online course, you can build an audience, establish yourself as an authority, and even make some money if you want to monetize your content.
Creating an online course is no easy task, however, especially if you are not a developer. To aid you in this task, Elementor joined forces with Tutor LMS.
Tutor LMS is a WordPress LMS (Learning Management System) plugin that handles all of the key “course” aspects like:
- Creating courses, lessons, quizzes, assignments, etc.
- Managing access to your courses and even charging one-time or recurring payments if needed.
- Managing and interacting with your students, like sending announcements to your course takers and answering student questions.
What’s especially useful about Tutor LMS, is that it offers deep integration with Elementor, enabling you to design all of your course content using Elementor’s visual interface and 25+ custom widgets. With this duo, you get the power to create flexible courses while still maintaining the ability to use Elementor to design your site.
In this step-by-step guide, we’re going to show you exactly how you can build an online course with Elementor and Tutor LMS. Let’s dig in!
Table Of Contents
- What You’ll Be Building in This Tutorial
- How To Create an Online Course With Elementor
- 1. Create Website and Install Required Plugins
- 2. Set Up Course Content
- 3. Design Your Course With Elementor
- 4. Charge for Access to Courses (Optional)
- 5. Configure Additional Settings As Needed
- How To Manage Your Online Course (Payments, Onboarding, etc.)
- Managing and Onboarding New Students
- View and Manage Payments
- Managing Instructors
What You’ll Be Building in This Tutorial
Before we get into the tutorial, we want to give you a quick tour of exactly what you’ll be building in this guide.
With Tutor LMS, you can set up your own custom courses on any topic, complete with different lessons, quizzes, etc. Then, you can use Elementor and Tutor LMS’s 25+ widgets to create the design for your course page.
Here’s an example of what it might look like – all of the content comes from Tutor LMS but the design is powered by Elementor:
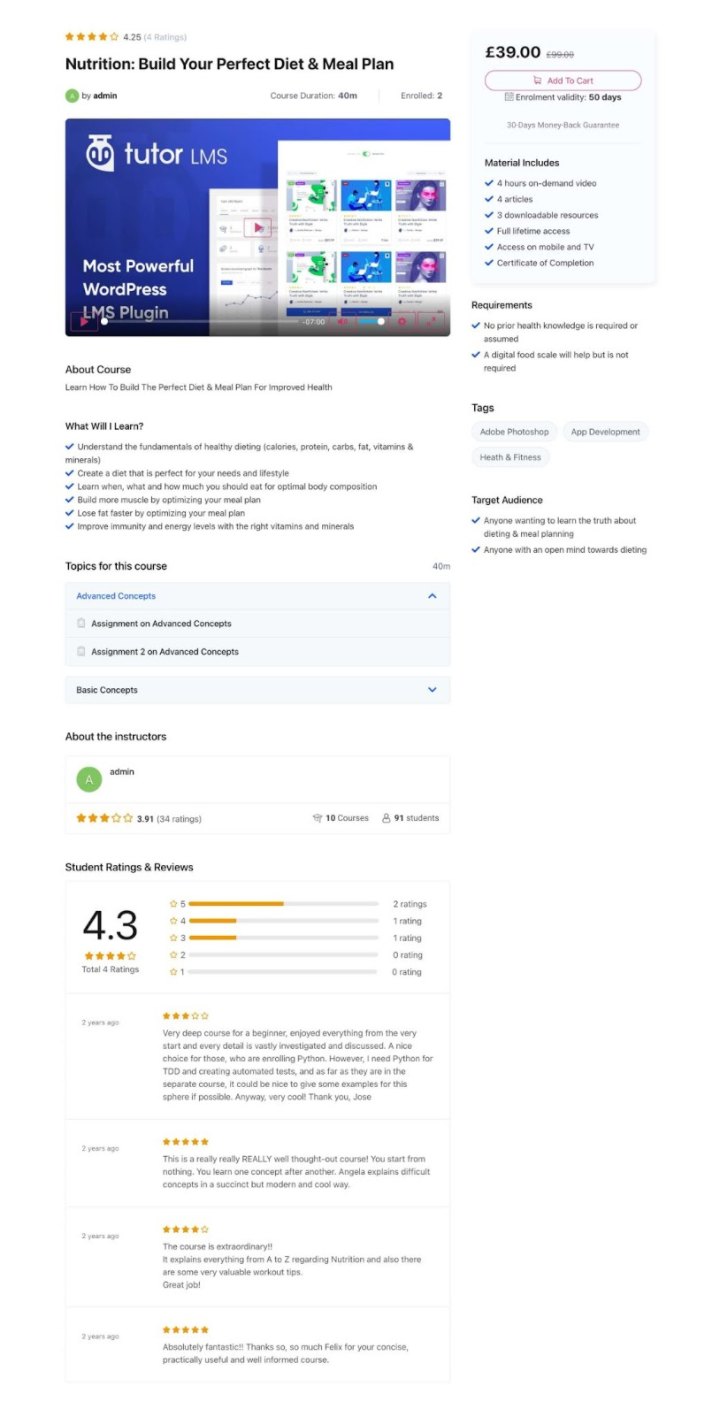
Students will be able to progress through your course lessons and quizzes. They’ll also get their own frontend dashboard where they can manage their enrolled courses and track their progress:
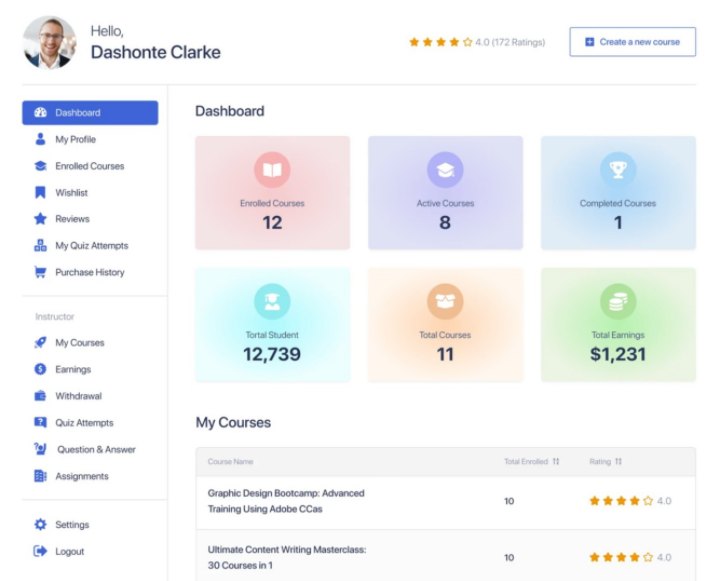
As a course owner, you’ll also get frontend and backend dashboards where you can manage your courses, students, earnings, and more. You’ll also be able to interact with students via announcements and Q&As.
This is just a quick tour to give you an idea of what you’re building – you’ll see lots more as you go through the full tutorial!
How To Create an Online Course With Elementor
Are you ready to build your online course?
Here’s a high-level look at the steps you’ll need to follow to launch your course:
- Set up your basic WordPress site and install the required plugins.
- Add your course content using Tutor LMS,
- Design your course pages using Elementor.
- Set up payments via WooCommerce if you want to charge for access.
- Configure other miscellaneous settings as needed, like whether or not you want to allow third-party instructors.
Let’s dig in!
1. Create Website and Install Required Plugins
Before you can get started building your online course, you’ll need to set up your basic WordPress site and install the plugins that you’ll need.
Set Up WordPress
If you haven’t set up WordPress yet, your first step is to choose WordPress hosting and install the WordPress software.
To help you pick the right host for your online course, you can browse Elementor’s recommended hosts and choose one from the list – here are some tips for choosing WordPress hosting.
Once you’ve purchased hosting, use your host’s WordPress installer tool to create a new WordPress site for your online course.
If you need some help with anything here, check out the full Elementor guide on creating a WordPress website.
Install Plugins
Once you have your basic WordPress website, the next step is to install and configure the necessary plugins.
Here are the required and optional plugins you need to create a course:
- Elementor – required – the free core Elementor plugin lets you design your course content and other pages using a visual, drag-and-drop editor.
- Elementor Pro – optional – you’ll need to install Elementor Pro if you want to use Elementor Theme Builder to design your site. You only need the free version of Elementor to design your Tutor LMS courses, though.
- Tutor LMS – required – the free Tutor LMS plugin provides the engine to power all of your course content, lessons, quizzes, student/instructor management, etc. Basically, all of the course functionality. It will launch a setup wizard as soon as you activate it – make sure to follow the steps to configure some important basics for your course.
- Tutor LMS Pro – optional – you don’t need the premium version to follow this tutorial. But it does add a lot of features to take your courses to the next level, so you might want to consider it.
- Tutor LMS Elementor Addons – required – this free plugin gives you 25+ Elementor widgets that let you design your online course using Elementor.
- WooCommerce – required if you want to accept payments – you’ll need WooCommerce if you want to monetize your courses and accept one-time or recurring payments. If you need some help setting it up, check out the “How to Set up WooCommerce” section in the full WooCommerce tutorial (don’t worry about creating a product page template with Elementor WooCommerce Builder, though – you don’t need that for an online course).
Choose a Theme
Finally, you’ll also want to set up the base design for your course. We’ll show you how to design your course pages using Elementor later in the tutorial, but you’ll want to set up the base design for your homepage and other key pages.
You have a couple of options here.
First, you can use the free Hello theme and then import Elementor’s online course template kit. This is a full template set that will help you set up all the core pages for your course and let you use Elementor Theme Builder to customize your site’s design.
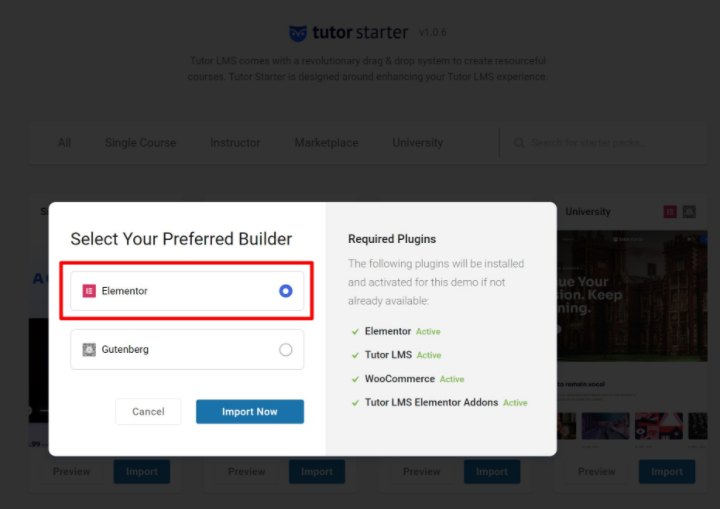
Or, you could use a dedicated Tutor LMS theme like TutorStarter, which offers pre-built demo sites that are built with Elementor. You can import one of the demo sites and then customize everything using Elementor’s interface.
For this tutorial, we’ll use one of TutorStarter’s Elementor-powered demo sites – you can choose whichever approach you prefer, though.
Here’s what it looks like to import one of TutorStarter’s Elementor designs:
2. Set Up Course Content
Now, you’re ready to set up your course content and lessons. Then, in the next section, you’ll learn how to control the designs for your course content using Elementor.
Create a Course
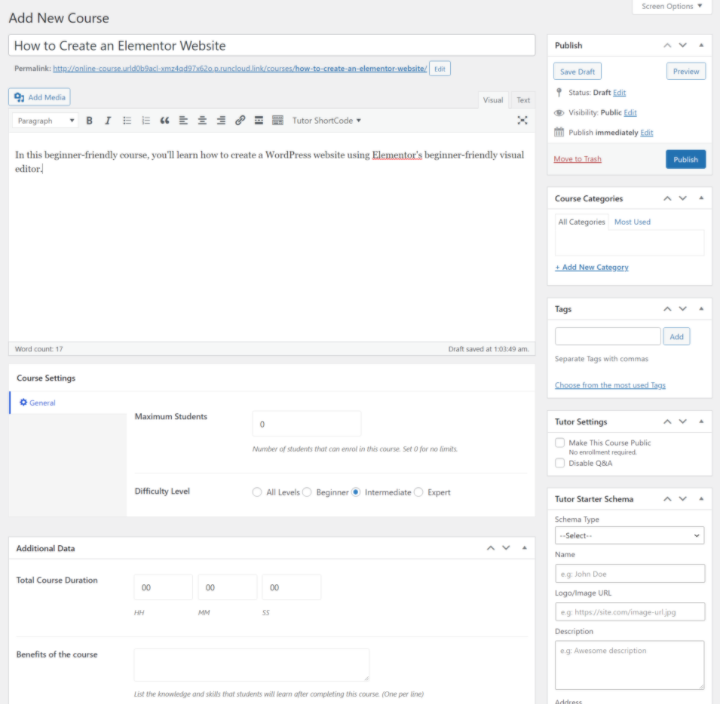
To create your first course, head to Tutor LMS → Courses → Add New.
First, fill out all the basic details for your course, such as the title, description, categories/tags, the options in the Course Settings box, and the options in the Additional Data box. You can also set a dedicated course introduction video:
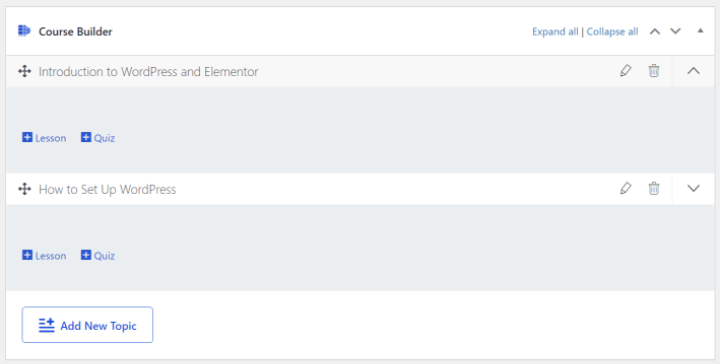
Once you’ve done that, you can set up the structure for your course using the drag-and-drop Course Builder box.
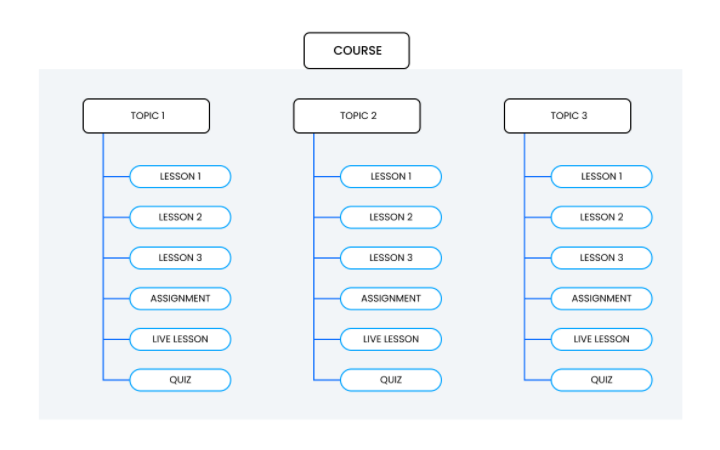
You can divide your course into different “topics”. Inside each topic, you can add lessons, assignments, live lessons, and quizzes. Here’s a diagram that shows how it works:
To get started, add a new topic in the Course Builder box. Inside each topic, you’ll see a prompt to add a lesson or quiz (more on those next). With Tutor LMS Pro, you’ll also see options for assignments and Zoom live lessons.
If you need to change the order of anything, you can use drag-and-drop:
Add Lesson Content
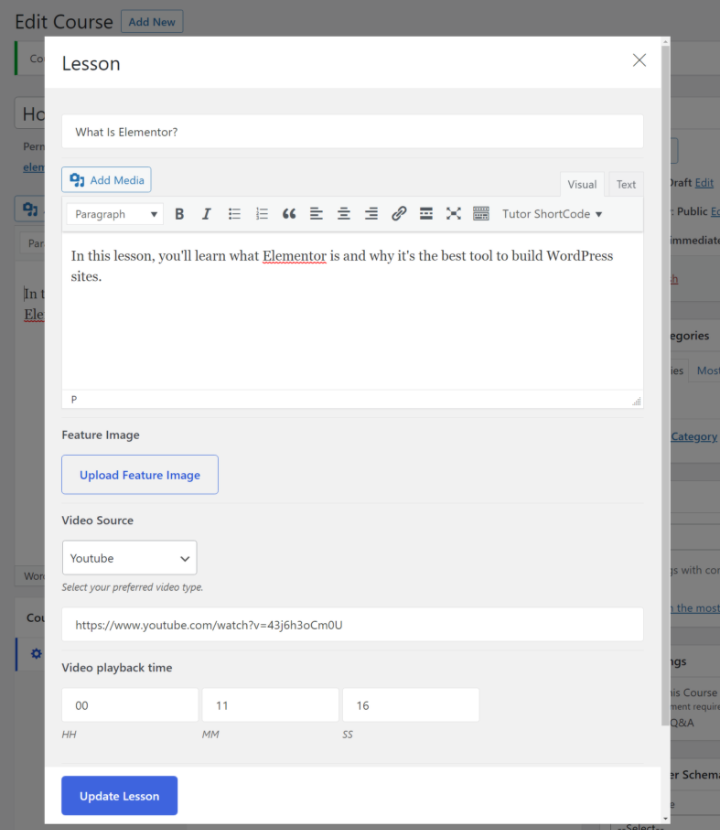
To add a lesson and control its content, click the Lesson link in the course builder. This will open a popup where you can:
- Add the name of the lesson.
- Include text content for the lesson in the editor.
- Set the video for the lesson. Typically, you’ll want to embed videos from YouTube or Vimeo. Tutor LMS includes the option to use its own video player, which will prevent visitors from sharing your course videos if you don’t want them to.
- Upload attachments if needed.
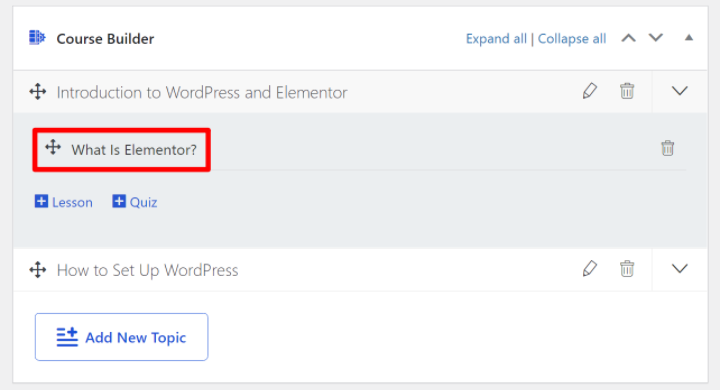
You’ll then see your lesson appear under the topic in the course builder.
Repeat the process to add all of the lessons that you want to include in your course. Again, if you need to change the order of any lessons or move them to a different topic, you can use drag-and-drop.
Add Quizzes (Optional)
If you want to add quizzes to your course, it works just like adding a lesson. To begin, you’ll click the Quiz link in the topic where you want to add the quiz. This will open a popup where you can configure your quiz and add questions.
You can add unlimited questions and choose from different types of questions. You’ll also get other settings, like assigning a point value to a question for grading:
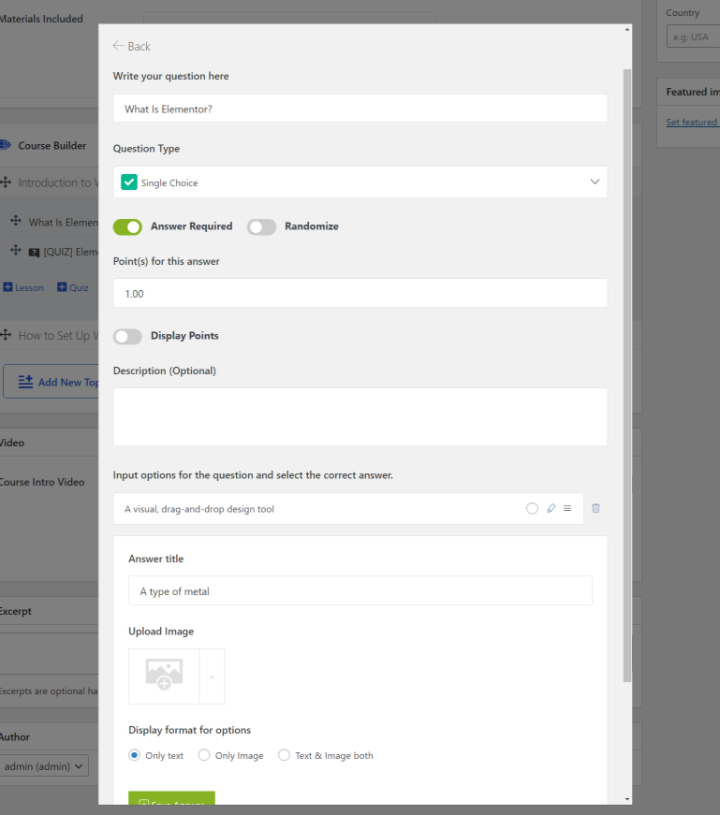
To access more types of quiz questions, you might want to upgrade to the premium version of Tutor LMS. It includes new question types for short answer, matching, image matching, image answers, and more.
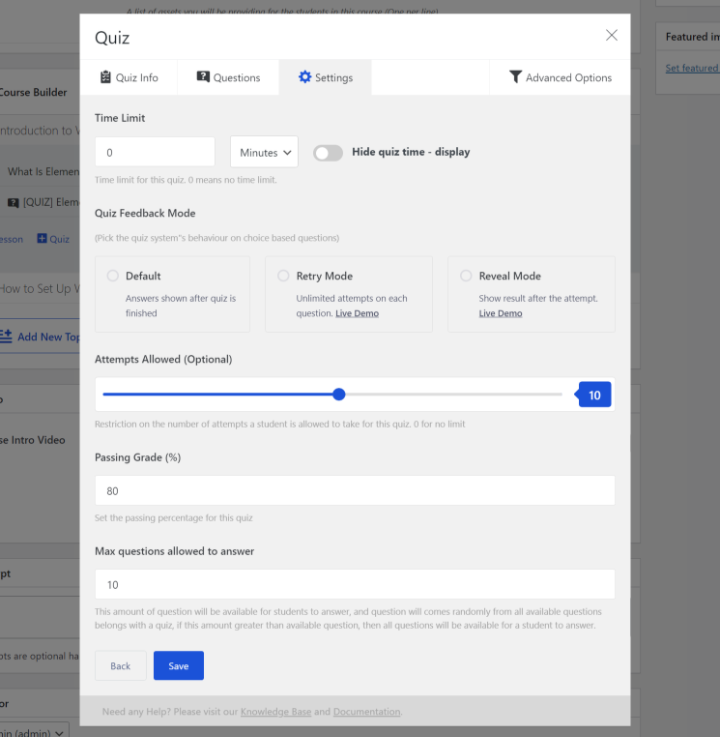
In the quiz settings, you’ll also be able to configure details like:
- Time limits.
- Feedback modes.
- Whether retries are allowed. If so, how many.
- Passing grades.
- Etc.
Once you finish, you should see your quiz appear in the Course Builder. You can repeat the process to add more quizzes and use drag-and-drop to change their placement in the course if needed.
Preview Your Course and Publish
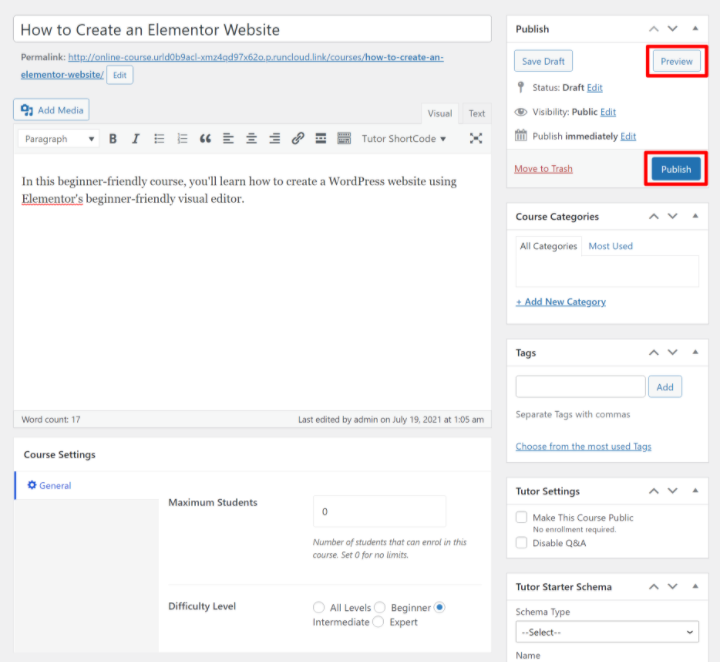
Once you’re happy with your course’s structure in the CourseBuilder, you’re ready to preview and publish your course.
To preview it, just click the Preview option in the top-right corner like you would use to preview any other type of WordPress content. Don’t worry too much about the design – you’re going to learn how to control that next. You just want to make sure that the general structure of your course looks correct and you’ve added all the necessary details.
Once you’re happy with everything, you can click the Publish button to publish your course:
3. Design Your Course With Elementor
At this point, you’ve added all of your course content on the backend of your site. Now, you’re ready to display that content on the front end using Elementor.
In addition to letting you design other parts of your site, Tutor LMS’s Elementor integration gives you two ways to design the templates for your courses:
- You can create a global template that applies to all courses.
- You can override the global template for individual courses to create a custom design.
Let’s first go over how to design your course templates and then we’ll cover other areas, such as creating a page to showcase your course(s).
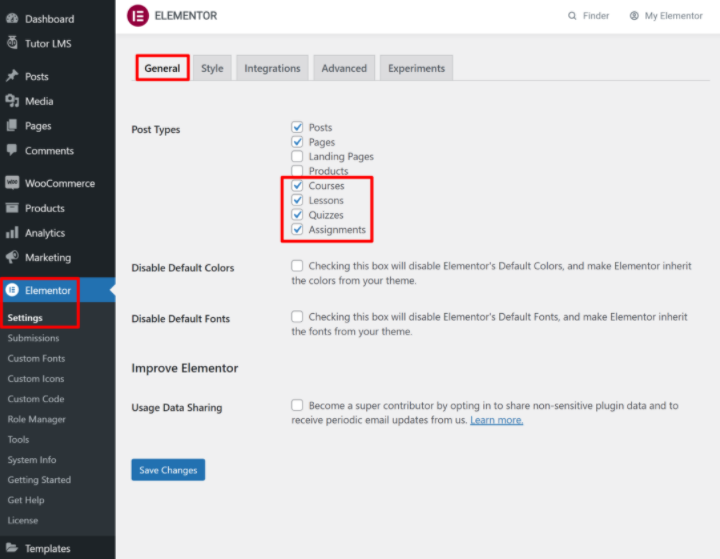
Enable Elementor for Tutor LMS Content
To get started, you need to tell Elementor that you want to use it for Tutor LMS content. To set this up, go to Elementor → Settings. In the General tab, check the following boxes in the Post Types list:
- Courses
- Lessons
- Quizzes
- Assignments
Create a Global Template for Your Courses
Next, you can use Elementor to create the global template that all of your courses will use by default.
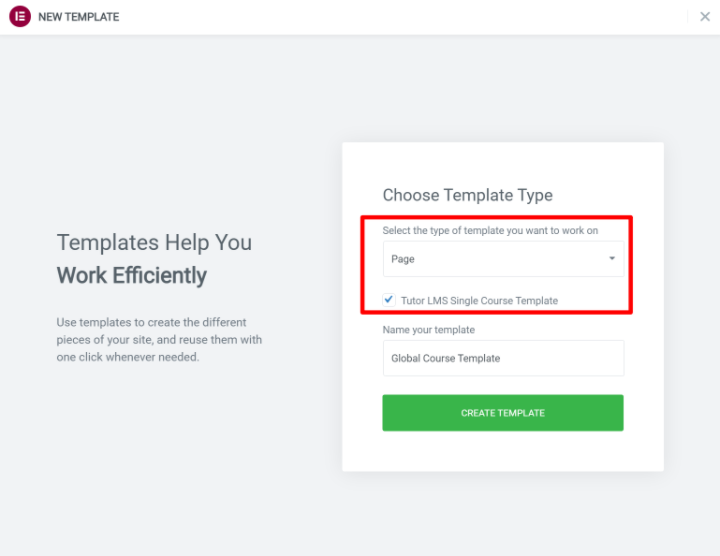
To get started, go to the Templates area in your dashboard and click Add New. In the popup, select Page from the drop-down and then check the box for Tutor LMS Single Course Template. You can then give it a name to help you remember it:
Now, you’ll be in the Elementor interface. To add course content, you can use the dedicated Tutor LMS widgets.
As you add them, Tutor LMS will automatically populate them with content from your actual course, just as if you were using Elementor Theme Builder:
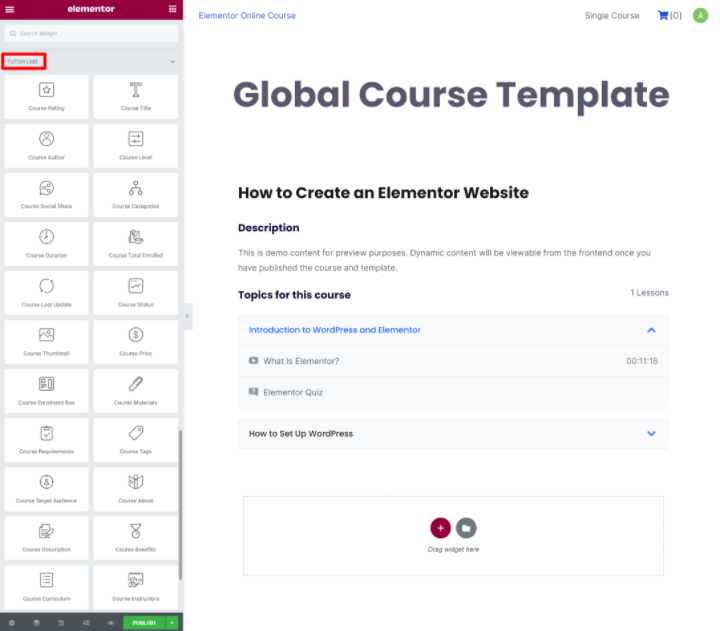
You’ll want to use most of the widgets, though you can leave out certain widgets if you don’t want to display that information. One widget you don’t want to leave off is the Course Enrollment Box, as this is what visitors will use to enroll in the course.
You can also use all of the other Elementor widgets, too, so feel free to get creative with your design.
Once you’re happy with how it looks, click Publish to make your global template live.
Create a Custom Design for a Course (Optional)
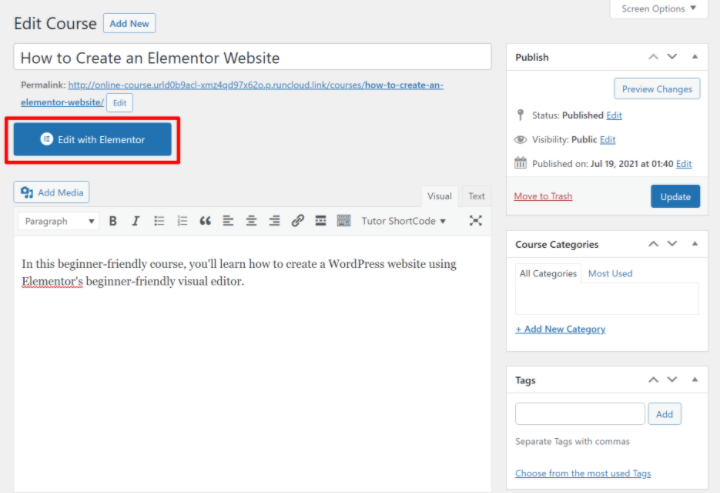
If needed, you can also use Elementor to override the global course template for an individual course.
To do this, open the editor for the course (Tutor LMS → Courses). Then, click the Edit with Elementor button to open the Elementor interface for just that course:
Create Your Course Archive Page (Course Listing)
If you have multiple courses, your course archive page is the page that lists all of your courses so that visitors can discover everything that you offer.
If you have a lot of courses, you might want to create a dedicated course archive page. Or, you might just want to include a list of courses on another page (like your homepage). Or, you might want to do both!
To help you display some or all of your courses, Tutor LMS comes with two dedicated Elementor widgets, each of which includes a lot of sub-options:
- Course List
- Course Carousel
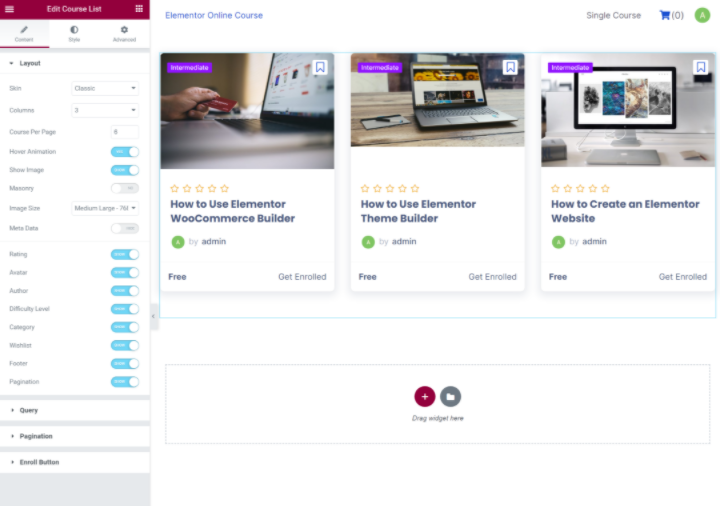
With the Course List widget, you can display a single or multi-column list of all your courses with four different “skins”:
- Classic
- Card
- Stacked
- Overlayed
In the widget’s settings, you’ll also get lots of other options to control metadata, enroll buttons, pagination, and more. If you have a lot of courses, you can also use the query rules to filter out specific courses by their category or instructor.
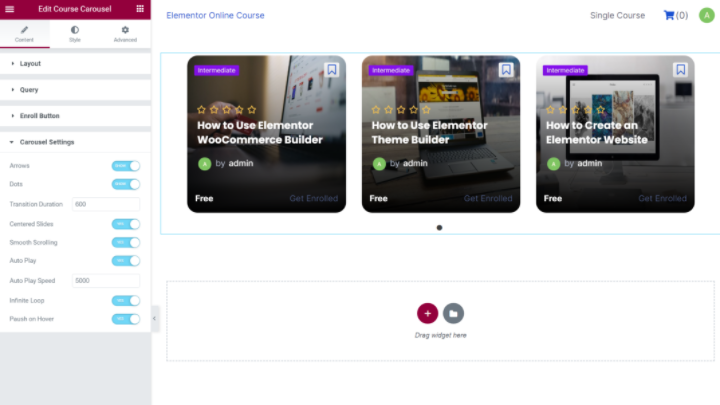
The Course Carousel widget has the same basic options and skins, but it displays your courses in a carousel view instead of a list.
You’ll get additional options to control navigation, autoplay, infinite looping, etc. Below, you can also see that we’ve switched to the “Overlayed” skin:
In addition to using these Elementor widgets to list your courses, you can also designate an actual course archive page if you go to Tutor LMS → Settings → Course.
4. Charge for Access to Courses (Optional)
If you only want to offer free courses, you don’t need to set up anything in this section. But if you do want to charge for access to your courses, you’ll want to set that up now.
Tutor LMS offers multiple options for accepting payments including WooCommerce, Easy Digital Downloads (EDD), and Paid Memberships Pro (a popular WordPress membership plugin). For this section, though, we’ll focus on the WooCommerce integration.
You can accept one-time payments with the core WooCommerce plugin. If you want to accept automatic recurring payments, you’ll need to purchase the popular WooCommerce Subscriptions plugin.
To charge for access to your course, you’ll create a regular WooCommerce product and link it to one of your courses. Then, the details for that product will show up on your course listing page and students can check out using the regular WooCommerce checkout (and whatever payment gateways you’ve configured).
Again, if you need help with any of the basics of setting up WooCommerce (like configuring payment gateways), check out the full Elementor WooCommerce tutorial.
Once you’ve set up the basics in WooCommerce, here’s how to set it up with Tutor LMS.
Enable Monetization
First, you’ll need to enable monetization in the Tutor LMS settings. Go to Tutor LMS → Settings → Monetization and set the Monetize Option equal to WooCommerce:

Create a WooCommerce Product
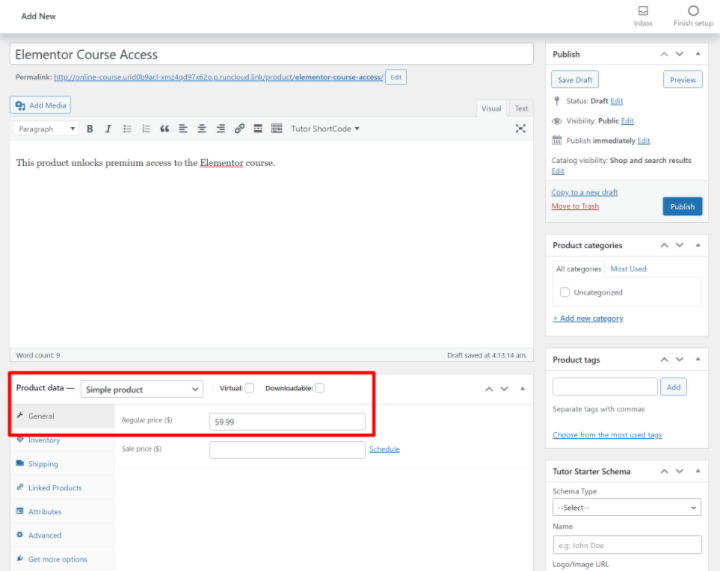
Now, go to Products → Add New to create the product that you’ll link with your course.
You don’t need to fill out all of the product information like you would for a real WooCommerce store. Instead, just focus on:
- Title
- Description
- Product image (this will appear on the checkout page, but it won’t be visible on your course page)
- Price (or, if you have WooCommerce Subscriptions, the subscription details)
Link the Product to Your Course
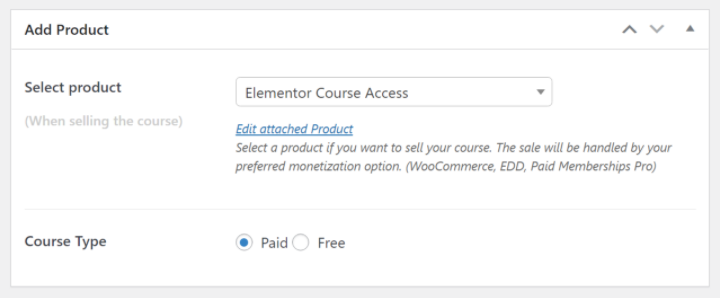
Once you’ve created the product, open the editor for the course that you want to link to this product. Scroll down to the Add Product box at the bottom of the course editor.
Set the Course Type to Paid and then use the drop-down to select the WooCommerce product that you created in the previous section:
And that’s it! To display the price of your course in your course template, you can use the Course Price widget in Elementor. For paid courses, the Course Enrollment Box widget will automatically change to “Add to Cart” to prompt users to purchase the course and enroll.
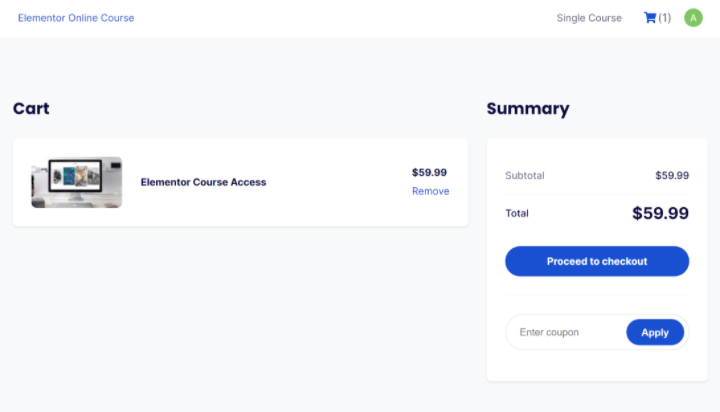
When students check out, they’ll see the normal WooCommerce checkout process. Once they make their purchase, they’ll be automatically enrolled in the course – you also have an option to automatically redirect them to the course page:
5. Configure Additional Settings As Needed
At this point, we’ve covered all the core features that you need to get a course up and running. To finish things out, you’ll want to explore the Tutor LMS settings and make a few other tweaks if needed. This is where you can dig in and customize your course to meet your needs.
But before jumping into the Tutor LMS settings, there’s one regular WordPress setting to complete.
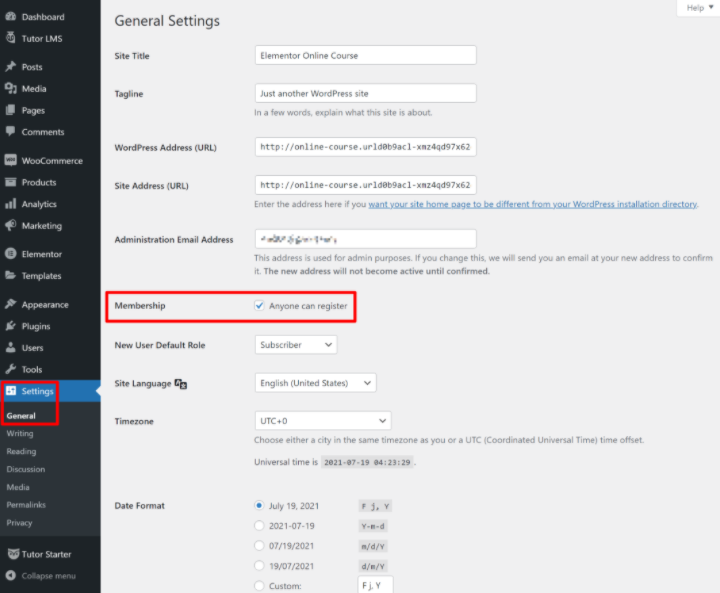
Enable Registration in WordPress Settings
In order to let students register for your courses, you’ll need to make sure that you’ve enabled registration in the WordPress settings area. You can do this by going to Settings → General and checking the Membership box so that Anyone can register:
In addition to the enrollment button on individual courses, Tutor LMS also lets you create a registration page where students can create an account. You can specify this page by going to Tutor LMS → Settings → Students.
To make it easy for students to log in, you can also use the Login widget in Elementor Pro to add a login form anywhere on your site. The Login widget also lets you redirect users to a custom page after they log in, so you could automatically redirect them to their account dashboard.
Configure General Course Settings
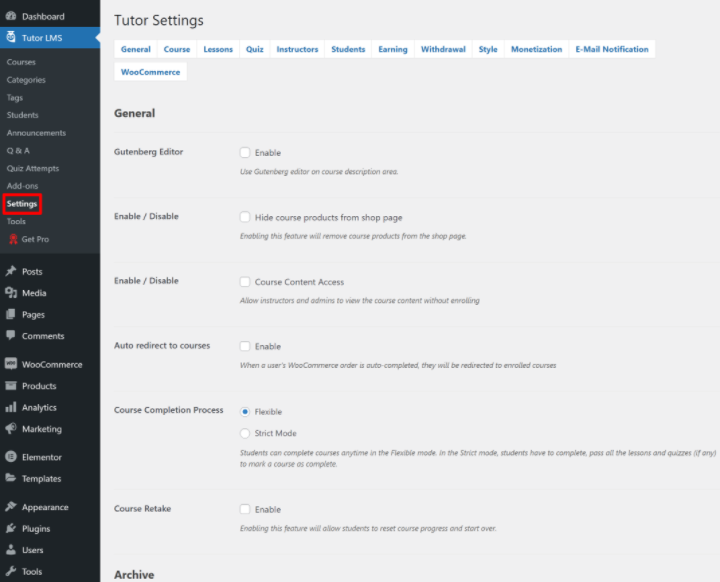
Now, let’s explore some of the other settings in the Tutor LMS settings area.
In the General, Course, Lessons, and Quiz tabs, you can configure important basics for those areas.
For example, maybe you want to use the native YouTube video player instead of Tutor LMS’s custom video player. You can set this up from the General tab. Or, you can automatically redirect users to their course after they complete a WooCommerce purchase in the Course tab.
We encourage you to explore all of these settings as you might find some options that are useful for your courses:
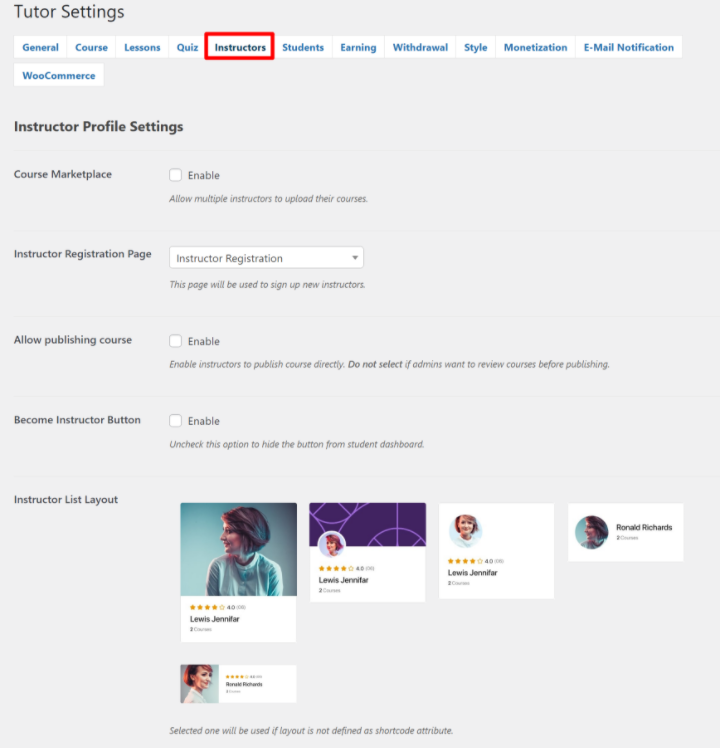
Allow Multiple Instructors
So far, we’ve focused mainly on the idea of creating a course with a single instructor (e.g. you or your client). But Tutor LMS also lets you allow multiple instructors, including an option to share commissions. This would let you hire multiple instructors under your own brand or create your own Udemy clone where you allow third-party instructors to register and create their own courses.
If you want to allow multiple instructors, you can set that up from the Instructors tab in the Tutor LMS settings. You can also specify an instructor registration page and choose whether or not to let instructors publish their own courses directly:
If you want to offer instructors a commission on the course revenue that they generate, you can set that up from the Earning tab. You can also specify a minimum withdrawal amount and choose withdrawal methods from the Withdrawal tab.
And that’s it! You now have a working online course powered by Elementor and Tutor LMS.
How To Manage Your Online Course (Payments, Onboarding, etc.)
Now that you’ve set up your online course and created a great-looking design with Elementor, let’s move into how you can manage key parts of your course on a day-to-day basis. This covers actions like:
- Managing and onboarding new students.
- Viewing/managing payments and earnings.
- Managing instructors (if you decided to allow multiple instructors).
Managing and Onboarding New Students
At this point, your students will be able to register for accounts and enroll in free or paid courses all by themselves.
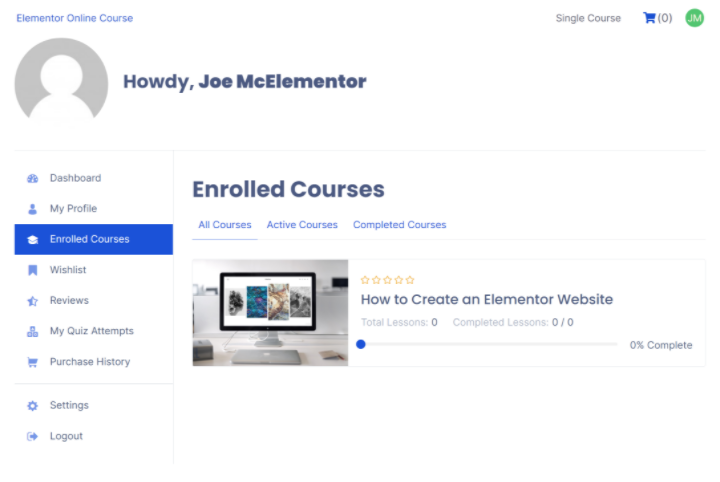
They’ll also get their own frontend dashboard where they can view their enrolled courses, leave reviews, and access other key details:
As the course owner, you’ll also get tools to manage and interact with your students. You can do this from either the backend WordPress dashboard or the frontend dashboard for your account (which is especially useful if you allow third-party instructors).
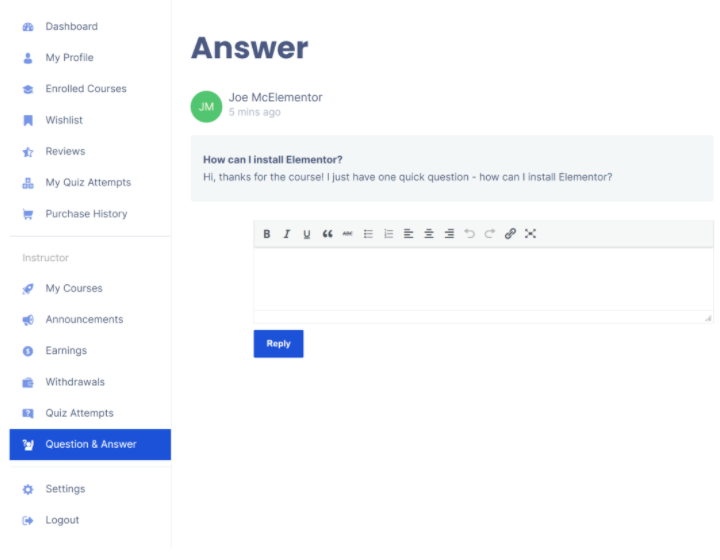
One key interaction area is Questions and Answers. Your students have the option to leave questions on each course/lesson and you can then respond to these questions from your dashboard (backend or frontend).
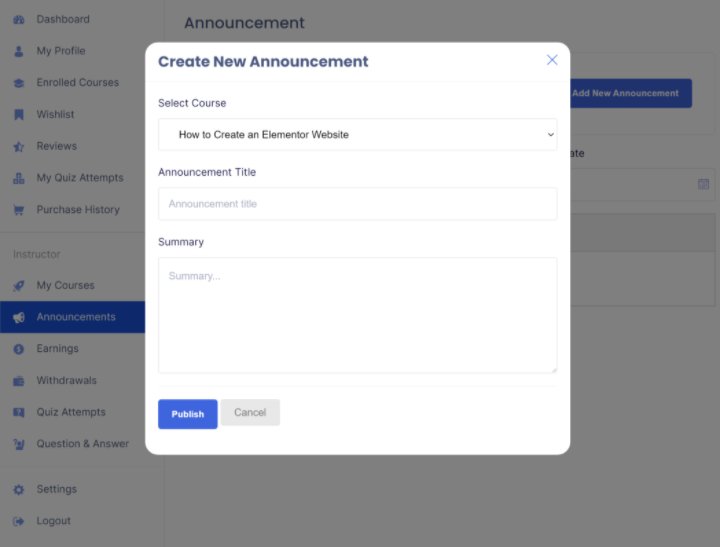
You can also create announcements, which lets you send a message to all of the students in a course. Again, you can do this from the backend or frontend according to your preferences:
You’ll also get other dashboard areas to view a list of your students, see quiz attempts, and perform other key admin actions.
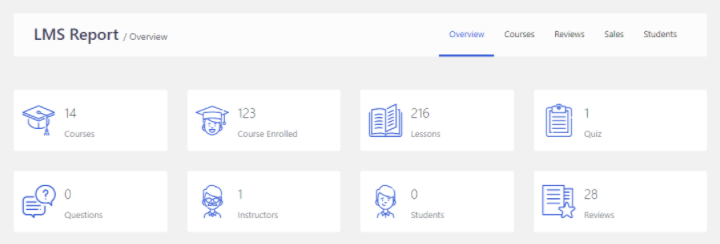
With Tutor LMS Pro and the Tutor Report add-on, you’ll also get a dedicated dashboard with a birds-eye view of your courses and options to track enrollments and stats over time, which is useful for spotting trends in your courses:
View and Manage Payments
If you’re selling paid courses, you might have situations where you need to view and manage your payments, and maybe even offer refunds if needed.
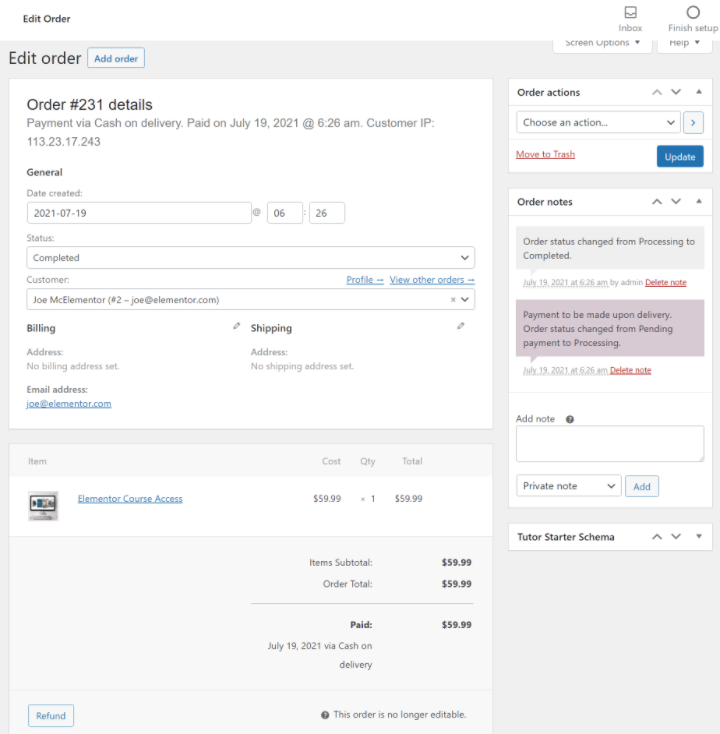
Because you’re using WooCommerce to manage the payments for Tutor LMS, you can view all of those details from the WooCommerce settings – either WooCommerce → Orders to see specific orders or WooCommerce → Reports to see overall reports.
If you’re using WooCommerce Subscriptions for recurring payments, you’ll also be able to track and manage subscriptions.
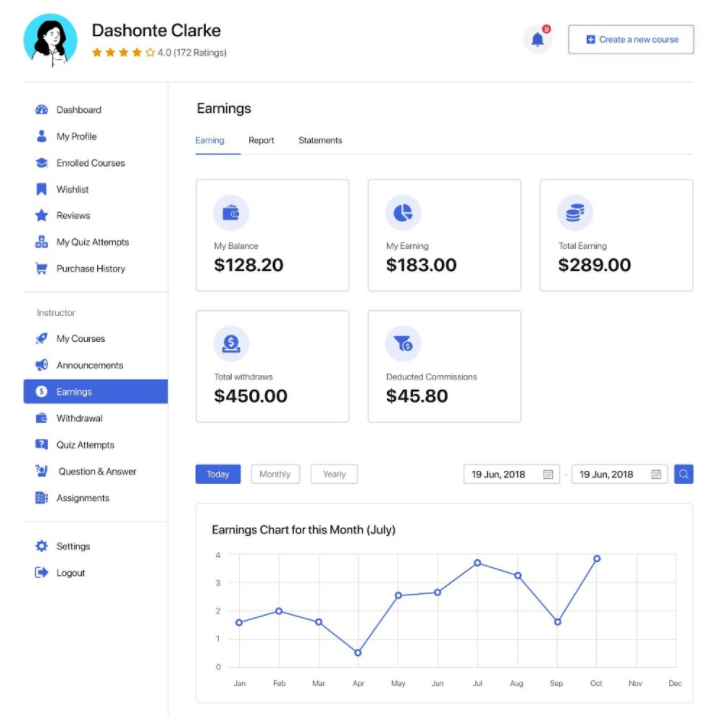
You or your instructors can also track earnings from the frontend dashboard. If you allow third-party instructors and pay commissions, they’ll also be able to see their earning and withdrawal history:
Managing Instructors
If you allow other instructors to create courses, you can manage all of your instructors by going to Tutor LMS → Instructors in your WordPress dashboard. You can manually add new instructors, edit existing instructors, and block instructors if needed.
Create Your Own Online Course With Elementor and Tutor LMS
Creating online courses is a great way to build an audience and monetize your knowledge. You could share your knowledge about web design or any other topic where you have experience.
By combining Tutor LMS and Elementor, you can build unique and customized courses without needing any special technical knowledge.
Tutor LMS can handle all of the important course functionality. Then, with Tutor LMS’s 25+ Elementor widgets, you can use Elementor’s visual, drag-and-drop interface to design your course content and templates.
Start creating your first course today and you’ll be up and running in no time.
Still have any questions about how to build an online course with Elementor and Tutor LMS? Let us know in the comments and we’ll try to help!
Looking for fresh content?
By entering your email, you agree to receive Elementor emails, including marketing emails,
and agree to our Terms & Conditions and Privacy Policy.


