Table of Contents
Want to accept payments on WordPress? If so, you’re going to need two tools:
- A payment processor like Stripe or PayPal to handle the payments for you.
- A plugin to help you integrate those payment processors into your WordPress site.
In this post, we’ll help you get up and running with both. First, we’ll dig into some of the best payment gateways for WordPress that you can use to accept payments. Then, we’ll show you how to accept payments on WordPress via your preferred payment gateway, using a few different approaches (no code required).
Let’s dig in so that you can get paid!
Grow Your Sales
- Incredibly Fast Store
- Sales Optimization
- Enterprise-Grade Security
- 24/7 Expert Service

- Incredibly Fast Store
- Sales Optimization
- Enterprise-Grade Security
- 24/7 Expert Service
- Prompt your Code & Add Custom Code, HTML, or CSS with ease
- Generate or edit with AI for Tailored Images
- Use Copilot for predictive stylized container layouts

- Prompt your Code & Add Custom Code, HTML, or CSS with ease
- Generate or edit with AI for Tailored Images
- Use Copilot for predictive stylized container layouts
- Craft or Translate Content at Lightning Speed
Top-Performing Website
- Super-Fast Websites
- Enterprise-Grade Security
- Any Site, Every Business
- 24/7 Expert Service

Top-Performing Website
- Super-Fast Websites
- Enterprise-Grade Security
- Any Site, Every Business
- 24/7 Expert Service
- Drag & Drop Website Builder, No Code Required
- Over 100 Widgets, for Every Purpose
- Professional Design Features for Pixel Perfect Design

- Drag & Drop Website Builder, No Code Required
- Over 100 Widgets, for Every Purpose
- Professional Design Features for Pixel Perfect Design
- Marketing & eCommerce Features to Increase Conversion
- Ensure Reliable Email Delivery for Your Website
- Simple Setup, No SMTP Configuration Needed
- Centralized Email Insights for Better Tracking

- Ensure Reliable Email Delivery for Your Website
- Simple Setup, No SMTP Configuration Needed
- Centralized Email Insights for Better Tracking

- Ensure Reliable Email Delivery for Your Website
- Simple Setup, No SMTP Configuration Needed
- Centralized Email Insights for Better Tracking
Part One: Pick Your Payment Gateway/Processor
To get started, you’ll want to choose the payment processor that you’ll use to accept payments on WordPress, as this will affect how you go about the next step in the process.
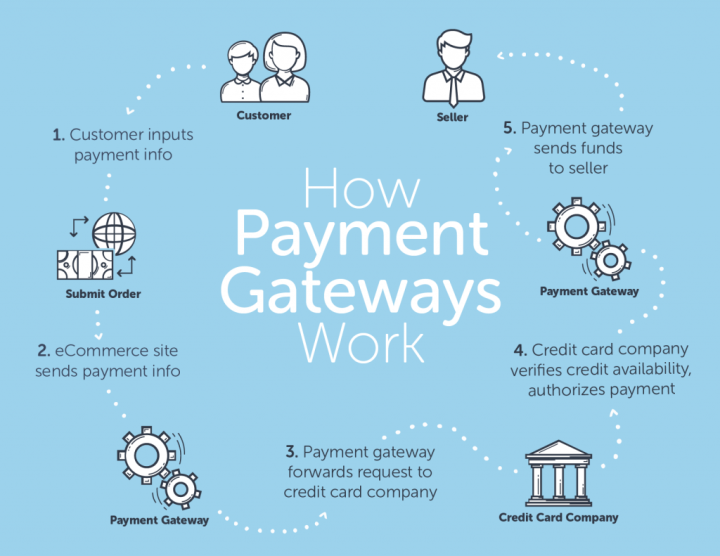
Your payment processor/gateway is what allows you to actually process payments. For example, if someone wants to pay with their credit card, they’ll pay through the payment gateway. Then, the payment gateway will transfer the money to you…after taking a small cut.
Why do you need a payment gateway as the middleman? Because there’s actually a ton of stuff going on behind the scenes – far too much for you to handle by yourself.
When someone submits their payment information, your payment gateway will take that information and further pass it along to the bank that issued the card and the card network (VISA, Mastercard, etc.) to check the validity (e.g. whether or not someone actually has the money or the credit necessary to make the purchase). If everything looks good, the issuing bank confirms to the card network, who further confirms to the payment processor, and the money is debited from that person’s account…where it eventually makes its way to you.
So while it seems simple on the surface, there’s actually a lot going on behind the scenes to make sure that all that money is moving as it should be!
For some payment gateways, shoppers will need to manually enter their card details, while other payment gateways — like PayPal — let people log in to their existing account rather than entering their card information directly.
Typically, the “standard” fee for domestic payments in the USA is something like 2.9% + $0.30 per transaction, while international payments can be higher. Unfortunately, there’s no way to accept credit card payments without paying this fee – it’s the cost of doing business.
Additionally, some payment gateways will let shoppers use other methods of payment. For example, PayPal lets people pay with their existing PayPal balance or via their bank account, while other payment gateways enable contactless methods, like Apple Pay.
There are a bunch of reputable payment gateways out there, but two of the biggest names are:
- PayPal
- Stripe
When in doubt, I would recommend choosing one of these two, though I will list some other options as well.
1. Stripe
Stripe is a popular payment gateway that offers a simple way to accept payments via a variety of methods. In addition to standard credit and debit cards, you can also use other methods like:
- Apple Pay
- Google Pay
- AliPay
- Etc.
To accept credit card payments, Stripe charges a processing fee of 2.9% + $0.30 per charge, which is pretty much the industry standard. Additionally, unlike PayPal, users will enter their actual card details, rather than logging into their account like they can with PayPal.
Stripe can also help you set up and process recurring payments.
2. PayPal
You probably don’t need an introduction to PayPal, as it’s pretty ubiquitous at this point.
One of the big benefits of PayPal is that it lets you accept payments via people’s PayPal accounts, as well as credit and debit cards. This can be good for privacy-conscious folks who can just sign in to their PayPal account, rather than having to enter their credit card details.
In terms of basic fees, PayPal charges the same 2.9% + $0.30, so there’s no difference there, and PayPal can also help you process recurring payments.
3. Authorize.Net
Authorize.Net is another popular service that lets you accept credit card and contactless payments (like Apple Pay), either online or in person.
One downside of Authorize.Net is that, in addition to the standard 2.9% + $0.30 fee, Authorize.Net also charges a flat $25 per month fee.
4. Amazon Pay
As the name suggests, Amazon Pay is Amazon’s own payment gateway offering. Because it’s such a well-known name, your users will inherently trust this gateway.
Additionally, it lets shoppers use the payment methods that are already stored in their Amazon account, rather than forcing them to manually enter their details, which is great for privacy-conscious folks who might be wary of entering their details in an unknown site.
Amazon Pay has the same base processing fee – 2.9% + $0.30.
Part Two: Choose Your Method to Accept Payments on WordPress
Once you have your payment processor, it’s time to decide how you want to integrate it into your WordPress site. Here, I’ll give you three different options, depending on your needs:
- Dedicated payment button — this is the simplest option, but doesn’t give you a ton of flexibility.
- Form plugin — if you want to collect some additional information along with a person’s payment, this a good option. It also lets you get more advanced, with tax calculations, multiple products, etc.
- Ecommerce plugin — this will give you the most flexibility, but it might be overkill for simpler use cases.
1. Dedicated Payment Button
If you just want a super simple way to collect and process payments, you might be able to get by with a dedicated payment button plugin.
Here, I’ll give you two options for the two most popular payment gateways — Stripe and PayPal.
WP Simple Pay
As the name suggests, WP Simple Pay is a simple way to accept payments via Stripe. It comes in both a free and premium version, and it was recently acquired by the same developer behind Easy Digital Downloads, which gives it good longevity.
The free version at WordPress.org is great if you just want to add a button that connects to Stripe for one-time payments, while the premium version gets a little more flexible with options to:
- Add a complete payment form, rather than just a payment button.
- Set up subscription payments, rather than one-time payments.
- Offer coupon codes.
- Integrate Apple and Google Pay.
The plugin is pretty easy to use — you’ll first need to register for a free Stripe account. Then, WP Simple Pay lets you authenticate your site with Stripe with the click of a button, which is really convenient:
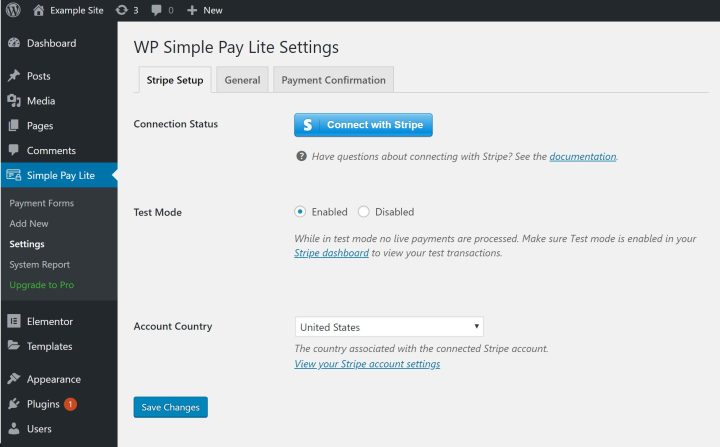
From there, you can create as many Payment Forms as you’d like, which is where you can enter the amount to collect, as well as configure other options:
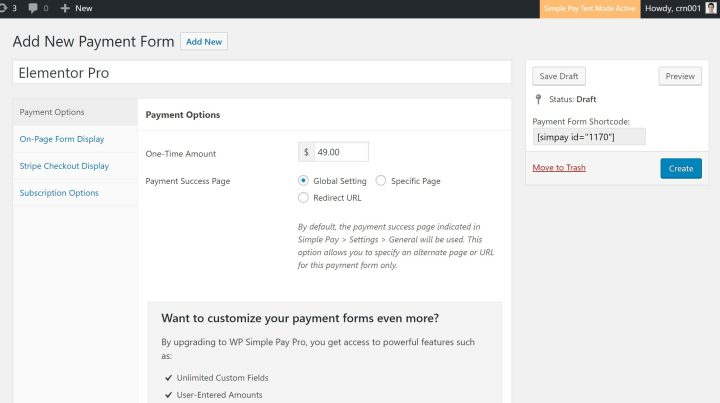
Then, you can use a shortcode to embed your payment form anywhere on your site, including inside your Elementor designs. Here’s an example of what the default payment form looks like — it’s super simple:
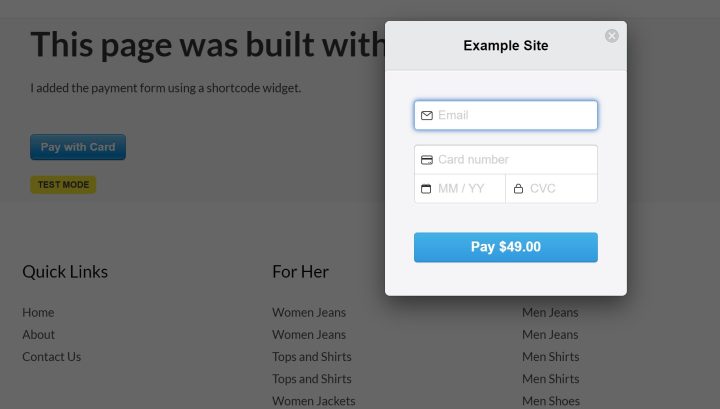
Again, the premium version of the plugin lets you collect additional information from people.
And that’s it! The plugin delivers on its promise — it’s a really simple way to accept payments on WordPress with Stripe.
PayPal Buy Now Button

Add PayPal to WordPress
If you’d prefer to accept PayPal payments rather than Stripe, the PayPal Buy Now Button plugin offers a similarly simple approach — just for PayPal. Like WP Simple Pay, it also comes in both a free and premium version.
The free version at WordPress.org lets you create a simple button for one-time payments, while the premium version adds support for features like:
- Discounts and coupon codes
- Taxes
- Multiple quantities
It’s super easy to use — once you install and activate the plugin, you can add your PayPal email or merchant ID in the plugin’s settings, as well as choose which type of button to use and where people should be taken after they make a payment:
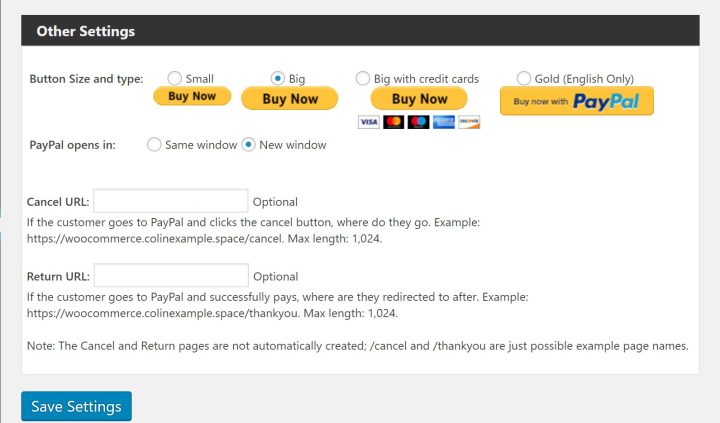
Then, you can add a PayPal payment button anywhere on your site using this shortcode format:
[wpecpp name=”NAME OF PRODUCT” price=”AMOUNT” align=”LEFT”]
The plugin also includes a button in the WordPress Classic editor, however, the button doesn’t appear in the new WordPress block editor at the moment, though the developer is working on a fix.
Here’s an example of what the button looks like:

And when someone clicks on it, they’ll be taken to PayPal to complete their purchase. The product name and price will be automatically filled in.
So again, for basic payments or donations, this is a super simple way to get started.
2. Your Preferred Form Plugin
The Elementor Pro Form widget can perform a ton of different actions with its Zapier integration, but accepting payments directly is not one of those actions at this time.
However, most premium WordPress form plugins do offer a payment integration, which lets you collect payments as part of a form.
The advantages of this approach over the previous solutions are that:
- You’ll have more flexibility — for example, you can include multiple products in a form, perform different price calculations, and more.
- You can collect additional information from people because you have access to all the normal form fields.
- You get more integrations. For example, you could charge people for submitting a job listing to your job listing site.
Some good options here are:
But most premium form plugins offer this functionality, so you can use a different one if you prefer.
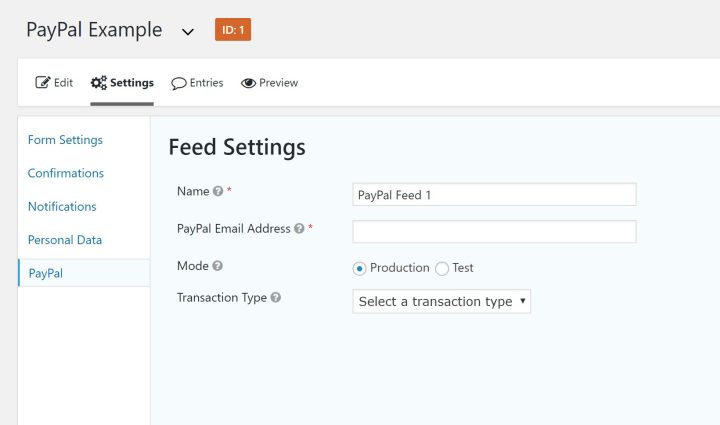
I’ll show you an example of how it works using Gravity Forms and its PayPal Standard add-on, but most form plugins use the same basic approach.
Essentially, you’ll build your forms just like you normally would. Only now, you’ll get new Pricing Fields where you can add fields for:
- Product
- Quantity
- Option
- Shipping
- Total
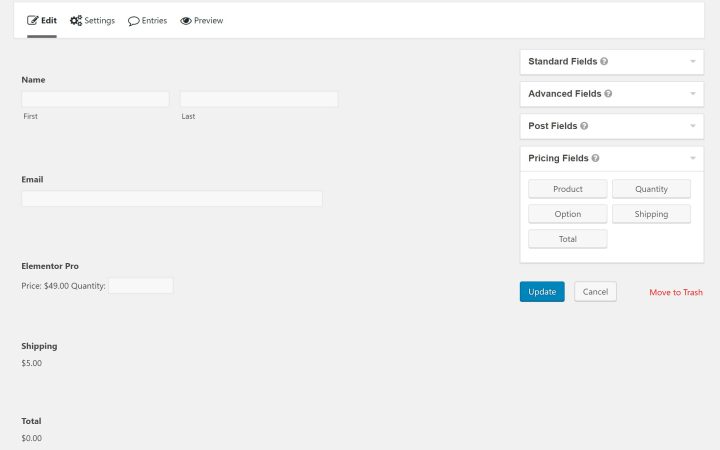
You can also configure additional settings in the form’s settings, like whether to make it a one-time or recurring payment and which PayPal email to use:
3. Ecommerce Plugin
Finally, the most heavy-duty option is to use a WordPress ecommerce plugin like WooCommerce, or other options like Easy Digital Downloads or Ninja Shop.
It’s not the most lightweight approach, but it will give you the most flexibility when it comes to how you structure your offerings and payment gateways.
Additionally, these plugins are not only for ecommerce — you can also use them to accept payments in other ways.
For example, WooCommerce Bookings lets you accept appointments/rentals, and WooCommerce Memberships lets you use WooCommerce as the basis for a membership site.
Beyond getting more options for managing products and a full on-site checkout process, another big benefit of choosing an eCommerce plugin is that you’ll get access to a huge array of payment gateways.
For example, there are 77+ payment gateways listed at the WooCommerce store, including lots of smaller local payment gateways. So being able to choose from this huge selection might be another reason to choose an eCommerce plugin.
This approach is a little more in-depth than the previous methods, so you should check out our full WooCommerce tutorial if you want to use WooCommerce to accept payments on WordPress.
Start Accepting Payments with WordPress Today
To recap, you’ll need two things to accept payments via WordPress:
- A payment gateway/processor.
- A plugin to integrate that payment processor into your WordPress site.
Two good payment processors to consider when you’re just getting started are Stripe or PayPal.
From there, you can choose a payment plugin depending on your needs. In order of simplicity (but not flexibility), three good options are a:
- Dedicated payment button plugin like WP Simple Pay (Stripe) or PayPal Buy Now Button (PayPal).
- Form plugin with built-in payments functionality, like Gravity Forms, WPForms, and others.
- Ecommerce plugin like WooCommerce.
Do you have any questions about how to accept payments on WordPress? Ask away in the comments and we’ll try to help!
Looking for fresh content?
By entering your email, you agree to receive Elementor emails, including marketing emails,
and agree to our Terms & Conditions and Privacy Policy.
