Table of Contents
WooCommerce is a free, open-source, plugin for WordPress that adds ecommerce functionality to your website. First launched in September 2011, the plugin is designed for small to large-sized online stores.
Originally a fork of Jigoshop, another e-commerce plugin, WooCommerce quickly became the flagship product of its maker WooThemes and reportedly generated eight-figure revenues. Due to its simplicity and ease of use, WooCommerce is one of the most popular solutions for creating an internet shop. In 2021, the plugin powers 21 percent of the top million eCommerce websites.
In this post, we will talk about how to build an e-commerce store site with WooCommerce. We’ll discuss how to install and set up the plugin, create WooCommerce products, build a shop and other important pages, as well as how to manage your WooCommerce store.
Table of Contents
- Why Use WooCommerce for Your WordPress Online Shop?
- How To Install WooCommerce
- How To Set up WooCommerce
- How to Add and Manage Products With WooCommerce
- How to Set Up a WooCommerce Shop Page
- Setting Up Important WooCommerce Pages
- Build an E-commerce Popup With Elementor
- WooCommerce Management Options and Settings
- The Best WordPress Themes for Using With WooCommerce
- Final Thoughts: Using WooCommerce and Elementor Together
Why Use WooCommerce for Your WordPress Online Shop?
No WooCommerce tutorial would be complete without first talking about the reasons why you should use the e-commerce plugin. So, let’s get started with that.
- Low cost – One of the best things about WooCommerce is that it is completely free. You can build a fully functional online shop without paying a dime. Sure, for certain functionality, you will need paid extensions (more on that below). However, with costs of $29-$249, these are peanuts compared to proprietary e-commerce solutions. Although there are costs associated with running a WooCommerce store, the platform itself is free to install
- Loads of features – With WooCommerce you can sell both physical and digital goods. The plugin can handle product variations like colors and sizes, digital downloads and even affiliate products. It also has highly configurable options for shipping and payment as well as a detailed reporting module.
- Developer friendly and secure – The e-commerce plugin integrates well with any WordPress theme and is highly customizable, scalable, and robust. WooCommerce also has its own API system and receives security audits on a regular basis.
- Extendable – Due to its popularity, there is a large ecosystem with tons of extensions. The plugin offers its own suite, including anything from memberships and recurring subscriptions to additional payment gateways and shipping providers. You can also find great WooCommerce plugins that extend its functionality.
You will see more of the benefits of WooCommerce as we move along. For now, let’s get started with getting the plugin on your site, shall we?

How To Install WooCommerce
WooCommerce is a WordPress plugin, which means you must first create a WordPress website before installing WooCommerce.
Step 1: Get a web hosting plan
The first thing you need to do when creating a WordPress website is to get a domain name and a web hosting service. There are several recommended hosting options for WordPress, find the one with the best plan that suits your needs, and follow the host’s instructions to get started.
Alternatively, Elementor Hosting offers managed hosting based on Google Cloud, with WordPress and Elementor pre-installed.
Step 2: Choose your domain name
Once you’ve completed the setup, you’ll need to choose a domain name. The domain name should contain your brand name and be reflective of your store. Try to keep it as simple as possible, and avoid using hyphens in your domain, as this makes it harder for users to remember your site. For an ecommerce site, we recommend using the ‘.com’ domain extension.
We recommend that you purchase your domain name together with your hosting plan as this allows for easier management.
If you’re absolutely stuck on a domain name and can’t think of anything, consider using a domain name generator such as Panabee.
Step 3: Install WordPress
If you have chosen Elementor Hosting, great news – you can skip this step! WordPress will already be pre-installed saving you precious time.
For those who haven’t chosen Elementor Hosting, once you’ve purchased your hosting plan and domain name, you’ll receive an email from your hosting provider with instructions on how to access your account.
After you have logged in to your hosting account, click on the My Accounts tab and then log in to your cPanel. In cPanel, click on the WordPress icon in the auto-installers area and follow the steps to install WordPress..
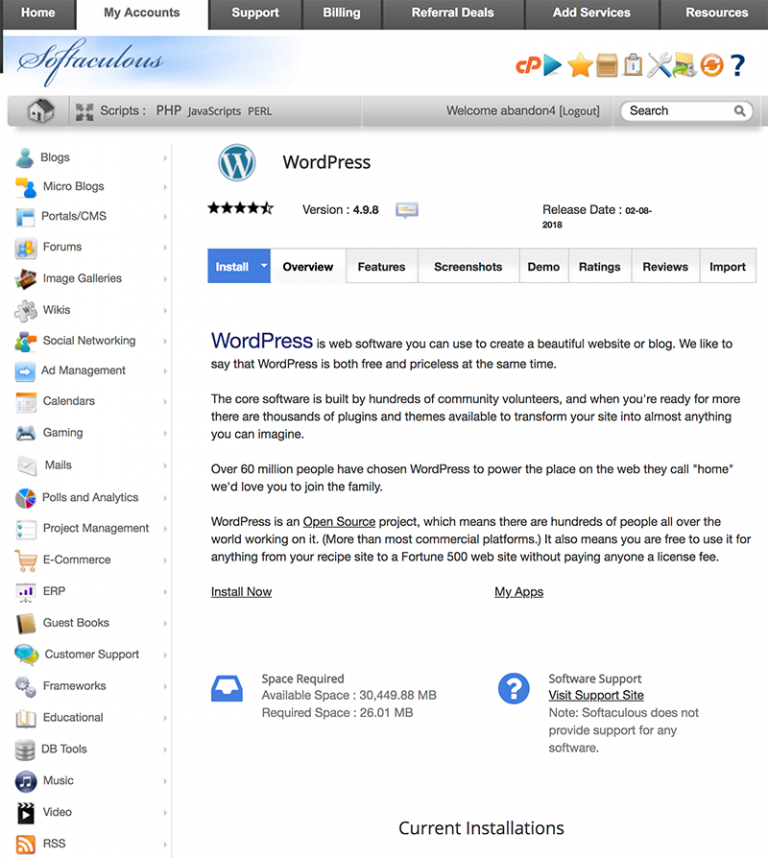
You’ll need to enter a username and password that you will use to log into your site along with some other information. Then, click the Finish installation button and wait for WordPress to be installed.
Note: There are two WordPress options available, .org and .com, to learn about the difference between these two options, see our in-depth guide – WordPress.com vs WordPress.org.
Once you’ve installed WordPress, you’ll need to set up your website. See our full guide on how to How to Create a WordPress Website for more information.
Step 4: Install WooCommerce
Once your WordPress website is set up, you can download and install WooCommerce like any other plugin. Just go to the WordPress repository, and download the plugin.
Or, you can find it from within the WordPress dashboard by going to Plugins > Add New, type in WooCommerce, and click Install.
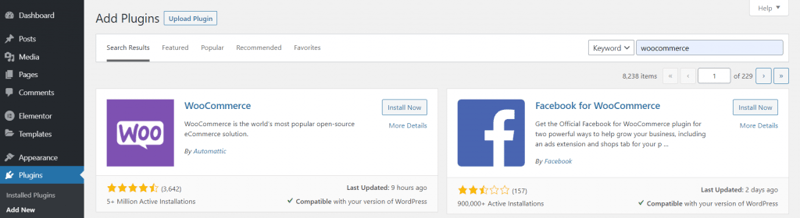
Once you have installed the plugin, click Activate Now to get started.
How To Set up WooCommerce
The first thing you will see after that is the WooCommerce installation wizard. Theoretically, you can skip it and make all the changes manually. However, it’s helpful to go through the process in order to configure basic WooCommerce settings and pages. So, that’s what we will do.
You can find more information in the official installation guide from WooCommerce.
1. Provide Basic Information
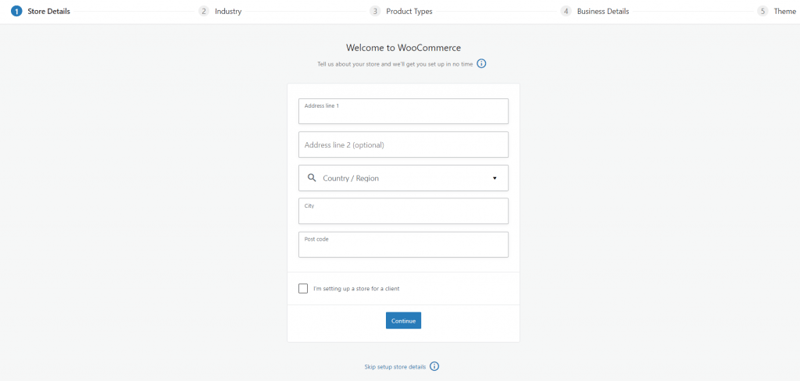
In the beginning, the setup asks you for the essential data about your shop.
This includes the country it is based in, its address, the currency you use, and the types of goods you are planning to sell (physical, digital, both, in-person). You can also determine whether you want to allow WooCommerce to track your usage in order to improve their product.
Make the appropriate input for your business and continue via the Let’s Go button at the bottom.
2. Set up Payment Gateways
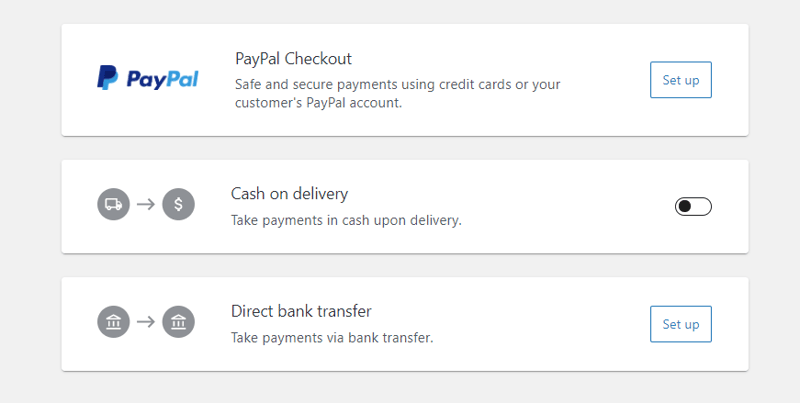
In the next step, you will configure payment options. Decide whether to use Stripe (credit card) and/or PayPal (plus, enter your credentials) as well as offline payment options like a check, bank transfer, or cash. If this is not what you need, you can extend the number of gateways via a plugin. Also, check the list of plugins at the bottom that will be installed depending on your choices.
3. Configure Shipping
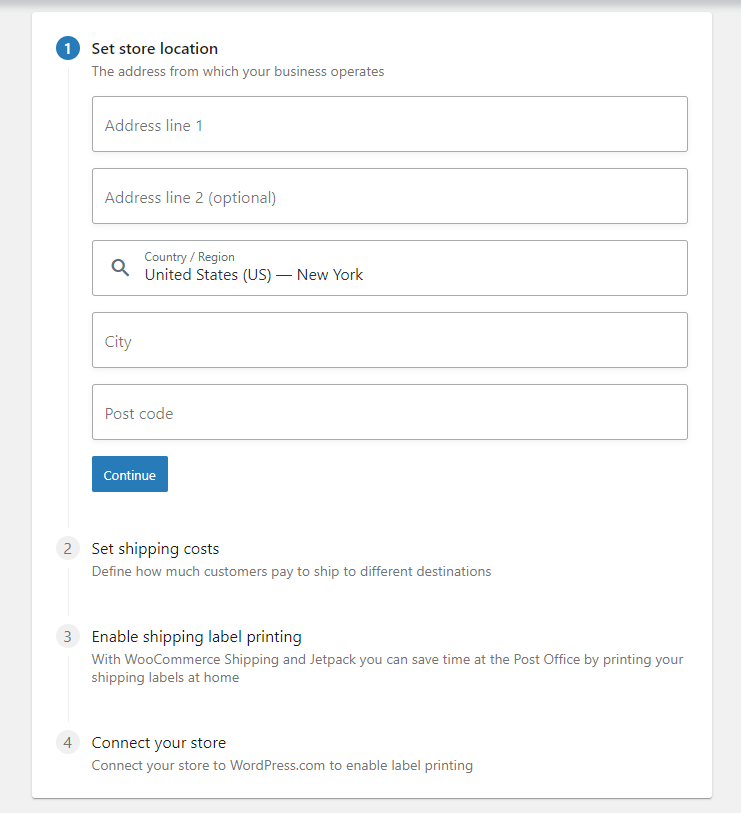
After that, it’s all about shipping. You already have some basic zones set up (that you can enable/disable) and to which you can apply rates. Again, more options are available via a plugin.
At the bottom, there is also a promotional offer for ShipStation, which you are free to use or not (if you do, WooCommerce will install an additional plugin). Below that, you need to determine which measurements to use for weight and dimensions. Again, take your pick and move on.
By the way, if you don’t know all of this information yet, don’t worry, you can also skip steps and change it all later.
4. Optional Extras
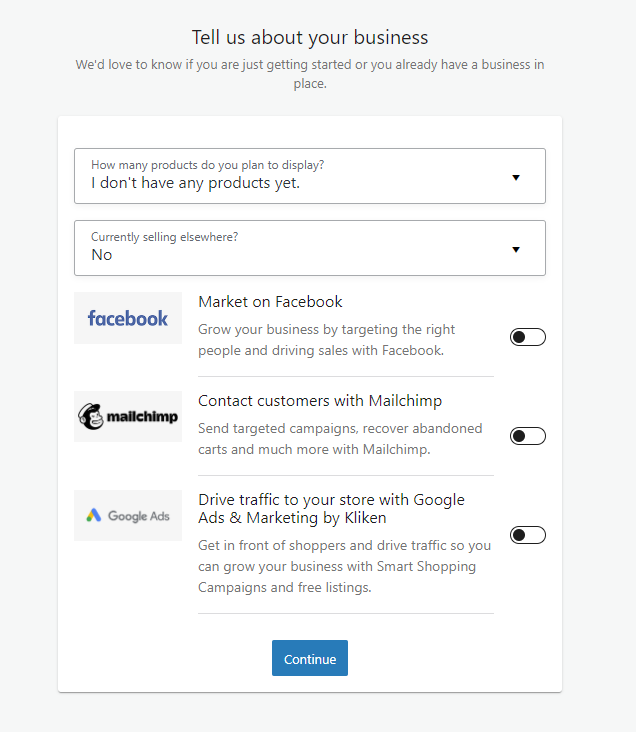
In this step, WooCommerce will ask you to install a number of extras. This includes the free Storefront theme (made for and by WooCommerce), automated taxes with Jetpack, MailChimp for email marketing, and Facebook for WooCommerce plugin.
Choose whatever you find appropriate. For testing purposes, it makes sense to include the theme. It is a good starting point for an online shop design that makes the beginning a lot easier. Plus, you can always install the rest later, if needed, and don’t have to overload your WordPress site installation at this moment.
5. Connect WooCommerce With Jetpack
After that, the setup wizard will ask you to connect your site with the aforementioned Jetpack.
It’s a good plugin with all sorts of functionality that makes sense to have and can also provide automated taxes. You can get it from the WordPress directory as well. However, I don’t want it right now, so I’ll skip this step at the bottom.
6. Finalize the Setup
Alright, this is pretty much it. In the last step, you can sign up for the WooCommerce email newsletter and also find some links for the next steps such as: add product, review settings, take a guided tour, etc.
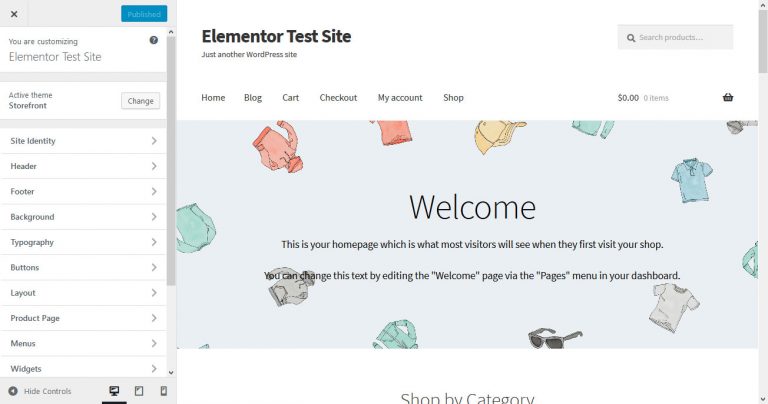
In this case, I just want to return to the dashboard. When you do the same, you will see a prompt to apply the theme homepage template and add example products.
Both are good steps to take if you just want to give WooCommerce a spin and find your bearings, so I click Let’s Go. If you choose to use the homepage template, you will be taken to the Customizer in order to take a tour and publish the changes.
Back on the dashboard, you will also find two new meta boxes.
These will keep you up to date on sales, orders, recent reviews, and more. Finally, there are two additions to the main menu called WooCommerce and Products. This is where you will take your next steps.
How to Add and Manage Products With WooCommerce
The Products menu is where you populate your shop with things others can purchase. Here’s how to do it.
1. Add a Product
As you can expect, you create items to sell via Products > Add New. Clicking on it takes you to this familiar screen.
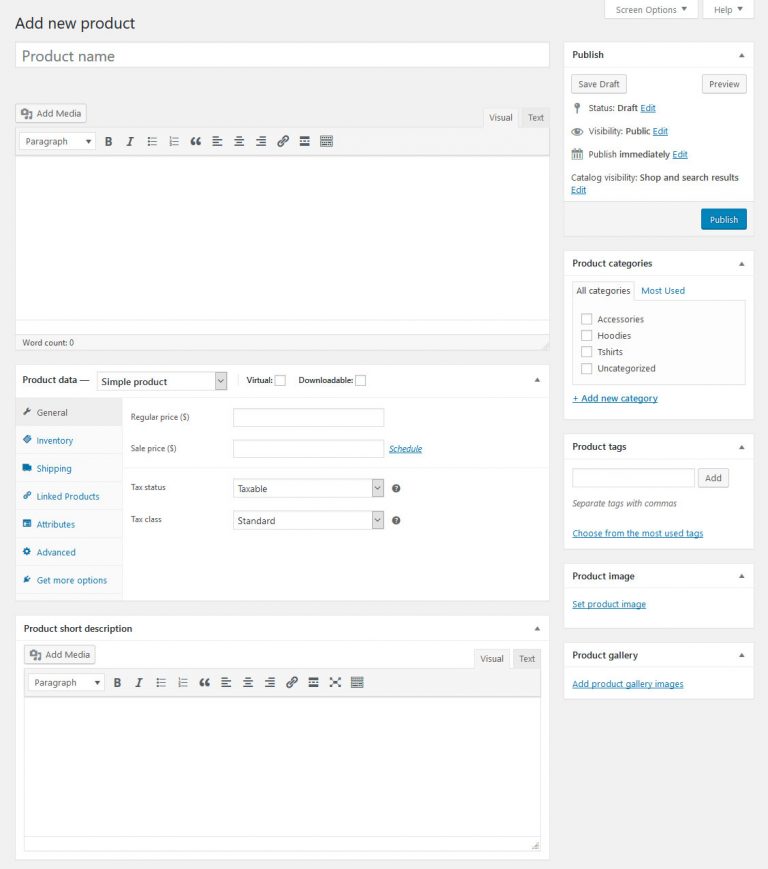
Creating products in WooCommerce basically happens through the classic WordPress editor plus some additional options.
At the top of the screen, you can give your product a title and description. This works the same way as creating a post or page, including that you can use the formatting options and add images and other media. All of this will appear on the main product page.
There are also a few other options that are very similar to what you find for posts and pages:
- Product categories – Gives you the option to divide your products into categories and subcategories and aides customers to find what they are looking for.
- Product tags – In addition to categories, you are able to create tags customers can use to find products.
- Product image – This works the same as a featured image and will appear both at the top of the product page and in the shop.
- Product gallery – In addition to that, you can also add an image gallery. This might be to show different product variations, images from other angles, and more.
If you have ever worked with WordPress before, all of this should pose no challenge to you. However, there are a few additional settings.
2. Configure Product Data
You find the product data below the main editor window. Filling in this information is mandatory for your shop to work.
The first choice you need to make is for the type of product you are selling:
- Simple product – Your run-of-the-mill physical product like a book.
- Grouped product – A collection of several simple products customers can buy individually or together, like a number of DVDs that can also be purchased as a set.
- External/Affiliate product – Items that you don’t possess or own but that clients purchase from someone else where you get a cut of the sale.
- Variable product – A good example of a variable product is a t-shirt that comes in several sizes and colors (i.e. variations).
This happens via a drop-down menu at the top. Depending on your choice, you will have different configuration options below.
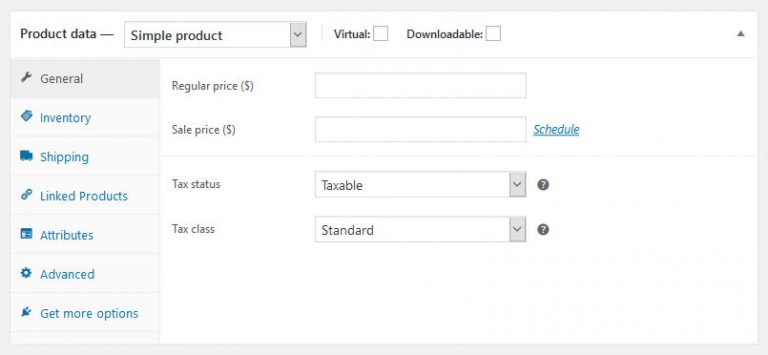
- Virtual – Check this box if you are not selling a physical product but some sort of software. Doing so will also remove the shipping options.
- Downloadable– This is the option for downloadable products. Checking it allows you to upload a file and add download conditions.
- General – Determine the price and sales price (if applicable) as well as the date range for any upcoming sales. In the general settings, you can also provide product URLs and a button text for affiliate products. Plus, you may set up whether it’s a taxed product as well as its tax class, if configured (and don’t miss our guide on how to set up WooCommerce dynamic pricing).
- Inventory – Assign a Stock Keeping Unit (a unique ID, mandatory), determine whether the product is in stock and the quantity available (if applicable). Allow backorders yes or no and whether customers can buy more than one of these products at a time.
- Shipping – Product weight, dimensions, and shipping classes.
- Linked Products – Include related products to display as upsells or cross-sells and create product groups.
- Attributes – Allows you to define custom product attributes like color, size, etc.
- Variations – With existing attributes, here’s where you create variations of your products.
- Advanced – Add a custom purchase note to send to customers after a purchase, change the product order inside the menu, and determine whether to allow reviews.
In addition, anything entered under Product short description will show up under the product title.
Together, it all ends up looking like this:
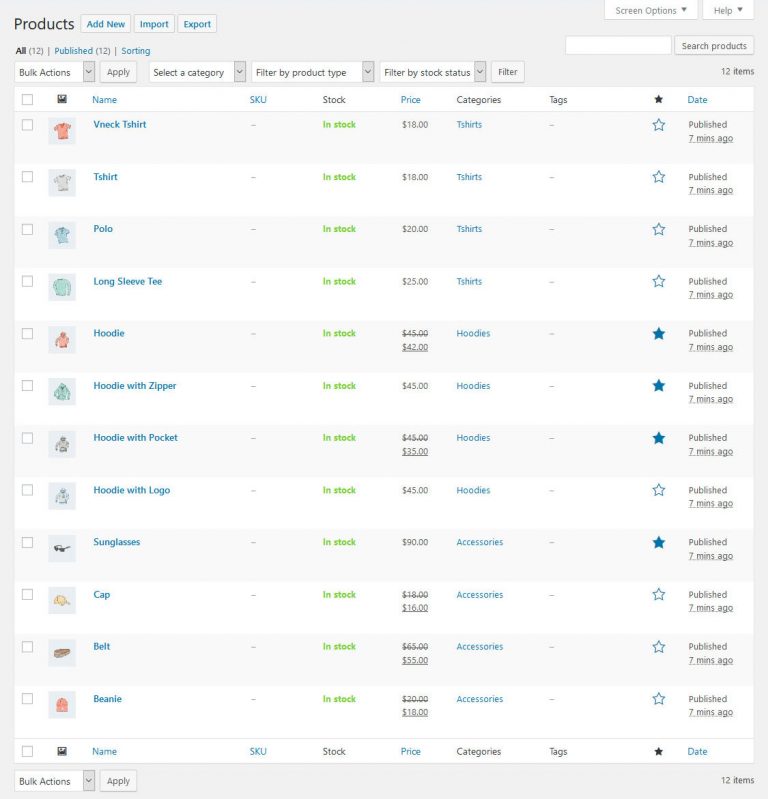
Once you are done and have saved, you can find your new product in the list under All Products.
3. Build a Product Page via Elementor
Of course, you can also customize the look and feel of your product pages with Elementor. Yes, your favorite page builder integrates with WooCommerce.
To create a new product template, simply go to Templates > Add New. Then pick Single Product as the type you want to create.
When you do, you can choose from a number of readymade blocks to get started more quickly.

Of course, it’s possible to customize them in the usual way or start from scratch.
What you will soon notice is that you have a variety of widgets for WooCommerce at your disposal.
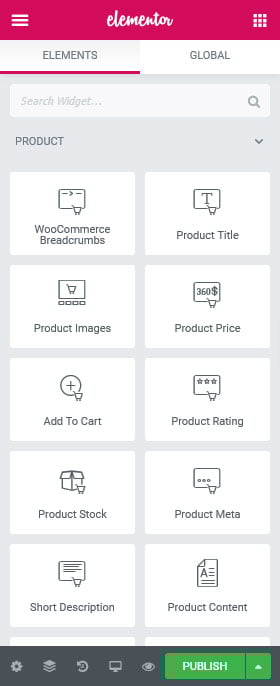
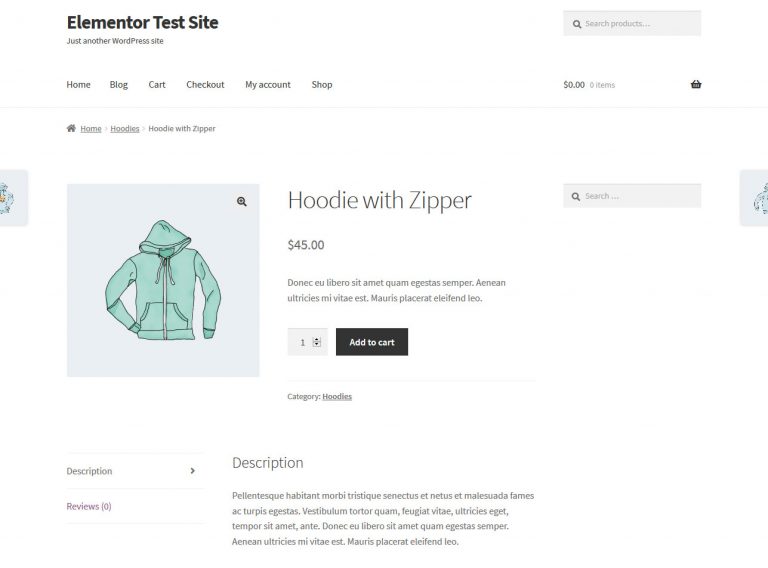
Selecting the appropriate widgets to use depends on what exactly you are selling. For example, if you are selling a simple product, something like the example below could be enough.
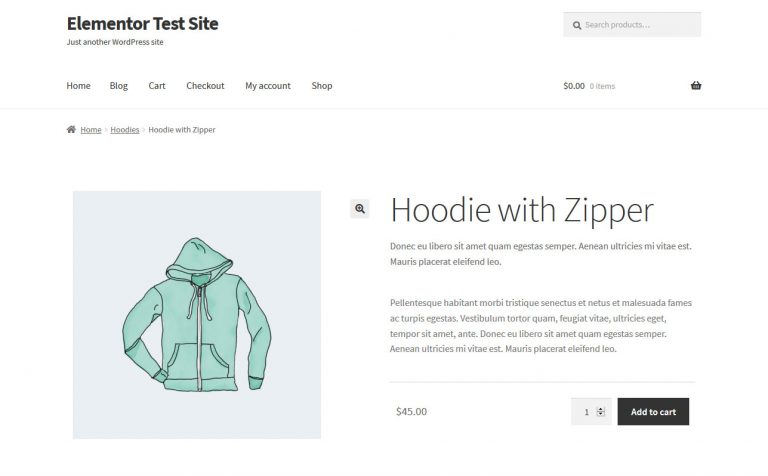
This example includes widgets for the product images, product title, short description, content, price, and the Add-to-Cart button.
However, for more elaborate wares, you might need a bit more.
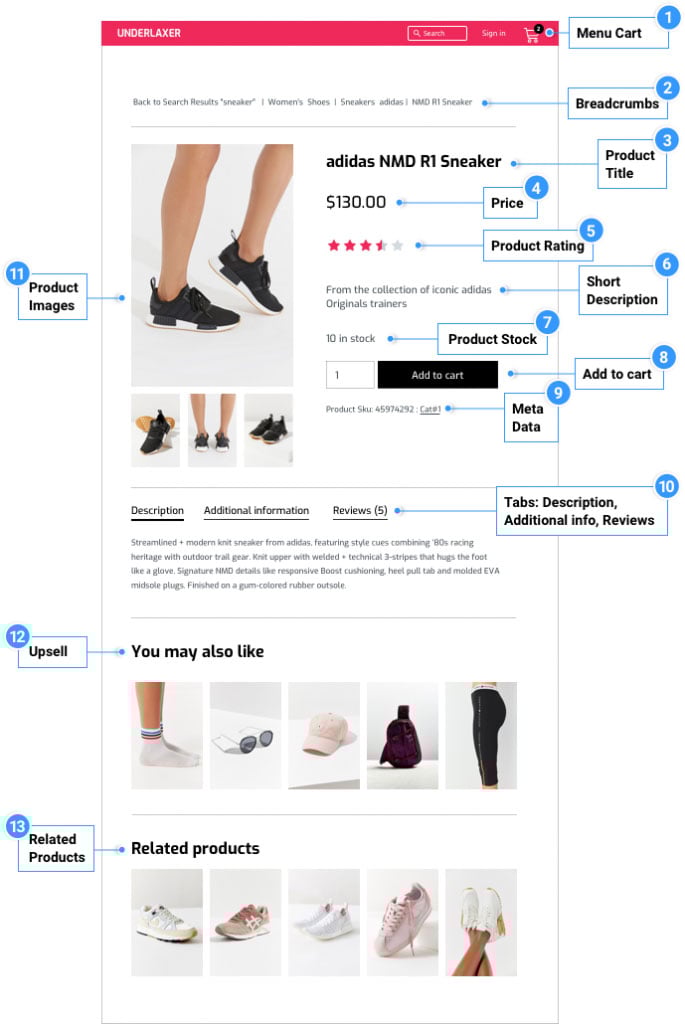
Looks good, right? And there are a few more to discover.
Also, don’t forget to use the preview settings to view your changes with an actual product!
4. Configure the Add-to-Cart Button
Since the Buy button is one of the most central elements of every online shop, it deserves special mention here. Elementor offers two options for Add-to-Cart buttons: regular and custom.
The first is the standard option that comes with WooCommerce. Here, Elementor gives you the usual styling options such as changing the colors, typography, borders, shape, hover effects, and much more.
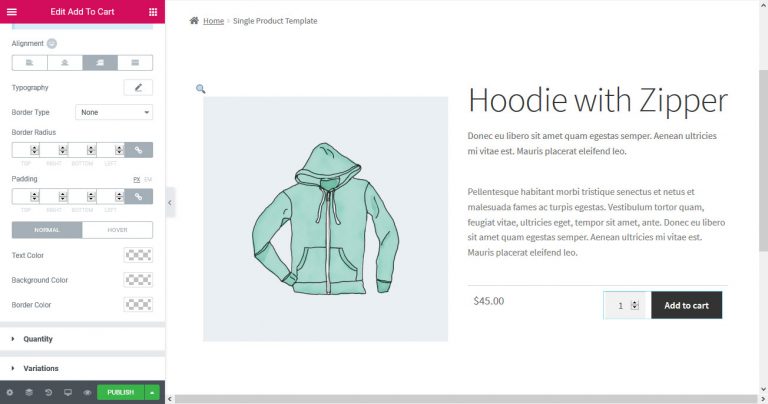
This applies both to the actual button as well as the quantity counter and variation labels. Overall, it’s a solid option.
However, if you want full control over the look and feel of your Buy-Now button, you might want to go with the custom Add-to-Cart option.
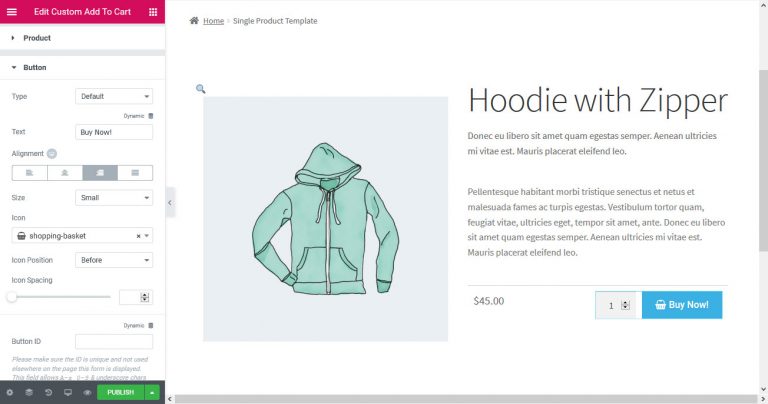
First of all, you can assign it to any product you wish; meaning, it’s also possible to place it outside of the product template and anywhere on your site.
You can also decide whether or not to show the quantity counter, and how many items to add to the shopping cart by default if it’s not visible. You also have a choice of the type of button (Default, Info, Success, Warning, Danger), label, alignment, size, button icon, and its position and spacing. Finally, you are able to assign a button ID for tracking events in your Analytics.
The Style and Advanced section contain the usual options. In short, with the custom Add-to-Cart button, you can take full control of this part of your user interface.
5. Finalize the Design
Finally, when you are done and ready to hit the Publish button, remember to set the conditions under which the new design should show up.

This can be set for all products, for a certain category and/or child category, a tag, or only for products by a certain author. More complex conditions are also possible.
Configure as needed and save.
6. Other Product Settings
There are a few more items under Products that are pretty easy to understand.
Categories and tags should be clear. Note that in WooCommerce you can add thumbnail images to product categories.

Shipping Classes allows you to create product groups by shipping and can be used for calculating shipping costs by class.
In Attributes, you may create sizes, colors, and other characteristics and apply them to products to create variations.
Alright, time to move on.
How to Set Up a WooCommerce Shop Page in Elementor
When you have created a few products, it’s time to set up your shop. After all, that’s where people will purchase your wares.
During the installation, WooCommerce will automatically create a new page called Shop that you can assign as your homepage (e.g. under Settings > General). Once you do, you have several ways of customizing it.
1. Using the WordPress Customizer
If you have installed a theme, like Storefront, you’ll get a bunch of options in the WordPress Customizer (Appearance > Customize) for making changes to your shop.
Besides the ability to modify the text and button color (the Typography and Buttons menu respectively), you’ll find the most important settings under Product Page and WooCommerce.
In the first option, you are able to switch the sticky Add-to-Cart and product pagination on and off.
WooCommerce has the following options:
- Store Notice – Create and enable/disable a sitewide notice for visitors.
- Product Catalog – Determine whether the shop and category pages will show products, product categories or both as well as their default sorting, how many products per row to display, and how many rows per page.
- Product Images – Control the ratio of your product images.
- Checkout – Allows you to determine the information collected on the checkout page as well as things like button copy and your privacy policy statement.
2. Using Elementor
To make changes to the WooCommerceshop page via Elementor, you need to create a product archive. You can do this in the usual way via Templates > Add New and then picking Product Archive as your type.
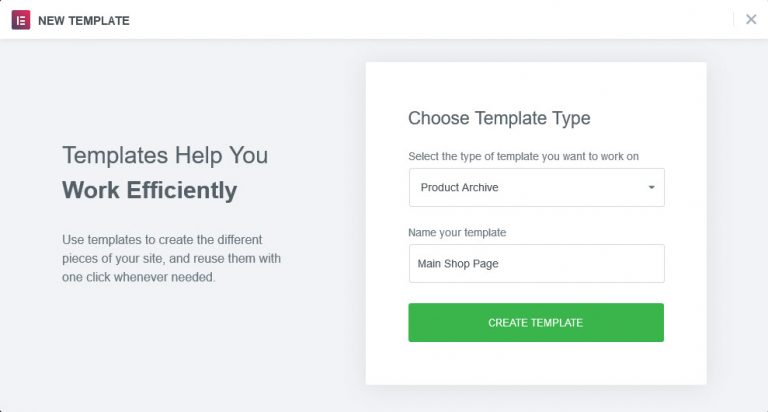
Again, you may choose a block from the included templates or start with an empty page.
Besides all the usual Elementor page elements, you have a few WooCommerce and archive-specific widgets:
- Archive Title
- Archive Products
- Archive Description
- Products
- WooCommerce Breadcrumbs
- Custom Add to Cart
- WooCommerce Pages
- Product Categories
- Menu Cart
Make any changes you desire, however, the most important part happens when you hit Publish. In the display options that pop up, you’ll need to pick where this product archive will show up on your site.
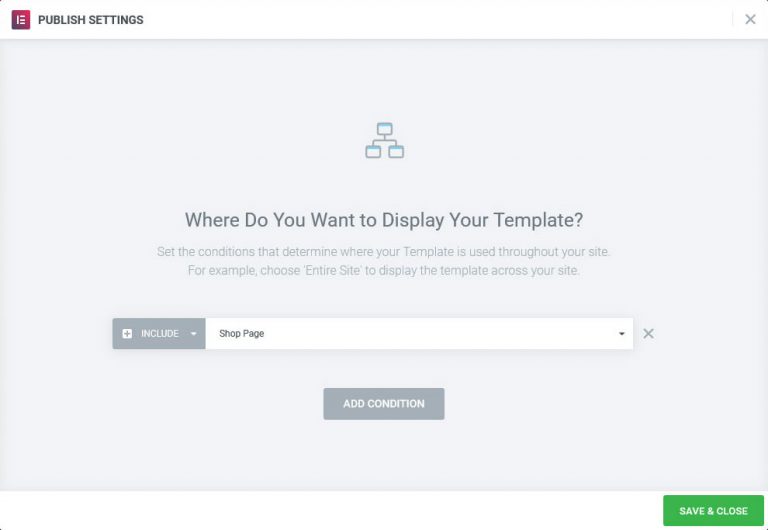
If you only want it to appear on your main shop, you need to select the Shop Page option from the drop-down list. Of course, you can also use it in several places and add more conditions as you go along.
One last thing: the Product Archive only customizes the part of the page that displays products. To change the design of the rest of your shop page, you need to learn how to customize your theme.
Other Product Archives
Of course, you can use the above method to customize any other product archive in your WooCommerce shop. To do so, simply make sure to set the display conditions to the respective settings.
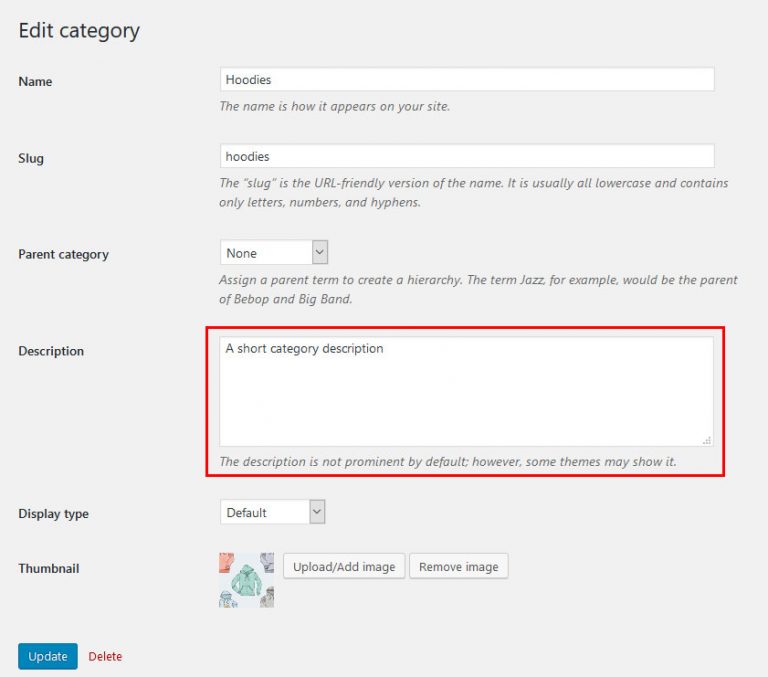
For example, it might make a lot of sense to include product category descriptions in your category archives. This turns these pages into unique content, which is great news for your SEO efforts. Otherwise, a lot of archives often tend to be very similar and thus of limited value (for more on this, don’t miss our guide on WooCommerce SEO).
When you include category descriptions in your page templates, be sure to add text to them under Products > Categories. Click on each taxonomy and write a description in the respective field.
By the way, this is also a great tip for your blogging categories.
Setting Up Important WooCommerce Pages
Besides the shop, WooCommerce sets up a number of other standard pages needed for purchasing that you might want to tinker with.
Checkout and Cart
You might notice that the Checkout and Cart pages have a standard WooCommerce design that doesn’t necessarily match your brand. But don’t worry – with Elementor Pro, you can easily customize these pages to provide a better user experience and create a design that truly represents your brand.
To get started, all you need to do is edit the default Checkout or Cart pages with Elementor.
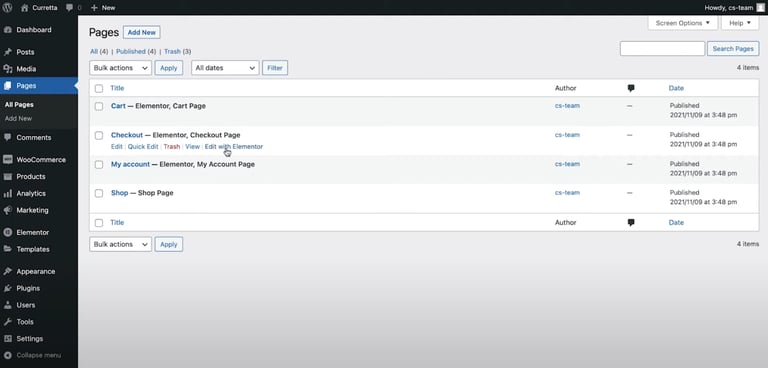
At first, you will see the default checkout/cart because it is set to display using a WooCommerce shortcode. All you need to do is remove the WooCommerce shortcode that’s displaying the default design, and replace it with Elementors Checkout/Cart widget. This way, you can make the page completely your own, the possibilities are endless.
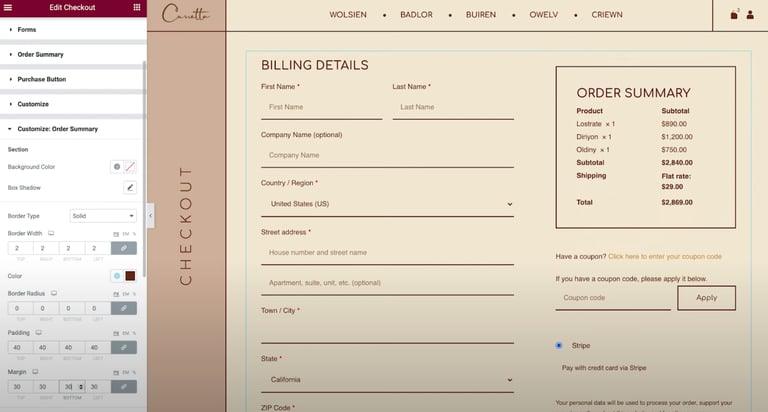
Once you’ve finished customizing the page, click the green Update button to save the page.
Thank-You Page
At the end of the checkout process, customers land on a summary or Thank-You page. It offers a lot of potential for further marketing measures.
Unfortunately, WooCommerce does not natively support a way of customizing it. They have a paid plugin for that purpose. However, you can get around this with some free plugins.
One example is WC Custom Thank You. When you install and activate it, you find a new menu item under WooCommerce > Settings > Advanced.
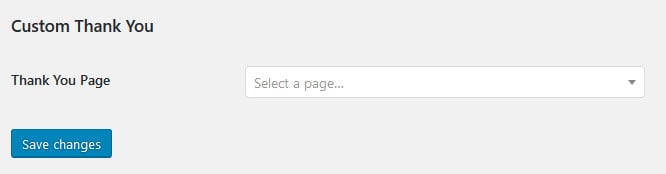
Here, you are able to choose any page as your Thank-You page, and visitors will automatically be redirected.
You can create a page for this purpose with Elementor in the usual way. Unfortunately, because of the way WooCommerce is built, there is no way to include a purchase summary. However, you can refer to the article linked above to find out what else makes sense to include here.
Build an E-commerce Popup With Elementor
Popups are a staple of the e-commerce world. In fact, we have an entire article on how you can use this marketing tool in your online shop. For that reason, no WooCommerce tutorial would be complete without talking about this.
Here are some ways you can use Elementor popups in your WooCommerce online shop:
- Build an email list
- Provide assistance
- Do customer surveys
- Recover abandoned shopping carts
- Alert them to discounts and sales
Follow the link above for details. The cool thing is that, with WooCommerce installed, you can also use popups to ramp up your sales. With the Products and Product Categories widgets, you are able to show more of your wares to visitors, which they can add to the cart directly from the popup.
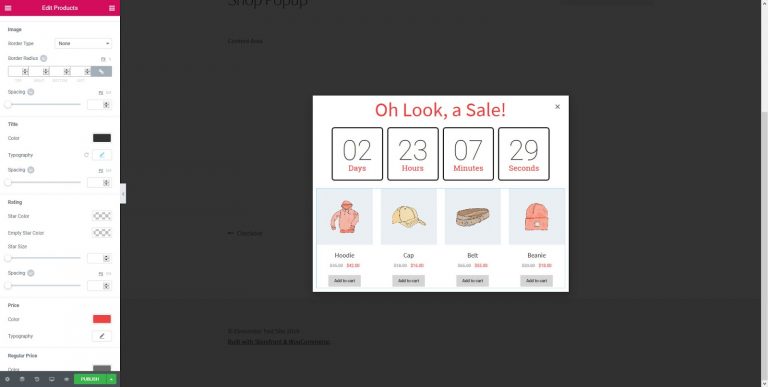
Thanks to query control, you can also make very granular settings in this area. For example, in the Products widget, you are able to control whether to show products from the current query, the latest wares, products on sale, featured products, or manually selected ones. You can also exclude whatever you don’t want to show up as well as duplicate products.
Finally, thanks to display conditions, triggers, and advanced rules, you can use popups for upsells and cross-sells.
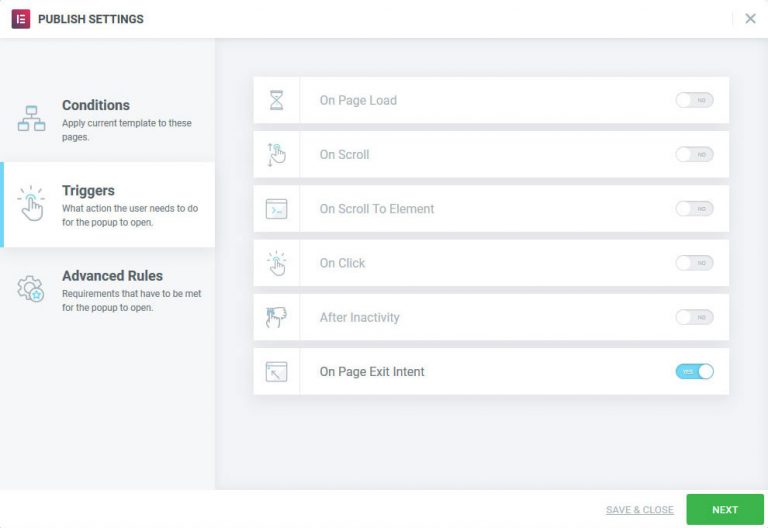
For example, you can only display them on category pages so that users see related products, triggered when someone adds stuff to their cart, and then again as they exit or on the checkout page for a last-minute temptation.
The possibilities are endless.
WooCommerce Management Options and Settings
For the final part of this WooCommerce tutorial, we will look at the settings available to you. I’ll explain each and every menu item one by one so you know exactly what’s going on there.
Orders
This menu shows the current status of orders at your shop.
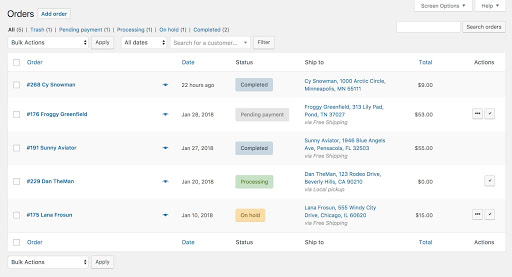
If you only sell digital products, all you will see here are the number and type of items sold, and to whom.
Physical goods, on the other hand, can have many different statuses (pending payment, on hold, refunded, failed, canceled, etc.). Know the situation of each at a glance, and click on each order to modify billing or shipping addresses, add notes, refund order, change the contents of the order, and more.
Coupons
This should be a familiar concept. Here, you may create and manage discount codes.
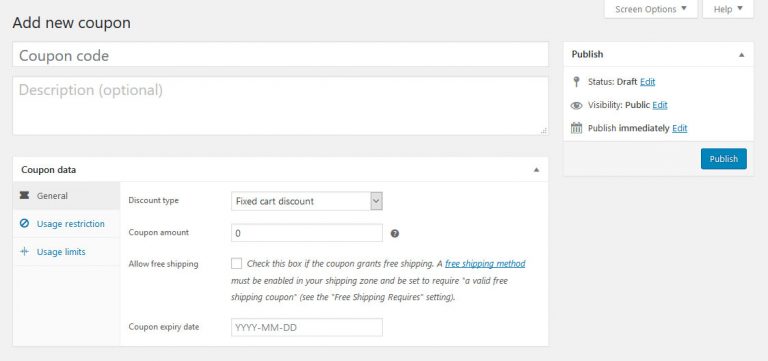
Determine the type and amount of the discount (including free shipping), its expiration date and usage restrictions (minimum or maximum expenditure, usage with other coupons, applicability to sales items, products, product categories). You can also set limits on how many coupons are available to be used overall or per customer.
Reports
As already mentioned, WooCommerce has a report section where you find detailed summaries of every aspect of your shop.
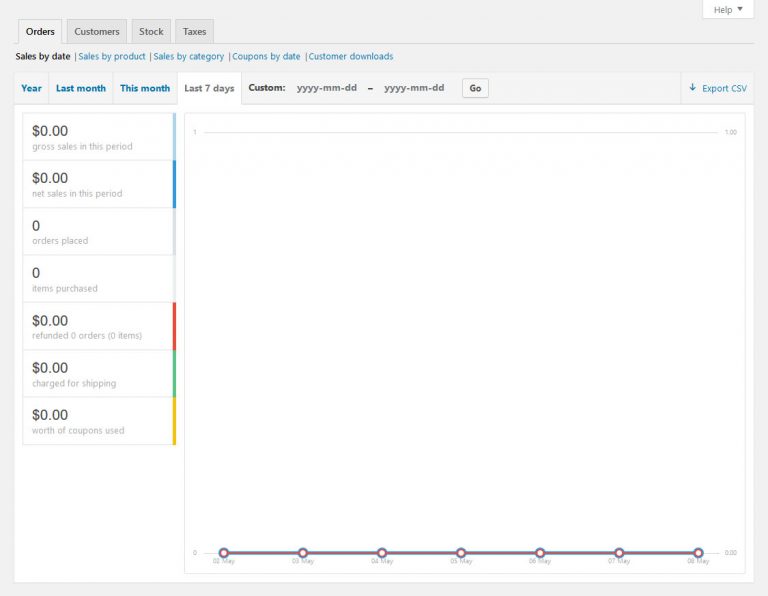
This includes gross and net sales of the last seven days, months, year, or custom time frame. You can also see orders placed, items purchased, refunds issued, shipping costs collected and coupons used. Furthermore, you may view sales by product, categories, coupons used or customer downloads and also find detailed information on customers, taxes, and stock.
In addition, everything available here can be exported in CSV form.
Settings
This is the section is where you control everything in your online store. It has loads of configuration options, which we will mention briefly so that you’ll have an idea of what is available.
General
- Store address – Where your store is located.
- General options – Choose the countries you sell and ship to, the default customer location and whether to use taxes and coupons or not.
- Currency Options – Set the currency you will be paid in and its display.
Products
- Shop pages – Determine the shop page, behavior of Add-to-Cart action, and placeholder image for products without their own.
- Measurements – Settings for weight and dimension units.
- Reviews – Control product reviews, ratings, and who can leave them.
- Inventory – Enable or disable stock management, how long to hold unpaid orders, notifications on low-running stock and their recipients, as well as stock thresholds and the inventory displayed on a page.
- Downloadable Products – Contains the file download delivery method and access restriction for downloadables.
Tax
- Tax Options – Determine whether to use net or gross prices, configure how to calculate product and shipping taxes, set up the rounding method, add tax classes, configure the price display in the shop and how to show tax totals.
- Standard Rates – Set up different tax rates to use in your shop.
- Reduced Rate Rates – Same for reduced rate items.
- Zero Rate Rates – Same for tax-free items.
Shipping
- Shipping Zones– Define different shipping zones and assign shipping methods to them.
- Shipping options – Show shipping costs in the cart yes/no, set a default shipping destination and enable debug mode for troubleshooting.
- Shipping classes – Create shipping classes to assign to products.
Payments
- Payment methods – Enable, disable, and configure a wide range of different payment options.
Accounts & Privacy
- Account options – Determine whether users can buy things as guests and log in during checkout when they can create an account, and how they can remove it, as well as their personal data.
- Privacy policy – Determine your privacy policy page, and link text to it, from the registration and checkout pages.
- Personal data retention – How long to retain customer data until it is deleted.
Emails
- Email notifications – The content and recipient of different email notifications about what happens on the site and information for customers.
- Email sender options – From which name and email address customers will receive messages.
- Email template – Customize the design of emails sent by WooCommerce.
Advanced
- Page setup – As you already know, this is where you set up important pages (e.g. cart, checkout, account, terms and conditions) and whether to force SSL at these locations.
- Checkout endpoints – Unique strings added to the URL during the checkout process.
- Account endpoints – Same for account pages.
- REST API – Enable/disable the WooCommerce REST API, set up endpoints and permissions for external applications to access your shop data.
- Webhooks – The ability to set up event notifications for external services.
- Legacy API – Enable the legacy REST API of WooCommerce.
- WooCommerce.com – Enable and disable tracking as well as marketplace suggestions from WooCommerce.
Status
This menu gives you an overview of the health and performance of your online shop. You can also download a system report in case you need to get in touch with the WooCommerce support.
Apart from that, you will find a number of tools for debugging and resetting cached data and the possibility to see data logs for your shop and scheduled actions.
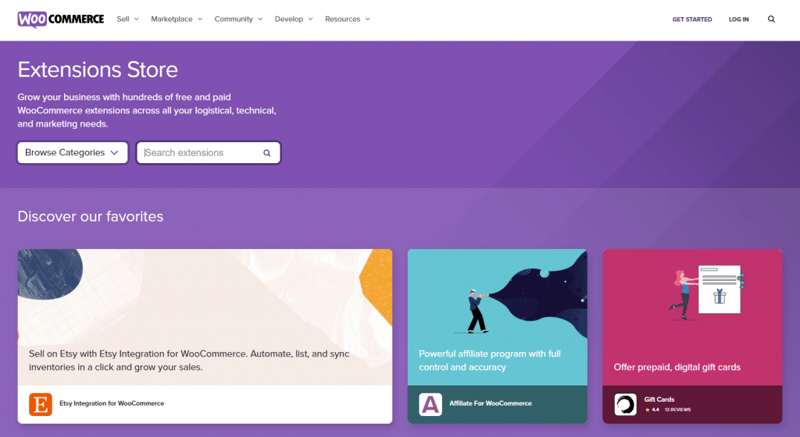
Extensions

Finally, through the add-on section, you get access to the official WooCommerce shop. Everything is ordered by category and a click on any extension takes you right to the website where you can purchase it. At the top, you are also able to see your current subscriptions and manage them.
You can also go to WooCommerce’s official extensions website and look for extensions there:
You can also go to the WordPress plugins depository (via the website, or directly from the dashboard) and choose to install the extensions you want.
Let’s expand a little more on this. For those who are unsure as to what extensions are, these are external applications that enhance WooCommerce’s functionality. There are numerous various extensions available, but we’ve gathered the best WooCommerece plugins here, and they include the following two and many more:
Booster for WooCommerce
Booster for WooCommerce includes more than a hundred modules and features that are required for improving the WooCommerce platform like the bulk price converter, currencies options, buttons, prices, products, and many more options.
Metorik

Metorik gives your store a real-time dashboard that unifies your store’s orders, customers, and products, helping you understand your data and make more informed decisions every day.
Note: Elementor’s WooCommerce Builder replaces many of those extensions and makes them unnecessary. Having fewer extensions is better for performance and an easier workflow.
The Best WordPress Themes for Using With WooCommerce
If you’re looking for the best WordPress theme to build an online shop with WooCommerce, Hello is our top recommendation.
This light and straightforward theme is designed as a starter template with minimal styling, providing you with a blank canvas to implement your ideas. Hello works with all popular extensions, including WooCommerce, and is purposely built for the Elementor website builder, making it a hassle-free solution for building your online store.
While there are other great options available, such as Astra, OceanWP, and GeneratePress, Hello stands out as the ideal choice for those who want a customizable and straightforward design for their online store.
If you want a seamless and easy way to get started with the Hello theme and Elementor website builder, consider using Elementor Hosting. It comes with Hello and Elementor pre-installed, allowing you to start customizing your online store immediately without any installation required.

If you want a seamless and easy way to get started with the Hello theme and Elementor website builder, consider using Elementor Hosting. It comes with Hello and Elementor pre-installed, allowing you to start customizing your online store immediately without any installation required.
Final Thoughts: Using WooCommerce and Elementor Together
Though not primarily known for it, e-commerce is another strong suit of the WordPress platform. If you want to go that route with your site, WooCommerce is an excellent and popular way of doing so. The plugin is mature, feature-rich, and part of a wide ecosystem that gives you all the tools needed for an online store.
The free version is enough to get you up and running. By now, you know how to create and set up your WordPress online shop with WooCommerce, create products, and manage every aspect of your store.
Additionally, you have learned how to customize the design of the most important pages with Elementor. In short, nothing can stop you from hanging out your virtual shingle and start hawking your wares on the Internet.
We here at Elementor wish you all the best with it.
If you are already a WooCommerce user, we would also like to hear from you.
What’s your experience with WooCommerce? Where do you struggle? What is your favorite functionality or extension? Let us know in the comments section below!
Looking for fresh content?
By entering your email, you agree to receive Elementor emails, including marketing emails,
and agree to our Terms & Conditions and Privacy Policy.


