
Table of Contents
Dynamic content is often an overlooked feature on WordPress and WooCommerce, but it offers a lot of flexibility. It allows you to take information from the site and automatically insert it into designated areas.
For example, dynamic pricing can help you boost your store’s revenue and drive sales to specific products that you may want to focus on. In the right hands, it becomes a great tool to have when marketing and growing your WooCommerce store.
In this post, we’re going to cover everything that you need to know about dynamic pricing on WooCommerce. We’ll start with a general introduction to the concept, some of the different ways that you can implement it, and how it helps you.
Then, we’ll show you step-by-step how you can start using your own dynamic pricing strategies with a free WooCommerce dynamic pricing plugin.
Let’s get started!
Table Of Contents
- What Is WooCommerce Dynamic Pricing?
- When Should You Use WooCommerce Dynamic Pricing?
- 1. Drive Sales to Specific Products
- 2. Boost Customer Lifetime Value
- 3. Gain Insights Into Customer Behavior
- How To Set Up Dynamic Pricing on Your WooCommerce Store
- 1. Configure the Plugin's Settings
- 2. Create a Pricing Rule
- 3. Customize the Dynamic Pricing Details
- Which Discount Strategies Should You Use on WooCommerce?
What Is WooCommerce Dynamic Pricing?
Dynamic pricing is a strategy where you change the price of a product based on certain criteria, such as how many items a user is buying, the role/status of the customer, the customer’s order value, the customer’s order history, etc.
In almost all situations, you’ll be giving the shopper a discount if they meet certain conditions.
One common example is bulk pricing, where you change the unit price of an item based on the quantity that a shopper is ordering. For example, you might charge:
- $10 per item for ordering between 1-10 items.
- $9 per item for ordering between 11-30 items.
- $8 per item for ordering between 21-50 items.
- $7 per item for ordering 50+ items.
Another common example is “Buy X, Get X Free” deals, or BOGO deals for short. For example, you could offer a special “Buy 3, Get 1 Free” deal on a certain item or category of items.
Or, you could give certain VIP members access to special discounted prices (which you could do on WooCommerce by targeting their user role). You could define VIP status by their order history (e.g. targeting loyal customers), whether they’re a paid member, etc.
The goal with all of these dynamic pricing strategies is to encourage your shoppers to buy higher quantities and/or make more frequent orders at your store.
When Should You Use WooCommerce Dynamic Pricing?
At a high level, the goal of dynamic pricing is to boost your revenue by increasing average order value and customer lifetime value.
For example, if you offer a discount if a user purchases 5+ items, that will encourage them to order 5+ items when maybe they would’ve just ordered 2-3 items without dynamic pricing.
Here are some specific benefits and situations where dynamic pricing can help you to:
1. Drive Sales to Specific Products
You could use dynamic pricing to drive sales of a specific product by singling that product out for dynamic pricing.
In addition to boosting revenue, this can be a great way to clear out inventory of products that aren’t moving quite as well as you hoped they would.
2. Boost Customer Lifetime Value
In addition to boosting your revenue for individual orders, you can also use dynamic pricing to boost the lifetime value of customers by giving special discounts to repeat buyers. For example, you could unlock special prices when a shopper reaches certain goal targets such as:
- Lifetime order value
- Lifetime number of orders
Or, you could create dependable recurring revenue by offering special prices to members who pay a monthly fee. For example, Tripadvisor’s Tripadvisor Plus service offers members special discount prices on hotels in exchange for a $99 per year fee. This not only gives Tripadvisor recurring annual revenue, but it also encourages people to always book their hotels through Tripadvisor since they already invested money in the annual fee.
3. Gain Insights Into Customer Behavior
Finally, you can also use dynamic pricing strategies to just generally gain more insights into your customers’ shopping behavior. For example, if you see that customers are happy to buy certain products in bulk, you could use that information to set up new products or bundles.
How To Set Up Dynamic Pricing on Your WooCommerce Store
Dynamic pricing is not a core WooCommerce feature, so you’ll need the help of a WooCommerce dynamic pricing plugin to set this up.
Because this pricing strategy is quite popular, you can find a number of free or paid plugins to set this up.
There is a dynamic pricing plugin from a third-party developer (Element Stark) listed at the WooCommerce extensions marketplace. However, it’s a bit expensive at $129 and you can find cheaper options (or even free options) to keep the cost of your store down.
For a more affordable option, you can consider the WooCommerce Dynamic Pricing & Discounts plugin at CodeCanyon, which costs $59 and has a 4.6-star rating on its over 19,000 sales.
Or, if you want to keep things free, you can also find some popular free dynamic pricing plugins:
- Advanced Dynamic Pricing for WooCommerce – a popular free option at WordPress.org with an excellent 4.8-star rating.
- Discount Rules for WooCommerce – a popular option focused on all types of discount rules, including dynamic pricing.
- WooCommerce Dynamic Pricing and Discount Rules – a free option from a developer with several popular WooCommerce plugins.
- ELEX WooCommerce Dynamic Pricing and Discounts – another popular free plugin from an established WooCommerce developer.
Because we want to make this tutorial accessible to everyone, we’ll use the free Advanced Dynamic Pricing for WooCommerce plugin in the step-by-step guide below. To get started, make sure to install and activate the free plugin from WordPress.org.
Most other plugins operate on the same basic principles, but their interfaces will obviously be different.
1. Configure the Plugin's Settings
Before you start creating your pricing rules, you’ll first want to browse through the plugin’s settings, which you can access by going to WooCommerce → Pricing Rules → Settings.
The plugin is set up in such a way that you don’t automatically need to edit any of the settings – it should work with just the defaults. However, you might want to make changes for your unique situation:
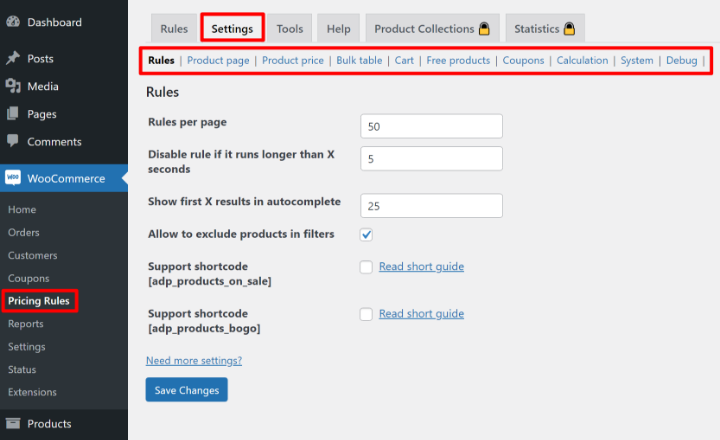
If you’re not sure how a specific setting will change things, you can always come back to this area once you get a better feel for how the plugin works and how you might want to adjust it.
2. Create a Pricing Rule
Each dynamic pricing strategy that you implement is called a “pricing rule”.
You can create rules that target specific products or you can create rules that apply to all products or products with a specific category/tag.
When setting up a rule, you get a lot of different options, so we’ll be sure to give you several examples of how you might want to set things up.
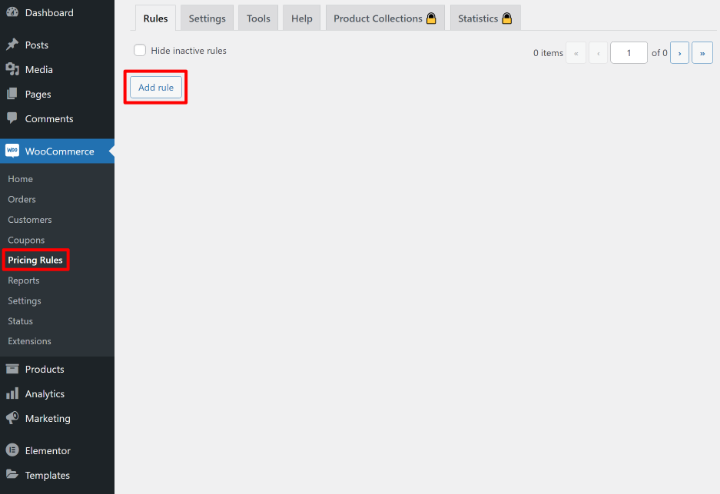
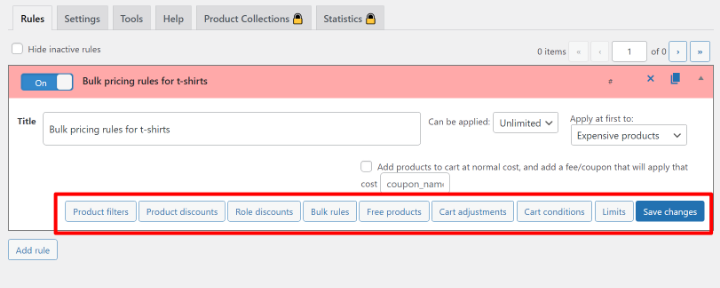
To create your first rule, go to WooCommerce → Pricing Rules → Add rule:
At the top, you can configure a few basic settings:
- Title – an internal name to help you remember what the rule does.
- Can be applied – how many times the rule can be applied – you can make rules unlimited use or limit their use anywhere from 1-10 times.
- Apply at first to – how to apply the rule to items in the user’s cart – you can apply to the most expensive items, the cheapest items, or as the items appear in the cart.
- Coupon – if you check this box, the plugin will add items to the cart at the normal price but automatically apply a coupon code to add the discount.
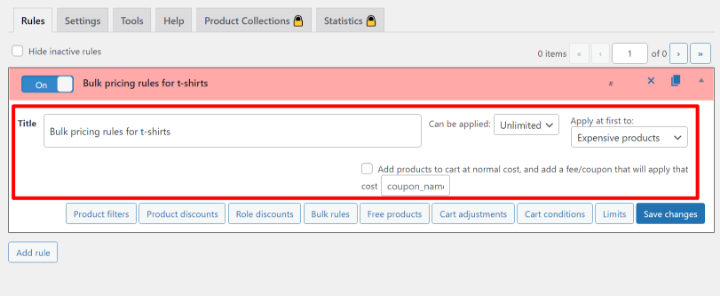
Once you’ve made those decisions, you can use the buttons below to set up the actual meat of your rule. You get eight different options:
- Product filters – choose which product(s) the rule will apply to.
- Product discounts – choose the type and amount of the discount.
- Role discounts – only apply the pricing rule to shoppers with a certain user role.
- Bulk rules – set up bulk discounts where you apply different prices to different quantities of items.
- Free products – give users one or more products for free if they meet the conditions.
- Cart adjustments – apply discounts, fees, or free shipping to the shopper’s entire cart.
- Cart conditions – only apply the rule if a shopper meets certain cart conditions, such as the total value of their cart, the number of items, their logged-in status, the date/time, and more.
- Limits – set an overall maximum usage for this rule.
The important thing is that you can mix and match as many or as few of these options as you want.
For example, you could limit the rule to certain products and limit it to certain user roles and require the shopper to have at least $200 in their cart to be eligible. Or, you could only apply the cart condition and not limit the discount in any other way.
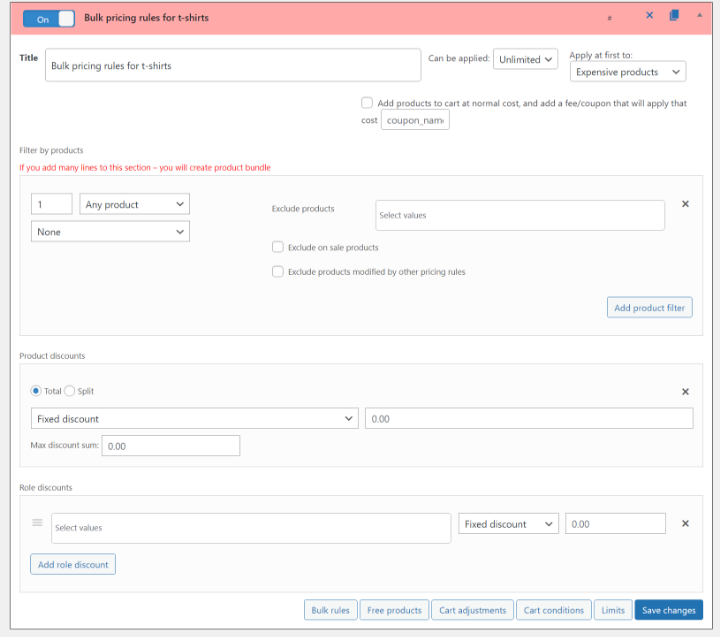
As you click on the options, they’ll expand additional settings areas to configure that type of rule. Once you open a settings area, that button will disappear from the list at the bottom:
So that’s the basic idea of how pricing rules work. Now, let’s look at some specific examples of how you could apply some of the dynamic pricing strategies that we discussed above.
Example 1: Dynamic Bulk Pricing
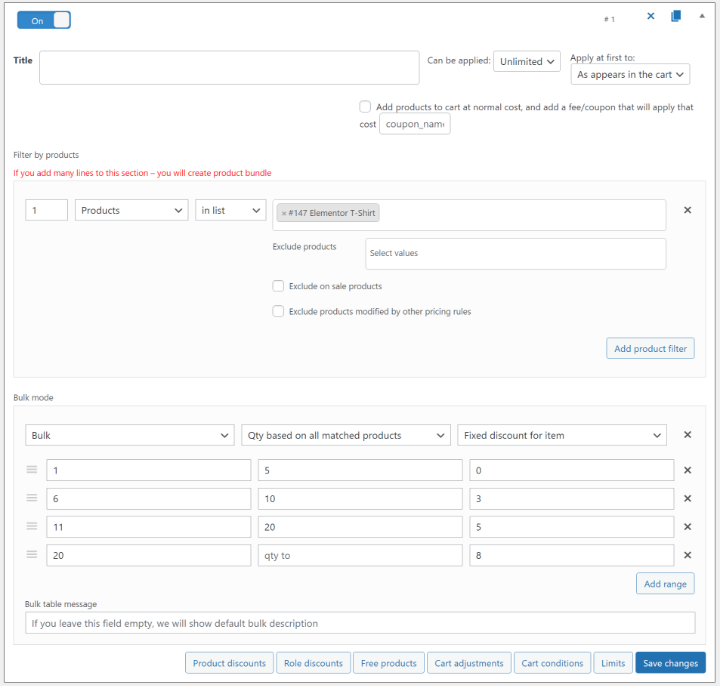
For this first example, let’s say you want to set up bulk pricing where the unit price of an item changes based on the quantity that a shopper purchases.
First, you would add the Product filters and choose which product(s) you want to enable bulk pricing for. We’re going to set up a special rule for just our Elementor t-shirt, but you could target multiple products, categories of products, or even all of your products.
Then, you would add the Bulk rules to set up your bulk pricing. You can set up both fixed or percentage discounts. Or, you can also enter fixed prices (instead of a discount). The percentage discounts would be especially useful if you’re applying a rule to multiple products with different prices.
For the fixed discounts or prices, you can either apply the discount to each item or to a set (e.g. all five items).
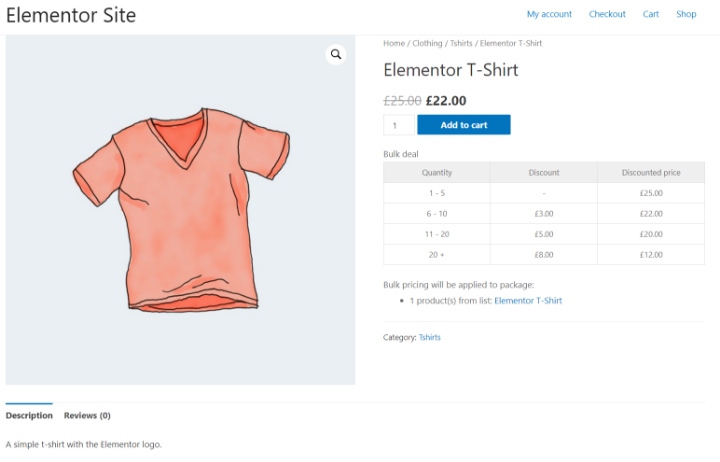
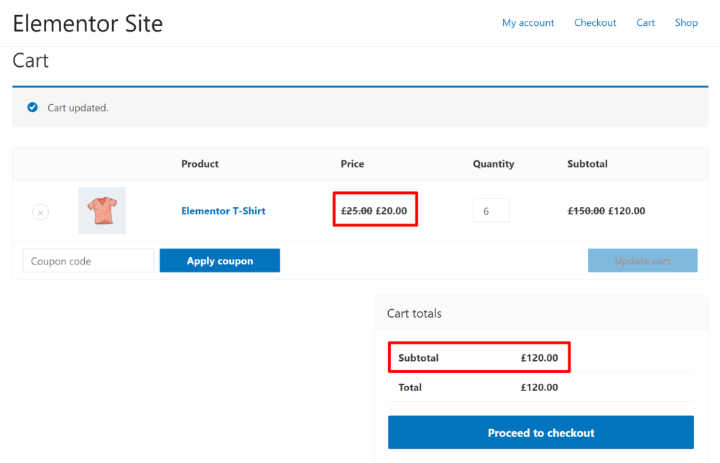
For this rule, our bulk pricing will be:
- 1-5 t-shirts – full price
- 6-10 t-shirts – $3 off per shirt
- 11-20 shirts – $5 off per shirt
- 20+ shirts – $8 off per shirt
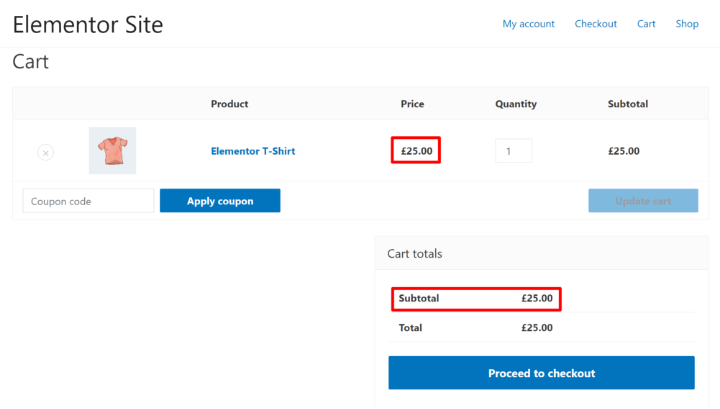
Below, you can see the full rule:
And here’s what that would look like on the front-end:
A quick note – if you’re using Elementor WooCommerce Builder, the plugin will automatically add the bulk pricing table wherever you’ve placed the Add to Cart widget from WooCommerce Builder.
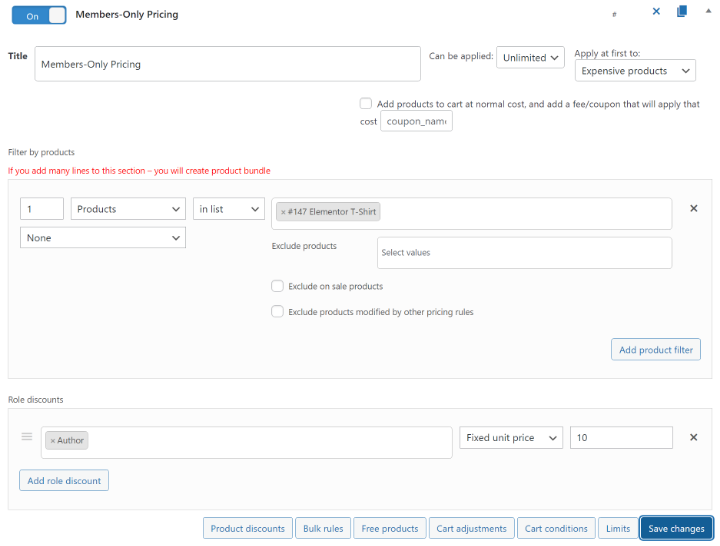
Example 2: Dynamic Pricing Based on Role
For this second example, let’s say you want to give users with a certain role a dynamic price on the Elementor t-shirt. Let’s say that if a person is an author at the site, they get a special dynamic price of just $10 per shirt.
To set this up, you need two rules.
First, you’d use the Product filters rule to target the Elementor t-shirt again.
Then, you’d apply the Role discounts rule to target a user role and apply the fixed unit price – e.g. authors.
Example 3: Discount With Minimum Spend
For this last example, let’s say that shoppers can get $5 off the cost of each Elementor T-Shirt that they purchase but only if they spend a minimum of $100.
To set this up, you’d need three rules.
First, you’d use the Product filters to target the products where you want to apply the discount.
Second, you’d use the Product discounts to add the discount per item. You can also specify a total max discount – e.g. $5 off per shirt but not more than $20 in total.
Finally, you’d use the Cart conditions to specify that the shopper’s cart subtotal must be greater than $100:

If the value of a shopper’s cart is under $100, they’ll pay full price for the shirt:
But if the value is over $100, they’ll automatically get a $5 discount on each shirt:
These are just three examples of the types of WooCommerce dynamic pricing that you can set up. You can play around with your own configuration to find the perfect strategies for your store.
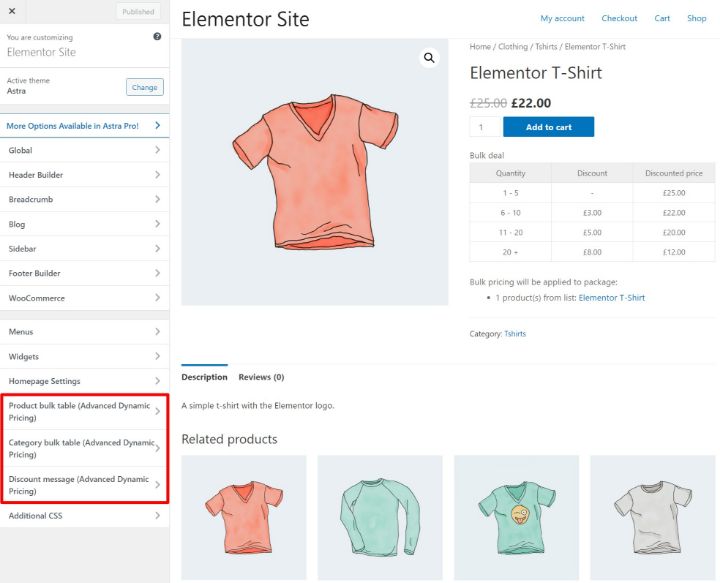
3. Customize the Dynamic Pricing Details
As you saw in the examples above, the plugin will sometimes add its own content to the single product page to communicate your dynamic pricing rules to customers (e.g. the bulk pricing table). Again, if you’re using Elementor WooCommerce Builder, these details will usually appear wherever you add the Add to Cart widget.
One nice option in the plugin, though, is that you can use the WordPress Customizer to control the style and layout of these additions.
To do so, go to Appearance → Customize and use the new options in the sidebar:
Which Discount Strategies Should You Use on WooCommerce?
There are several different dynamic pricing strategies that you can use with the plugin(s) above. Depending on your store, you might want to use multiple strategies or you might just stick with one type of dynamic pricing strategy.
Here are some ideas:
- Bulk pricing tiers – offer cheaper prices in different tiers as the quantity increases (like our first example).
- Members-only pricing – offer special prices for certain user roles (like our second example).
- High order value discounts – offer discounts on certain items if a user’s total order value is higher than a certain amount.
- Loyalty discounts – give special offers to loyal customers – e.g. people that have placed 10+ orders.
- BOGO deals – offer “Buy X, Get X Free” deals. You can also add cart conditions to limit them, like requiring a minimum spend.
- Product bundles – create product bundles that offer lower prices if people buy multiple products.
- Time-based discounts – offer lower prices on certain days/times. This can be especially useful if you’re using WooCommerce as something like a restaurant ordering system, where you might have slow days of the week that you want to offer dynamic prices on.
Boost Your Store’s Revenue With Dynamic Content
WooCommerce dynamic pricing is a great way to boost your store’s revenue by encouraging your shoppers to buy more and more often. They get discounts on the items they already want and you get higher revenue per order and lifetime value – it’s a win-win.
To set up dynamic pricing on your WooCommerce store, you have a variety of plugins, including free and paid options. We showed you how to set up dynamic pricing using the free Advanced Dynamic Pricing for WooCommerce plugin, but the other plugins operate on much the same principles and might be a better fit for your needs depending on the types of pricing rules that you want to create.
Best of all, you can still use these plugins even if you’re using Elementor WooCommerce Builder to customize your product page designs. As we showed you in the example, Advanced Dynamic Pricing for WooCommerce functions just like normal even when using a WooCommerce Builder template (remember – details like the bulk pricing table will show up wherever you add the Add to Cart widget).
If you already have a store, start applying these principles today. And if you haven’t launched your store yet, we have some guides to help you out. You can check out our best WooCommerce hosting post and then our full WooCommerce tutorial.
Once you have your store, we have guides on the best WooCommerce themes, setting up WooCommerce SEO, and finding the best WooCommerce plugins.
Do you still have any questions about WooCommerce dynamic pricing? Let us know in the comments!
Looking for fresh content?
By entering your email, you agree to receive Elementor emails, including marketing emails,
and agree to our Terms & Conditions and Privacy Policy.


