Table of Contents
When you create a website for yourself or clients, you don’t just want it to look good on a surface level, but you also want to guarantee that it’s going to function exactly as expected both now and in the future.
Performing website QA testing helps you do that by letting you systematically test your site to uncover mistakes or other potential problems before making it live.
In this post, we’ll show you how to perform a website QA test for your site, along with including a checklist version of this post that you can use to test all of your sites.
Table Of Contents
- What Is Website Quality Assurance (QA)?
- Why Do You Need to QA Test Your Website?
- How To Perform a Website QA Test
- 1. Form Input and Validation
- 2. HTML/CSS Validation
- 3. Cookie Testing
- 4. Link Testing
- 5. Website Security
- 6. Mobile Responsiveness
- 7. Accessibility
- 8. Functionality Testing
- 9. Payment Gateways (If Applicable)
- 10. UI Testing
- Download This Website QA Guide as a Checklist
What Is Website Quality Assurance (QA)?
Quality assurance (QA) is the process of testing your website to uncover mistakes, problems, or other oversights that you might’ve missed during the website development and design phases.
The important thing about QA is that it’s a comprehensive and ongoing task, whereas regression testing, requirements testing, user testing, and other common types are more focused on singular issues.
You should also perform QA testing before launching a website, whereas other tests like user testing are only performed once the site is live.
Why Do You Need to QA Test Your Website?
QA testing helps you make sure that your website is ready for prime time and that your site’s visitors will have a great experience from day one.
If you’re building websites for yourself, QA testing is important to ensure a good visitor experience. But if you’re building websites for clients, it’s doubly important to make sure that the site you’re turning over to clients is functioning properly.
On a more specific level, implementing detailed website QA testing will:
- Improve the functionality of your website by detecting potential problems.
- Help you look more trustworthy and build your brand (because having a buggy site makes you look bad).
- Save you time and money in the long run because you can catch issues early on before they grow into bigger problems.
How To Perform a Website QA Test
Now, let’s get into the guts of how to perform a website QA test. To do this, we’ll run over some of the most important areas to check, along with some tools that you can use to help where applicable.
If your site isn’t live yet, you can perform these tests on a staging site.
1. Form Input and Validation
If you have forms (which most websites will), it’s important to test the configuration of your form(s) to verify inputs, field validation, and form functionality.
For example, if you have a “Name” field, you don’t want to let users enter numbers in that field (and vice versa). You’ll also want to make sure that “Required” fields are marked as required. Check for:
- Data input validity.
- The allowed values in each field.
- What happens when there are invalid inputs (e.g. does the user get a message so they know what’s wrong?).
By going this, you can ensure that the form collects all the data that it needs and that the data is in the proper format.
2. HTML/CSS Validation
Creating validated HTML and CSS code is important to debug issues, ensure future-proofing, simplify future maintenance, and just generally maintain good best practices.
To validate your site’s code, you can find a number of free online tools that let you validate a page by entering its URL. Some popular options are the W3C’s Markup Validation Service and CSS Validation Service.
Both tools will provide a list of validation issues for you to fix:
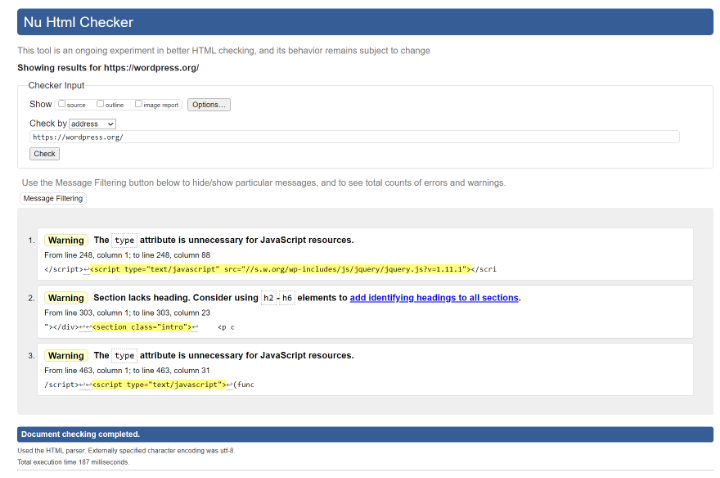
Or, you can also find browser extensions that make it easier to validate multiple pages. A popular option is the HTML Validator extension for Chrome and Firefox. It validates against the same W3C criteria but is embedded inside your browser and doesn’t need to make an external connection (which means you can use it to test local HTML content as well).
3. Cookie Testing
Cookies are files that are stored on a visitor’s browser when they visit your site. For example, if you log in to a site, that site will add a cookie for your login session.
To QA test your site’s cookies, you should test your website in various scenarios, such as testing with cookies enabled and cookies disabled to make sure everything still works. You should also test your cookies for security – Geekflare’s tool can help you catch potential cookie security issues.
Note – if you’re using WordPress, WordPress should automatically take care of most cookie issues for you.
4. Link Testing
Broken links are horrible for user experience and also bad for SEO – a double whammy that makes it very important to avoid them.
To test for broken links, you can use a free plugin like Broken Link Checker or you can use a cloud-based tool like the free Ahrefs broken link checker.
Once you find the offending links, you can change the link or set up a redirect to send users to the right spot if you’re unable to change the link for some reason.
Beyond testing for broken links, you should make sure that key links are going to the proper page (even if they aren’t broken). For example, test all the links in key navigation areas to make sure they go to the proper destination.
5. Website Security
Website QA for security is important so that you can assess your site for potential security vulnerabilities and prevent future issues.
There are several different issues to check here:
- Test your SSL/HTTPS connection to make sure it’s working properly – you can use Qualys’s free tool to validate. Also, make sure that all HTTP traffic is redirected to the HTTPS version of your site.
- Make sure users can’t download files or access pages that are supposed to be restricted.
- Check CAPTCHAs for proper functioning.
- Make sure users cannot log in with an invalid username or password.
To learn more about security for WordPress, you can browse our WordPress security checklist and our collection of WordPress security plugins.
6. Mobile Responsiveness
Mobile-responsive design is essential nowadays, especially given that more than half of Internet traffic happens on mobile devices and Google has moved to a mobile-first index.
However, responsive design can also introduce some QA issues, such as buttons/links that are difficult to tap.
To test your site for issues, you can use Google’s Mobile-Friendly Test. It will list out specific issues that you can fix.
Chrome Developer Tools can also be useful here as it lets you quickly preview your site as different devices:
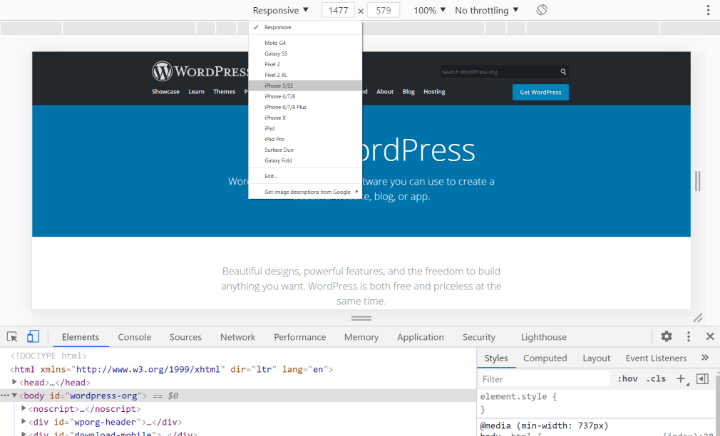
For more heavy-duty testing, you can use a paid tool like BrowserStack
We also have some tips on designing responsive WordPress websites with Elementor.
7. Accessibility
Creating an accessible website is important for both creating a better experience for all visitors and also for legal compliance in some jurisdictions.
When it comes to accessibility, validating your site against the Web Content Accessibility Guidelines (WCAG) is a great place to start. W3C maintains a list of web accessibility evaluation tools that you can use to help you test your site. WAVE (Web Accessibility Evaluation Tool) can also be a helpful tool – it has browser extensions for Chrome and Firefox so that you can easily test accessibility in your browser as well:
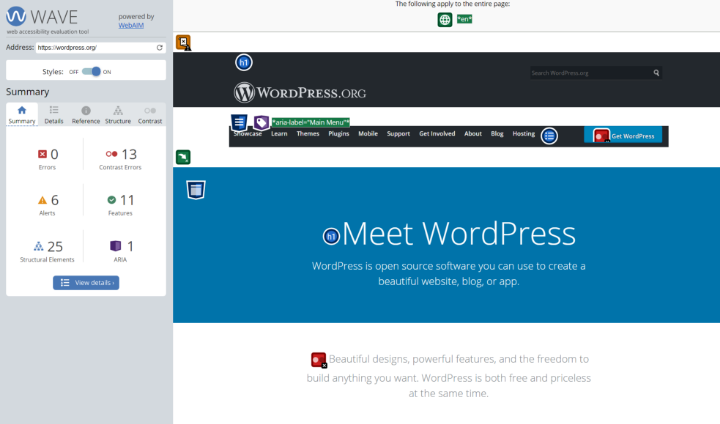
Or, for WordPress, you can also use a plugin like Accessibility Checker, which can help you test your entire site for accessibility issues and provides lots of documentation to help you fix problems.
Website accessibility is an important and complex topic, so we also have some dedicated guides to help you out. You can follow our tips to design for web accessibility and also our general guide to improving WordPress website accessibility.
8. Functionality Testing
We’ve already talked about some functionality testing with checking links and forms, but it’s important to also check other key functions to make sure they’re behaving properly.
For example, if you have a WooCommerce store with product filters, you’ll want to make sure that the product filters function as expected.
Some other common issues to check when it comes to functionality testing include:
- Drop-downs.
- Buttons.
- Process flow – can your visitors complete the full journey that you want them to complete? For an e-commerce store, this might be making sure visitors can go from “single product -> add to cart -> shopping cart -> checkout -> order confirmation.
For small sites, you might be able to do this manually. For more heavy-duty testing, you can consider using a tool like Selenium to automate your testing, or, a low-code AI-powered testing tool like Testim.
9. Payment Gateways (If Applicable)
If you have an e-commerce store or other website that accepts any type of online payment, it’s important to test payment gateways to make sure they’re working.
Most payment processors include some type of “test mode” that lets you perform transactions using dummy data. For example, Stripe maintains a testing page that lets you test both general transactions, as well as various debug situations (such as a user’s address verification failing). Braintree (from PayPal) does the same.
These test sandboxes are great for QA – just remember to enable live transactions when your website goes lives.
10. UI Testing
UI testing involves testing the design and interface of your website to make sure that it’s consistent and it also looks correct in all browsers and situations. In this area, you should test:
- Design consistency – are the colors, fonts, font sizes, layouts, buttons, etc. all consistent across your entire site?
- Screen resolutions – does your site look good at all resolutions? It’s not just small resolutions – many visitors now have 2K or even 4K screens, so your site needs to work at high-resolution, too.
- Browsers – does your site look correct in all browsers? You can use tools like BrowserStack or CrossBrowserTesting to quickly test variables.
- Localization – if you have a multilingual website, do key interface elements still function properly? It’s easy for layouts and interface designs to get messed up when translating content because the translation might take up more or less space.
Download This Website QA Guide as a Checklist
Want a checklist version of these tips that you can use in the future? Just click below to download a PDF checklist version of this post:
Maximize Your Site’s Quality With QA Testing
If you want to make sure your website is fully functioning and error-free, it’s important to perform website QA testing. QA testing doesn’t just help you solve problems in the present, but it also sets up a strong foundation to prevent problems in the future.
In this post, we’ve taken you through some of the most important steps to running a successful website QA. To make sure you’re implementing this for all your websites, you can download this post as a PDF checklist for easy use in the future.
For some other tips on getting your website ready for launch, check out our full website launch checklist.
Do you still have any questions about running a website QA test or applying these principles to WordPress and Elementor? Let us know in the comments section!
Looking for fresh content?
By entering your email, you agree to receive Elementor emails, including marketing emails,
and agree to our Terms & Conditions and Privacy Policy.


