Table of Contents
The WordPress sidebar is a fixture on many WordPress sites. It gives you a vertical space alongside your content where you can help your readers navigate, grow your email list or social following, display ads, and more.
Because it’s such an integral part of so many WordPress sites, we thought the sidebar deserved its own mega guide. In this post, we’ll take you through everything you could ever want to know about the WordPress sidebar.
There’s a lot to cover, so let’s get started.
Table of Contents
- What Is a WordPress Sidebar?
- What Can You Use the WordPress Sidebar For?
- How to Control WordPress Sidebars From Your Theme
- Manage Sidebars From WordPress Customizer
- Manage Sidebars for Individual Pieces of Content
- Manage Widgets via WordPress Customizer
- Manage Widgets via Dedicated Widget Area
- How to Add a Custom Sidebar in WordPress
- How to Remove A Sidebar in WordPress
- How to Display Different Sidebars on Different Content
- Best WordPress Sidebar Plugins to Enhance Your Sidebar
What Is a WordPress Sidebar?
A WordPress sidebar is a vertical column that’s placed on either the right or left side of your main content area. It gives you space outside of your primary content area where you can include additional content, navigation menus, and more.
While your primary content will change from page to page, your sidebar is typically the same for every page (though there are tactics you can use to customize your sidebar).
By default, your WordPress sidebar is controlled by your chosen theme. Out of the box, your theme will control:
- Whether or not you have a sidebar in the first place
- Which side the sidebar is on
- How many sidebars to use (for example, some themes let you use two sidebars at the same time)
However, with the tactics that we’ll show you in this post, you can add a sidebar to any WordPress theme, even if your theme doesn’t come with a sidebar by default.
Four Examples of Website Sidebars
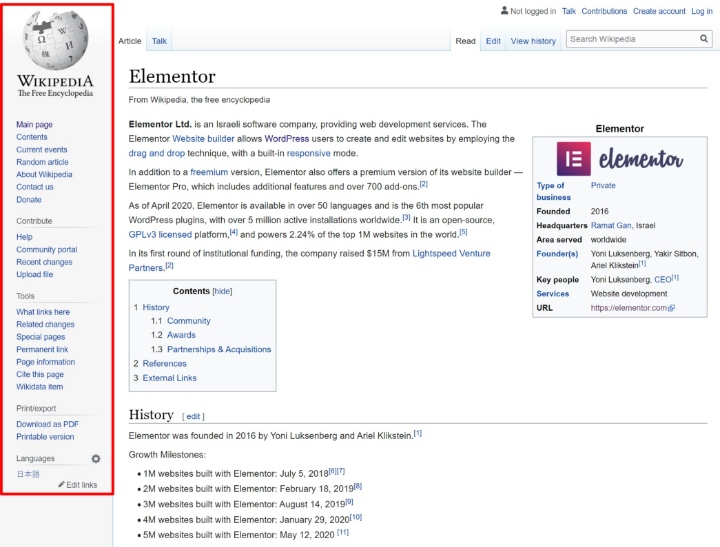
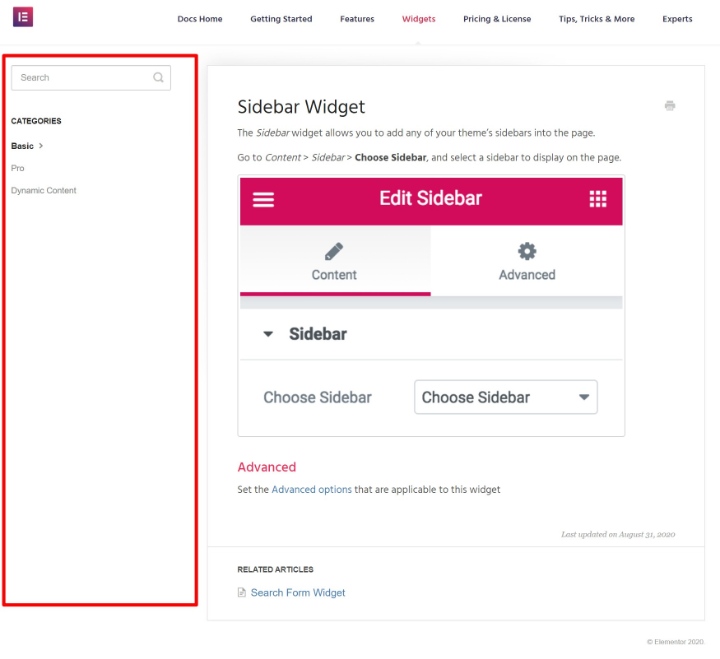
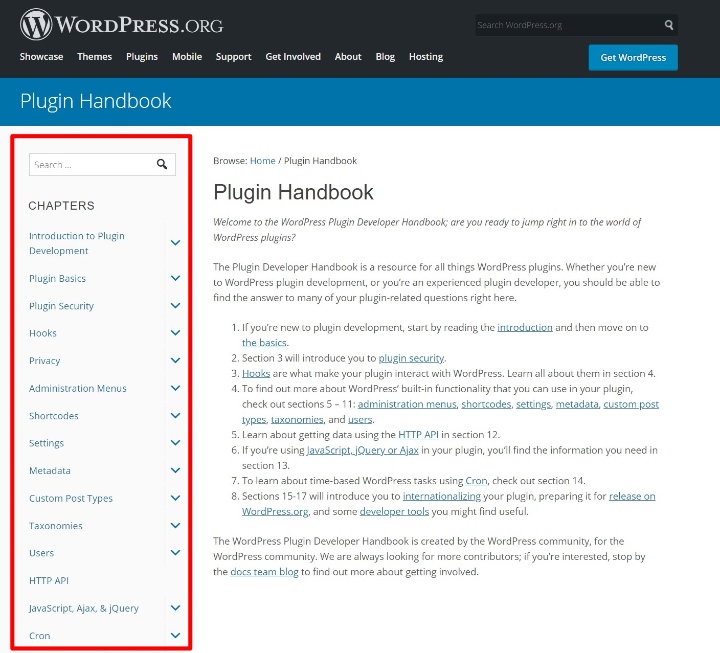
A picture is worth a thousand words, so let’s look at some examples of sidebars to drive home the point. On each example, we’ll highlight the sidebar area with a red box:
1. Wikipedia
2. TechCrunch

How Can You Add Content to WordPress Sidebars?
To add content to your sidebar, you can use WordPress widgets. This is why some people also refer to your sidebar as a “widget area”.
Each widget is one piece of content. For example, you might use one widget to add a search box, another to add an email subscribe form, and so on. We’ll show you this in detail later on.
What Can You Use the WordPress Sidebar For?
Sidebars can be useful in a ton of different ways. Here are some examples:
- Search – you can add a search box to your sidebar to help people find content.
- Navigation – you can use your sidebar as another navigation aid. For example, you could list all of the categories in your blog sidebar.
- Call to action (CTA) – you can add CTAs to drive people to action. For example, if you launched a new online course, you could promote that course with a CTA in your sidebar.
- Email opt-ins – you can add an opt-in form to grow your email list.
- Social media follow/share – you can use your sidebar to encourage people to follow you or share your content on social media.
- Ads – if you rely on advertisements to generate revenue, your sidebar is a great place to put them.
- Featured content – you can feature your most popular posts, recent posts, related content, and more.
Most importantly, you can use multiple strategies at once. For example, in one sidebar, you could include a search box, some navigation links, ads, and more.
Of course, there’s nothing forcing you to use a sidebar. In fact, we don’t use a sidebar here on the Elementor blog. The main advantages of skipping the sidebar are that you give your main content more room and you create a more distraction-free experience for your visitors (because there’s no sidebar content competing for their attention). This is why we’re also going to show you how to remove a WordPress sidebar if you prefer that approach.
Flywheel has an excellent post on the pros and cons of using a sidebar on your WordPress site.
How to Control WordPress Sidebars From Your Theme
Later in this post, we’ll show you how to create a custom sidebar if your theme doesn’t include a sidebar (or doesn’t have enough sidebars). However, for now, let’s assume that your WordPress theme already supports a sidebar and talk about some of the common ways that you can control how your sidebar works.
These examples will not hold true for all WordPress themes, but they will apply to most modern WordPress themes.
Note – if you’re using the free Hello theme, the Hello theme intentionally doesn’t include sidebars by default to keep things lightweight. We’ll show you how you can add sidebars to Hello (and other themes) later in this post.
Manage Sidebars From WordPress Customizer
The first spot to look to control your theme’s sidebar is the WordPress Customizer. If your theme includes a sidebar and features to customize it, they’ll usually be here.
The exact settings area depends on the theme, but typically you’ll want to look for something like “Layout Settings”, “General Settings”, “Sitewide Settings”, etc.
For example, with the OceanWP theme, you can choose from different sidebar configurations in the General Settings. You can use a right sidebar, a left sidebar, or sidebars on both the right and left.
You can also configure the width of the sidebar:
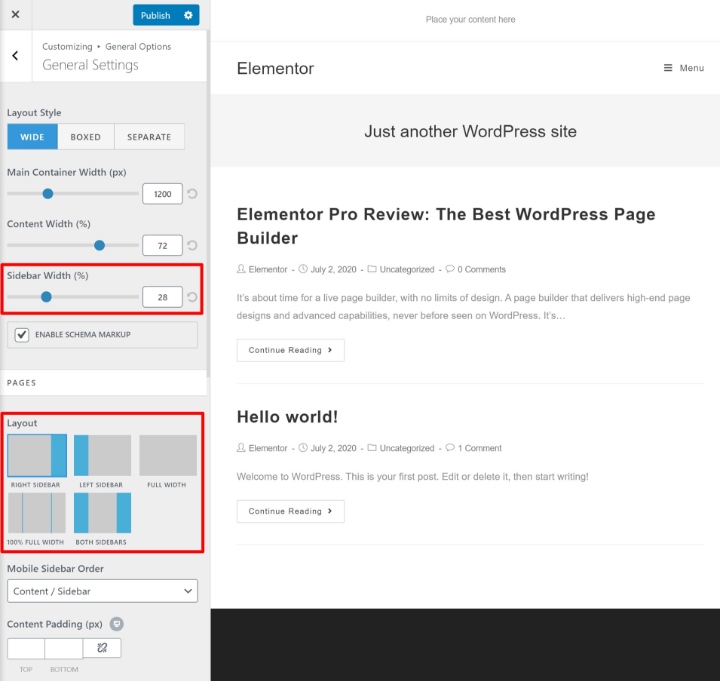
If you can’t find these settings, try exploring different areas in the WordPress Customizer. Or, consult your theme developer’s support documentation.
Manage Sidebars for Individual Pieces of Content
Some themes also give you page-level settings that let you control the sidebar for individual posts or pages.
If your theme has this feature, you should see these options when you’re working in the WordPress editor. They might appear as a meta box underneath the editor. Or, some themes also add them in the Document sidebar.
For example, with the OceanWP theme, you get options to choose a different sidebar layout on individual pages/posts:
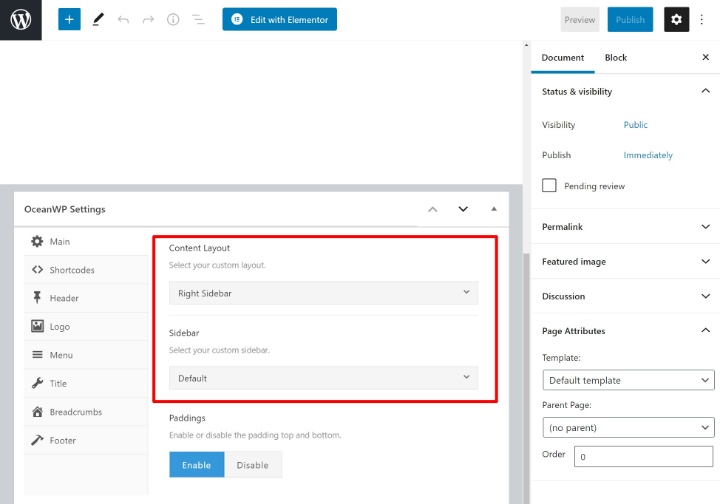
Again, not all themes include these types of page-level sidebar controls.
How to Add Widgets to the WordPress Sidebar
Your sidebar is an area on your site. But to add content to that area, you need to use WordPress widgets.
There are two ways that you can add widgets (content) to your theme’s existing sidebar:
- The WordPress Customizer
- The dedicated widgets area
Both areas automatically sync, so it’s totally fine to use either. The advantage of using the WordPress Customizer, however, is that you’ll be able to see how your widgets look in real-time on the live preview of your site.
Manage Widgets via WordPress Customizer
To manage your sidebar widgets via the WordPress Customizer, go to Appearance → Customize.
Then, select the Widgets menu option. First, you’ll be prompted to select the widget area that you want to manage. Depending on your theme, you might only see a single option. Or, you could see multiple options, including non-sidebar areas (like your footer):
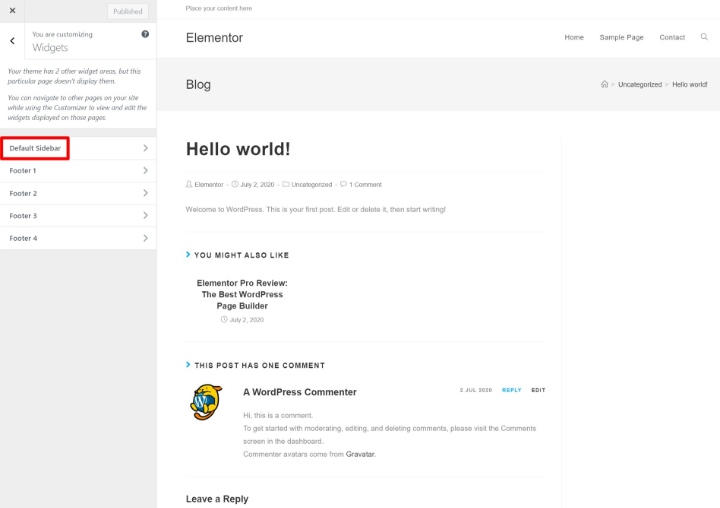
Then, you can click the Add a Widget button to start adding widgets to your sidebar. After you add the widget, you can configure it using the options in the sidebar:
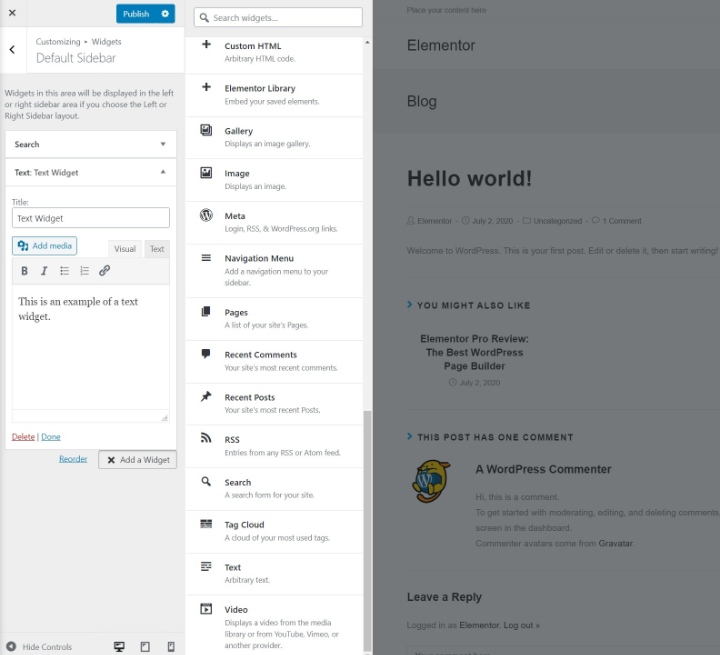
As you add new widgets, you’ll immediately see them appear on the live preview of your site. You can also use drag-and-drop to rearrange the order of the existing widgets.
Manage Widgets via Dedicated Widget Area
In addition to the Customizer, WordPress also includes a dedicated widget area that you can access by going to Appearance → Widgets.
Here, you’ll see all of your available widgets, as well as all of your theme’s sidebar areas (and other widget areas, like footers).
To add widgets, all you do is drag them over to the sidebar section. Then, you can customize their content by expanding the widget’s options:
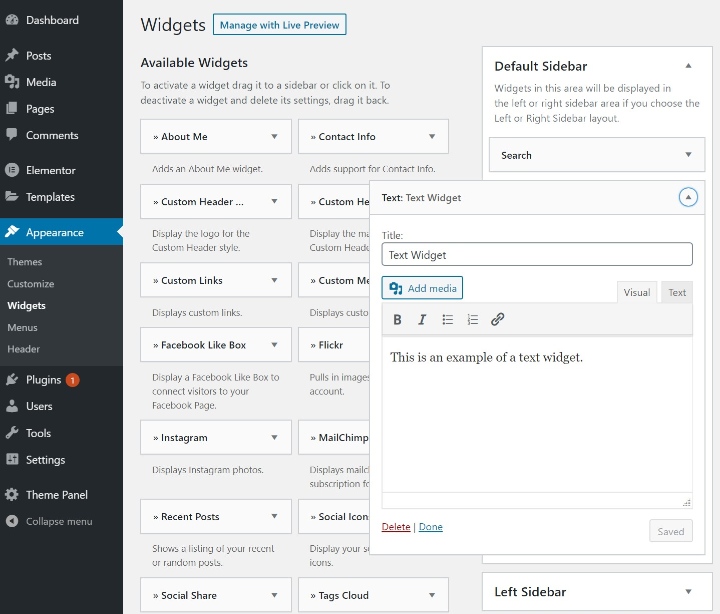
You can also rearrange the order of widgets in your sidebar by using drag-and-drop.
Use Elementor to Design Custom Widgets
If you have Elementor Pro, you can use Elementor’s visual, drag-and-drop interface to design content that you include in your sidebar.
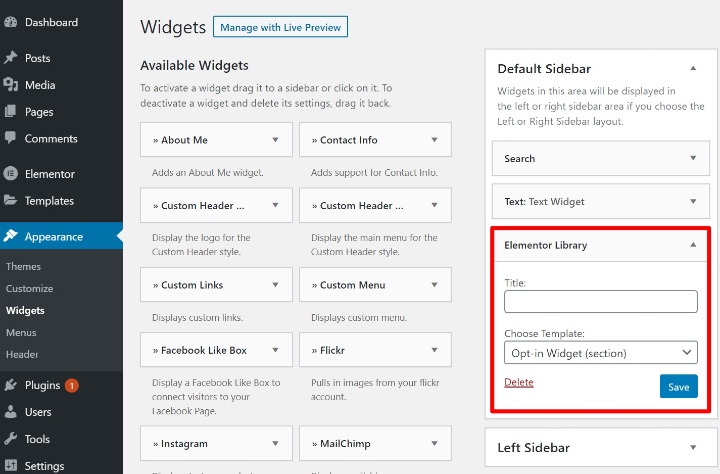
To achieve this, go to Templates → Add New and create a new Section template. For example, you could create a template that includes an email opt-in form or a call to action (CTA). Make sure to publish your template when you’re finished.
Next, add the Elementor Library widget to your sidebar where you want your template to appear. Then, use the Choose Template drop-down to choose the specific template that you want to add to your sidebar:
How to Add a Custom Sidebar in WordPress
So far, we’ve assumed that your theme already has support for sidebars and gives you built-in settings to control them.
However, what if that’s not the case? Some situations you encounter could be:
- Your theme doesn’t have any built-in support for sidebars. This is true of the Hello theme because Hello aims to create the most lightweight foundation possible.
- Your theme only includes one sidebar area but you’d like to add another one.
Thankfully, it’s pretty painless to create a sidebar. There are two basic steps here:
- You register your custom sidebar with WordPress via a simple code snippet.
- You edit your site to display the sidebar on the front-end (via a plugin or code)
1. Register Your Sidebar
Before you can add widgets to your sidebar and display them on the front-end of your WordPress site, you need to register your sidebar(s) with WordPress.
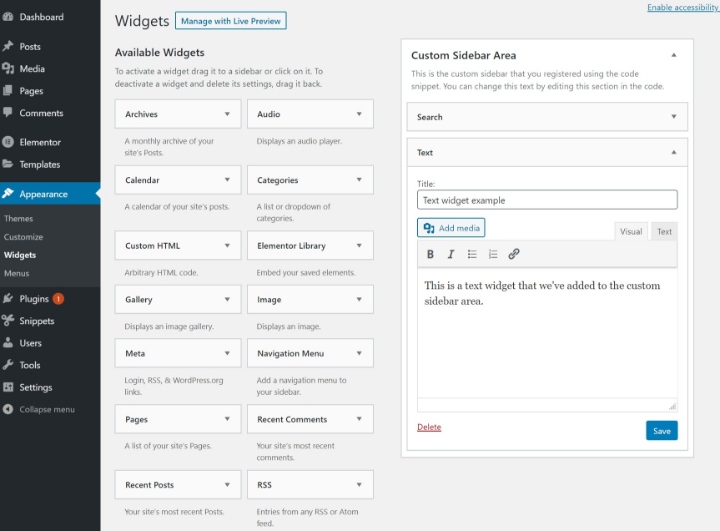
Once you’ve registered your WordPress custom sidebar, it will show up when you go to Appearance → Widgets and you’ll be able to add widgets using the method from the previous section.
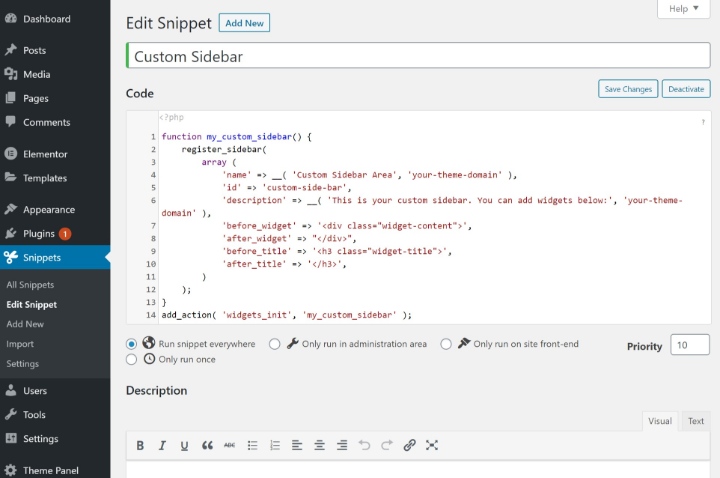
To register your custom sidebar, all you need to do is add a small code snippet to either:
- The functions.php file of your theme (make sure you use a child theme if doing so).
- A free snippet manager plugin like the Code Snippets plugin.
Using the Code Snippets plugin (or something similar) is the simplest solution because it eliminates the need to use a child theme.
Here’s the code snippet that you need:
function my_custom_sidebar() {
	register_sidebar(
		array (
			'name' => __( 'Custom Sidebar Area', 'your-theme-domain' ),
			'id' => 'custom-side-bar',
			'description' => __( 'This is the custom sidebar that you registered using the code snippet. You can change this text by editing this section in the code.', 'your-theme-domain' ),
			'before_widget' => '<div class="widget-content">',
			'after_widget' => "</div>",
			'before_title' => '<h3 class="widget-title">',
			'after_title' => '</h3>',
		)
	);
}
add_action( 'widgets_init', 'my_custom_sidebar' );
And here’s what that snippet looks like in the free Code Snippets plugin:
2. Display Your Sidebar
Once you’ve registered your sidebar, you should see it show up as an option when you go to Appearance → Widgets. If you want, you can start adding widgets to your custom sidebar just like we showed you before:
However, you’re not quite finished yet – you still need to configure WordPress so that it displays your custom sidebar (and its widgets) on the front-end of your site.
Here, you have two options:
- Elementor’s Theme Builder – you can use a visual, drag-and-drop interface to configure everything and add your sidebar. You don’t need to know any code.
- Code – you’ll need at least a basic understanding of PHP, HTML, and CSS.
How to Create a Sidebar With Elementor
With Elementor, you can create new templates for any part of your theme. For example, if you create a new template for your “Pages”, all of your pages will automatically use that template.
You can do the same for your blog posts (or custom post types). You can also conditionally apply your templates to different content, which is useful because it lets you add a sidebar to some pieces of content but not others.
To use Elementor to display your custom sidebar, you’ll basically create a new post or page template that includes your sidebar alongside your main content area.
To get started, go to Templates → Theme Builder. Then, choose where you want to add your sidebar first – either Single Post or Single Page:
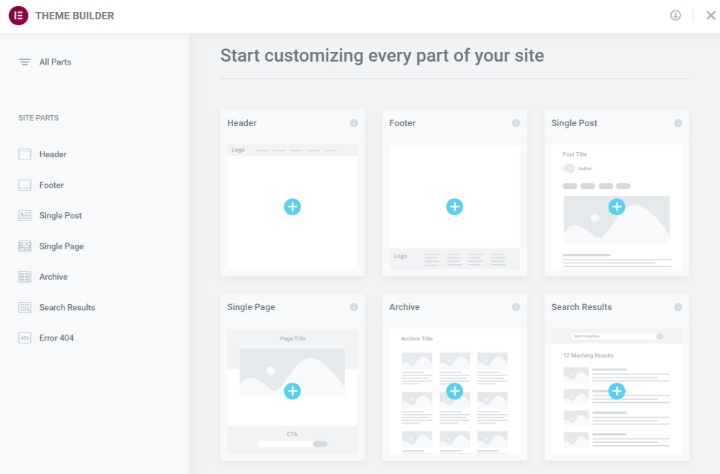
To save time, you can choose one of the premade templates. Or, you can build your design entirely from scratch. The simplest option is to just choose one of the templates that already includes a sidebar:
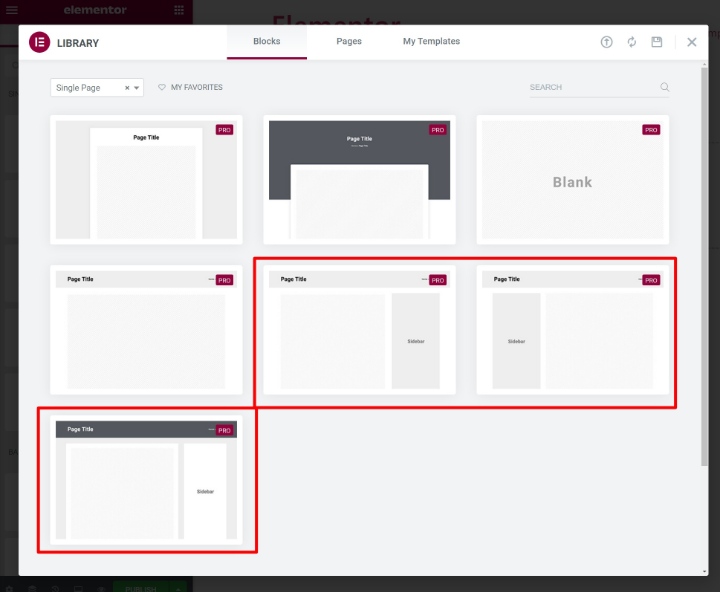
If you opt to design your template from scratch, just make sure to use two columns and add the Sidebar widget where you want your custom sidebar to appear.
Then, edit the Sidebar widget and use the Choose Sidebar drop-down to select the custom sidebar that you registered in the previous step.
Once you do that, you should see a live preview of any widgets that you’ve already added:
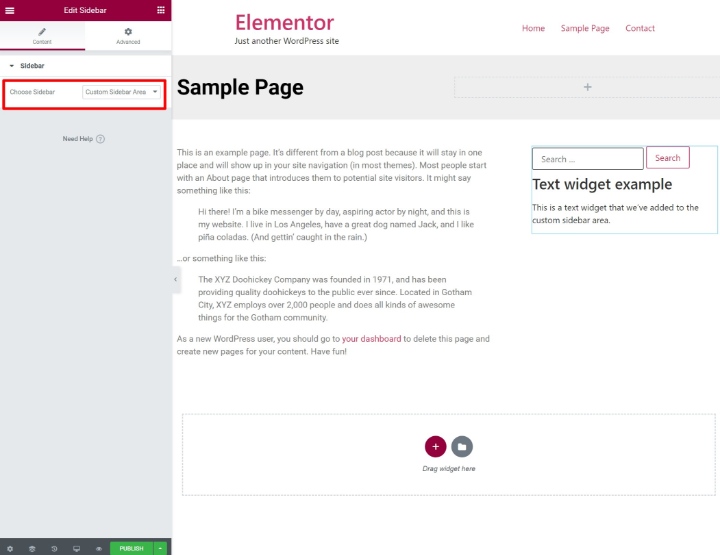
As you add new widgets via the WordPress Customizer or the dedicated widgets area, they will automatically appear in this sidebar area.
To finish things out, make sure to Publish your template. When you do, you can use display conditions to control where your sidebar template appears. You can either display it on all content (to use your sidebar sitewide). Or, you can use the display rules to only add your sidebar to specific content.
How to Add Your Sidebar With Code
Unless you feel comfortable working with HTML/CSS/PHP, you should stick with the Elementor method above.
To display a WordPress custom sidebar with code, you’ll need to directly edit your theme’s template files. Because you’re making direct edits to your theme, it’s essential that you use a WordPress child theme. This will prevent your changes from being overwritten when you update your theme.
To learn more about child themes and how to create them, you can read the comprehensive guide to WordPress child themes.
Once you’ve created your child theme, copy the single.php file from your parent theme’s folder to your child theme’s folder. Then, edit the single.php file and add the following snippet where you want your custom sidebar to appear:
<?php if ( is_active_sidebar( 'custom-side-bar' ) ) : ?>
	<div id="primary-sidebar" class="primary-sidebar widget-area" role="complementary">
		<?php dynamic_sidebar( 'custom-side-bar' ); ?>
	</div><!-- #primary-sidebar -->
<?php endif; ?>
To make sure the sidebar appears in its own column, you’ll likely also need to add some custom CSS. This is why the Elementor method from above makes a better option if you’re not a developer.
Depending on how you want to set things up, you might also need to add this snippet to additional template files (like archive.php, etc.)
For a deeper look at this topic, you can consult this WordPress Codex entry.
How to Remove A Sidebar in WordPress
Now, let’s go the other direction and talk about how to remove a sidebar that you don’t want to use. For example, maybe your theme comes with its own sidebar, but you’d rather use a full-width template for some or all of your content.
To remove a WordPress sidebar, you have the same two options as creating a custom WordPress sidebar:
- Elementor Pro
- Code
However, before you turn to these options, make sure that your theme doesn’t include a built-in feature to let you disable the sidebar. Many themes give you an option in the WordPress Customizer where you can disable the sidebar without any manual action on your part. Or, your theme might already come with a full-width template, which you can select when working in the WordPress editor.
If your theme doesn’t include this option, here’s how to manually remove your sidebar.
How to Remove a Sidebar With Elementor
To remove your WordPress sidebar with Elementor, all you need to do is create a template that doesn’t include a sidebar area. Then:
- If you want to completely remove your sidebar from all content, you can use this template sitewide.
- If you only want to remove your sidebar from certain content, you can conditionally display your sidebar-less template wherever it’s needed.
To get started, go to Templates → Theme Builder and choose where you want to remove your sidebar first – either Single Post or Single Page:
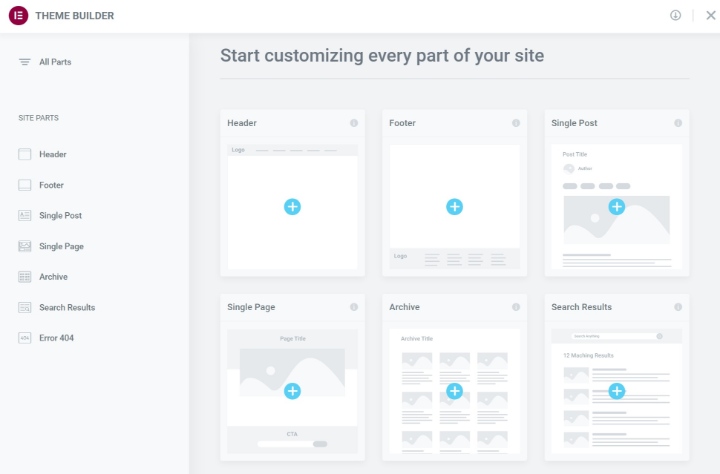
To save time, you can choose one of the premade templates that don’t have a sidebar. Or, you can also build your design from scratch – just don’t add the Sidebar widget!
Once you’re finished, you can Publish your template and use the display conditions to control where it appears.
How to Remove Your Sidebar With Code
You can also remove a WordPress sidebar by directly editing your theme’s template files and removing the PHP snippet that displays the sidebar.
Because you’ll be editing your theme’s files, make sure to use a child theme. Then, copy over the template files for the content where you want to remove the sidebar. For example, single.php, archive.php, etc.
Edit those files and remove all instances of <?php get_sidebar(); ?> (or similar variations – the code might look slightly different).
You might also need to adjust the HTML and CSS to make sure everything looks right.
If you’re not familiar with PHP, HTML, and CSS, we recommend sticking with the Elementor method because it eliminates the need to use code.
How to Display Different Sidebars on Different Content
In an earlier section, we talked about how to add a sidebar in WordPress even if your theme doesn’t support it.
However, what if you want to take your existing sidebar area, but just display different sidebars on different content? This would let you display different collections of widgets for certain types of content.
For example, maybe you want to use one set of widgets for blog posts in your “Reviews” category and a different set of widgets for blog posts in your “Tutorials” category.
The easiest way to display different sidebars on different content is Elementor. You do this as follows:
- First, create several Elementor templates, as explained above. Each template should have its own sidebar.
- Then, go to conditions and assign each template to the relevant category, page, or other condition.
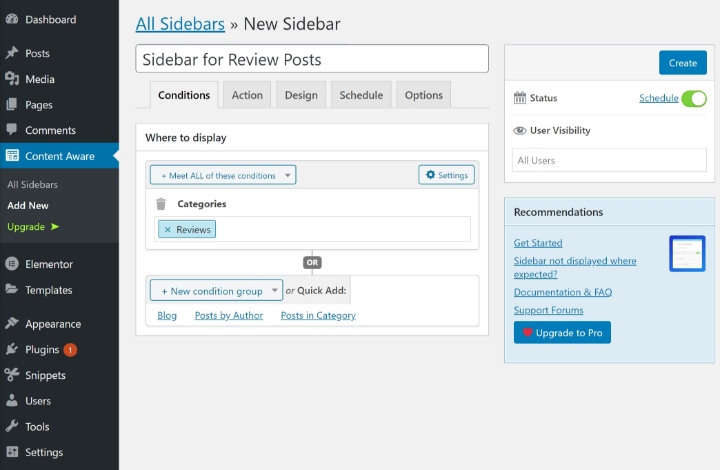
Additionally, to achieve this functionality, you can use the free Content Aware Sidebars plugin. Once you install and activate the plugin, go to Content Aware → Add New to get started.
First, choose the conditions for when you want to replace your default sidebar with the new sidebar that you’re creating. For example, if you want to use this sidebar for all blog posts in the “Reviews” category, create a Categories condition:
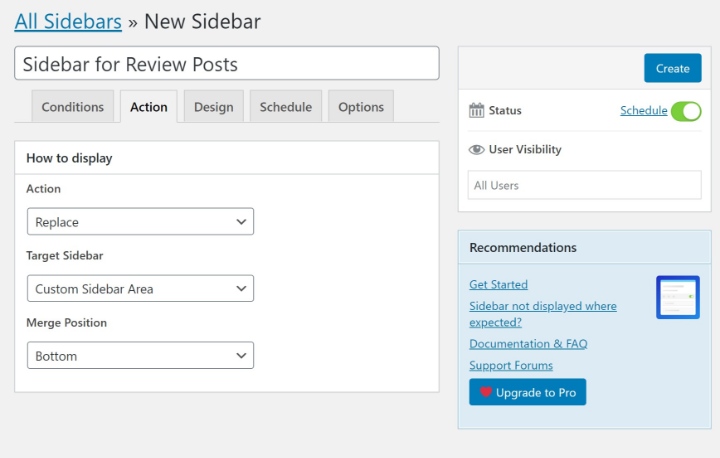
Next, go to the Action tab and choose which sidebar you want to replace. Or, you can also “merge” sidebars to include content from both:
You can peruse the other tabs for some additional settings, but there’s nothing else you need to configure.
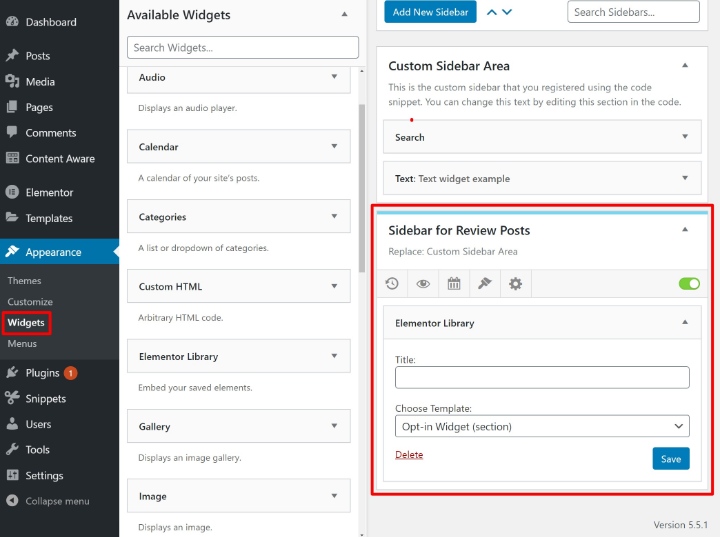
Once you’ve made your choices, click Create. Then, go to Appearance → Widgets to add content to your conditional sidebar:
8 Best WordPress Sidebar Plugins to Enhance Your Sidebar
To finish things out, let’s go over some of the best WordPress sidebar plugins that can enhance how you work with sidebars and what content you can include.
Some of these plugins add useful new widgets that you can include in your sidebars, while others adjust the sidebar itself. You’ll also see a few familiar faces from the tutorial sections above.
1. Elementor Pro / Theme Builder
Elementor Pro helps you with your sidebars in two big ways.
First, Theme Builder is great for letting you add, move, or remove sidebar areas without requiring any coding knowledge. As we showed you above, you can easily create your own theme templates that include zero, one, two (or more) sidebars. Better yet, you can do this all from a visual, drag-and-drop interface.
Second, Elementor Pro also lets you create custom designs for your sidebar. You can create opt-in forms, CTAs, and more using the visual interface. Then, you can easily add them to any sidebar by saving the template and using the Elementor Library widget.
2. Content Aware Sidebars
Content Aware Sidebars, which we also featured above, makes it easy to conditionally replace your default sidebar with different sidebars for different content. This helps you optimize how you use your sidebars by letting you personalize the sidebar content to the exact content that visitors are viewing.
3. WordPress Popular Posts
WordPress Popular Posts is a useful plugin that lets you display your most popular content in your sidebar. You can display popular content by different metrics like all-time visits, visits last week, comments, and more.
It also works with custom post types. For example, you could use it to display your most popular WooCommerce products on an eCommerce store.
4. Recent Posts Widget With Thumbnails
Recent Posts Widget With Thumbnails gives you another option to display content in your sidebar. Only this time, it’s your most recent content, not your most popular content like the previous plugin.
While WordPress does come with a default widget to display your recent posts, the advantage of this plugin is that it gives you a lot more flexibility, including the option to include featured image thumbnails in the list of posts.
5. Q2W3 Fixed Widget for WordPress
Q2W3 Fixed Widget for WordPress lets you make certain widgets in your sidebars “sticky”. That is, even if a user scrolls down past the widget, the widget will remain “stuck” to the sidebar and always visible.
This is a great way to highlight key widgets and it’s also a tactic that many sites use to display sticky ads.
6. Advanced Sidebar Menu
If you want to use your sidebar to help visitors navigate your site, Advanced Sidebar Menu helps you create a more optimized navigation section for pages or categories by factoring in the parent/child relationships of pages and categories.
For example, you can automatically indent child categories, choose how many “levels” to display, and lots more.
And be sure to check our step-by-step guide on how to create a vertical sidebar navigation menu.
7. Ad Inserter
Ad Inserter is a super useful plugin if you want to display advertisements in your sidebar (or anywhere else on your site). It helps you manage your ads, automatically inject them into widgets, and perform lots of other useful actions based on advertising.
8. Widget Options
Widget Options is kind of like Content Aware Sidebars. But instead of displaying completely different sidebars based on various conditions, it lets you show/hide individual widgets based on conditions that you set.
Basically, if you don’t need the full flexibility of Content Aware Sidebars, this plugin gives you a more targeted approach by letting you work with individual widgets.
Take Full Advantage of the Powers of a WordPress Sidebar With Elementor
If you’re using WordPress, it’s important to understand the WordPress sidebar so that you can get the most from your site. After reading this post, you should have all the knowledge you need to get started.
You’ll be able to control your theme’s existing sidebar and add content, or, if your theme doesn’t include a sidebar, you know how you can easily add one using Elementor Pro.
If, however, you have decided you want to go the opposite direction and remove your theme’s sidebar for a more distraction-free interface, that’s fine, too, and Elementor can also help you get the job done without requiring any code.
Do you still have any questions about the WordPress sidebar? Let us know in the comments and we’ll do our best to help!
Looking for fresh content?
By entering your email, you agree to receive Elementor emails, including marketing emails,
and agree to our Terms & Conditions and Privacy Policy.
