
Table of Contents
If you want to build custom, dynamic WordPress sites, it’s important to understand how WordPress custom fields work.
In a nutshell, custom fields let you store additional information about your blog posts, pages, custom post types, or even taxonomies (like categories and tags).
With Elementor Pro, you can even take the information from your custom fields and dynamically include it in your Elementor designs and Theme Builder templates (meaning you can use custom fields to edit WordPress themes and child themes).
Put simply, custom fields are one of the main keys to unlocking WordPress’s power as a full content management system. Because they’re so important and so useful for building custom websites with Elementor, we’re going to dedicate an entire post to WordPress custom fields and how to use them.
Here’s what we’ll cover:
- More about what custom fields are and how they help you
- How to add custom fields in WordPress
- How to display data from custom fields on the front-end of your site
- The difference between custom fields and post types/taxonomies (and when to use each)
- The best custom fields plugins for WordPress
Let’s dig in.
What Are WordPress Custom Fields?
As you learned in the intro, custom fields help you collect additional information about a piece of content on WordPress.
In technical terms, custom fields help you collect and manage metadata or “data that provides information about other data”.
When you add a new blog post in WordPress, you get to enter the title and content of the blog post in the editor. But what if you wanted to collect additional structured information?
For example, let’s say that you have a review blog and you want to assign a numerical rating to each review blog post that you publish.
You could add a new “Rating” custom field to your blog posts where you enter the number, along with some other useful information. These fields would get their own separate box and would be stored separately in the WordPress database (in postmeta). In fact, this is basically what most review plugins do.
Your next question might be – “why can’t you just add the rating in the WordPress editor with the text of the review.”
Well, you certainly could. However, separating this data into its own custom fields gives you a lot more flexibility. For example, you could:
- Automatically format the rating on the front-end of your site to create a styled review box.
- Ensure that all of your review posts use the exact same formatting.
- Use the review rating to query and sort content. For example, you could create a page that lists all of the reviews where you’ve given a perfect rating, or you could let visitors sort reviews by the review rating.
These benefits are even more pronounced for more complex sites. For example, imagine that you created a real estate listing site with thousands of houses. You wouldn’t want to manually create the design for each house, right?
Imagine having to manually format the number of bedrooms, bathrooms, etc. for every single listing. It would take forever!
Instead, you could just fill in the basic details for bedrooms, bathrooms, etc. using custom fields and let your template automatically format all that information for each house.
Examples of How Custom Fields Can Help You
To illustrate how powerful custom fields can be, let’s look at a few real examples of how you could use custom fields.
This is by no means a complete list — it’s just some ideas to get your creative juices flowing.
Ecommerce Products
WooCommerce is the most popular way to create an eCommerce store on WordPress, but it’s also a great example of WordPress custom fields in action.
If you want to create a working store, you’ll need to collect a lot of additional information about the products that you want to sell. For example, you’ll have:
- Prices
- Stock status
- Attributes
- Etc.
Custom fields let you store all of that additional metadata. WooCommerce then uses this data to properly display products on the front-end of your store.
Real Estate Website
Let’s go back to that real estate example from above.
If you want to use WordPress to create a real estate listing site, you’d first create a “House” custom post type. We’ll cover custom post types later on, but a custom post type is basically just another “type” of content like the default WordPress “Posts” and “Pages”.
When you add a new house, you would want the ability to easily collect information such as:
- Bedrooms
- Bathrooms
- Square footage
- Price
- Etc.
You could add a custom field for each piece of information so that you can easily enter it in the backend editor and then automatically display it on the front-end of your site according to your template.
Restaurant Website
If you’re building a restaurant website, you could use custom fields to help you easily create and maintain your menu.
You could create a new custom post type for “Menu Item”. Then, you could add custom fields to collect information such as:
- The dish’s price
- Any relevant dietary concerns (for example, you could add checkboxes to indicate if a dish is gluten-free, whether it’s vegetarian, etc.)
- Calories
- Etc.
As soon as you publish a new dish, it will automatically appear on the menu with all the proper formatting.
It’ll also be easier for non-technical users to add new menu items, change information, or remove menu items.
What Could You Use Custom Fields For?
Hopefully, these examples got your creative juices flowing.
The most important question is – how could custom fields help improve your next WordPress website?
Are there any repetitive content formatting tasks that you currently perform that could be automated with custom fields?
Would adding more information to your site help your users?
Have you ever wished that you could create more complex WordPress sites? Like a job listing board? Or a business directory? Anything that goes beyond “Posts” and “Pages”?
Do your clients keep breaking things because you gave them full access to the editor? This is a great solution – create custom fields for all the things a client might want to change and then only give them access to those custom fields. That way, they can never accidentally break something.
Almost every WordPress site could benefit from custom fields in some way – so think about how custom fields could help yours.
How to Add Custom Fields in WordPress
Now, let’s get into the more actionable steps of how to add and display custom fields on WordPress.
As is often the case with WordPress, there are two routes that you can follow to add custom fields:
- Use the manual method
- Use a plugin
In almost all situations, we would recommend that you use a custom field plugin. However, WordPress does include a native custom field feature, so we’re going to start our tutorial there.
How to Use the Native WordPress Custom Fields Feature (Manual Method)
Again, on a real WordPress site, you probably don’t want to use this feature. However, it’s a native WordPress feature, so we think it’s worthwhile to explain how it works.
You might never have seen it, but WordPress includes a feature to help you add custom fields from within the regular WordPress editor.
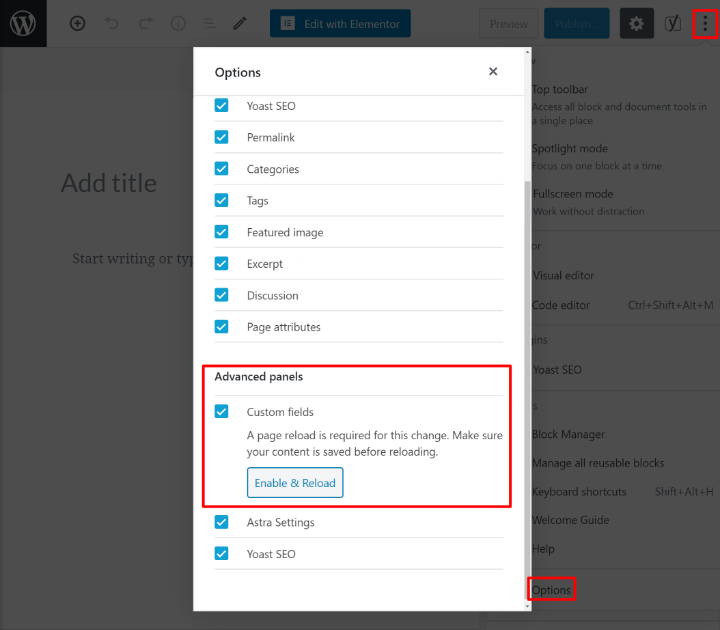
To make the custom fields interface visible, you need to open the menu in the top-right corner and select Options at the bottom. Then, check the box for Custom fields under Advanced panels.
You’ll then be prompted to reload the page to see the custom fields:
If you’re using the Classic TinyMCE editor, you can show custom fields by clicking the Screen Options toggle at the top of the interface and checking the box for Custom Fields.
Once you reload the page, you’ll see a new Custom Fields box somewhere below the editor.
You can use the Name column drop-down to select from existing custom fields on your site (you’ll probably see some from your theme or plugins). Or, you can create your own custom field name.
Then, you can use the Value box to enter the information that you want to include in the custom field:
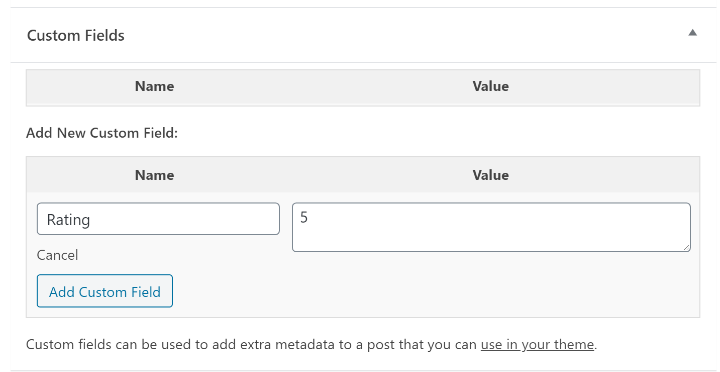
You could then display this information on your site using PHP.
A little underwhelming, right? We told you that the manual method isn’t very user-friendly. It’s also not very flexible for the types of information that you can add to your custom fields.
To really unlock the power of custom fields, you should use a plugin, so let’s cover that next.
How to Add Custom Fields to WordPress With a Plugin
Now, we’ll show you how to add and work with custom fields using a plugin. Beyond just making custom fields easier to work with, a good custom fieldsplugin will also let you collect different types of information in your custom fields. For example, you’ll get field types for:
- Text
- Numbers
- URLs
- Image/file uploads
- Google Maps locations
- Etc.
For this tutorial, we’ll use the free Advanced Custom Fields plugin (ACF), which is one of the most popular options. However, there are some other excellent custom fieldsplugin that we’ll share later on. No matter which plugin you choose, the basic process will be the same.
To get started, install and activate the free Advanced Custom Fields plugin from WordPress.org.
Then, go to Custom Fields → Add New.
ACF uses what it calls “field groups”. A field group is just a collection of one or more custom fields that display together in the editor.
First, give your field group a name and use the Location box to choose where to attach the field group. For example, if you want to use these custom fields for regular blog posts, you’d set it so that:
Post Type…is equal to…Post
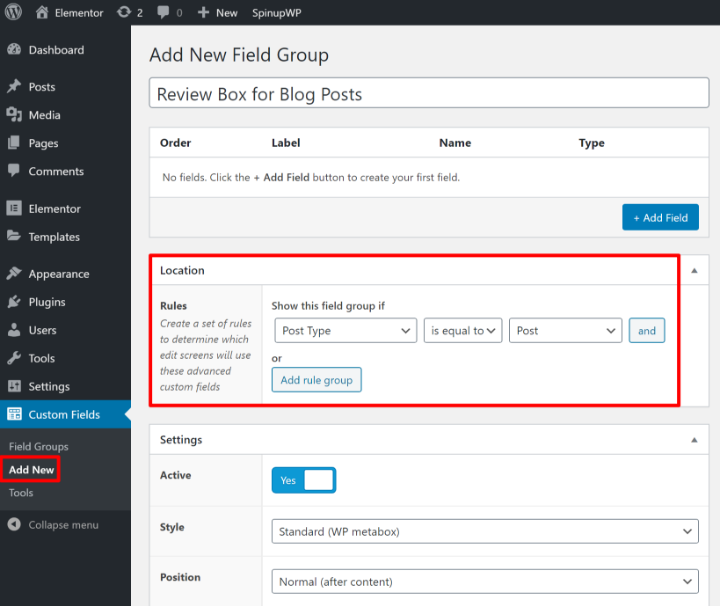
Then, use the + Add Field button to start adding custom fields.
When you add a new custom field, you’ll find that you get a lot more options than the manual method.
The two most important choices here are:
- Field Label – this is the name of the field. This will also automatically populate the Field Name box, which is how you’ll programmatically reference this field (if needed).
- Field Type – this is the type of information that you want to collect. You can choose from different options such as text, number, email, URL, image, date picker, etc.
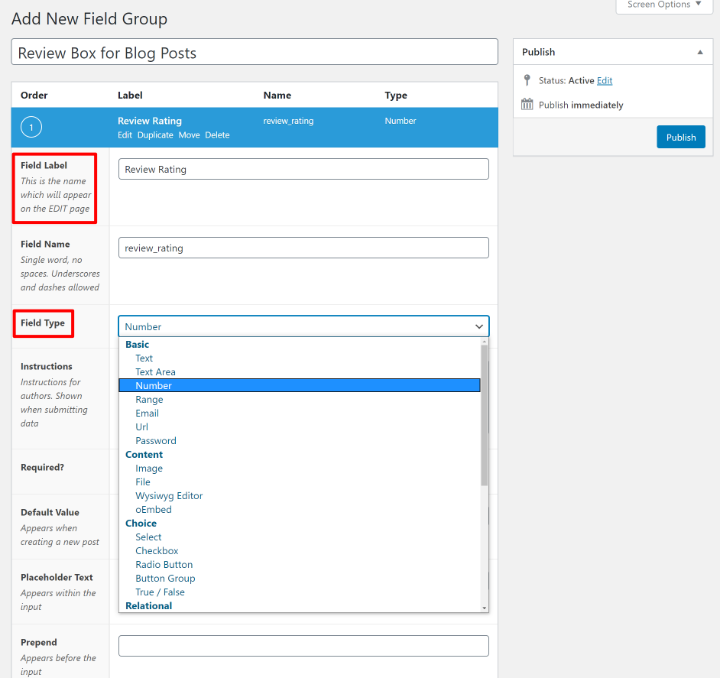
You’ll also get lots of other optional settings for controlling your custom fields, such as setting default placeholder text or adding a character limit. You can fill these out if you want, but it’s also totally fine to just leave the other settings blank.
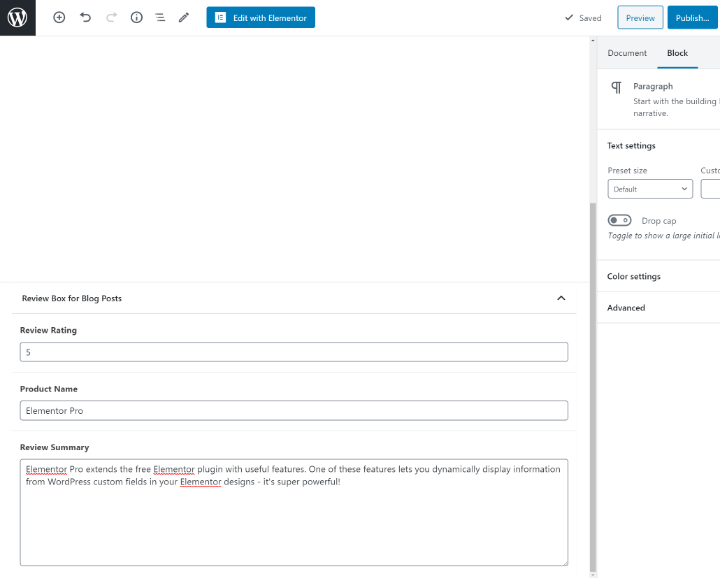
You can then repeat the process to add additional fields. For example, here’s a simple collection of three fields to form the basic review box from before:
- Review Rating – a number field that collects the review rating, from 1-5, in 0.5 increments.
- Product Name – a short text field that collects the name of the product.
- Review Summary – a larger text box that contains a short summary of the review.
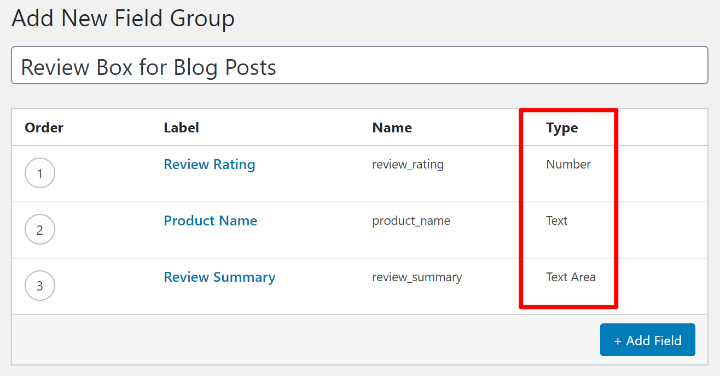
Note the differences in the Type column – you can see how each field collects a different type of information.
After you Publish your field group, you’ll see those fields when you add a new piece of content:
How to Use Custom Fields in WordPress
Now, you should have a solid understanding of how to add custom fields to WordPress. But that’s only one part of the puzzle – you also need a way to display the information from those custom fields on the front-end of your website. Otherwise, it’s just sitting there in your site’s database doing nothing!
The easiest way to display information from custom fields, especially if you’re not a developer, is with Elementor Pro and its Theme Builder feature. With Elementor Pro, you can include custom field information using Elementor’s visual, drag-and-drop interface — no code required.
Beyond Elementor Pro, other methods that you can use to display custom field information include:
- PHP
- Shortcodes
Let’s briefly go over these three methods.
1. Elementor Pro
With Elementor Pro, you get access to Elementor’s dynamic content feature, which lets you “dynamically” display content from custom fields in your Elementor designs.
Here’s how it works:
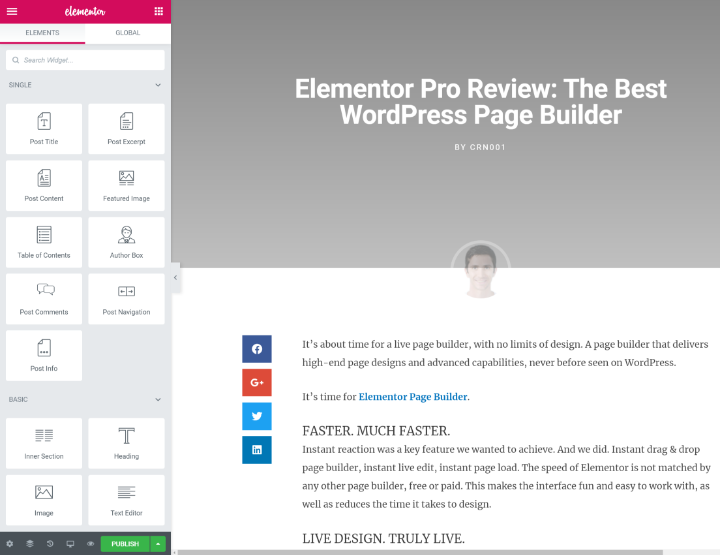
To get started, you would open the Elementor editor, either for a single piece of content or for a template that you’re building with Elementor Theme Builder. In this example, we’re creating a template that will automatically apply to all “review” blog posts.
Here, you can see that our initial template just shows the post title and the content from the body of the editor:
Next, we’ve added a simple review box that contains:
- A star rating
- A heading text widget
- A paragraph description
Instead of the static rating and text that currently exists, we want to dynamically populate the content in this box with the information from our custom fields. This is where Elementor Pro’s dynamic content feature comes into play.
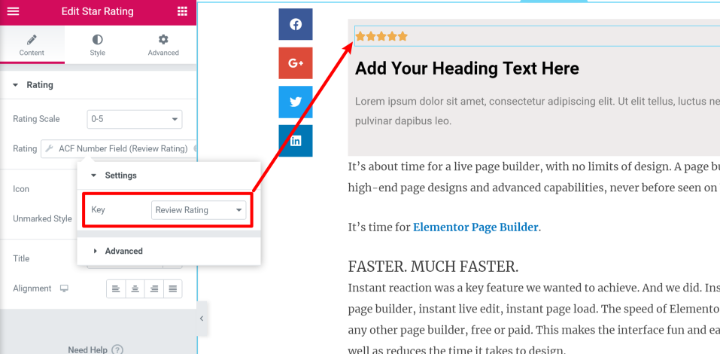
To link a widget’s content to a custom field, you just need to edit a widget and select the Dynamic Tags option. That will give you an option to choose your ACF field:
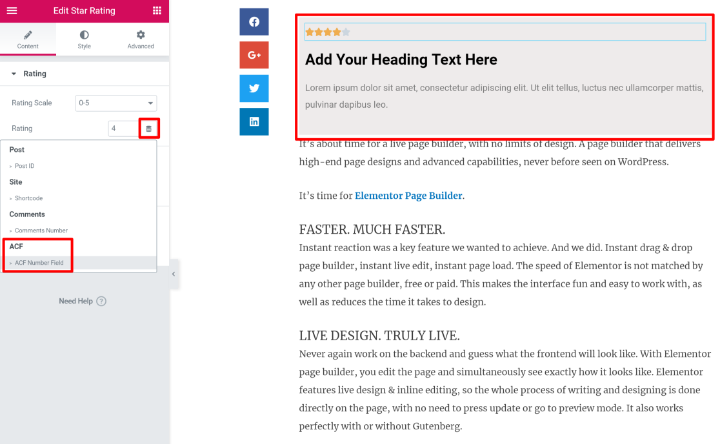
Now, the number of stars in the star rating widget will be pulled directly from the number in the review rating custom field:
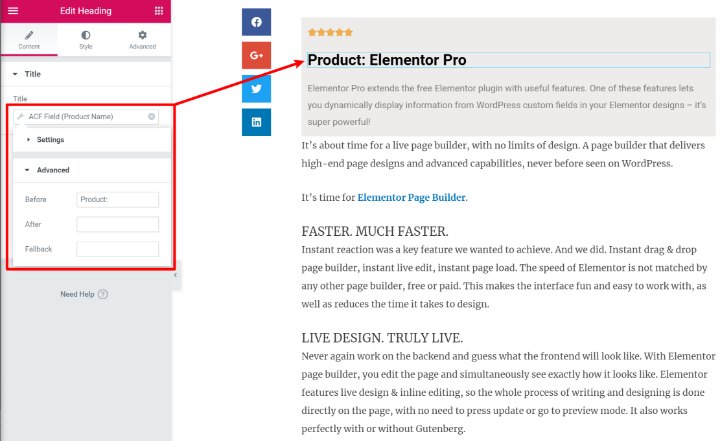
You can repeat the same process for the text content.
One useful feature here is the ability to include static content before or after the custom field information:
And that’s it! You can repeat the same steps to use information from custom fields in all kinds of ways including:
- Inserting images from custom fields as backgrounds, slider items, and more
- Adding a URL from a custom field to the link destination in a button widget
- Populating any number-based widget with a number from a custom field, including pricing tables
- Etc.
2. PHP
Before tools like Elementor Pro, using custom fields required at least a working knowledge of PHP.
You need to:
- Edit your theme’s template files
- Programmatically reference the custom fields where you want them to appear
ACF includes detailed documentation for all of the different PHP functions that you can use to do this.
For example, to get the custom field value of the “Review Rating” field for the current post, you could use:
get_field( “review_rating” );
If you understand PHP and WordPress templating, you can use this to display custom fields anywhere on your site.
3. Shortcodes
If you need to display custom fields on-the-fly, some custom fields plugins include shortcodes that work in a pinch.
This isn’t ideal because it requires a lot of manual effort – you’ll need to manually add the shortcode each time, rather than just creating a template as you can with Elementor Pro or your own PHP.
However, for occasional use, it offers a simple, non-technical way to display data from custom fields.
With ACF, all you need is this shortcode:
For example, to display the review rating, you could use:
The Difference Between Custom Fields, Custom Post Types and Taxonomies
Now that you know how to use custom fields, let’s back away from the technical aspect and get back to some theory.
On a custom WordPress website, you’re likely going to need more than just custom fields to get the job done.
You’ll also encounter two other types of “custom” content:
- Custom post types
- Custom taxonomies
Custom post types basically let you create new types of content. WordPress ships with two default content types — “Posts” (aka blog posts) and “Pages”.
Custom post types let you add your own content types. Some examples:
- “House” custom post type for a real estate listing site
- “Job” for a job listing website
- “Menu Item” for a restaurant menu
If you created a “House” custom post type, you would be able to “Add a New House” just like you can “Add a New Page”.
Custom taxonomies are another type of metadata that you can add to WordPress.
Taxonomies are tools for grouping content together. By default, WordPress comes with two taxonomies for your blog posts — Categories and Tags.
However, you can also create your own custom taxonomies for anything else. For example, if you had a movie review website, you could create a “Genre” taxonomy to group different movies by genre.
The Difference Between Custom Fields and Custom Post Types
Typically, you’ll use custom fields and custom post types together.
Custom post types let you define the type of content and then custom fields let you collect additional information about that content (metadata).
Let’s go back to the “House” example for a real estate listing website.
Once you created a “House” custom post type, you would want to collect additional information about each house. For example:
- Bedrooms
- Bathrooms
- Square footage
- Etc.
To collect each piece of information, you would add a custom field and associate it with your custom post type.
The Difference Between Custom Fields and Custom Taxonomies
Deciding between using custom fields vs. custom taxonomies is usually a little more complicated. Because both custom fields and custom taxonomies help you store additional information about a piece of content (such as a custom post type), you might run into a situation in which you’re unsure which to use.
Depending on your use case, the same piece of information could be better suited to either a custom field or a custom taxonomy – that’s why it can get a little confusing.
In general, the distinction goes like this:
- Use custom fields if the information is specific to the post itself.
- Use custom taxonomies if the information is shared between different posts, and you want to be able to group them together by this information.
Here’s an example that illustrates both use cases:
Let’s say you have a “Movie” custom post type, and you want to add extra information that contains the director.
Should you add the director as a custom field or a custom taxonomy? It depends.
If you just want to add the director as data for that individual post and you don’t need visitors to be able to quickly look up “Movies” by the director, you can add it as a custom field.
On the other hand, if you want visitors to be able to click on a director’s name to automatically display all of the movies directed by that person, then you should probably use a custom taxonomy.
Meta Box has an excellent article that digs into this question in more depth.
It also includes this table to help you decide between custom fields vs. taxonomies:
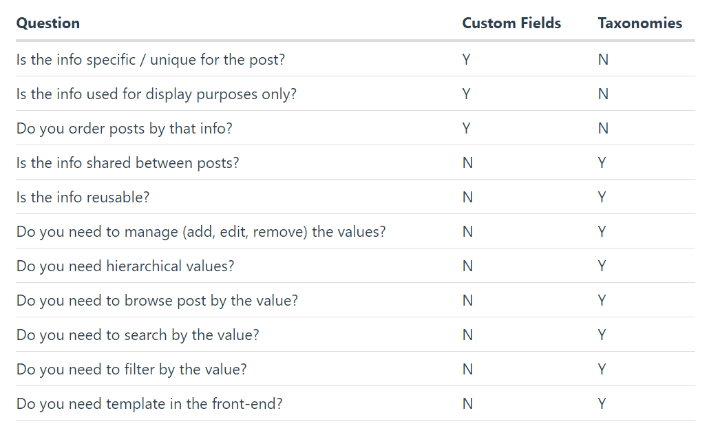
Four Best Custom Fields Plugins for WordPress
As we mentioned earlier, while you can manually add custom fields to WordPress, you’ll almost always want to use a plugin instead.
Plugins save you time, give you more flexibility, simplify things…basically — use a plugin if you want to work with WordPress custom fields.
Here are three of the best plugins.
1. Advanced Custom Fields (ACF)
Advanced Custom Fields, commonly abbreviated as ACF, is one of the most popular plugins for adding custom fields to WordPress. It’s also what we used for many of the tutorial screenshots above.
Unlike the other plugins on our list, ACF is only for custom fields — it does not help you work with custom post types or taxonomies. You’ll need a different tool for that — the free Custom Post Type UI plugin is a common pairing that will help you create custom post types.
As you saw above, ACF also integrates with Elementor Pro to display your custom fields.
2. Toolset
Toolset is a premium suite of plugins to help you work with custom content on WordPress. For one price, you get access to several different components.
For custom fields, you’ll want the Types component. Types also helps you work with custom post types and custom taxonomies.
Depending on your needs, you also might want to use some or all of the other components:
- Forms – helps you create front-end content creation forms that feed into your custom fields, post types, and taxonomies.
- Access – helps you restrict access to your custom content.
- Maps – helps you display custom information on Google Maps or Azure Maps.
- Blocks – helps you design custom layouts and lists of content using the block editor.
Toolset also integrates well with Elementor Pro.
3. Pods
Pods is a 100% free project that’s a full solution for custom WordPress sites. It can help you create and work with custom:
- fields
- post types
- taxonomies
Basically, Pods is all you need to create and manage custom content. It also integrates well with Elementor Pro – so you can use Pods to manage everything on the backend and Elementor Pro to display everything on the front-end.
4. Meta Box
Meta Box is a freemium WordPress custom fields plugin that is very developer-friendly and flexible. It enables you to quickly deal with not only custom fields but also with custom post types and custom taxonomies easily in the UI on the backend.
Moreover, Meta Box provides more than 40 field types – almost all types of data that users needs. There are some special fields from Meta Box plugin:
- Open street map
- Background
- File upload (allow users to drag and drop files directly to the editor)
- Custom HTML
- Key value
- Sidebar
- Video
Meta Box integrates well with Elementor, using the Meta Box Elementor Integrator extension.
Which Custom Fields Plugin Should You Use?
Choosing between ACF, Toolset, and Pods requires an entire post of its own…which is why we wrote an entire post of its own!
If you’re not sure which plugin is right for you, you can check out our detailed ACF vs Toolset vs Pods comparison to make the right choice.
Start Using WordPress Custom Fields
If you want to build dynamic websites and unlock WordPress’s full power as a content management system, it’s important to understand WordPress custom fields.
To recap, custom fields help you store additional information about content on your WordPress site.
WordPress includes its own built-in custom fields feature. However, it’s a much better approach to use dedicated custom field plugins. Three of the best options are Advanced Custom Fields (ACF), Toolset, and Pods.
For the easiest way to display information from custom fields on the front-end of your site, you can use Elementor Pro and its dynamic content feature. You’ll be able to quickly add custom field information to your Elementor designs and style it using all of Elementor’s normal settings.
How will you use custom fields in your next project? Or do you still have any questions about custom fields in WordPress? Let us know in the comments!
Looking for fresh content?
By entering your email, you agree to receive Elementor emails, including marketing emails,
and agree to our Terms & Conditions and Privacy Policy.


