Table of Contents
About the author: Roy Eyal, Elementorist @ Elementor
Roy Eyal is an expert Elementorist at Elementor and a WordPress web developer that loves design and working with designers.
Over the past year, we’ve seen a new design trend of animated text surrounding an image, including here in the Elementor showcases. For example, Diangelo Santos’s portfolio website, which was featured on the August 2020 showcase and Terrasol, which was featured in the November 2020 showcase.
I’ve seen this animated effect used by creating an animated GIF. However, creating such a GIF requires special knowledge to be able to create the graphic, animate it into a video, and then convert it into a GIF. Beyond requiring graphic design skills, it also takes too much time and effort for most people.
My aim for this tutorial is to show you how anyone can create the same effect without needing a special graphic and using real “live” text (specifically, an SVG).
Better yet, I’ll show you how to create this effect in two different variations – one that animates the emblem text on-scroll and another that automatically animates the emblem right away.
What Is an Animated Emblem Effect?
The animated emblem effect lets you add a bit of spinning text around part of a graphic for decorative purposes (I’ll show some examples below).
You can choose from two different methods to control this animation:
- You can animate the text as a user scrolls down using Elementor Motion Effects, which creates an eye-catching effect as users navigate your page.
- You can automatically animate the text (even without action by the user) using some CSS code.
Here are examples of each type of animated emblem effect:
Option 1: Animated emblem effect on scroll using Motion Effects
Option 2: Automatic animated text effect using CSS
What You Need To Create an Animated Emblem Effect
To follow this tutorial and create your own animated emblem effect in Elementor, you’ll need the following:
- An SVG file – you’ll use this to create the text that will spin around your graphic. I’ll show you how to create this in the first step.
- CSS code – you’ll use this to style the text inside the SVG file.
- Separate CSS code for automatic animation – you’ll need to add some additional CSS if you want to use the automatic spinning effect (rather than relying on Elementor’s built-in Motion Effects for the on-scroll effect).
I’ll provide you with all the code that you need – all you need to do is follow along with the tutorial below.
How To Create an Animated Emblem Effect With Elementor
Here’s a high-level look at the process:
- Set up your SVG text file (using my example code as a starter).
- Add the SVG file using an Icon widget.
- Add custom CSS to style your emblem text.
- Set absolute positioning to position your emblem over the background graphic.
- Add your animation effect (either on-scroll or automatic).
Let’s dig in…
1. Customize the SVG File To Use Your Own Text
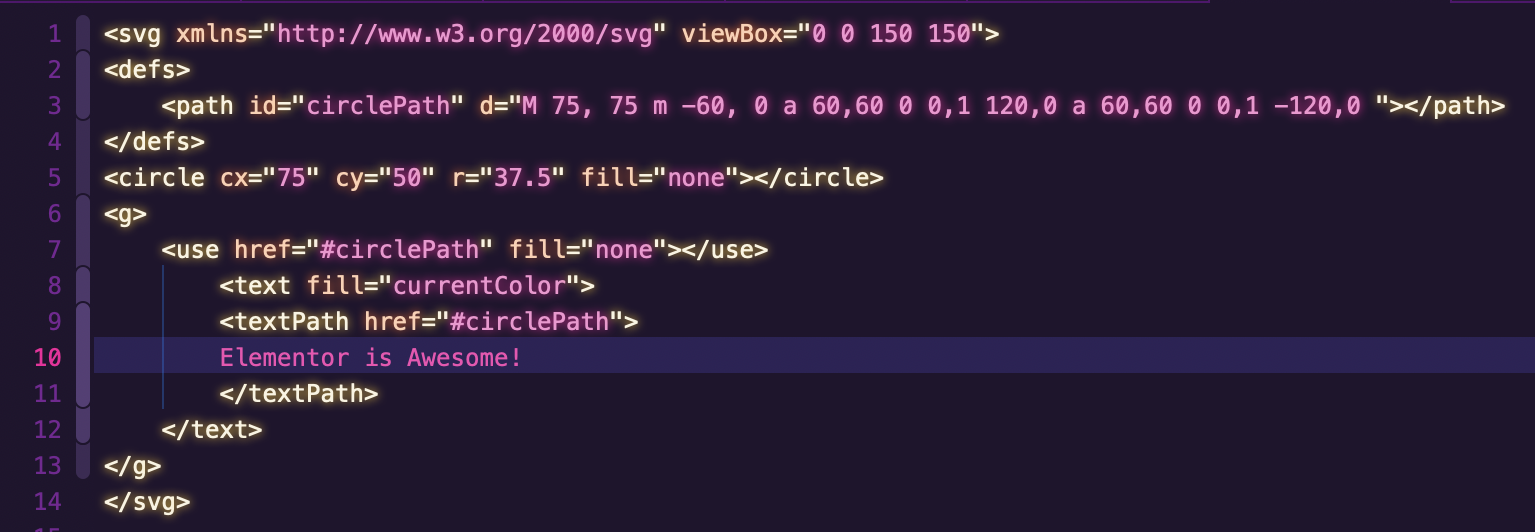
To get started, you need to customize your SVG file to display the text that you want to animate.
To do this, download the example SVG file below and open it in a code editor:
I recommend using a code editor with code highlighting, as that will make it a lot easier to edit the code. Visual Studio Code and Atom are both free and cross-platform (PC, Mac, and Linux). Personally, I use Nova, though it’s only available for macOS.
Tip – if your code editor isn’t highlighting the text properly, you might want to view the SVG as an XML file. This should fix things and give you the highlighting like my example screenshot below.
To customize the text, replace “Elementor is Awesome! …” with the text that you want to use. Make sure to limit the number of characters as space is limited – try to keep it around the same length as my example text.
Save the file in an easily accessible folder because you’re going to need it in the next step.
2. Add Your SVG File Using an Icon Widget
Next, you need to add the SVG file to your Elementor design using an Icon widget.
I’ll assume that you’ve already added the background graphic to which you want to add your animated emblem. If you haven’t done so, you can do that using a regular Image widget.
To add and customize the SVG file:
1. Drag a new Icon widget above the graphic that you want to target. That is, add your Icon widget above the existing Image widget.
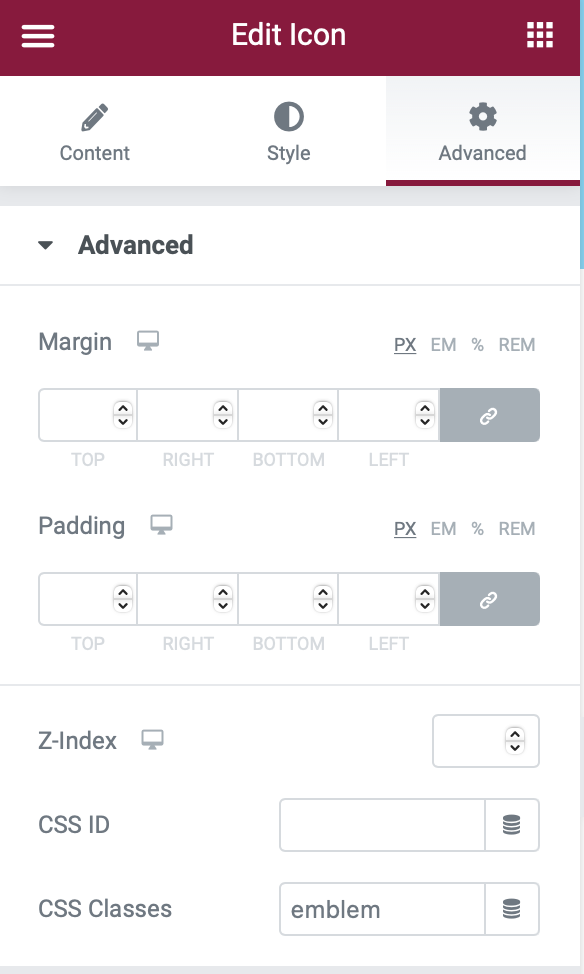
2. Go to the Advanced tab in the Icon’s settings. Set the CSS Classes field equal to emblem.
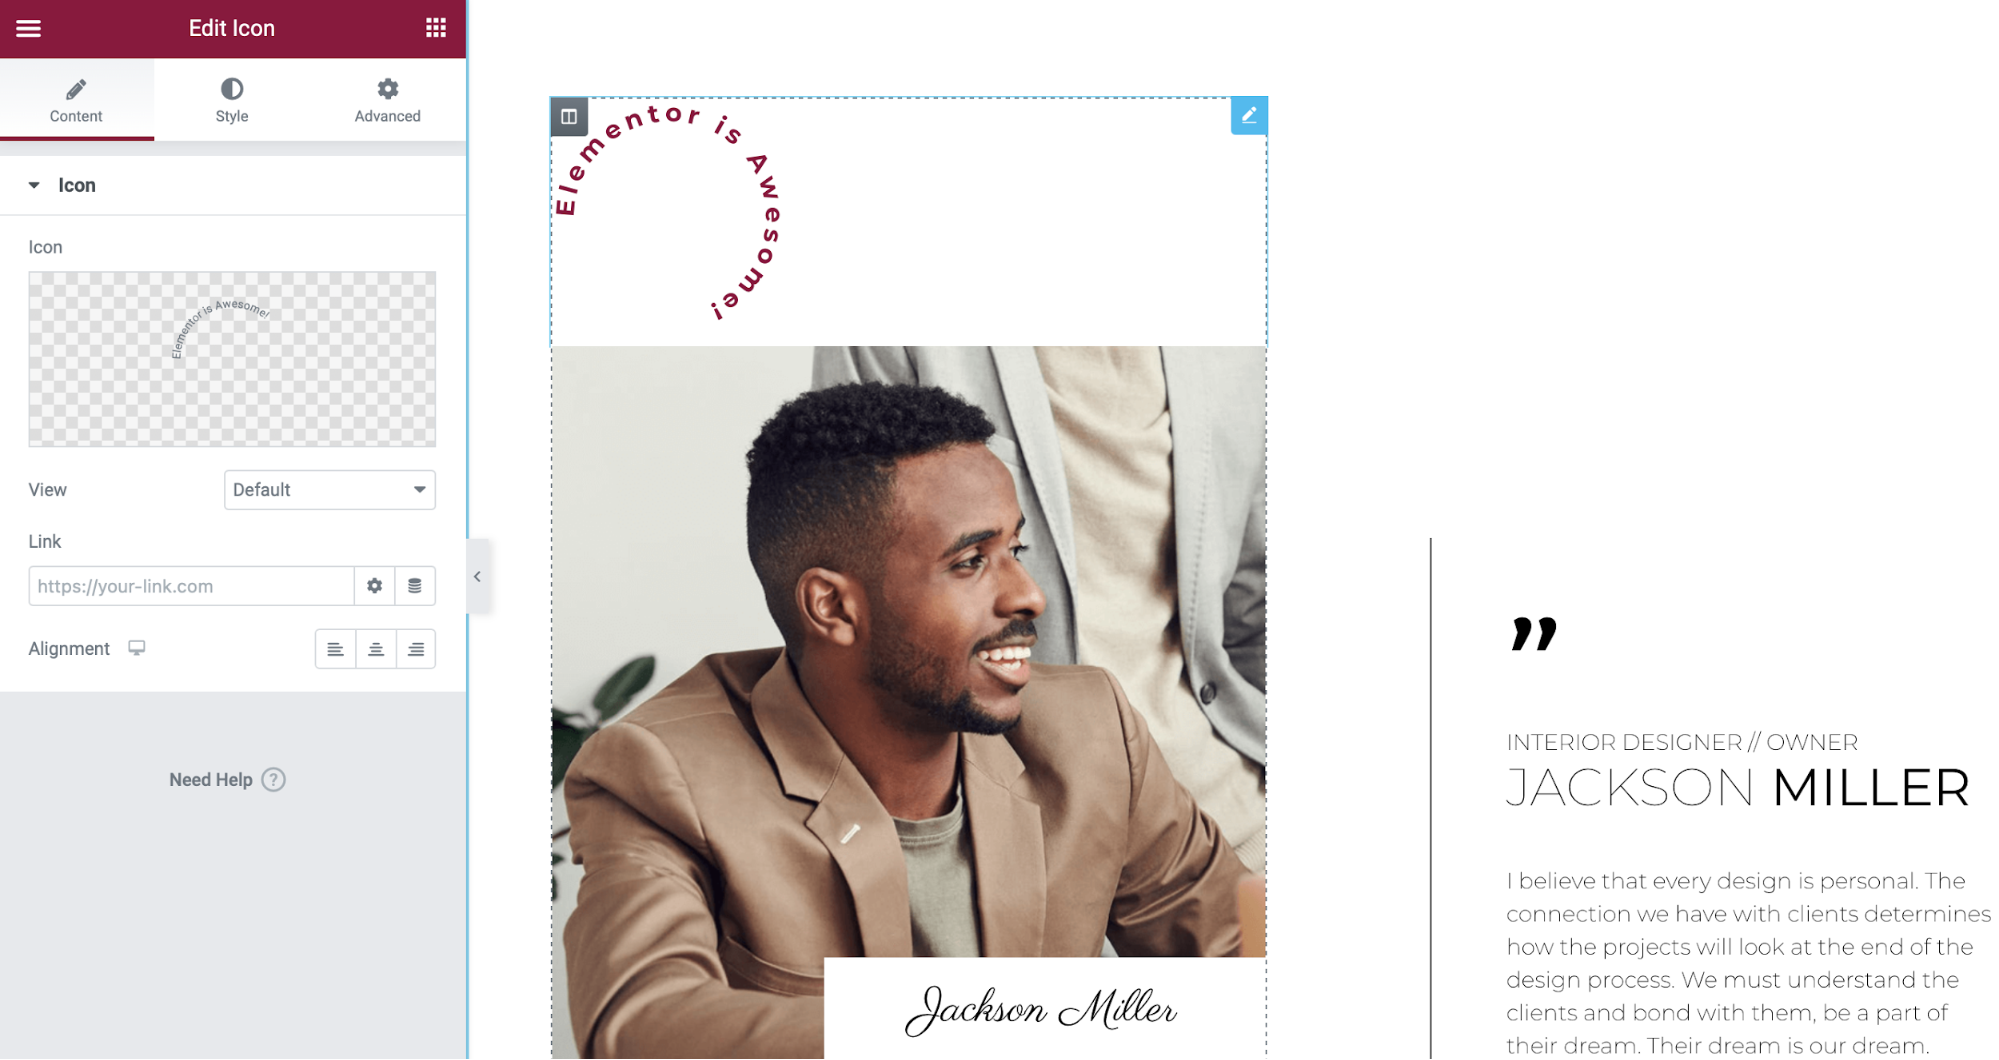
3. Go back to the Content tab. Click the Upload SVG option and upload the SVG file that you created in the previous step.
4. Go to the Style tab and choose the Primary Color for your text – ideally, a global color that matches your theme.
5. In the Style tab, increase the Size. You can start with 160, but you might need to play around with its size to get the right effect. Don’t worry if the emblem text looks too large right now – you’ll fix that with CSS in the next step.
Note – if you’re having problems uploading the SVG file, you need to make sure that SVG file uploads are enabled. WordPress disables SVG uploads by default, though Elementor should automatically enable SVG uploads when you use the Upload SVG feature in the Icon widget.
To make sure that SVG uploads are enabled, go to Elementor → Settings → Advanced and make sure that the Enable Unfiltered File Uploads drop-down is set to Enable.

3. Style Your Emblem Text Using CSS
Now, you need to style your emblem text using some CSS. This should fix any issues you saw after increasing the size of the Icon widget.
To do this, add the following CSS to your section or to the global CSS for your design:
					.emblem text {
  font-family: initial;
  font-size: 16px;
  font-weight: normal;
  letter-spacing: 0px;
}
If you don’t see any change to the emblem text right away, there are two troubleshooting steps:
- Make sure you set the Icon widget’s CSS class equal to emblem.
- Refresh the page to reload the Elementor interface. Just make sure you save your changes before you refresh.
If you don’t have a lot of text, you might want to go further and pad the letters a bit to improve your emblem effect.
You have two main options here:
- You can set the font weight to bold.
- You can increase the letter spacing from 0 px to a higher number – 3 px is a good starting point, but you can play around with it according to your preferences
You can also consider choosing a different font. For example, in the customized code below, I’ve done three things:
- Changed the font to Montserrat.
- Bolded the font.
- Increased the letter spacing to 3 px.
					.emblem text {
  font-family: "Montserrat", Sans-serif;
  font-size: 16px;
  font-weight: bold;
  letter-spacing: 3px;
}
4. Use Absolute Positioning To Move the Icon Widget
Now, it’s time to make it so that the icon widget appears on top of your target image. Right now, it’s positioned above and separate from the background image:
To do this, you can use absolute positioning, which will give you pixel-perfect control over the emblem text’s positioning.
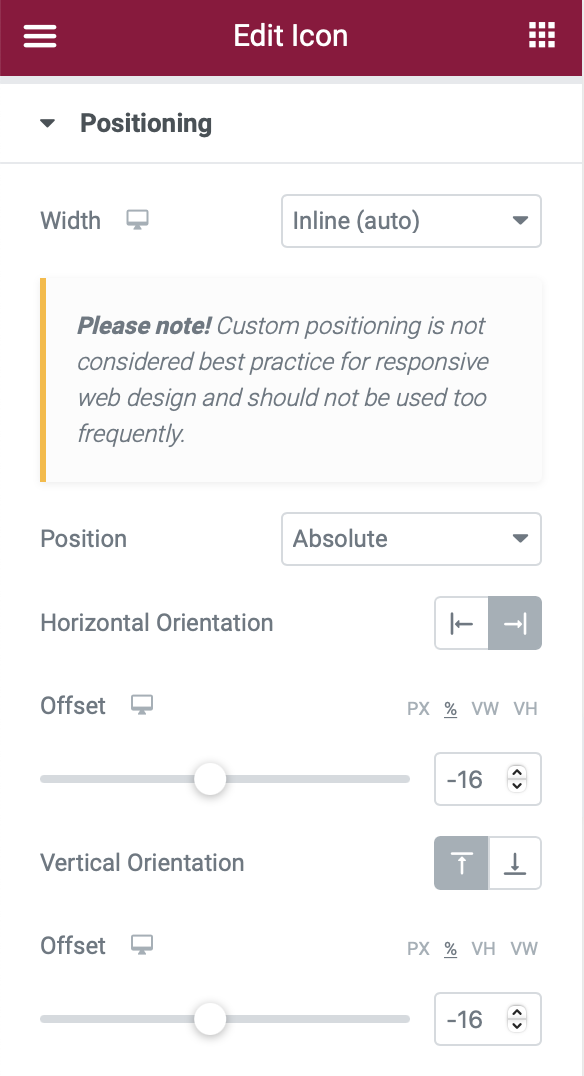
Open the settings for the Icon widget. Then, go to the Advanced tab and find the Positioning settings. Configure them as follows:
- Width: Inline (Auto)
- Position: Absolute
- Horizontal Orientation: Right
- Offset (Horizontal): -16px
- Vertical Orientation: Top
- Offset (Vertical): -16px
I chose -16 for both the horizontal and vertical offsets, but you might want to play around with different numbers to find what works best for your design and background image. You can also change the horizontal and vertical orientations according to your preferences.
You should also use the responsive settings to adjust the offset for mobile and tablet devices. Make sure to set the horizontal offset for mobile devices to zero to avoid issues with vertical scrolling.
5. Set up Your Emblem Animation Effect
To finish things out, you need to set up the animation for your emblem. Again, you have two options:
- You can animate the emblem so that it spins as a user scrolls down.
- You can automatically animate the emblem so that it spins without any user input.
I’ll show you how to configure both – you should only choose one of these methods, though.
Option 1: Animate Emblem on Scroll
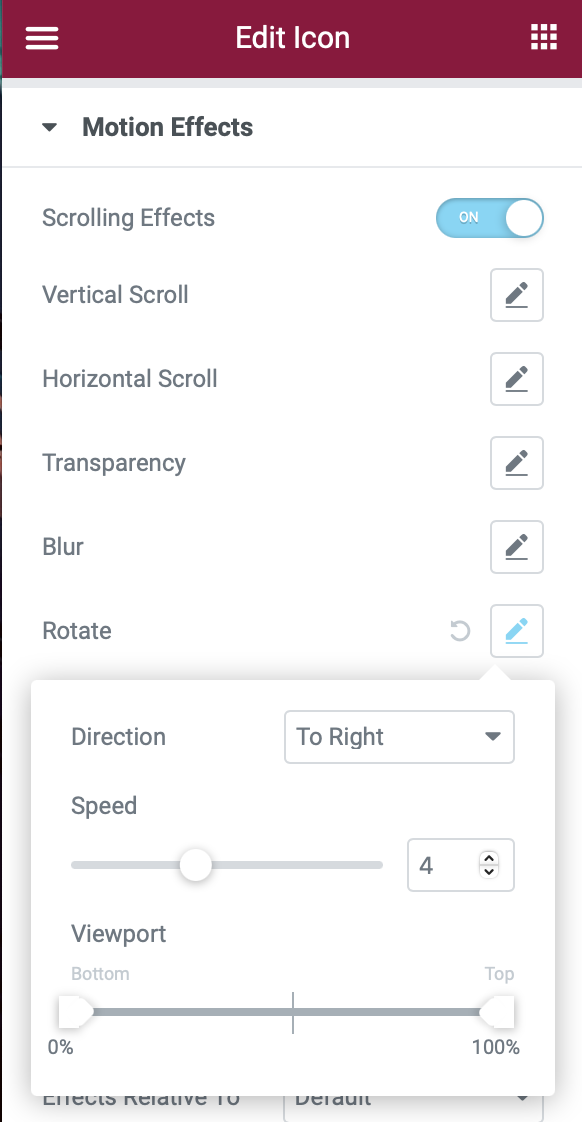
To animate the emblem as a user scrolls down, you can use Elementor’s built-in Motion Effects.
Open the Icon widget and go to the Advanced tab. Select Motion Effects → Scrolling Effects (turn it on) → Rotate (click the edit icon). This will open some additional settings – configure them as follows:
- Direction: To Right
- Speed: 4
Option 2: Automatically Animate Emblem Text
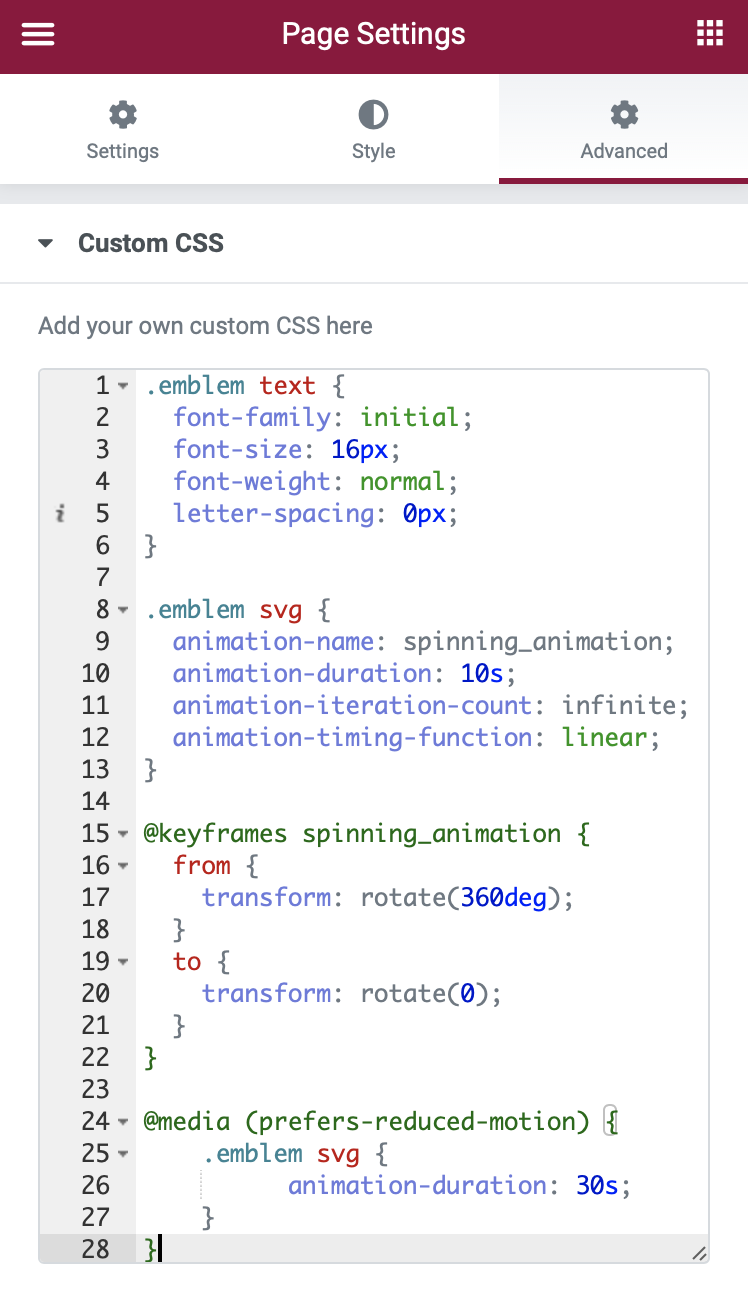
To automatically animate the emblem text, you can use the following CSS code. You’ll want to add this code in addition to the CSS that you’ve already added.
					.emblem svg {
  animation-name: spinning_animation;
  animation-duration: 10s;
  animation-iteration-count: infinite;
  animation-timing-function: linear;
}

@keyframes spinning_animation {
  from {
    transform: rotate(360deg);
  }
  to {
    transform: rotate(0);
  }
}
Optional: Reduce Motion for Accessibility Purposes
The last part of the code snippet above is technically optional, but I’ve added it there to improve your website’s accessibility by making the animated emblem effect more friendly to users who are sensitive to constant motion:
					@media (prefers-reduced-motion) {
    .emblem svg {
		  animation-duration: 30s;
	}
}
This part of the code slows down the animation for users who have set their device to “reduce motion” mode (e.g. reduce motion on MacOS or reduce screen motion on iOS).
While you can technically remove this part of the code snippet without changing its effect, I recommend leaving it in because it’s always a good idea to respect your users’ preferences, especially when it comes to website accessibility. Another example of respecting user preferences is dark mode, just like how the Elementor editor will adopt dark mode if a user has chosen that in their system preferences.
Specifically, the code will slow down the animation from 10 seconds (10s) to 30 seconds (30s) if a user has set reduced motion as their preference.
Another option would be to completely stop the animation if a user has set their device to “reduce motion”. You can accomplish this by replacing the accessibility-focused code snippet with this snippet:
					@media (prefers-reduced-motion) {
    .emblem svg {
		  animation-duration: none;
	}
}
Grab Your Visitors’ Attention with an Animated Emblem Effect
The animated emblem effect gives you a neat way to create a more eye-catching design with Elementor. All you need is an SVG file to control the text, the Icon widget, and a little bit of CSS.
How will you use the animated emblem in your own Elementor designs? Or do you still have any questions about how it works? Let us know in the comments!
Looking for fresh content?
By entering your email, you agree to receive Elementor emails, including marketing emails,
and agree to our Terms & Conditions and Privacy Policy.


