In the following article, we’ll show you how to easily build a membership site in WordPress using Elementor and MemberPress. This post will cover the setup process, membership and protected content creation, important page and login form design, email notification management, reports, and more.
Table of Contents
- What Is a WordPress Membership Site?
- How to Build a WordPress Membership Site
- 1. Install the MemberPress Plugin
- 2. Configure the MemberPress Options
- 3. Set up Membership Levels
- 4. Edit Registration Pages With Elementor
- 5. Include and Edit MemberPress Forms
- 6. Configure Access Rules
- 7. Create Members-Only Pages
- 8. Protect Video Content
- 9. Create a Pricing Page
- 10. Build a Custom Pricing Page Using Elementor
- 11. Include Sign-Up and User-Login Forms
- 12. Create a Login Popup
- 13. Customize Email Templates
- 14. Set up Reminders and Coupons
- 15. Check Your Reports
- Final Thoughts: WordPress Membership Sites
Grow Your Sales
- Incredibly Fast Store
- Sales Optimization
- Enterprise-Grade Security
- 24/7 Expert Service

- Incredibly Fast Store
- Sales Optimization
- Enterprise-Grade Security
- 24/7 Expert Service
- Prompt your Code & Add Custom Code, HTML, or CSS with ease
- Generate or edit with AI for Tailored Images
- Use Copilot for predictive stylized container layouts

- Prompt your Code & Add Custom Code, HTML, or CSS with ease
- Generate or edit with AI for Tailored Images
- Use Copilot for predictive stylized container layouts
- Craft or Translate Content at Lightning Speed
Top-Performing Website
- Super-Fast Websites
- Enterprise-Grade Security
- Any Site, Every Business
- 24/7 Expert Service

Top-Performing Website
- Super-Fast Websites
- Enterprise-Grade Security
- Any Site, Every Business
- 24/7 Expert Service
- Drag & Drop Website Builder, No Code Required
- Over 100 Widgets, for Every Purpose
- Professional Design Features for Pixel Perfect Design

- Drag & Drop Website Builder, No Code Required
- Over 100 Widgets, for Every Purpose
- Professional Design Features for Pixel Perfect Design
- Marketing & eCommerce Features to Increase Conversion
- Ensure Reliable Email Delivery for Your Website
- Simple Setup, No SMTP Configuration Needed
- Centralized Email Insights for Better Tracking
- Ensure Reliable Email Delivery for Your Website
- Simple Setup, No SMTP Configuration Needed
- Centralized Email Insights for Better Tracking

- Ensure Reliable Email Delivery for Your Website
- Simple Setup, No SMTP Configuration Needed
- Centralized Email Insights for Better Tracking
What Is a WordPress Membership Site?
A WordPress membership site allows you to restrict access to some or all of your site’s content, including downloads, webpages, forms, and more.
A membership site is an effective way of monetizing your WordPress site, as you can invite users to subscribe, in order to access premium content. Companies also use membership sites to restrict content so that only employees can access it.
How to Build a WordPress Membership Site
The WordPress sphere offers a ton of awesome solutions for creating membership sites, each with different features and their own pros and cons.
For this tutorial, we’ll use one of the world’s top and easiest-to-use WordPress membership plugins, MemberPress. The add-on works with any theme, is easy to use, is beginner- and developer-friendly and has a wide range of features. We recommend MemberPress because it is ideal for adding subscriptions, paid content and digital downloads to your site. Not only that, it offers top-notch support and detailed documentation.
MemberPress is a paid-only solution. So, if that falls outside your budget, you might want to refer to the comparison post linked above. Always keep in mind, though, that the benefits of paid features can equal greater efficiency and ease of use (big money savers when it comes to the bottom line).
1. Install the MemberPress Plugin
Once you’ve signed up with MemberPress, you’ll receive an email with a download link and license number. Click to copy the download link.
Next, log into your site and go to Plugins > Add New. Click the Upload Plugin button at the top of the screen, then browse to your file and tap Install Now.

Once the process is finished, enable the plugin on your site. Next, go to MemberPress > Activate.

Here, paste in your license key and tap the big blue button. Now you’re all set and ready to start configuring your site.
2. Configure the MemberPress Options
Once you’ve installed and registered your copy of MemberPress, you’ll be asked to visit the options page (MemberPress > Options).
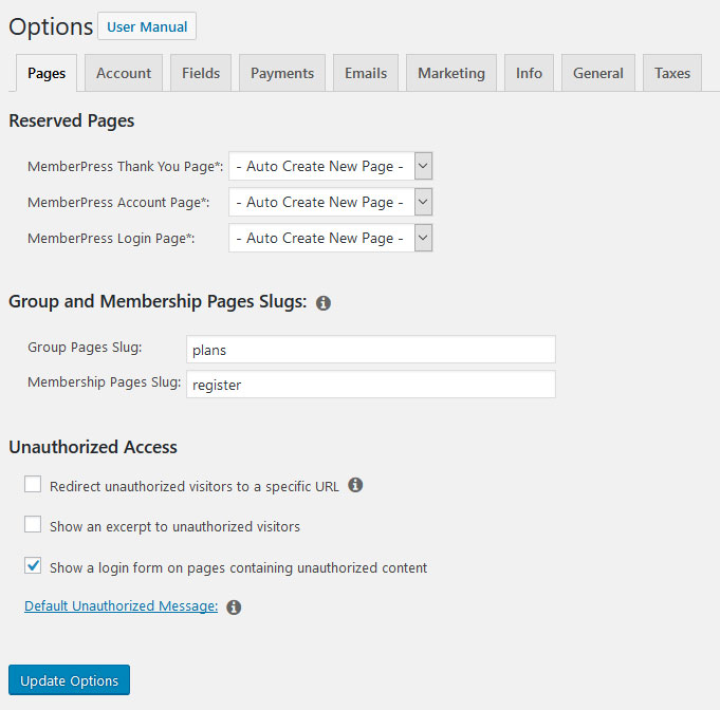
There’s no need to configure all the settings at this point, as we’ll address these settings at various points throughout the tutorial.
At the beginning, make sure to hit the Update Options button under Pages. Doing so will automatically generate the thank you, account, and login pages.
If you plan to monetize your membership site, now is the time to configure a payment method under Payments.

MemberPress supports Stripe, PayPal, and offline payments. If you run into any trouble setting up payments, visit the documentation pages for help.
Under Info, you’ll add your business information. The General section allows you to choose your membership site’s language and currency. If you’re feeling confident in your understanding, go ahead and configure tax rates under Taxes. Otherwise, feel free to skip this step for now.
3. Set up Membership Levels
Under MemberPress > Memberships, you’ll now create memberships your clients can purchase. Here, you can create a variety of memberships with different pricing, features, and access levels.

Simply tap Add New at the top to create each new level.
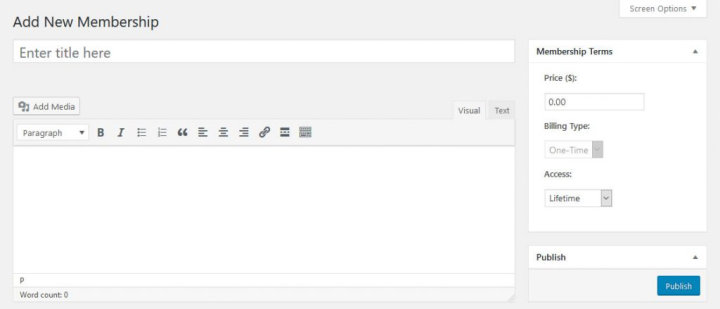
Give each level a name, add a description, and set the terms in the section to the right (price, recurring, or one-time billing and expiration). In the next step, you’ll configure the Membership Options at the bottom.
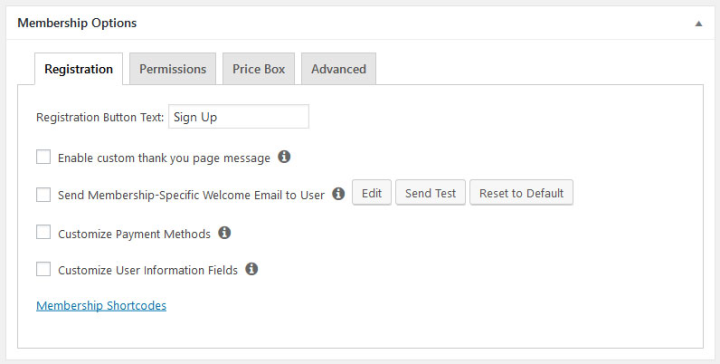
- Registration – This section controls the sign-up button text, thank you message, email message, payment methods, and which user information to collect. You can also define much of this information globally (more on that below). So, you only need to configure these details if you want to use special settings.
- Permissions – Here, you’ll determine which users can purchase a membership and define the message the user sees when they don’t have permission. Again, there are global settings for these details.
- Price Box – In this section, you’ll configure the design and content of the pricing table for the membership. This information will show up on the pricing page later, so don’t skip it!
- Advanced – Here, you’ll find advanced options for membership URLs, pricing terms, and redirects.
Once you’re happy with the setup, tap the Publish button to make the new membership available on your site. Repeat the process as many times as needed to create the desired number of membership levels.
4. Edit Registration Pages With Elementor
After creating a membership, click the URL under the title or on View Membership at the top. Doing so will allow you to see what the registration page will look like on the front end (use a private browser window to view what users who are not logged in will see).
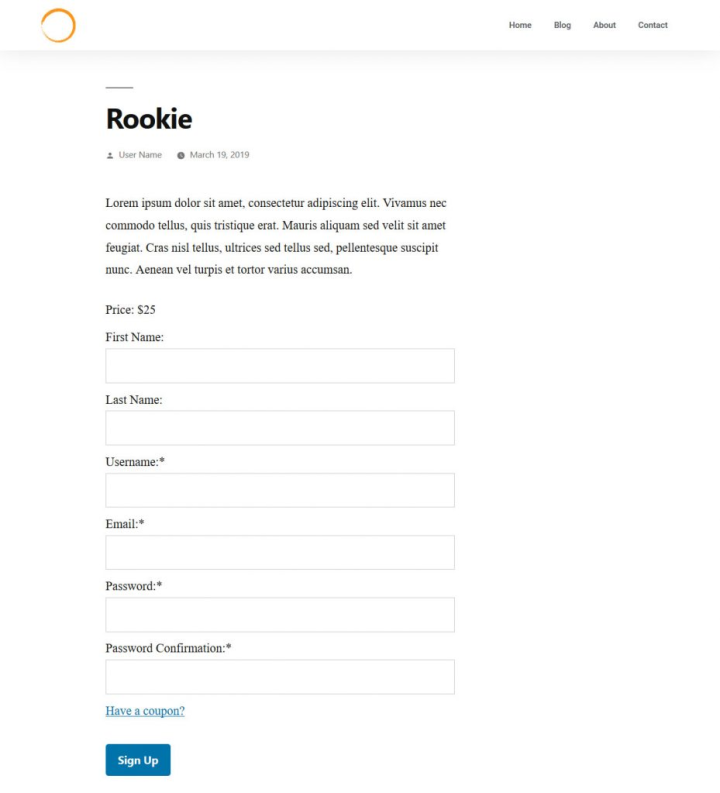
If you’d like to tweak the way things look, you can edit your page using Elementor. Simply go to Templates > Add New.
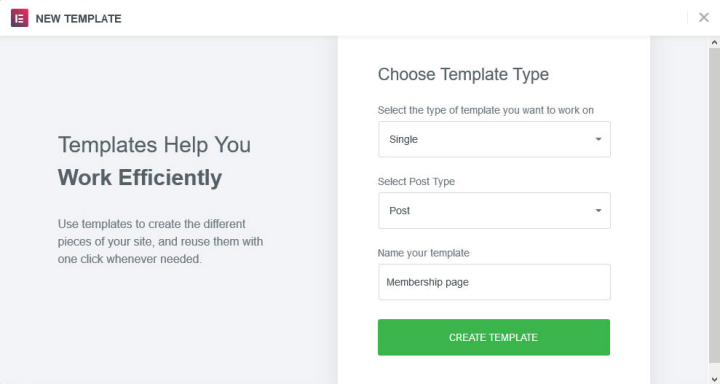
In the popup menu, select Single and then Post. Ignore the templates and click Continue. In the editor window, locate the Preview button (the eye icon) on the lower left.

Click Settings to access the preview settings. From the drop-down menu, choose Memberships, then search for and choose one of the memberships you just created.
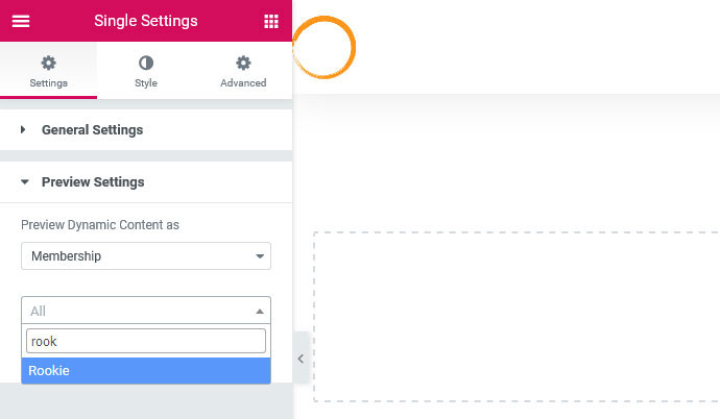
Next, click Apply & Preview, and Elementor will automatically use its page content in the editor. When you add widgets for the title and content, they will automatically appear.
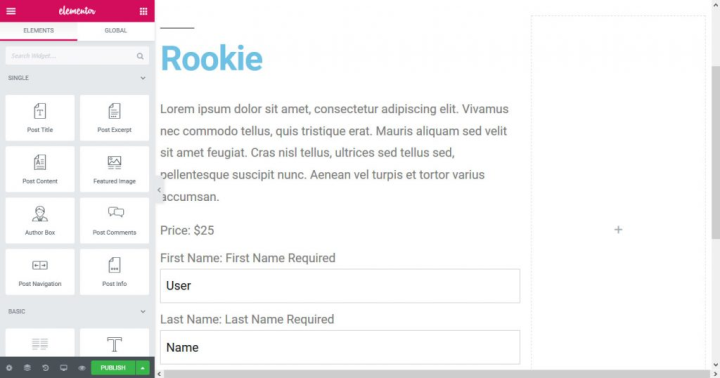
Continue to customize however you like. When you’re finished, click the Publish button, and make sure to set the display settings to Memberships and All.
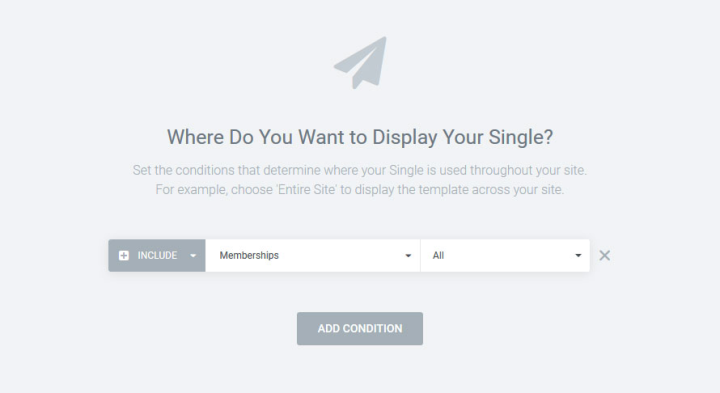
Configuring the display settings to Memberships and All will apply the new design whenever a user views your membership registration forms. You can edit the other standard pages (account and thank you) similarly.
5. Include and Edit MemberPress Forms
If you want to completely customize your membership pages, you can use shortcodes to input the registration forms anywhere you like. You’ll find these shortcodes at the bottom of your membership pages within the membership options.

Using these shortcodes will enable you to input and preview your forms in Elementor page templates via the shortcode widget.
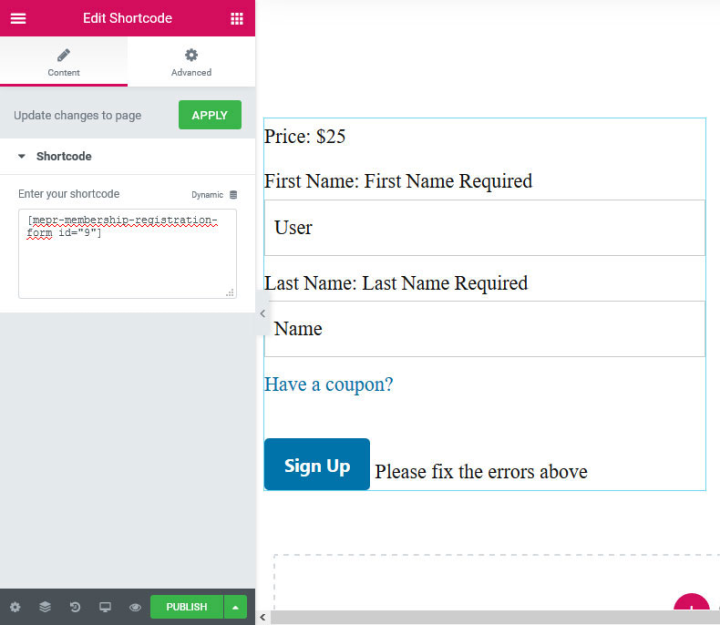
The forms are hardwired into MemberPress, so you can’t make edits to the designs through Elementor. However, you can make any desired changes via custom CSS.
To do so, first examine the forms with your browser’s developer tools. Next, make the desired changes, then add the changed CSS rules to your Elementor widget under Advanced > Custom CSS.
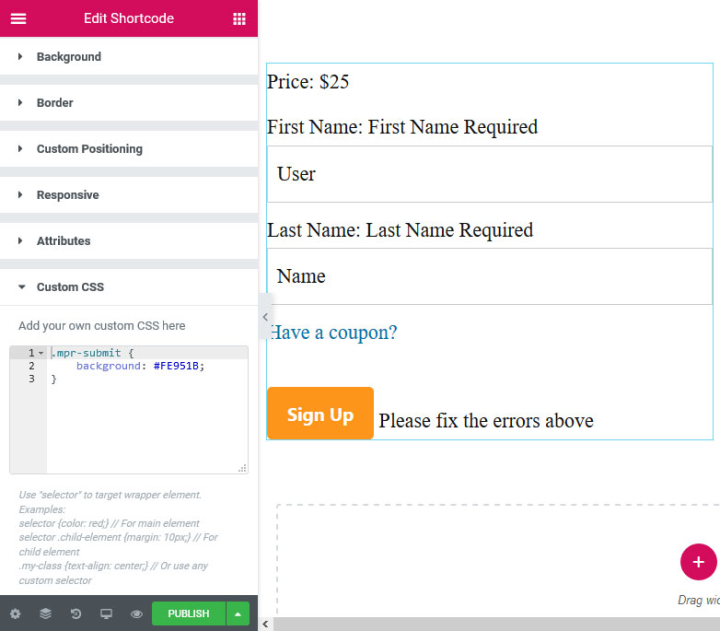
You can find more information on customizing your registration pages here.
6. Configure Access Rules
Next, you’ll need to select which content is available for each membership level. You can complete this step via access rules available under MemberPress > Rules. Again, tap the Add New button to access the following screen.
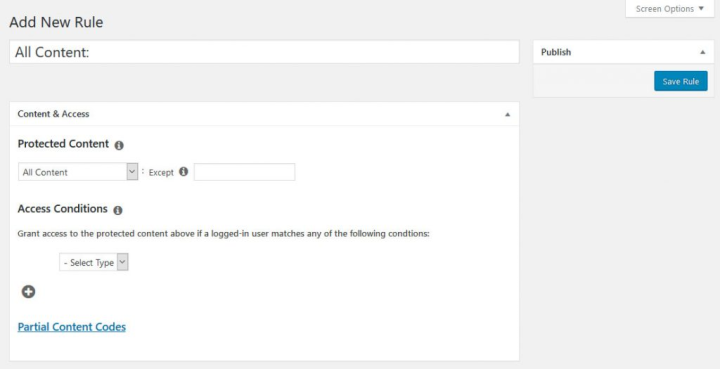
Using the drop-down menus you can set rules that apply to your content — anything from posts with a specific category or tag to just about any other distinction.
Below the above section, you can set which users can access specific content. Access can be limited to certain membership levels or single members.
Further below, you’ll find the option to enable drip content and expirations.

Drip content refers to gradual rather than all-at-once release of content to members. And expirations allow you to make content unavailable after a set time. These are great tools for creating urgency and bringing users back to your membership site.
Finally, at the bottom, you’ll configure options for those users who don’t have access.
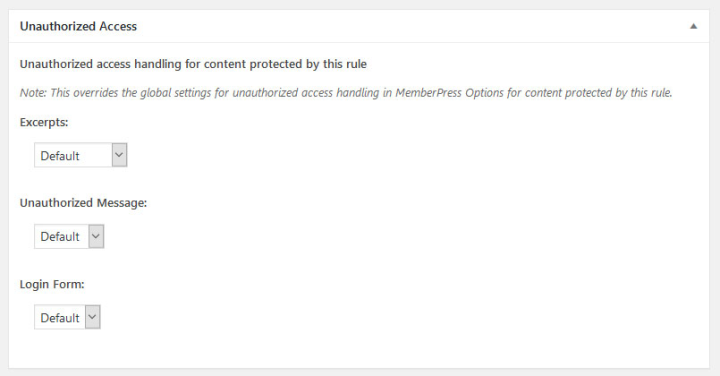
Here, you’ll determine how much locked content users will be able to see, what message will be displayed to them and what login form they will use. Again, remember that much of this information is set globally, so it’s not advisable to change it unless you have a good reason.
You can also use shortcodes to manually set what authorized and non-authorized members can see. You can find these by clicking on Partial Content Codes.

Once satisfied, save the rule at the top right.
7. Create Members-Only Pages
When you keep the access rules in mind, creating content to which only members have access is simple. For example, if you’ve determined that content from a certain category or with a specific tag should be restricted, you need only add the category or tag to posts to protect that content.
When a rule applies to any content, MemberPress will recognize it accordingly. If you’re using the classic editor, a message letting you know that a piece of content is restricted will appear at the top of the screen.
Aside from the above, there are several ways to determine what non-authorized users will see when they try to access restricted content. Global options for these settings are located at the bottom of MemberPress > Options > Pages.
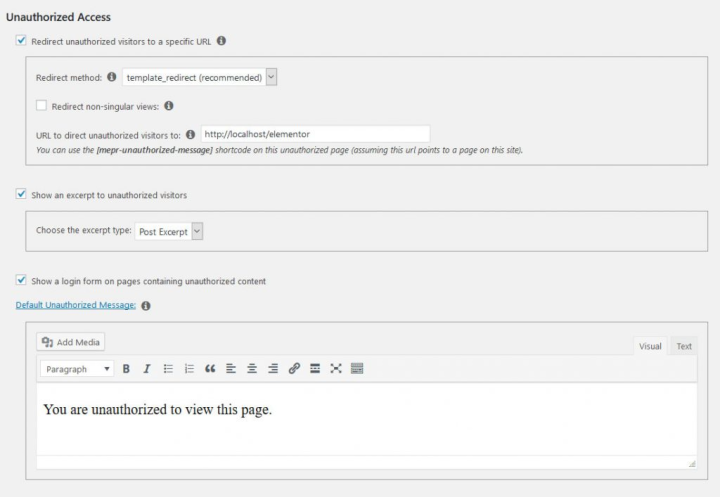
Here, you can decide whether to redirect visitors, whether to show them snippets of the protected content, whether to direct them to a login form and what message they will see by default.
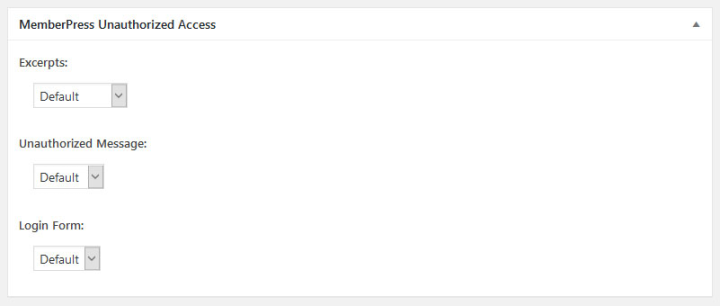
At the bottom of the content editor, you’ll also find the same options to override global settings on a per-page basis.
Once you’ve set rules and created content to which they apply, you’ll see these details represented in your list of posts and pages.

With this list, you can know at a glance whether your settings are configured correctly.
8. Protect Video Content
With the new integration, you can now work within Elementor to protect your content. As you’ll see in the tutorial video below, it’s easy to:
- Edit Access Within Rows – The feature enables you to allow someone to see an excerpt at the free level, but the full row once they have a membership.
- Make Customized Membership Rules – You can create rules to set parameters for each section of your membership site. Set up specialized messages that plug your upgrades, highlight what unauthorized viewers are missing and give sneak peeks to features that are typically only available to paying customers.
- Decide Actions for Unauthorized Access – You can configure how you want MemberPress to deal with unauthorized access by setting up specialized messages that display to users who don’t meet a specific membership rule.
9. Create a Pricing Page
Once you’ve set up your content and rules, you’re ready to start attracting members. But for that, you’ll still need a few important pages.
The first of these is the pricing page. On this page, your visitors will see and be able to select the available membership plans and move on to payment. The site will also redirect those trying to access restricted content here.
To get started setting up your pricing page, go to MemberPress > Groups > Add New.
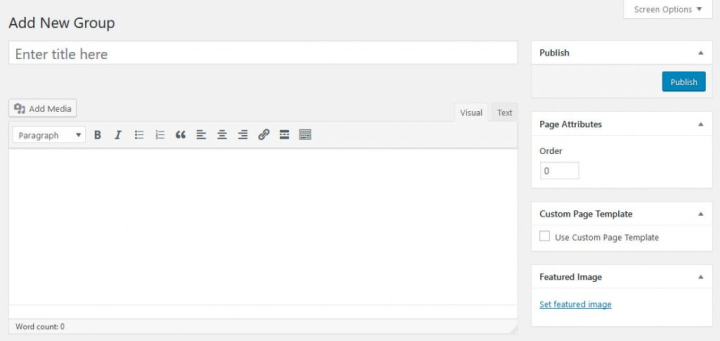
The first thing you’ll want to do is add a title. The title will also appear on the front end, so consider using a strong call to action.
Next, the most important settings will fall under Group Options.
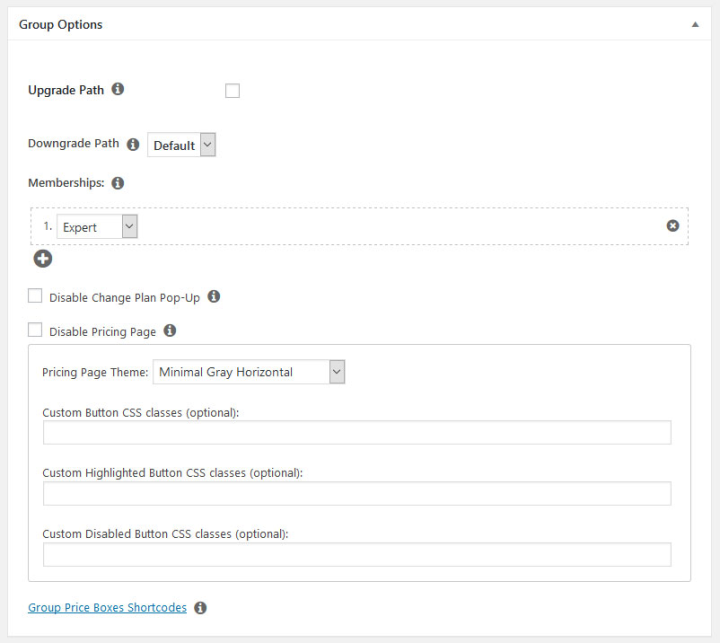
Following is a breakdown of what these important options mean:
- Upgrade Path – Limits users to only one membership subscription plan at a time.
- Downgrade Path – Determines which plan to fall back when a subscription expires. Here, it’s a good idea to create and set a free plan.
- Memberships – Determines the membership levels to include on the pricing page. Be sure to pay special attention to the order of the plans.
- Disable Change Plan Pop-Up – Controls whether members who want to upgrade can do so via a quick-selection popup or if they are taken back to the pricing page.
- Disable Pricing Page – Excludes the pricing page from front page access. Use this option when you want to set up your own custom page (more on that later).
- Pricing Range Theme – Allows you to choose the look of the pricing table from existing templates.
Below Group Options, you can style the pricing page yourself using custom CSS classes. To make any membership stand out, choose Highlighted under Price Box in the membership editor.
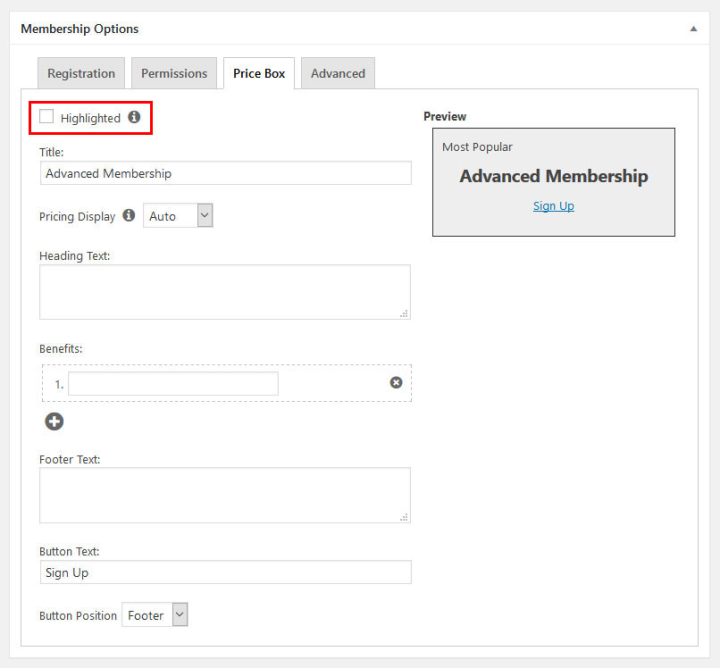
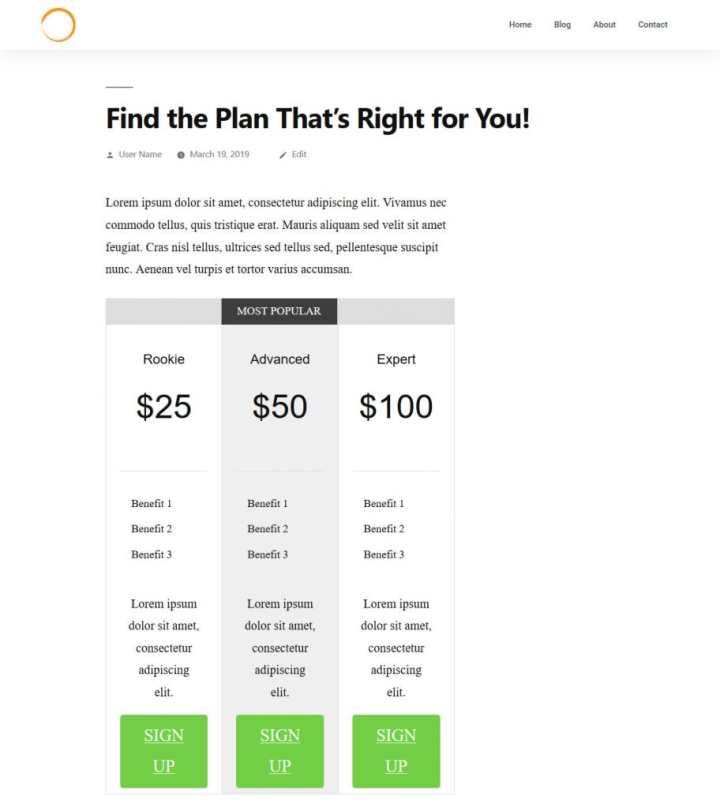
Again, once you’re satisfied with your choices, publish the page to make it available on your site. Be sure to preview your page by clicking the link after publishing.
10. Build a Custom Pricing Page Using Elementor
As another option, you can create a pricing page from scratch with Elementor, taking advantage of its many useful widgets and templates.
To get started, create a new page template (Single > Page), give it a name, and continue to the editor. In the library, you’ll find a large selection of templates to choose from.
Use the drop-down menu in the upper left corner to see all Pricing blocks.
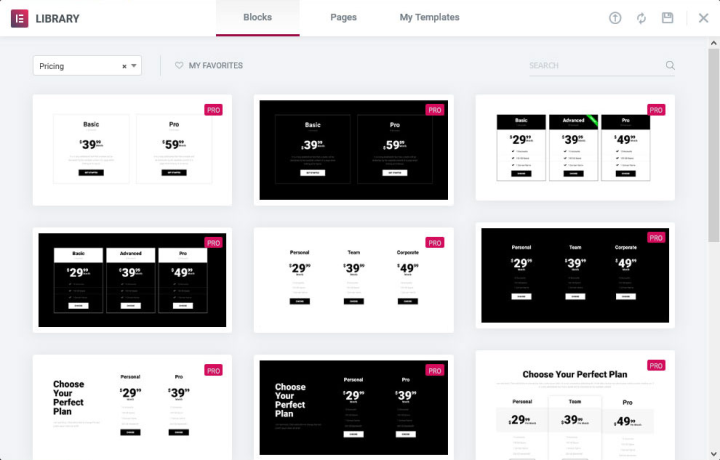
Alternatively, you can access entire pages for this category under Pages at the top. As another solution, you might simply opt to use the pricing table widget from the normal Elementor menu.
Choose whatever option suits you, and customize it to your needs. Be sure to copy and paste the URLs for your MemberPress > Memberships to the sign-up buttons.

Instead, you can choose to have Elementor input your URLs dynamically. To do this, click the Edit button for the pricing you want to edit. Under Footer, you can change the button settings. Click on the blue Dynamic link, then choose Internal URL.
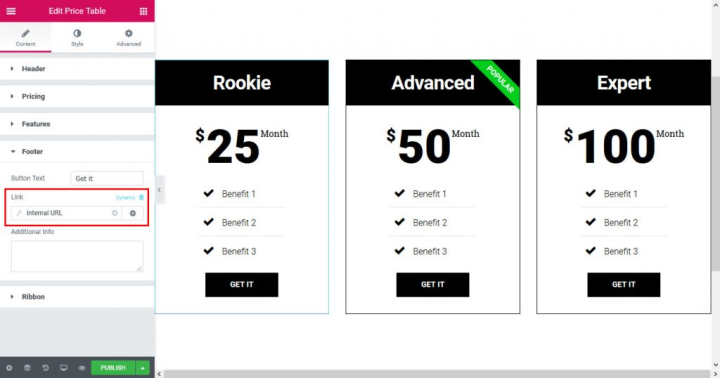
Next, click the wrench symbol to open settings. Under Type pick Content, then click the bottom drop-down menu and start typing the name of your desired membership.
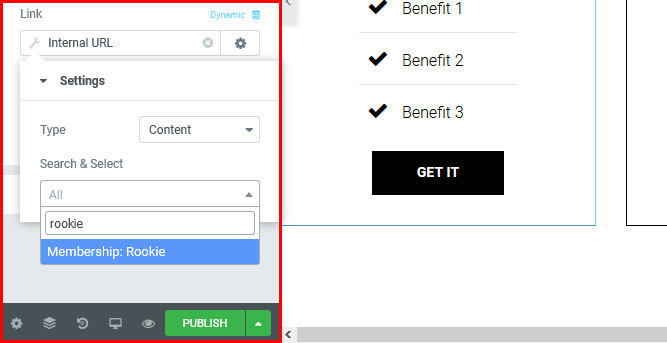
Select that membership level, then repeat the same process for the other membership plans. Whenever you save, Elementor will automatically keep the URLs up to date.
When creating your own pricing page, be sure to check the Disable Pricing Page option at the bottom of the page created by MemberPress. Also, be sure to add the URL of your new page as the redirect address.
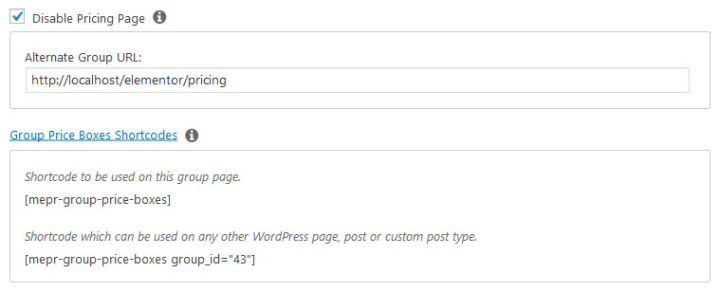
Finally, rather than creating a page completely from scratch, you can use the shortcodes at the bottom. Doing so will allow you to use the pricing tables from MemberPress on your page. You can also customize the look of these tables via CSS, as with the registration forms described above.
11. Include Sign-Up and User-Login Forms
Now that you’ve set up everything you need for your membership site, it’s time to give members access. The first thing you’ll need is a web form where users can log into their accounts.
One of the easiest ways to include this is the MemberPress widget, which you can find under Appearance > Widgets. Simply drag and drop MemberPress Login to any widgetized area, such as your sidebar, to include the form on your site.

(When you have time, it will be worth checking out the other useful MemberPress widgets on this page.)
Next, go to Appearance > Menus, and make sure to add the pricing page to your main menu. To do that, open the Groups tab, check the box for your page and click Add to Menu (check the Screen Option in the upper right corner in case you can’t see Groups as an option).
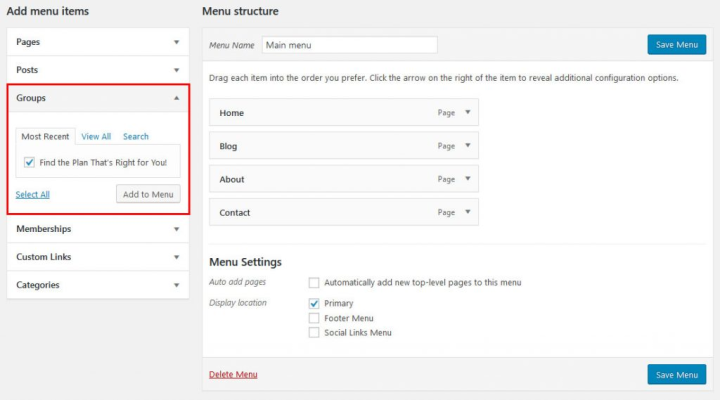
If you’ve created your own page, you’ll find it under Pages, and can add it in the same way. Drag the menu to the position you desire, and change the label according to your needs.

Don’t forget to save when you’re done! After saving, you’ll see the form and link on your site.
You can also use the aforementioned shortcodes to place forms wherever you want them in your Elementor templates. As always, you’ll find them at the bottom of each page.
12. Create a Login Popup
One other option you can use with Elementor is a click-triggered login popup. With this popup, users don’t have to go to a page to login, and there’s no need to have the form always on screen.
To create a login popup, go to Templates > Popup > Add New. Give the popup a name that makes sense (e.g. Membership Login) and continue.
Elementor comes with a number of ready-made templates for this purpose.
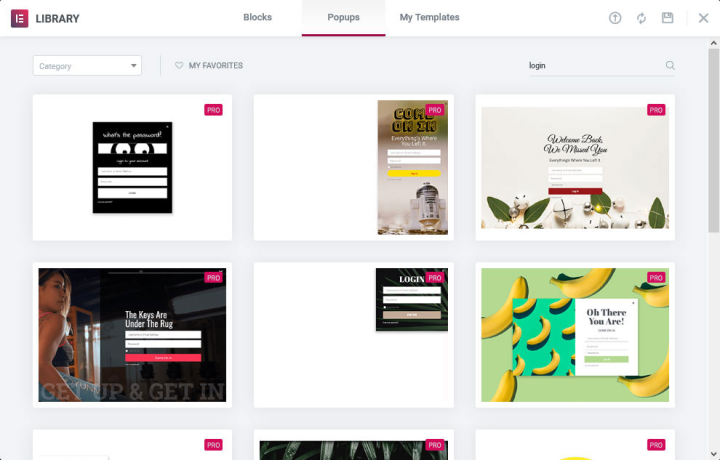
The easiest way to create your popup is to choose one from among the templates and customize it to your needs. However, you can also start completely from scratch.
Once you’ve made your choice, there are two ways you can integrate the MemberPress login form:
First, you can use the shortcode for the login page via the Elementor Shortcode widget.
Second, you can input the MemberPress Login widget from inside Elementor (find it under WordPress or via search).
Again, using Elementor directly, you’ll have limited styling options, so you’ll need to use the custom CSS settings. Once you’re satisfied, click Publish. There’s no need to set conditions, triggers, or rules.
Now, you’ll want to make sure the popup shows up on your page. The simplest way to accomplish this is to edit your header template to include a Login button.
Once you’ve done so, access its settings, find Link, choose Dynamic, and then Action > Popup. Next, click the wrench symbol, choose Open Popup, and find the popup you just created by name at the bottom.
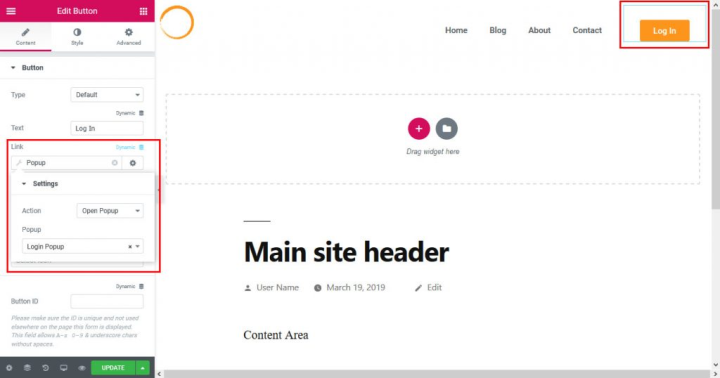
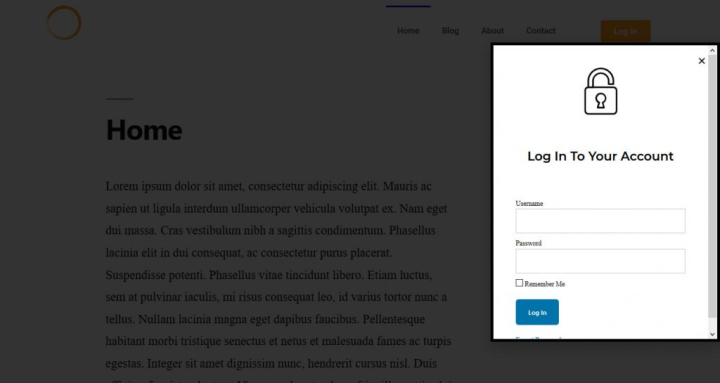
Once you update the template, go back to the front end and click the button. The login popup should appear.
13. Customize Email Templates
MemberPress will send multiple emails to users who sign up for your WordPress membership site. You can easily edit those emails under MemberPress > Options > Emails.
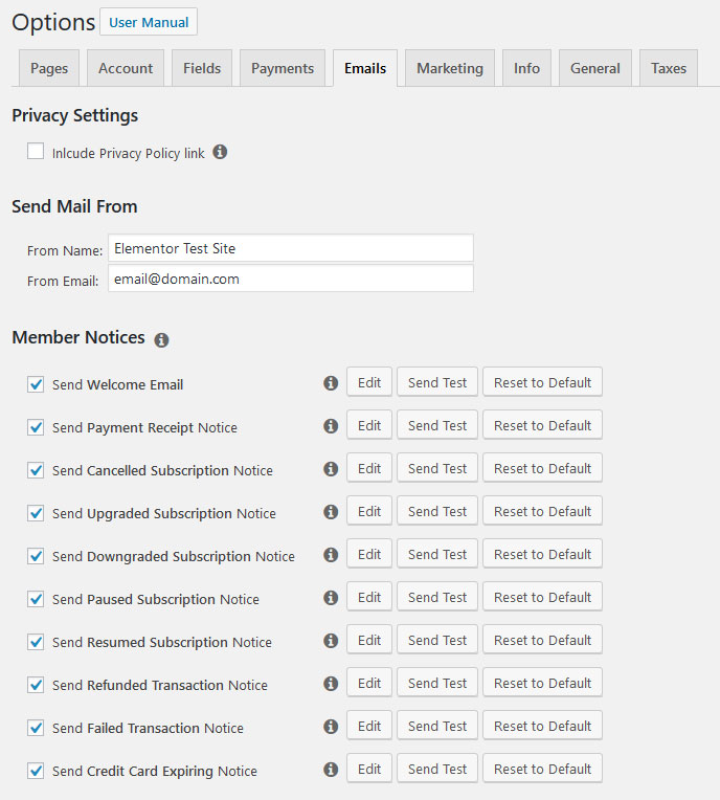
At the top, you’ll find an option to include a link to your privacy policy in any email the plugin sends. For those located or doing business in Europe, we recommend you include this link.
Below, you can determine the name and email address your messages will come from.
To change the email templates, simply click Edit next to any of the various notices.
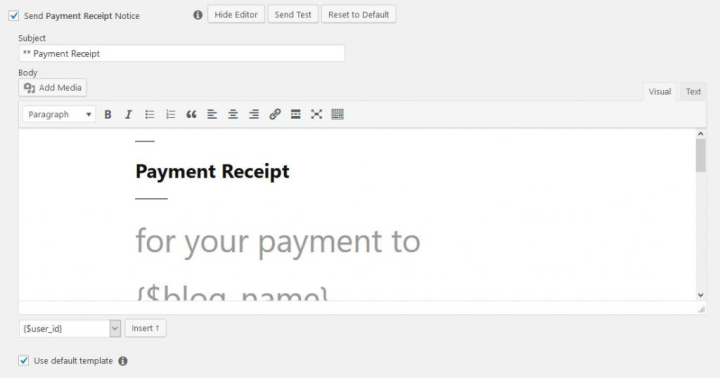
The editor will now open on the page. Here, you can edit the subject line and content, add media for branding purposes and make any other changes you desire.
At the bottom left, in the drop-down menu, you’ll also find a great list of smart tags to personalize your messages. To add them, simply use the Insert button.
Be sure to utilize the Send Test button every now and then. Test emails allow you to see what your emails look like to your users and also ensure your site is sending emails successfully.
MemberPress integrates with many email marketing providers. You can easily add these providers to your site via add-ons available under Activate > Add-ons.
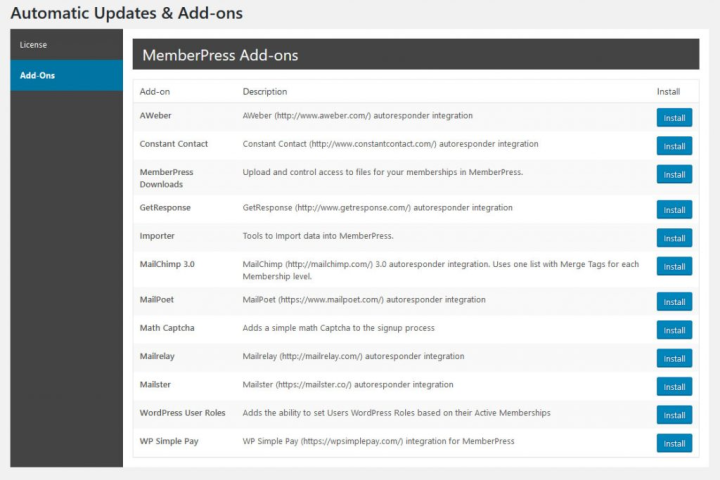
Simply click Install to add any of these services to your membership site. But be aware that you may have to connect your membership site with the service before you can use it.
14. Set up Reminders and Coupons
Reminders and coupons are great tools to attract and retain subscribers. Reminders take the form of email messages sent to subscribers to welcome them, let them know their account is about to expire or that it’s time to renew, and more. To access the various reminders, go to MemberPress > Reminders > Add New.
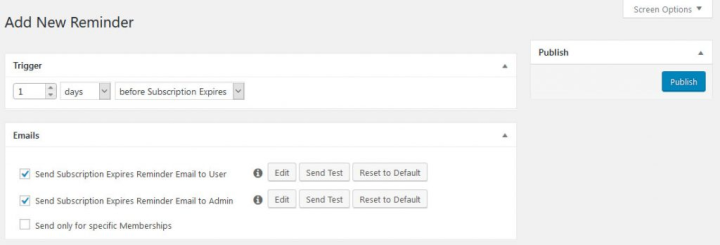
The interface here is pretty intuitive. You simply edit the emails that go to your subscribers and set limits to the number of reminders each receives. At the top of the page, you can also set triggers that will activate reminders. Once you’re finished setting up an email, simply select Publish.
You’ll find the coupons menu under Coupons on the MemberPress menu.
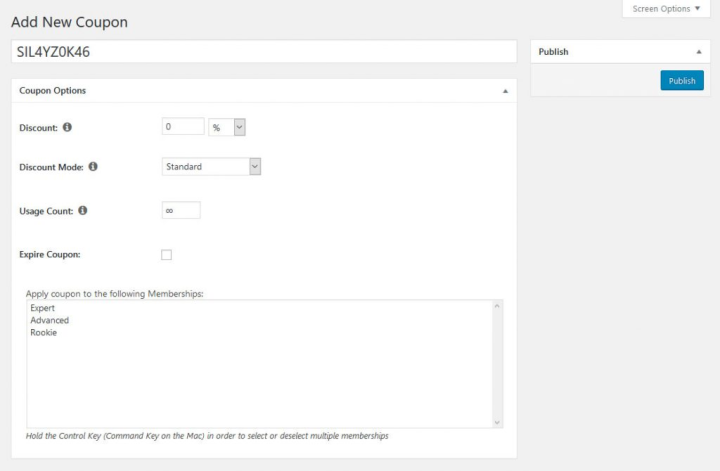
Adding coupons is also straightforward. Create a name, set the discounted amount and how it should apply, set the number of times the coupon can be used, determine an expiration date and set which memberships the coupon can be used for.
15. Check Your Reports
Under MemberPress > Reports, you’ll find a ton of great reports to keep you up to speed on how your membership site is performing. These reports are invaluable tools to help inform your business decisions and planning.
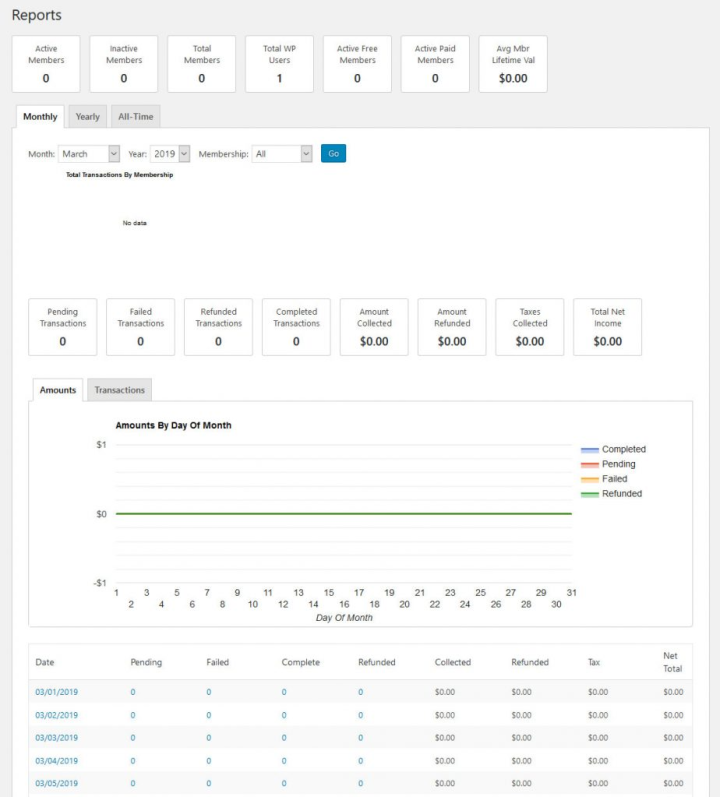
At the top, you can quickly view the number of active, inactive and total members, total users on your site, free and paid members and their average lifetime value.
The next section includes your site’s financial information — the number of pending, failed, refunded, and completed transactions and their monetary value, plus taxes collected and total income. You can also view this information in graph form and by-day data (click on any date for more information).
The tabs at the top allow you to see the same information on a monthly, yearly, and all-time basis.
Final Thoughts: WordPress Membership Sites
If you’ve read this far, you’re well on your way to creating a WordPress membership site that will generate recurring income for years to come. Thanks to MemberPress’ powerful features (and even more powerful integration with Elementor) this process is easier than ever to start and maintain — no coding required!
After you’re done here, though, your next job is getting those subscribers you need to support your site. So get busy! Once you’ve accomplished that, there’s nothing stopping your success.
What’s your experience creating a membership site with Elementor? Do you have anything to add to the above? Please share in the comments section below!
Looking for fresh content?
By entering your email, you agree to receive Elementor emails, including marketing emails,
and agree to our Terms & Conditions and Privacy Policy.
