Table of Contents
Here in Elementor, our goal is not just to give you the tool, but help you use it. Today I want to focus on a newly added Pro widget, the Price Table, and show you a few examples of best practices for creating beautiful and effective pricing tables.
Our previous tutorial about designing hero scenes has gotten great feedback, and my hope is that this article will also help you design better pricing tables.
Before we get started, I invite you to check out the full video tutorial by Elementor FED Josh Marom. In the video, Josh explains just how to use every aspect of this new widget.
Pricing Table Templates
- 1. Rounded Corners Pricing Table Template
- 2. Classic Pricing Table Template
- 3. Minimal Pricing Table Template
- 4. Bordered Price Table Template
- 5. Icon Pricing Table Template
- 6. Cards Pricing Table Template
- 7. Single Focus Pricing Table Template
- 8. Pop-Out Pricing Table Template
- 9. Add to Cart Pricing Table Template
- 10. Extraordinary Price Table Template
If you want to learn how we go about creating unique pricing tables, here are 10 examples of price tables designed in Elementor, including pro tips on how we designed them.
1. The Rounded Corners Pricing Table Template
We start off with a simple price table, that uses the border radius and box shadows options to create a clean and modern design.
A good rule of thumb is to make sure you never overdo it with regards to features. For this price table, three main features are enough to help the visitors quickly differentiate between the plans and choose the one that suits them more.
- Create rounded corners
Price Table > Advanced > Background & Border > Border Radius > 10

2. The Classic Pricing Table Template
This classic design shows all the elements to create a nice design. It includes an interesting use of background colors for the title and price sections. In addition, features are highlighted by check and times icons to highlight which features appear on each plan. We also give a more generous top and bottom padding to the pricing section, giving it more focus than the features that are more close together.
- Set interesting background colors
Price Table > Style > Header > Background Color
PT > Style > Pricing > Background Color

3. The Minimal Pricing Table Template
This design is effective because it sends a clear, hassle free message to the potential client. What you see is what you get.
This straightforward approach cuts down on any visitor hesitation and makes it easy to decide to go onboard. Whereas it is usually advised to downplay the free plan in favor of the paid one, this is the exception to that rule.
- Thick top border color
Price Table > Border > Top > 5px

4. The Bordered Price Table Template
This PT uses one main color: red. By setting a different and thicker top border, we get a nicer effect for the whole table. The third plan is elongated and includes a green ‘hot’ ribbon. This sets it apart and focuses the attention on it. Because of the heavy use of the red color, the green ribbon really makes the third plan pop-out nicely.
To get the border effect, All boxes get a top solid red color of 8, and the left and right borders are different for each box. This prevents the borders between the price tables to be double in size.
- Pricing plans that are attached to one another
Price Table #1: Advanced > Background & Border > Width > 8, 1, 1, 1
PT #2: Advanced > Background & Border > Width > 8, 0, 1, 0
PT #3: Advanced > Background & Border > Width > 8, 1, 1, 1
PT #4: Advanced > Background & Border > Width > 8, 1, 1, 0
- Third box is heigher than the rest
Section > Layout > Content Position > Bottom
Price Table #3: Style > Header > Padding top & bottom > 20px

5. The Icon Pricing Table Template
What is nice about Elementor widgets is that they work great combined. In this example, we combine the icon widget on top of the price table, so the Drupal, WordPress and Joomla icons appear on top.
You can emphasize the most preferred plan in any number of creative ways. In this example, a simple solid black border on the column level and negative button background color are all it takes to do the trick.
- Combine the Icon and Price Table widgets
Price Table > Advanced > Element Style > Margin top > ‘-20’ (To get rid of the default widget padding)
- Add a black frame around the middle pricing table
Price Table #2 >Column > Background & Border > Width > 3

6. The Cards Pricing Table Template
This unique card effect creates a really unique effect for the price table, making it much more visual and playful than before.
- Set background image & opacity
Price Table > Advanced > Background & Border > Image
PT > Style > Header, Pricing, Features, Footer > Background Color > Grey, Opacity 50%

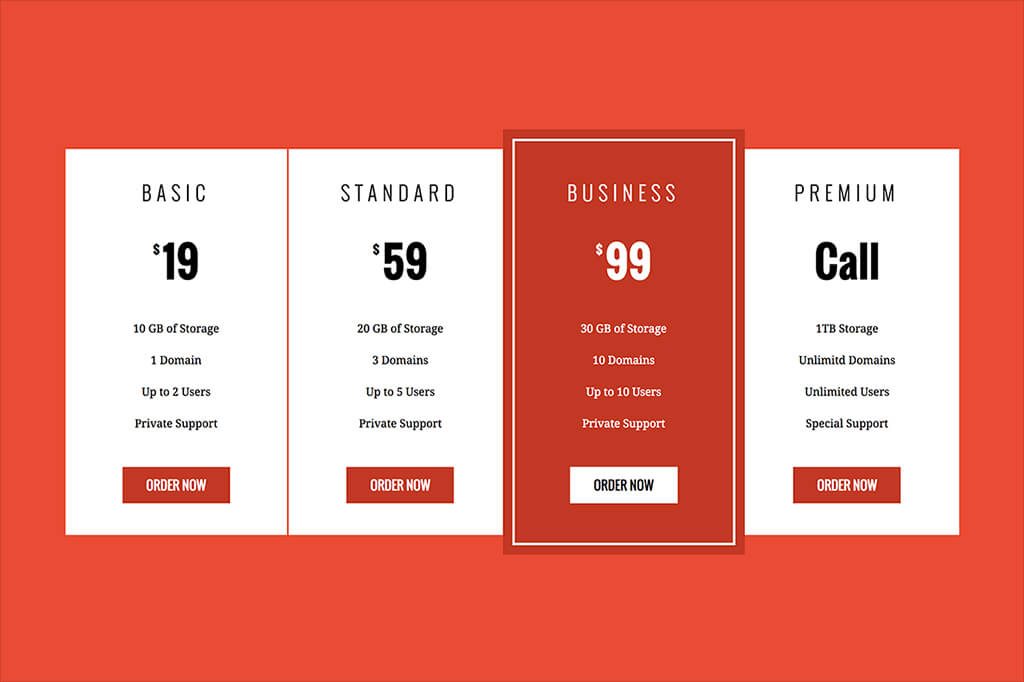
7. The Single Focus Pricing Table Template
This pricing table features three ‘plain’ white plans, that are all overshadowed by the main crimson colored plan that is also bigger, features negative colors and is framed. The result is an interesting layout which should also convert nicely since the eye is automatically drawn to the Business plan.
Here, we used a box shadow with no blur on the column to create the external red frame effect around the price table. We also had to add some custom CSS to bring the box shadow frame in front of the other price tables.
- Set white and red frame effect
Column > Style > Background & Border > Color > #ffffff
Column > Style > Box Shadow > Yes, Blur > 0
Column > Advanced > Custom CSS: selector {z-index:2;}
- Get the third price table to stick out on both sides
Section > Layout > Content Position > Middle
Price Table #3: Style > Header > Padding top > 10px
PT #3: Style > Footer > Padding bottom > 10px

8. The Pop-Out Pricing Table Template
Even without reading the features one can come to the conclusion that this is a hotel resort price table. The smart use of a script font, icons, gold and dark-blue colors, drop shadows and background image, all help to give it the luxurious design we automatically assign to premium hotels.
To put more emphasis on the middle plan, we’ve made it wider, We also created a pop-out effect by playing with the border radius and box shadows.
- Get the round edges
Price Table #1: Advanced > Background & Border > Border Radius > 10, 0, 0, 10
PT #2: Advanced > Background & Border > Border Radius > 10, 10, 10, 10
PT #3: Advanced > Background & Border > Border Radius > 0, 10, 10, 0
- Make the middle price table wider
Price Table #1, #3: Column Width > 31%
PT #2: Column Width > 37.6%
- Pop out the middle column in front of the others
Middle Column > Advanced > Custom CSS: selector {z-index:2;}
Middle Section > Layout > Content Position > Middle
Price Table #3: Style > Header > Padding top > 10px
PT #3: Style > Footer > Padding bottom > 10px

9. The ‘Add to Cart’ Pricing Table Template
This is another example of matching another widget to the price table, this time an image widget. By using the Woo-Add to Cart widget, you can create landing pages that compare various products, and allows the visitor to add them to the WooCommerce cart with a click. You can also replicate this example to create not only pricing plans but top 5 product comparison pages that look amazing.
- Attach image
Image > Advanced > Element Style > Margin > -20
- Add the Add to Cart button
Drag & drop ‘Woo Add to cart’ widget
Pair each button to the right product

10. The Extraordinary Price Table Template
Honestly, price tables can be so boring. They are still tables, what could be more boring than tables? I’ve seen many price tables that looked like they were pasted from Excel. Yikes!
In the example above we manage to bring our pricing table to life by using vivid colors, a white frame, semi-transparent backgrounds and box shadows. This way we manage to create a unique and much more interesting design.
- Create a semi-transparent price table
Price Table > Advanced > Background & Border > Color > Opacity 50%

Conclusion
I hope you’ve enjoyed this short tutorial. Feel free to share your own best practices when designing price tables in the comments section below.
If you’d like to enjoy this widget, plus many more useful widgets and features, check out Elementor Pro. We’ve added some new Pro templates that include price table designs, to help you get started.
Looking for fresh content?
By entering your email, you agree to receive Elementor emails, including marketing emails,
and agree to our Terms & Conditions and Privacy Policy.


