Table of Contents
Ever come across those marketing sites that force you to sign up or pay to get access to the content?
They make some of their best content available to members only. They offer you just enough to understand the value their content can provide and then make certain parts of their site only accessible to paid subscribers.
You see, people are really inclined to pay for accessing great content, if it’s delivered by someone they trust. This creates a great opportunity for website owners that put time and effort into delivering quality content for their readers.
Restricting content on your Elementor website is a great way to reward your most loyal readers, gain more subscribers with exclusive content, as well as to monetize it.
The type of content you restrict doesn’t have to stop at premium articles, you could restrict things like forums, online stores, access to other member’s contact information, and more.
In this post, we’ll show you how to use the Paid Member Subscriptions plugin to restrict content on your Elementor website. We’ll go over the key features of the Paid Member Subscriptions plugin, show you how to create membership plans, and then walk you through the steps to restrict content on your Elementor posts and pages.
Paid Member Subscriptions Overview

Paid Member Subscriptions plugin is an easy-to-use plugin that allows you to add membership functionality to your website. Key features include:
- The ability to create free and paid membership levels.
- The ability for your members to manage their account and subscription details.
- Easy shortcodes that allow you to add content-restriction, front-end login, and registration forms to any page on your site.
- Several addons that extend the functionality of your membership site, such as integration with bbPress, discount codes, WooCommerce integration, invoices, Stripe integration, and more.
Paid Member Subscriptions plugin integrates seamlessly with Elementor so you can make sure your members area will match the rest of your site.
You can also manage your members and see which plans they are subscribed to and which members have successful, pending or failed payments.
A standout feature of the Paid Member Subscriptions plugin is the ability to restrict content based on a variety of factors. For example, you can restrict content based on subscription plans and logged in status. Content that can be restricted includes posts and pages, custom post types, WooCommerce products and shop pages, and bbPress forums and topics. Due to this integration, all these content restriction features are available directly from Elementor’s front-end visual interface.
The Paid Member Subscriptions plugin can be downloaded from the official repository for free. The free version has the basic features in place so you can easily give the plugin a test run and see if it’s the right fit for your business.
If you want more advanced features such as extra addons, you can upgrade to one of the premium versions of the plugin. Premium versions of the plugin include various add-ons such as integration with Stripe that will allow you to offer free trials for your membership plans, integration with WooCommerce and bbPress, support for automatic renewals, and more.
Restricting Content on Your Elementor Website
Now that we’ve covered the main features of the plugin, let’s take a look at how you can use it to restrict content on your Elementor powered website. The basic steps include installing and configuring the plugin, creating your membership plans, creating necessary pages for new user registration, login, and account management, and finally using the Paid Member Subscription plugin to restrict content on posts and pages.
Installing and Configuring the Plugin
First things first, you need to download and install the Paid Member Subscriptions plugin. To do this, go to Plugins > Add new, search for it, and then install and activate the plugin.
Once the plugin has been installed, navigate to Paid Member Subscriptions > Settings.
Here, click on the Payments tab and enter your PayPal email address so you can begin accepting payments for your membership plans. Don’t forget to set your preferred currency.
Under the Content Restriction tab, select how you want to restrict content: using messages, redirection or a template. Each of the different methods has been described below and this is where you can customize restriction messages and templates that will be used.
Using the Emails tab, you can customize the emails that are used to notify your members about their account and subscription. You can tweak these to use your brand’s voice. After you have configured the plugin, you need to create your membership plans. To do this, go to Paid Member Subscriptions, select “Subscription Plans” and click “Add New”. You can then enter the plan name, description, and the price. Simply repeat that process as many times as needed to create additional subscription plans.
Creating Membership Plans
After you have configured the plugin, you need to create your membership plans. To do this, go to Paid Member Subscriptions, select “Subscription Plans” and click “Add New”. You can then enter the plan name, description, and the price. Simply repeat that process as many times as needed to create additional subscription plans.

As you can see from the screenshot, you can also set the duration for each subscription plan and associate each plan with a user role. Keep in mind that advanced features such as the ability to offer free trials, automatic renewals, and fixed end date subscriptions are available on the premium version of the plugin so if that’s something you want, it’s definitely worth making the investment.
Creating Necessary Pages
With membership plans created, it’s time to create your login, registration, and the account pages. You will need those pages to allow your visitors and readers to sign up for one of your plans when they try to access the restricted content. To do this, go to Pages > Add New. Name your page Register or Sign up and then click Edit with Elementor.
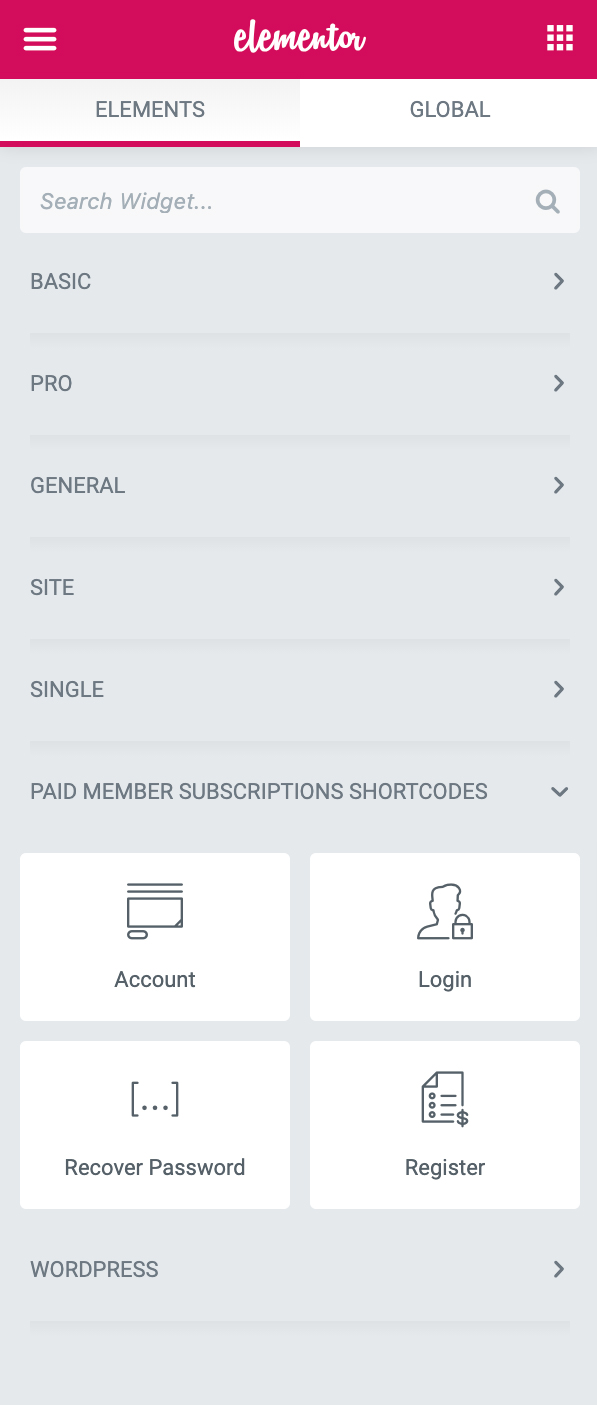
Here, you can add a heading and a text widget that has a brief description of your membership. Then, add the Login shortcode widget from Paid Member Subscription widget section.
Keep in mind that you can also use any of the premade Elementor templates to create the registration page as well as other necessary pages.

You can also create a separate pricing page with a pricing table widget to display your membership plans in a more visually appealing way. To do this, create a new page, edit it with Elementor, and add the pricing table widget. Once you have added all the tables for all the membership plans, you can link the buttons to the corresponding membership plans.
To do this, you will need to link to the original registration page we’ve created, and add the URL parameter subscription_plan along with the plan ID which can be found under Paid Member Subscriptions > Subscription Plans. For example, the final URL will look like this for the Silver plan:
https://yoursite.com/demo-registration-page/?subscription_plan=8

When you’re done designing your page, click on Publish. Then, repeat the same steps to create the Register and Account pages, adding the appropriate widgets.
Restricting Elementor Content for Sections and Widgets
Once you are done creating your membership plans and the necessary pages have been set up, you can begin restricting content on your Elementor website. Let’s take a look at how you can restrict contents on a page created with Elementor.
Start by going to Pages > Add new. Enter the name for your page and then click Edit with Elementor. For the purposes of this tutorial, we’ve named the page Restricted Content Demo. I have added a text widget and a video widget. Feel free to customize the page to fit your business or blog.
The first text widget will serve as a brief teaser content and the video widget will be restricted to paid members. To restrict the content, click on the widget you want to restrict and click on Advanced, then Content Restriction.
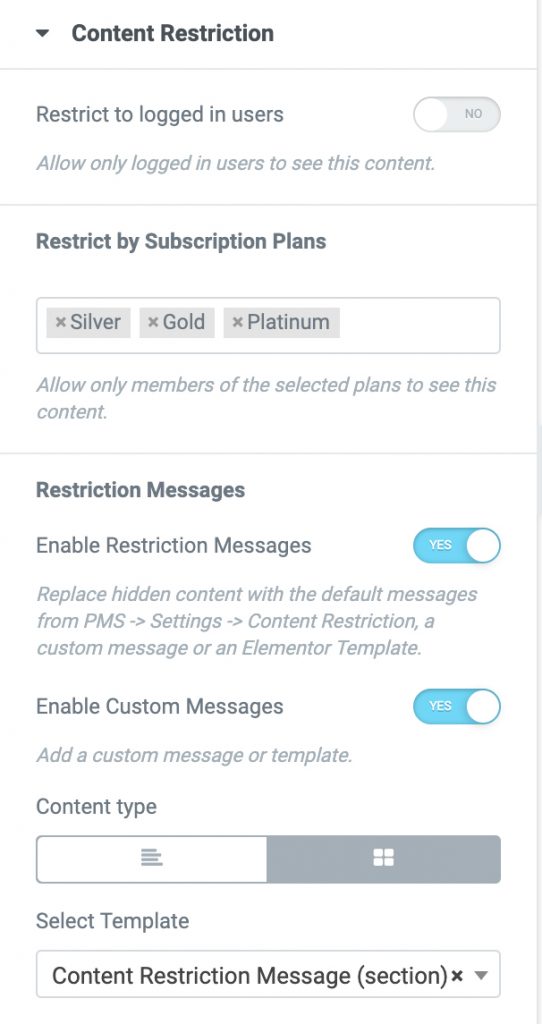
Under content restriction settings, you can choose to make this widget available only to logged in users and choose which subscription plans have access to this content.
You can also enable restriction messages and customize them to your liking. Simply, toggle the option on and then enter your custom restriction message in the text box.
Alternatively, you can create a custom block template in Elementor and use that as your custom message. Make sure to include a button that points to your registration page created earlier so visitors and readers can sign up for one of your subscription plans.

In a similar fashion, you can restrict an entire section of the page or your blog post. Simply select the widget or the section you want to restrict access to, head over to Advanced settings and configure the content restriction settings for that widget or section.
Final Thoughts
Restricting content on your Elementor website is easy once you have the right tools for the job. With the help of Paid Member Subscriptions plugin, you can easily create different membership levels and restrict certain content directly from Elementor’s front-end visual interface.
This allows you to create a recurring revenue stream for your website and monetize your existing and new content. The good news is that you can create your membership site for free since both Elementor and Paid Member Subscriptions offer a free version of their respective plugins. You can then upgrade to a paid version once you start getting more members and need more advanced features.
Use the steps in this article to help you restrict content in your Elementor powered site, by taking advantage of the seamless integration with the Paid Member Subscriptions plugin.
* The author of this article is affiliated with the plugin ‘Paid Member Subscriptions’.
Looking for fresh content?
By entering your email, you agree to receive Elementor emails, including marketing emails,
and agree to our Terms & Conditions and Privacy Policy.


