Table of Contents
Learn the visual way to create tables in WordPress using TablePress & Elementor.
Tables are useful tools for many WordPress websites. They allow you to organize, compare and break down data, and display it to visitors in an easy-to-understand way. Therefore, knowing how to create a table in WordPress is a very useful skill.
In former times, you had to create HTML tables by hand, but that is way too cumbersome. In addition, until the new Gutenberg editor came out (which has a table block), WordPress didn’t have any native functionality for this. Luckily, the CMS offers several plugin solutions to include tables on your site.
The most popular of them all is TablePress. It allows you to create tables with a graphic interface and easily include them in your content. Judging by its 700,000+ installs and solid 5-star rating (after almost 3,500 reviews), it also seemingly does a bangup job.
In this post, you will learn everything you need to know about creating tables in WordPress with Elementor and TablePress. We will give you an overview of the plugin and its features, a detailed guide on how to create, import, and export tables as well as talk about useful add-ons.
TablePress – Easily Add Tables to WordPress

Before diving into the how-to part of this post, let’s first talk about the plugin we’ll be using.
As mentioned, TablePress is the most popular of its kind. The main reason for that is most probably its ease of use, intuitive handling, and beginner friendliness. You will see that for yourself below.
However, besides that, the plugin comes with a number of features that make it stand out:
- Import data from many formats – TablePress not only enables you to create tables but also to import existing data from different formats (Excel, CSV, HTML, and JSON). That way, you don’t have to manually input your spreadsheet information but can use it right away.
- Exportability – Vice versa, any table that you create with TablePress, you can export in several formats. This lets you transfer the information to a different site, Excel file or use it for any other purpose.
- Extendability – In addition to the main plugin, the developer has put together a number of add-ons for TablePress. They allow you to make your tables responsive, add column filters, an option to save tables to PDF, and more. We will talk about this at the end of the article.
Create Tables in WordPress With TablePress & Elementor
In this first part, we will deal with how to create brand new tables in WordPress with the TablePress plugin.
1. Install TablePress
The first step is, of course, installing the TablePress plugin. You can do that just like you do for any other WordPress plugin. Simply go to Plugins > Add New, search for the name and hit Install.

When it’s downloaded to your site, don’t forget to activate the plugin!
2. Add a New Table
Once active on your site, you will notice a new TablePress menu item in the WordPress dashboard. A click on it takes you to this screen.

Here, you can take care of everything regarding tables on your WordPress site. At the top, there are some useful links in case you need help.
To create a new table, simply click on Add New. When you do, you’ll find yourself here:

In this step, all you need to do is enter a table name, an optional description and determine how many rows and columns you’ll need. When you’re done with that, click Add Table at the bottom.
3. Fill the Table With Content
In the next step, you can fill in your table’s cells. If you have ever worked with a spreadsheet before, you should have no trouble with this.
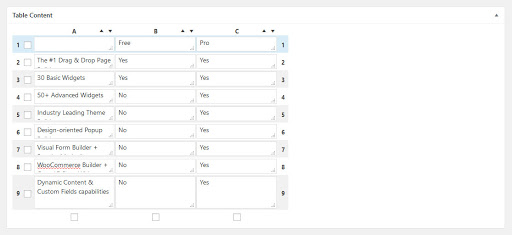
Note, that you are able to move rows and columns via drag & drop; you can sort them with the little arrow icons.
(By the way, if you are considering using Elementor Pro, you can find plenty of good reasons here.)
4. Configure Advanced Options
Further below, you’ll find additional choices for table manipulation, design, and formatting.

At the top, it allows you to insert links, images, and text via an advanced editor. For all three options, you first need to click the respective button and then the cell where you want to add the content. The plugin will then give you a familiar interface for each of the three options.

You also have the option to combine cells, hide, duplicate, insert, and delete rows or columns as well as add new ones. Use the checkboxes on the sides to mark what you want to manipulate.

Under Table Options, you can determine whether you want the table to have a header or footer. You can also switch alternating row colors on and off, control highlighting on hover, and whether the table name and description should appear and where. Furthermore, you may add CSS classes for your own custom styling.
Finally, at the bottom are controls for some features of the JavaScript library controlling the tables.

They include adding options to sort the table, search and filter it, use pagination and horizontal scrolling. There is also a field to input custom parameters.
5. Display the Table on Your Site
Once finished, you can save or preview the table at the bottom. The most important thing, after saving it, is to check the shortcode in the upper right corner.

You will use that to input your table into your WordPress site and can also always check it from your list of tables by clicking Show Shortcode.

To display tables anywhere on your site, simply copy the shortcode and input it into a post, page, or text widget.

If you are using the classic WordPress editor, TablePress also adds a button to it, from which you can insert tables.

When you click it, you get a list of all the tables on your site and buttons to input each shortcode into your content.

Regardless of what you choose, here’s what it looks like on the page. Note the pagination and search box.

6. Use TablePress Tables in Elementor
If you want to include a table in one of your Elementor templates (such as for Single Posts), you can do that as well. For that, simply open the template in question, find the Shortcode widget on the left (here the search function is helpful) and drag it where you want the table to appear.
Then, paste the table shortcode in the field on the left. Note, that because of the way TablePress is set up, you don’t see your table in the preview window but only the shortcode.

However, don’t let that bother you. When you preview or publish the template, you will find the table in there as it should be.
7. Re-editing Tables
If you want to change something about one of your tables, you can simply go back to the main menu of TablePress. Here, in your list of tables, hover over the name and click the Edit link that will appear.

This will take you to the familiar editing interface where you can make changes as needed. After saving, the table will also be updated everywhere you have included it in your content.
Importing a Table With TablePress
As already mentioned, instead of inputting your data manually, you can also import it from an existing file. TablePress makes this just as simple as creating a new table.
1. Import Your Table
You’ll find all the options for this under TablePress > Import a Table (there’s also a tab at the top of the main screen).

First, select your input source. This can be via file upload, URL, file on your server, or manual input (copy and paste).
In this case, we want to use a file. For that, click on Browse and navigate to the spreadsheet you want to upload. When done, use the drop-down menu to tell TablePress which format it is (CSV, HTML, JSON, Excel).
The cool thing is that you can choose whether to create a new table from the data, replace one that already exists, or add new data to a table already on your site. Of course, when you choose any of the latter options, you need to select that table from the menu.
Configure as needed and hit Done.
2. Check and Format
Once you have imported your table, you will have sent it to the same page as before.

If everything went right, your data should already be correctly filled in. Therefore, all that’s left for you to do is configure the design and behavior options.
3. Display It on Your Site
After that, using the shortcode, you can add the imported table anywhere on your site in the same manner as you did earlier.
TablePress – Exporting a Table
Finally, we’ll go over the export functionality the plugin offers its users. Unsurprisingly, you can find this option under TablePress > Export a Table or the tab at the top of the main menu. Both of them take you to this screen.

Here, you first need to select the table you want to export. By holding Ctrl/Cmd, you can also choose several or use the Select all button on the left to export all the tables on your WordPress site.
Below that, choose the export format (CSV, HTML, JSON) and delimiter between values when using CSV (comma, semicolon or tab).
You also have the option to create a zip file. This setting is mandatory when exporting several tables at once.
Once you have made your choices, hit Download Export File to receive your file.
Available Plugin Options
The Options panel of TablePress is very limited.

You mainly find settings to change the styling of your tables via CSS. If you are not familiar with that, the developer has put together a bunch of documentation that helps you with this if needed.
Below that, you are able to change the position of the TablePress menu item on the main menu.
Furthermore, at the bottom, you’ll find a button to uninstall the plugin and important notes for doing so.
If this isn’t enough for you, some of the add-ons below bring more functionality to the plugin.
Useful TablePress Add-ons
As mentioned at the start, TablePress comes with a number of optional add-ons. Here, you’ll find a list of the most useful extensions.
Note, that, while all of them are free, some have been marked as premium.

These are the ones that have taken a lot of time and effort to develop, so the author asks for a donation if you do end up downloading one of them.
- Responsive Tables – TablePress tables are not responsive out of the box. You can remedy that with this extension. It offers three different ways to make tables mobile- friendly and you can find examples and instructions on the page.
- Automatic URL Conversion – If you create a table that contains a lot of URLs, this extension is for you. Instead of using the button method, it will automatically make any pasted URL clickable.
- DataTables Sorting Plugins – Adds a sorting ability for currencies, numbers with text, and dates.
- DataTables Buttons – This extension lets you include a number of buttons in your tables. Includes options to copy to clipboard, save to PDF, save to Excel, and more.
- DataTables FixedColumns – Fixes columns to the side of a table so they don’t move during horizontal scroll.
- DataTables FixedHeader – Same as the columns solution but for the header.
- Change the [table] Shortcode – Lets you change the name of the TablePress shortcode to address conflicts with other plugins or themes (or just for the hell of it).
- Automatic Periodic Table Import – Automate the import of data from a source table at regular intervals.
Use the online Word editor program to compose visual documents in your web browser for free.
Final Thoughts: Creating WordPress Tables With TablePress
TablePress is the most popular plugin for creating and including tables in WordPress and for good reason. It makes the entire process easy and comfortable. If you need to organize data on your site, this plugin is a great way to go.
Above, you learned how to create a table in TablePress, display it on your Elementor site, import existing table data, and export tables from your site. We also went over the plugin options and many of the available add-ons. Everything is pretty straightforward.
Hopefully, you now feel comfortable creating tables on your own WordPress site. If you have any additional input, we would love to hear from you.
Do you have any other plugin recommendations for creating tables in WordPress? Any questions or comments on the above? Please let us know in the comments section below.
Looking for fresh content?
By entering your email, you agree to receive Elementor emails, including marketing emails,
and agree to our Terms & Conditions and Privacy Policy.


