Searching for the easiest way to customize the WooCommerce checkout page?
In the past, you needed to rely on your WooCommerce theme for the checkout page design. Or, you might’ve gone with custom CSS or a third-party WooCommerce checkout plugin.
But with the new Checkout widget in Elementor Pro, you can now fully customize your checkout page using Elementor’s visual interface and code-free options. This widget works alongside the Elementor Cart and My Account widgets to help you design all of your store’s key pages.
In this tutorial, you’re going to learn how to use Elementor Pro’s Checkout widget to customize and optimize your store’s checkout page without needing to leave Elementor.
Then, we’ll also share some additional tips on how to use WooCommerce action hooks to further customize the checkout page.
While you don’t need to use code if you’re using Elementor Pro’s Checkout widget, these action hooks can be useful if you want to add custom content to your checkout page, such as a set of trust badges that appear below the credit card fields.
If you prefer watching a video tutorial, you can watch the video above on how to use the Elementor Checkout widget.
Otherwise, keep reading for the full text-based tutorial that parallels the video, as well as some extra tips on using WooCommerce action hooks that we didn’t cover in the video.
Table of Contents
How Does the Elementor Pro Checkout Widget Work?
The WooCommerce checkout page is the page where shoppers finalize their orders by entering their addresses, contact details, billing information, and so on.
It’s an essential page for any store, so it’s important that you optimize it for conversions and make it as user-friendly as possible.
With the Elementor Checkout widget, you can fully customize your store’s checkout page directly from Elementor. This helps you create a consistent design with the rest of your store and optimize key details on your page.
You’ll be able to change colors and typography, adjust spacing, change section and form text, and more. You can make checkout-wide changes or you can enable granular options to apply different styles to specific parts of your checkout.
For example, if you want to draw attention to the coupon field, you can add special colors, a border, and so on — all with zero code required.
How to Customize the WooCommerce Checkout Page With Elementor
Now, let’s shift into a detailed guide for how you can use the Checkout widget in Elementor Pro to customize your store’s checkout page.
Again, if you’d prefer to view this tutorial in video format, you can watch it above. Both tutorials contain the same information.
1. Edit Your Store’s Default Cart Page in Elementor
When you make a WooCommerce store, WooCommerce automatically creates a checkout page for your store that uses the WooCommerce checkout shortcode.
In this tutorial, you can use that same page for simplicity. Only, instead of relying on the WooCommerce shortcode, you’ll edit the page in Elementor and add the Checkout widget.
To get started, go to the Pages list in your WordPress dashboard and locate the checkout page. WooCommerce will automatically mark it with an identifier that says “Checkout Page”.
When you’ve found the correct page, click the Edit button to open the WordPress editor.
Once you’re inside the editor, click the Edit With Elementor button to enable Elementor for this page and launch Elementor’s editor.
2. Replace the WooCommerce Checkout Shortcode With the Elementor Checkout Widget
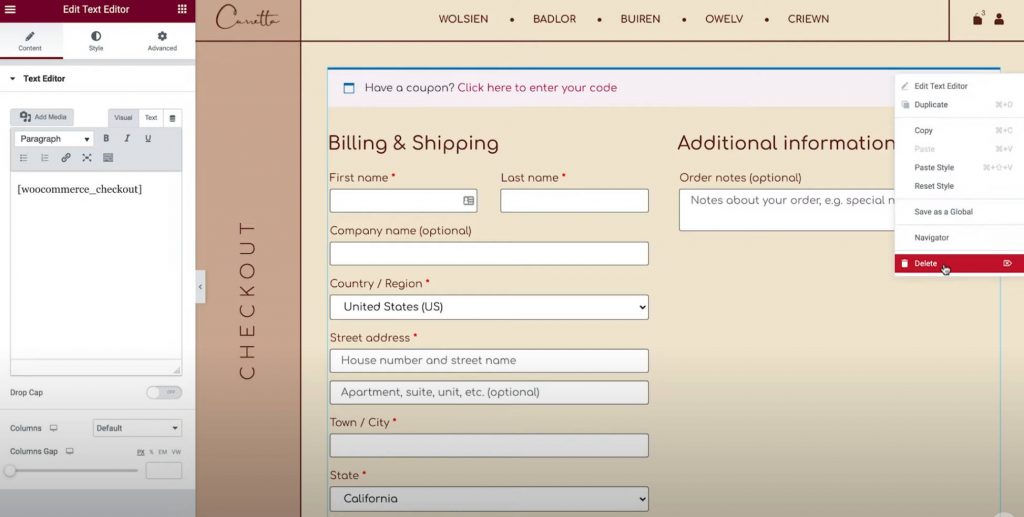
When you open the default cart page in Elementor, you should see a very simple design. The only elements on the page will be the [woocommerce_checkout] shortcode inside of an Elementor Text Editor widget.
To use Elementor to control your checkout, you’ll first want to delete the existing widget/shortcode:
Then, add the Elementor Checkout widget in its place. Once you add the Checkout widget, you’ll see a live preview of the checkout page right in the editor.
Note – because the Elementor editor gives you a visual preview that perfectly matches what your website’s visitors will see, you’ll want to add some items to your shopping cart so that you can see what the actual checkout process looks like. Here’s all you need to do:
- Go to the frontend of your store.
- Add some items to your cart.
- Reload the Elementor interface.
Once you reload Elementor, those items should appear in the checkout summary while you’re working on your design.
3. Customize Your Checkout Page’s General Settings
Now, it’s time to start customizing.
To begin, open the settings for the Checkout widget in the Elementor sidebar.
Let’s first go through all of the settings in the widget’s Content tab.
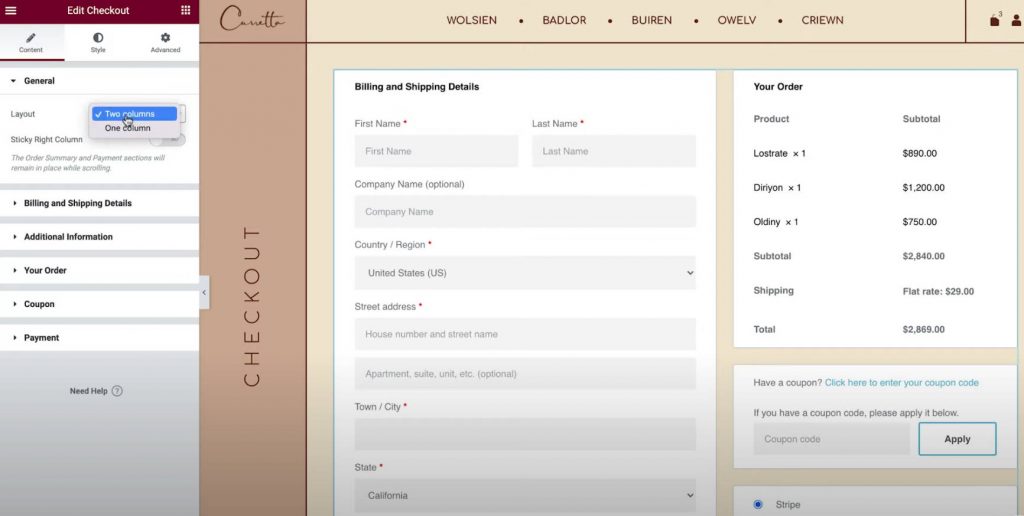
General – One-Column or Two-Column Layout
First, you can use the General settings area to choose between a one-column or two-column layout for your checkout page.
If you choose a two-column layout, you can also make the right column sticky. If you enable the sticky right column, you get an additional option to add an offset, which helps you avoid your header overlapping with the column.
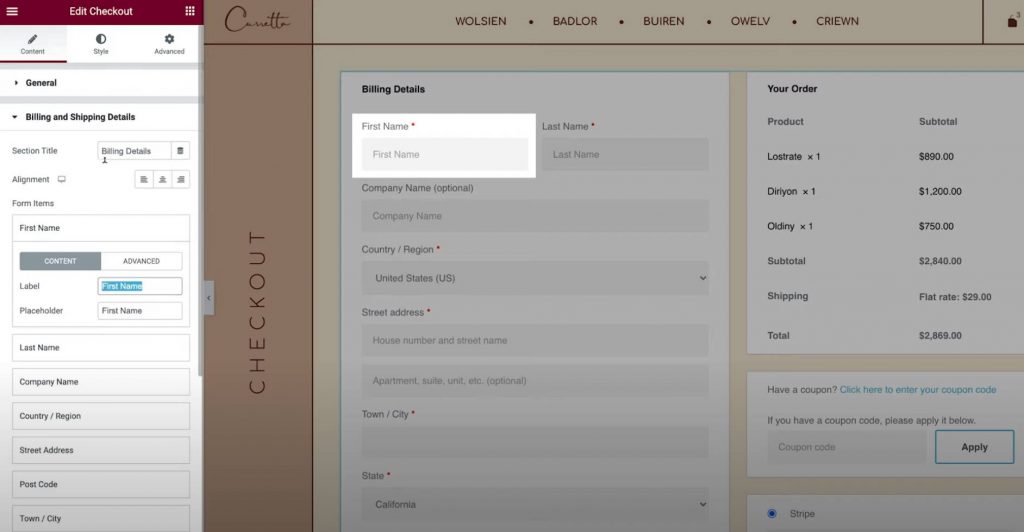
Billing and Shipping Details
The Billing and Shipping Details section lets you customize the billing and shipping form details.
You will see these fields together if you set the billing and shipping details to be the same in WooCommerce’s settings. You can enable this by going to WooCommerce → Settings → Shipping and selecting Force shipping to the customer billing address. Otherwise, you’ll see them separately.
First, you can set the section title and alignment for this section.
Then, you can open the settings for each individual field to customize the labels and placeholders.
Additional Information
The Additional Information section lets you customize this area of the checkout page. By default, this is where shoppers can leave special order notes, though you might see additional details depending on your store’s setup.
As with the other sections of your checkout page, you can customize the alignment and labels of this section.
Or, you also have the option to hide this section from the checkout page, which might be useful if shoppers don’t need to leave custom notes.
Your Order
The Your Order settings let you customize the order summary part of the checkout. If you use a two-column layout, this section will appear at the top of the right-hand column. In a one-column layout, it will appear below the billing and shipping details.
Coupon
The Coupon settings also let you customize the coupon section title and alignment. However, you also get an option to customize the link text for applying the coupon code. This can help you create a more optimized and user-friendly experience for shoppers who are applying coupons.
Payment
The Payment settings let you change the alignment of the purchase button and also customize the terms and conditions message and link text.
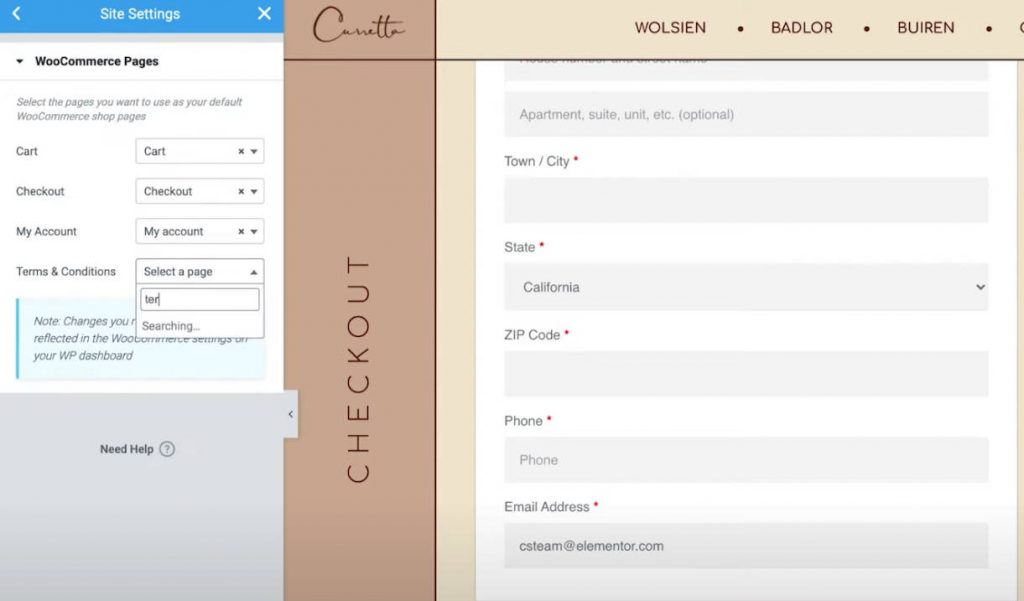
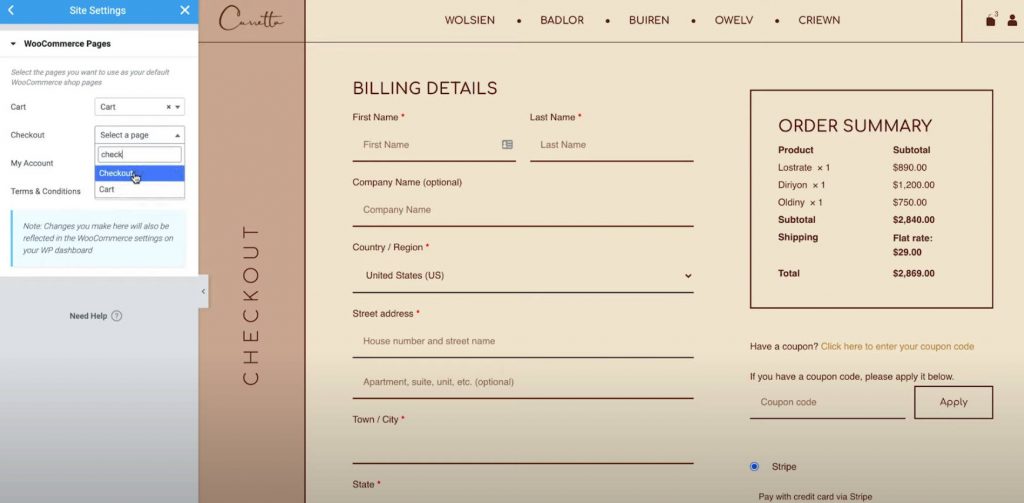
In order to see the terms and conditions message, you’ll need to have set the terms and conditions page in your WooCommerce settings. To simplify things, you can select this page without leaving Elementor:
- Click the hamburger menu icon in the top-left corner of the Elementor interface.
- Select Site Settings.
- Select WooCommerce.
- Use the Terms & Conditions field to search for and select the right page for your terms and conditions.
Returning Customer
If you allow guest checkout in WooCommerce’s settings, you’ll also get an additional settings area called Returning Customer that lets you customize the message that prompts returning customers to log into their existing accounts.
4. Customize Your Checkout Page’s Style Settings
Next, you can move to the Style tab of the Checkout widget’s settings to further customize the style and design of the checkout page, including making sure it matches the rest of your store’s design.
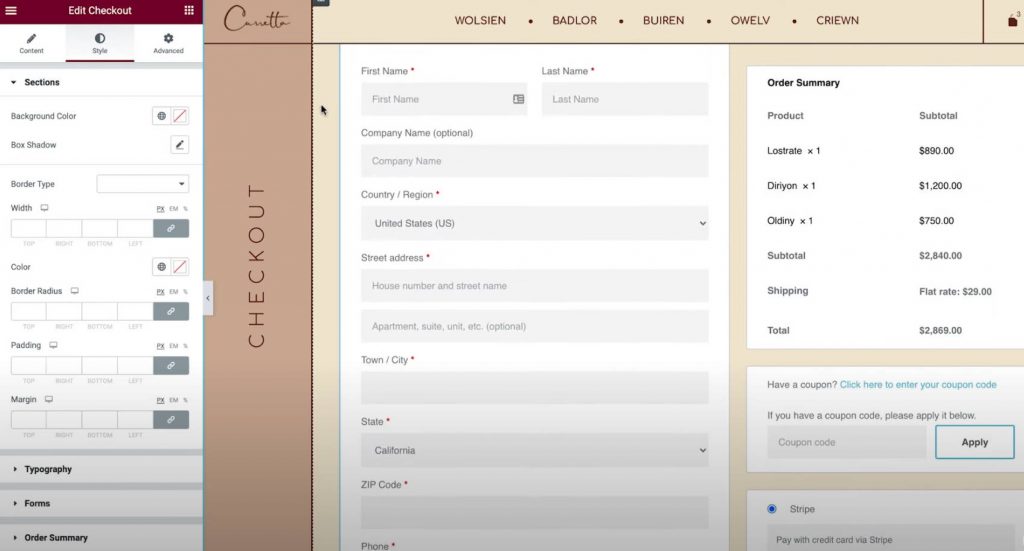
Here are the general design options that you can configure in the different settings areas…
Sections
In the Sections settings, you can control the overall style of all the different checkout parts.
For example, if you change the background color, it will affect the background of all the sections. You can also adjust the border and spacing as needed.
Typography
In the Typography settings, you can customize the colors and typography of most of the text on your checkout page, including titles, secondary titles, descriptions, messages, radio buttons, checkboxes, and more.
The one bit of typography that you can’t customize here is your forms, which you’ll do from the next section.
Forms
In the Forms settings, you can control everything about your checkout page’s forms and form fields, which primarily affects the billing/shipping fields and coupon form.
You can adjust the columns and rows gap for the various form fields. You can also customize the typography of labels and fields, as well as adjust spacing, borders, and backgrounds.
Beyond that, you also get an option to style the coupon button, just like any other button on your site.
Order Summary
In Order Summary, you can control the rows, which affects the spacing in the list of items in a shopper’s cart.
You can also control the colors and typography of the different summary items. For example, you could use one typography setting for the items and a different one for the order totals.
Purchase Button
In the Purchase Button settings, you can fully customize the purchase button, including typography, colors, spacing, borders, and more.
This is probably the most important button on the checkout page, so you’ll want to make sure that it’s attention-grabbing and matches the rest of your design.
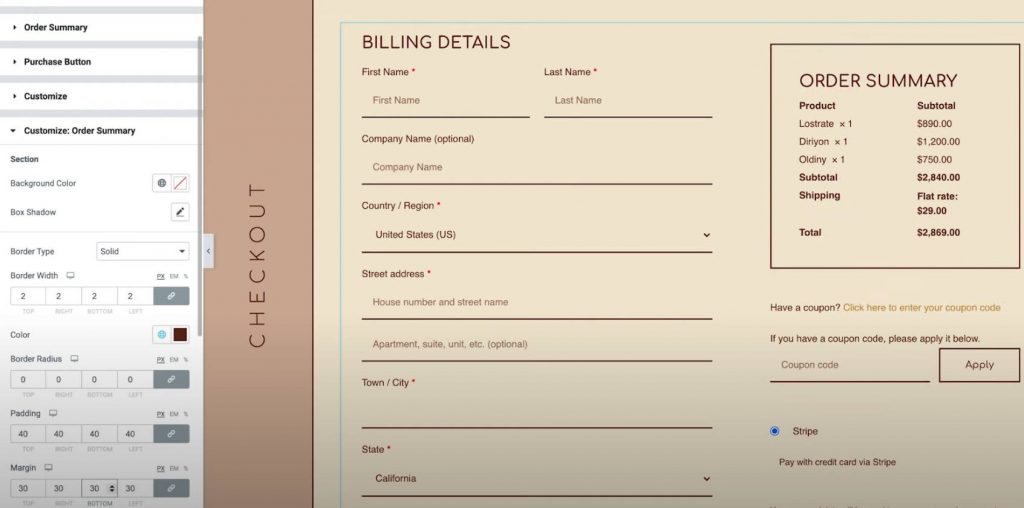
Customize
Lastly, the Customize item lets you add individual styling controls for specific parts of your checkout page. You can add them for the following areas:
- Billing Details
- Additional Information
- Shipping Address
- Order Summary
- Coupon
- Payment
For example, you might want to make the order summary stand out from the rest of the checkout page by adding a custom border.
You could do this by enabling the customize settings for the order summary area and configuring them according to your preferences.
5. Adjust Your Checkout for Mobile Shoppers
Now that you’re finished customizing the checkout page for desktop users, you’ll want to switch to the responsive mode, to see if you need to make any adjustments for mobile or tablet visitors
As with all of the designs that you create with Elementor, your checkout page design is responsive by default.
However, you can also use Elementor’s mobile controls to adjust the design if needed. All you need to do is look for the device icon next to settings that can be tweaked for different devices.
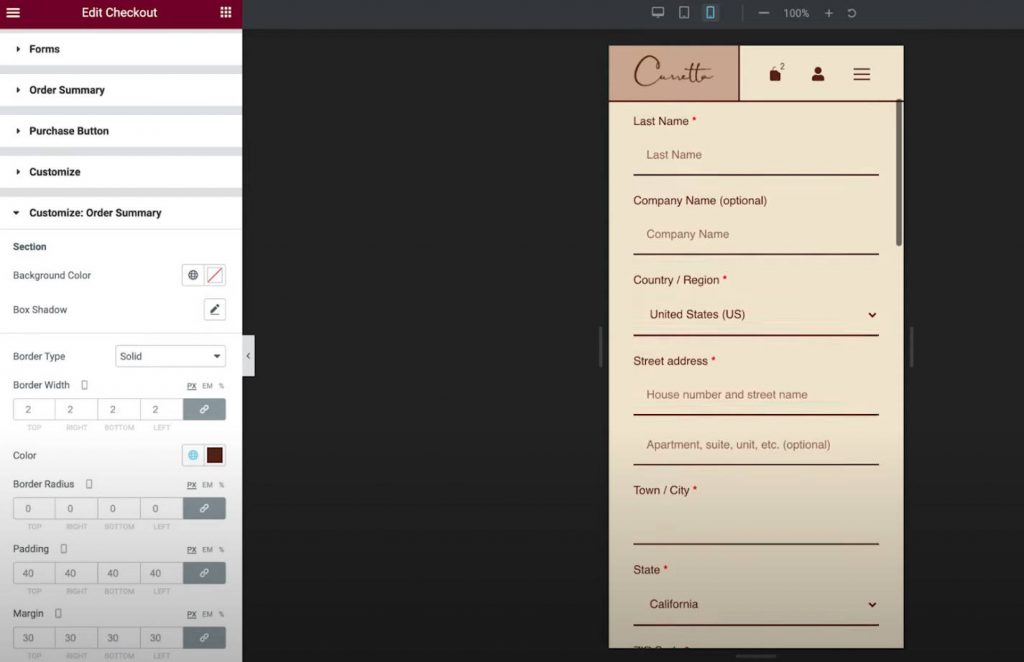
For example, you might want to slightly adjust the spacing of different elements for your mobile design.
6. Adjust WooCommerce Page Assignments in Site Settings If Needed
This last step is totally optional, but it’s worth noting that you can also control key WooCommerce page assignments from the Elementor Site Settings area.
This could be useful if you created a new page for your checkout page rather than using the default page that WooCommerce created.
You can access these options from the WooCommerce tab of the regular Site Settings area. You’ll find the WooCommerce option under the Settings section.
How To Customize the WooCommerce Checkout Page With Code
For additional customizations to the WooCommerce checkout page, you can use code and make use of WooCommerce’s numerous checkout action hooks.
This can be especially handy if you want to add new content to the checkout page, such as inserting trust badges below the payment button.
The nice thing about this approach is that it will still work with the Elementor Checkout widget, which makes it a great complement to Elementor for additional changes.
What Are WooCommerce Checkout Action Hooks?
WordPress action hooks essentially let you use PHP to inject content at different parts of the checkout page. For example, you could add a new text message, include an image (maybe a trust badge), and so on.
In total, WooCommerce offers 16 different action hooks for the checkout page.
The first nine hooks are always available:
- woocommerce_before_checkout_form
- woocommerce_checkout_before_customer_details
- woocommerce_checkout_billing
- woocommerce_checkout_shipping
- woocommerce_checkout_after_customer_details
- woocommerce_checkout_before_order_review
- woocommerce_checkout_order_review
- woocommerce_checkout_after_order_review
- woocommerce_after_checkout_form
The last seven hooks may or may not be available depending on your WooCommerce settings. For example, if you haven’t enabled registration on the checkout page, you won’t be able to use the action hook related to the registration form:
- woocommerce_checkout_before_terms_and_conditions
- woocommerce_checkout_after_terms_and_conditions
- woocommerce_before_checkout_billing_form
- woocommerce_before_checkout_registration_form
- woocommerce_after_checkout_registration_form
- woocommerce_before_checkout_shipping_form
- woocommerce_after_checkout_shipping_form
To understand where these hooks will add content to the checkout page, Business Bloomer maintains an excellent visual guide to each location:
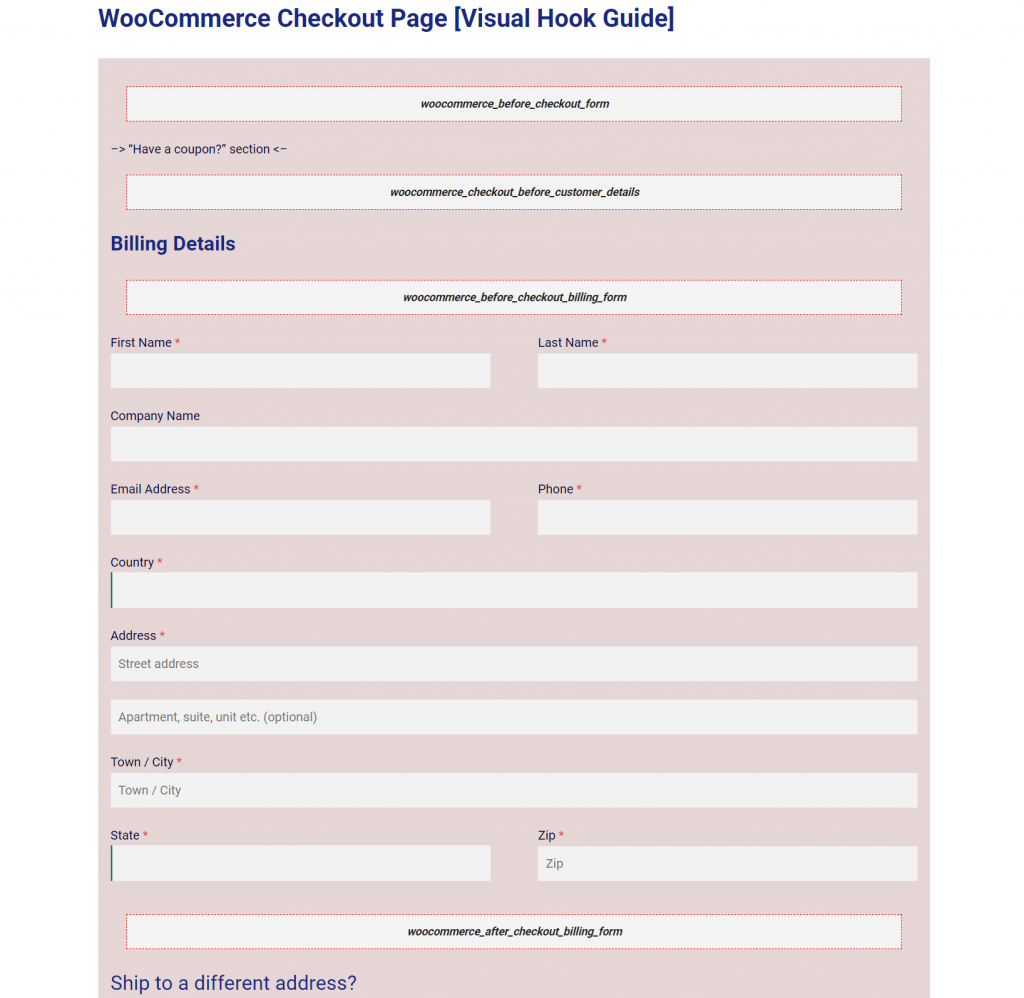
How To Use WooCommerce Checkout Action Hooks
To inject content with an action hook, you’ll need to add a code snippet to the functions.php file of your child theme or via a plugin like Code Snippets.
Because you’ll be adding code to your site, we highly recommend taking a backup before proceeding and/or testing the changes on a staging site first.
First, choose the hook location where you want to add content.
For example, let’s say you want to add a set of trust badges below the “Place Order” button. For that, you’d use the woocommerce_review_order_after_submit hook.
Then, you’d add a code snippet like this:
add_action( ‘action_name’, ‘your_function_name’ );
function your_function_name() {
// Your code
}
For example, to add a trust badge image, the code might look like this:
add_action( ‘woocommerce_review_order_after_submit’, ‘display_trust_badges’ );
function display_trust_badges() {
echo ‘<img src=”trust-badges.png” />’
;}
Below, you can see that the trust badges appear below the place order button, even while working with the Checkout widget in the Elementor interface:
How To Test Your WooCommerce Checkout Page
Before making the changes to your checkout page live, we highly recommend testing everything to make sure there are no issues. After all, anything that interferes with your store’s checkout page will have a direct negative effect on your bottom line.
Many WooCommerce payment methods include test modes that you can use to submit orders. This is true of both the official Stripe gateway plugin and the official PayPal gateway plugin, as well as WooCommerce Payments. All of the links in the previous sentence will take you to the proper documentation page for that gateway’s test functionality.
Or, you can also use the free WC Order Test plugin, which adds a new “Order Test” payment gateway. You can set up this gateway by going to WooCommerce → Settings → Payments.

Once you’ve enabled a test payment gateway, you can submit some test orders to make sure that all of the checkout fields are working and none of your content or design changes interfere with the checkout process.
We recommend testing on both desktop and mobile devices.
Start Customizing Your WooCommerce Pages With Elementor
With the Checkout widget in Elementor Pro, you can now fully customize the WooCommerce checkout page using Elementor’s visual, drag-and-drop design.
For most people, Elementor is all you’ll need, as it lets you customize colors, typography, text, spacing, borders, and more.
If you want to go even further and add new content to your checkout page, you can also make use of WooCommerce’s built-in action hooks, which are fully compatible with the Elementor Checkout widget.
Best of all, Elementor doesn’t limit you to just customizing the checkout page.
Elementor WooCommerce Builder can also help you customize other parts of your store using Elementor’s visual, drag-and-drop builder. For example, you can also customize the WooCommerce cart page, the WooCommerce single product page, the WooCommerce My Account page, and more.
Do you still have questions about customizing your WooCommerce checkout page with Elementor or action hooks? Let us know in the comments!


