
Table of Contents
On average we lose 3,000 items in our lifetime. The last thing we need is to spend even more time seeking what we’re looking for.
That’s why you want to add a search bar to your websites. Not only does it make life easier for the user, but it’s also incredibly easy for you to build. That’s because you don’t even need to be a developer or have any coding skills. All you need is Toolset and Elementor.
A custom search is a golden ticket for increasing sales conversions. Using custom search is a piece of cake and really helps users find what they are looking for. Your custom search can be split into two parts, the search form, and the search results.
In this tutorial, we’ll walk you through how to set up a custom search with multiple advanced features. We will also create the content that users will search for using custom post types
After following these steps, you should have something similar to our personal trainer website below:

What’s So Great About a Custom Search Powered by Toolset and Elementor?
Elementor and Toolset complement each other perfectly to create a powerful feature that will really enhance your website. Elementor is a revolutionary visual design builder that can make your website stand out.
Meanwhile, Toolset’s suite of plugins acts like your very own CMS, allowing you to add all the features you need – nearly without requiring any further plugins.
With Toolset’s custom search you can:
- Filter by any type of field
- Display the nearest results to you on a map
- Display search results as a list, table or grid
- Include pagination in your results
- Add AJAX updates, so results update without having to reload the page
Now you know why custom search is such a great option, let’s look at how you actually create one. Follow these easy steps:
What You Need to Get Started
Here are the main ingredients you need to create the perfect custom search:
- A WordPress website and theme
- The Elementor plugin – we recommend downloading the Pro add-on plugin as well as the free version
- Toolset Types – to create the custom post types
- Toolset Views – the Query Builder that will create the search
All of these plugins can be installed straight from the WordPress admin. To add Elementor Pro you just need to enter your personal license key on the plugin settings page.
You can install both Types and Views from the WordPress admin once you have registered Toolset.
After everything is up and running, we can start to create our custom search.
1. Create Your Custom Post Type
First off, create a ‘Trainers’ custom post type. Then add the details of each personal trainer to this post type.
In your WordPress admin, go to Toolset->Post Types and click on the Add New button. Fill in the names and slug of your post type and click Save Post Type.

Now we have a section where we can add our personal trainers. However, we still need to fill in the content for each personal trainer.
2. Create Your Custom Fields
Use custom fields to create a template of the information to include within each post.
Start by going to Toolset->Custom Fields and click on the Add New button. After naming the set of fields, start adding new fields by clicking on Add New Field.
Below you can see the four fields we added to the ‘Trainers’ post type:

The final step before we start creating the custom search itself is to add content.
3. Populating Your Content
Of course, you can’t have a custom search without content to search for. So, let’s add content to the ‘Trainers’ post type.
Just head to Trainers->Add New and start filling in the content. This is how one of the ‘Trainers’ posts looks like on the back-end:

And on the front-end (after some CSS styling):

Now it’s time to start creating our custom search.
4. Creating the Search Results View
As mentioned before, the custom search consists of the search result and the search form. First, let’s create the search result.
The search result will be the View which provides us with a list of items that we are looking for. Let’s add our search results View for the ‘Trainers’ post type.
4.1 Setting up Our Search Results View
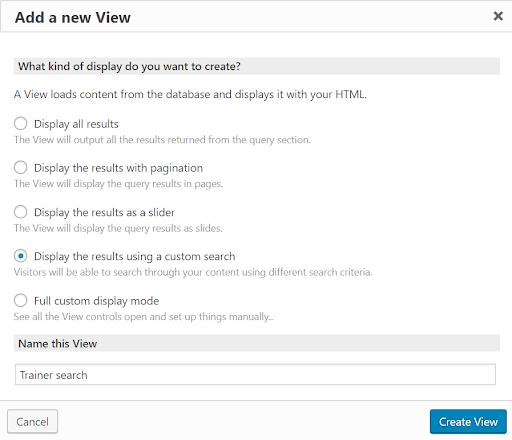
Begin by heading over to Toolset->Views and clicking on Add New. At this point, choose what kind of display to create. Since we are creating a custom search, tick the Display the results using a custom search option.
In the next section, we can now start to design our custom search.
4.2 Design the Output for Our Custom Search
Under the Content Selection section choose the post type you want to filter results for.
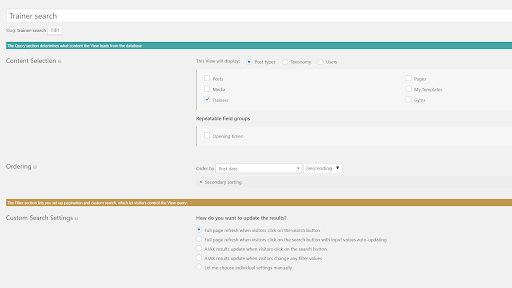
Now design the output for the custom search. In other words, the information that will appear for each search result.
To do this, scroll down to the Loop Editor and click on the Loop Wizard. Under the Loop Style section, we can decide how we want our results to be displayed.

For the purpose of this exercise, select the Table option and Make the table sortable by columns, but there are also others worth exploring. Once you have made your choice, click Next.

Let’s now add a list of the custom fields to display for each result. These are the fields we already added for each trainer:
- Post title with a link to the post
- Specialties
- Price per hour
- Degree
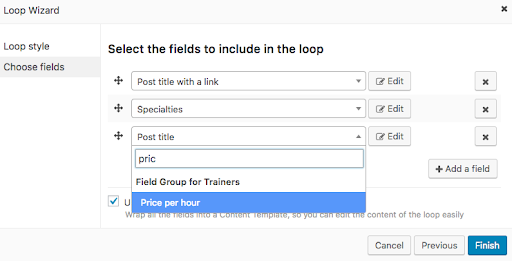
Ensure that the Use a Content Template to group the fields in this loop is checked so that you can edit a single post entry in one place. Click Finish.
Finally, add the text for each of the fields. In between each of the [wpv-heading] fields, we will write the heading. Below you can see where we have done so.

4.3 Add the Image for Each Result
Before we’re done, just add the ‘Trainer Picture’ to the top of the fields so that it’s the first to appear. In the Templates for View section place your cursor before the [wpv-post-link] and click on Fields and Views.
Once we select ‘Trainer Picture’, choose Medium 300×300 as the image size. Finally, click on Insert Shortcode.
Let’s preview our custom search by clicking the Create a page with Views.
You should be able to see a table listing all the posts from your custom post type. Here is a list of all our trainers:

Now that the results are ready, we can create the search form.
5. Create the Search Form
We can now edit the search form and choose what filters to include in it. All these filters are easy to add without any coding. Here are the filters we will add:
- Trainer’s first or last name
- Specialties
- Degree
- Minimum/maximum price per hour
Scroll up to the View that we used for our search result until you reach the Search and Pagination section. This is where we will add our filters and search button.
To start adding filters, click New filter and select the field groups (mentioned above) in the order needed. After selecting each filter, click Insert shortcode, and the filter will appear.
As soon as we’ve added each filter, label them similar to how we did it for the search results. Each label will be added between the wpml-strings. For example, we wrote ‘Trainer’s first and last name’ so that users know where they can search by name.

Repeat this step for each filter added.
Once you are happy with your filters, the final step is to add the ‘Submit’ button. All you need to do is click on the Submit button and add it to the desired location.
Now preview the search form just like you did for the search result. Once again, choose the Create a page with Views option and select Preview.
Here’s what it looks like:

Now that we have a working custom search we can add it to our website.
6. Inserting Search View on a Website
Adding a custom search View using Elementor couldn’t be easier.
In Elementor edit the page where you want your custom search to appear. Search for the Toolset View widget and drag it into the page. As soon as you select the View you want from the drop-down, you will instantly see a preview.

All that is left to do is the icing on the cake – making our custom search look good!
7. Styling a Custom Search
Never judge a book by its cover, but that doesn’t mean that making our custom search look good isn’t important. With Elementor, it’s easy to add the necessary CSS styling.
We will add CSS in the same section where we inserted the search view on Elementor. Under Custom CSS add code:

You can check out our CSS code in more detail to see what we added.
And that’s it! Now let’s see it in action on the front-end. Here is an example of a search using some of the filters:

By using three filters we narrowed down the perfect trainer to meet our requirements.
Not so hard, right?
Let us know in the comments below if you used custom search on your website.
Looking for fresh content?
By entering your email, you agree to receive Elementor emails, including marketing emails,
and agree to our Terms & Conditions and Privacy Policy.


