Learning how to back up a WordPress site is one of those things that might feel like it isn’t urgent…until something happens to your site, and it becomes incredibly urgent (but maybe too late).
There’s nothing fun or exciting about backing up WordPress. But it’s something that you’ll absolutely want to learn to prevent yourself from heartbreak down the road.
In this post, we’re going to try to make the topic of WordPress backups as painless as possible by covering everything you need to know in one spot. Let’s dig in.
Table of Contents
Elementor Cloud Websites can be backed up on the Elementor Cloud. Find out more about backing up your Elementor Cloud Website.
Grow Your Sales
- Incredibly Fast Store
- Sales Optimization
- Enterprise-Grade Security
- 24/7 Expert Service

- Incredibly Fast Store
- Sales Optimization
- Enterprise-Grade Security
- 24/7 Expert Service
- Prompt your Code & Add Custom Code, HTML, or CSS with ease
- Generate or edit with AI for Tailored Images
- Use Copilot for predictive stylized container layouts

- Prompt your Code & Add Custom Code, HTML, or CSS with ease
- Generate or edit with AI for Tailored Images
- Use Copilot for predictive stylized container layouts
- Craft or Translate Content at Lightning Speed
Top-Performing Website
- Super-Fast Websites
- Enterprise-Grade Security
- Any Site, Every Business
- 24/7 Expert Service

Top-Performing Website
- Super-Fast Websites
- Enterprise-Grade Security
- Any Site, Every Business
- 24/7 Expert Service
- Drag & Drop Website Builder, No Code Required
- Over 100 Widgets, for Every Purpose
- Professional Design Features for Pixel Perfect Design

- Drag & Drop Website Builder, No Code Required
- Over 100 Widgets, for Every Purpose
- Professional Design Features for Pixel Perfect Design
- Marketing & eCommerce Features to Increase Conversion
- Ensure Reliable Email Delivery for Your Website
- Simple Setup, No SMTP Configuration Needed
- Centralized Email Insights for Better Tracking

- Ensure Reliable Email Delivery for Your Website
- Simple Setup, No SMTP Configuration Needed
- Centralized Email Insights for Better Tracking

- Ensure Reliable Email Delivery for Your Website
- Simple Setup, No SMTP Configuration Needed
- Centralized Email Insights for Better Tracking
Why You Need to Backup Your WordPress Site
In a perfect world, backing up your WordPress site would be a waste of time and effort because nothing ever goes wrong.
However, your WordPress site doesn’t exist in a perfect world – it exists in the real world. And in the real world, there’s a lot that can go wrong with your WordPress site:
- You can make a mistake, like permanently deleting important content by accident (such as an Elementor design that you’ve spent hours working on!).
- A malicious actor might gain access to your site and inject malware or otherwise cause issues.
- Your host might have a failure that leads to lost data.
- A plugin or theme might crash your site.
- A newly-applied update might suddenly cause an issue.
In all of those situations, you’re dealing with the potential loss of all or some of your WordPress site.
Without a recent backup, any one of those situations can be catastrophic.
However, if you always have a recent backup on hand, the worst-case scenario is a minor inconvenience – not a catastrophe.
Long story short, if you have a WordPress site, you need to take backups of your WordPress site.
The rest of this section is dedicated to how, how often, and what to back up.
Do WordPress Hosts Perform Backups?
In general, you should not rely on your hosting company to back up your WordPress site.
While most web hosts do take some type of backup, there are no guarantees when it comes to the frequency and completeness of those backups. For your planning, you should treat them as if they basically don’t exist.
At most hosts, the only way to guarantee that you have a full, recent backup of your site is to do it yourself.
However, there are some exceptions here.
Namely, if you’re using premium managed WordPress hosting providers such as Kinsta, WP Engine, Flywheel, etc.
These types of managed WordPress hosts implement strong automatic backup policies with off-site storage — these conveniences are one of the reasons why managed WordPress hosting costs more.
How Often Should You Backup Your WordPress Site?
How often you need to backup WordPress depends on how often your site changes.
For example, if you have a static portfolio site that never changes, you don’t really need to back up every day. You might even be fine with monthly backups.
On the other hand, if you have a blog where you publish a new blog post every day and your readers leave lots of comments, then you probably want to back up every day.
And if you have a busy WooCommerce store where orders are always coming in, you probably want a real-time backup solution that saves changes right away so that you never miss your valuable order data.
To help come up with a schedule that makes sense for your site, ask yourself this question:
If I lost the data from the last X days (or hours), would that negatively affect my site?
If X equals one day for your site, you should run daily backups.
Remember to consider other content beyond how often you yourself create new content, though. Backups also capture user-generated content, like native WordPress comments.
For example, if you have a blog where you only post once per week, but your visitors leave tons of valuable comments every day, then you would still likely want to go with a daily backup schedule so that you don’t miss out on those comments if you ever need to restore your site.
Finally, if you have a site with constant activity, such as a WooCommerce store, forum, BuddyPress site, etc. then you’ll want to use a real-time incremental backup solution — more on this below.
WordPress Backup: Files vs Database
There are two parts to backing up your WordPress site:
- WordPress files
- WordPress database
Your site’s files are files such as:
- Theme/plugin files
- Image/media uploads in the wp-content/uploads folders
Your site’s database contains your actual content, such as:
- Blog post content
- Page content
- Elementor designs
- Comments
- Form submissions (if you store form submissions so that you can view them in your dashboard)
- Settings
When you back up your site, you need to back up both your files and your database.
However, depending on how your site works, you might not necessarily want/need to back up both parts with the same frequency.
Because of that, the backup plugins that we’ll discuss below let you choose to back up specific parts of your site (e.g. just your database).
Let’s go back to the example of a blog where you:
- Post content once per week (including uploading images for the new blog post)
- Receive lots of valuable reader comments every day
In such a situation, you might choose to:
- Back up your site’s files once per week. This would make sure you always have the file uploads for your latest blog post.
- Back up your site’s database every day. This would ensure you always have the latest visitor comments, even on days where you don’t publish a new blog post.
The advantage of this approach is that you use fewer resources by avoiding the need to back up the same set of files every day when nothing changes. Even on a large site, your database is usually quite small and easy to back up. However, a large site’s files can take up a huge amount of space.
Some tools also offer an approach called incremental backups. With incremental backups, you only back up your full site during the initial backup. Then, subsequent backups only back up new changes that have been made to your site.
For example, if you publish a new blog post, the incremental backup tool would just update the backup to include that new post, rather than taking a completely new backup.
With this incremental approach, you also have the option to take real-time backups of your site by automatically backing up each change as soon as it happens. Again, this is important for WooCommerce stores, forums, etc. where you will have constant changes to your site’s database.
Where Should You Store WordPress Backups?
You should not store your site’s backups on your WordPress site’s server, which some plugins give you the option to do.
If you store your backup on the same server as your live WordPress site, that’s still a single point of failure. It could help you in some situations, like accidentally breaking something on your site, but if something goes wrong with your server, you would lose both your live site and your backup.
There are two places that you can safely store WordPress backups:
- Your local computer – you download your backup files onto your local hard drive.
- Cloud storage – you host your backups in the “cloud” using services such as Google Drive, Dropbox, Amazon S3, DigitalOcean Spaces, or others.
If you have a mission-critical WordPress site, the United States Computer Emergency Readiness Team (as well as many others) recommends the 3-2-1 backup rule:
- Keep three copies of your WordPress site: one primary (your live site) and two backups
- Keep the files on two different media types
- Store one copy offsite (e.g. outside your home or business facility)
A simple way to implement this for a WordPress site would be to use both your local computer and cloud storage. For example, you could:
- Download one backup to your local hard drive.
- Store another backup on Amazon S3.
Putting It All Together
We covered a lot of backup theory in this section, so let’s summarize what we’ve learned.
Every WordPress site needs a backup. From mistakes that you make to mistakes from others or attacks from malicious actors, a lot can go wrong. A reliable backup ensures that none of those problems are devastating.
If you host at a quality managed WordPress host, your host might already have a reliable, off-site backup procedure in place.
However, if you’re not using one of these premium services, you shouldn’t rely on your host’s backups to keep your site safe — you need to create your own backup policy.
The frequency with which you back up your site depends on how often you, or others, are changing its content.
A more effective strategy can be to back up your site’s files and database on different schedules. For example, you can:
- Back up your site’s files once per week
- Back up your site’s database every day
This minimizes the resources that your backups use, while still letting you back up the most important information every day (which is stored in your site’s database).

3 Best WordPress Backup Plugins
UpdraftPlus is the most popular free WordPress backup plugin. It’s active on over two million WordPress sites while maintaining an excellent 4.8-star rating on over 3,500 reviews.
In the next section, we’ll show you how you can use UpdraftPlus to back up your WordPress website.
UpdraftPlus lets you run manual or automatic backups for your WordPress site. If you opt for automatic backups, you can choose a custom schedule that works best for your website.
When you back up your site, you can choose to back up:
- Your entire site (files + database)
- Just your files
- Just your database
You can also automatically offload your backups to remote storage options such as:
- Google Drive
- Dropbox
- Amazon S3
- Backblaze
- Google Cloud
- Microsoft Azure
- UpdraftVault (the developer’s own cloud storage service)
- …more
Finally, if you do need to restore from a backup, UpdraftPlus includes its own tool that makes that quite easy.
Most WordPress sites will only need the free version. However, the developer also sells a number of premium extensions that can help with:
- WordPress Multisite backups
- Scheduling backups at specific times of day (instead of just a rough schedule). For example, you can run your backups during low-traffic periods.
- Multiple off-site storage locations. For example, you can back up your site to both Google Drive and Amazon S3 at the same time.
- Incremental backups.
- A WordPress migrator tool.
- More options for backing up your database.
Price: Free. You can purchase individual add-ons or get a bundle of all add-ons for $70. The bundles also include storage in the UpdraftVault.
Jetpack Backup, formerly known as VaultPress, is an automatic backup service that’s part of the all-in-one Jetpack plugin from Automattic, the same folks behind WordPress.com and WooCommerce.
Jetpack Backup offers two types of backups, depending on your plan.
With Jetpack Personal, the entry-level backup plan, you get daily backups to a secure off-site location. Jetpack will store all of your backups for 30 days, and you can restore from any backup with a single click.
With Jetpack Professional, you get real-time, incremental backups.
Jetpack will still back up your full site every 24 hours to its off-site storage. However, it also uses hooks to automatically update smaller changes to your website in real-time.
These real-time incremental backups include:
- WordPress core database changes – e.g., publishing a new blog post, editing Elementor, new comments.
- WooCommerce database tables – e.g., new orders.
- Any associated file changes – e.g., uploading an image to a blog post.
For other changes, such as installing a plugin, you’d need to wait for the next daily backup.
Jetpack Professional also stores unlimited backups (vs. 30 days for Personal) and lets you restore from any backup.
Overall, if you’re running something like a WooCommerce store, forum, membership site, etc. then you’ll probably want to use this real-time incremental approach.
Price: While the Jetpack plugin is available for free at WordPress.org, Jetpack Backup is only available on the paid subscriptions. The Personal plan costs $3.50 per month or $39 per year.
The Professional plan, which enables real-time incremental backups, costs $29 per month or $299 per year.
BackupBuddy is a premium WordPress backup plugin from iThemes.
It lets you back up all or some of your WordPress site on your own custom schedule. For example, you can choose to back up some/all of the following types of content:
- Database
- Themes
- Plugins
- Media
You can set your backups to run automatically on a schedule ranging from hourly all the way up to monthly (or more).
To securely store your backups, iThemes offers its own cloud storage location called BackupBuddyStash. Or, you can connect to other storage locations such as:
- Amazon S3
- Google Drive
- Dropbox
If you need to restore from a backup, you have options to restore all or just some of your site. For example, if you don’t need a full site restore, you could just roll back your database instead.
Other useful tools include options for site migration and cloning WordPress, including a deployment feature that helps you create your own WordPress staging site.
Price: BackupBuddy starts at $80 for use on a single site. That plan also includes 1 GB of BackupBuddyStashcloud storage. You can purchase additional storage starting at $35 per year for 5 GB extra.
Bonus Plugin: Image Optimizer
While regular backups are essential, optimizing your site’s performance is just as important. An image optimizer plugin can drastically reduce the size of your media files without compromising quality. This not only speeds up your website but also reduces the size of your backups, making them faster and easier to restore. For sites with lots of media, integrating an image optimizer is a great way to enhance overall efficiency and ensure smooth, quick backups.
How to Back Up Your WordPress Site
In this section, we’ll show you step-by-step how to back up your WordPress site…
- Using the free UpdraftPlus plugin
- Manually
We recommend that most people use UpdraftPlus (or another plugin from the list above), as it’s much simpler than trying to manually back up WordPress.
How to Back Up WordPress Site Using a Plugin
As we covered above, UpdraftPlus is the most popular free WordPress backup plugin.
In this section, we’ll show you how you can use the free UpdraftPlus plugin to back up your WordPress site. We’ll also show you how to set up your own automatic backup schedule and store your backups remotely.
How to Take Your First Backup
To get started, install and activate the UpdraftPlus plugin from WordPress.org. Then, visit Settings → UpdraftPlusBackups in your WordPress dashboard
To create your first backup, all you need to do is click that big blue Backup Now button:
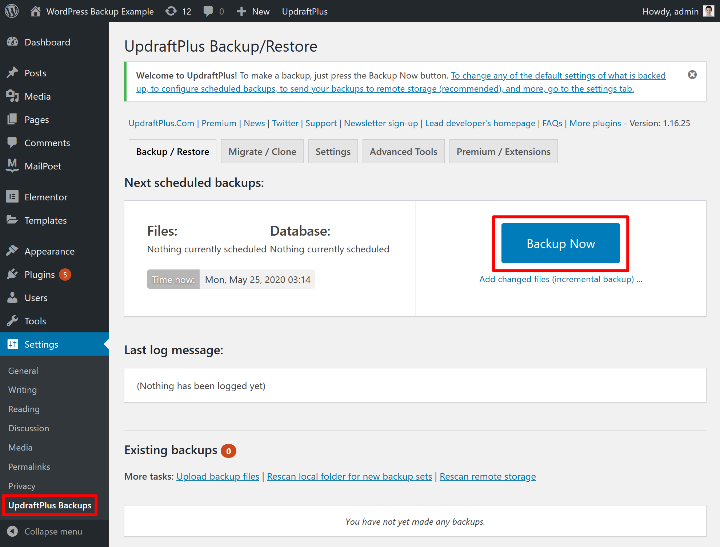
This will open a popup where you can choose what content to backup. Again, you can choose between your site’s files, database, or both.
Since this is your first backup, select both boxes. Then, click the Backup Now button:
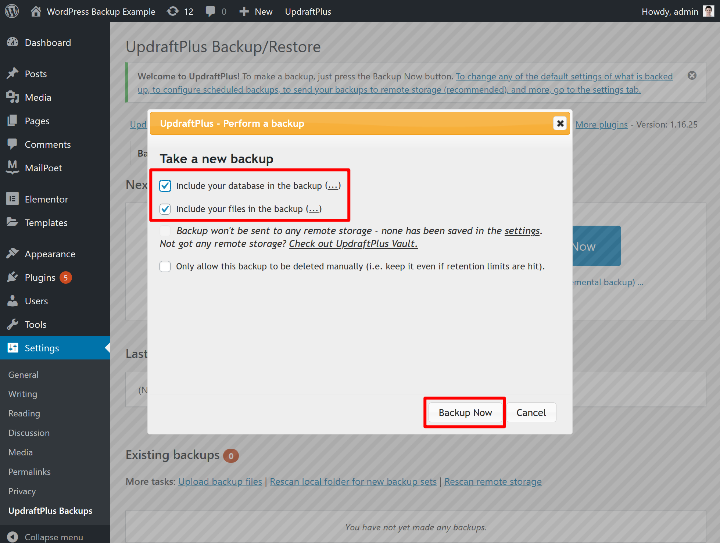
This will start the backup process, which might take some time depending on the size of your site.
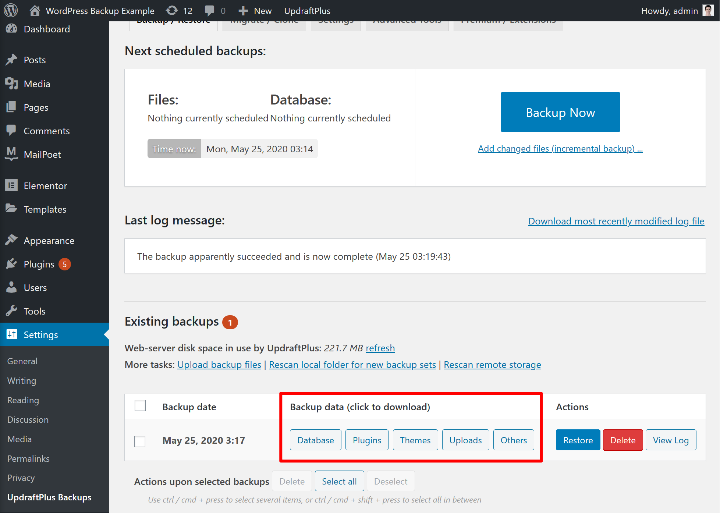
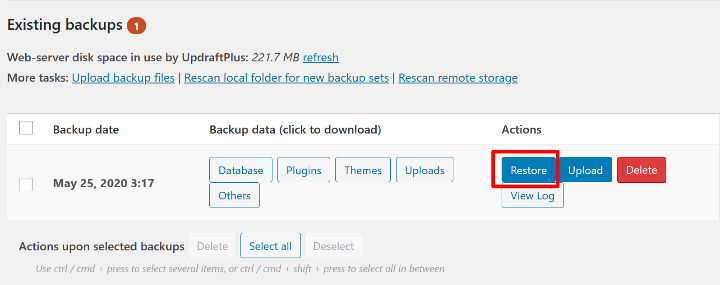
Once the backup finishes, you’ll see it listed in the Existing backups section.
To download the backup files to your local computer, you can click the five buttons under Backup data.
Make sure to download all five pieces of data so that you have a full backup of your site.
How to Set Up Remote Storage
When you created your backup in the previous section, UpdraftPlus stored those files on your WordPress site’s server.
While this is better than nothing, it’s still not ideal because you have a single point of failure (your server).
Instead, you should configure UpdraftPlus so that it automatically stores your backups on an external storage service such as:
- Google Drive
- Dropbox
- Amazon S3
- Etc.
To set up a remote storage destination, go to the Settings tab and click on the icon for the service that you want to connect to. Then, you’ll see instructions appear below the list of icons to help you connect that service.
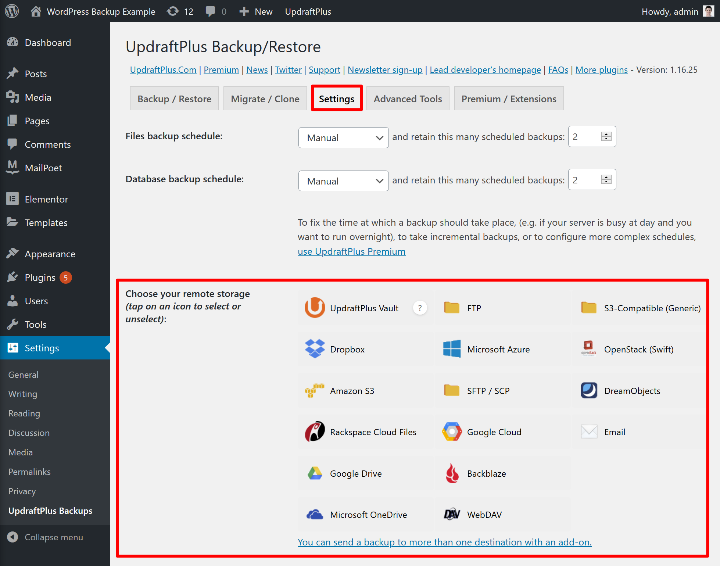
For this example, we’ll use Google Drive.
For Google Drive, you need to:
- Save your changes.
- Click the authorization link in the popup that appears after you save your changes.
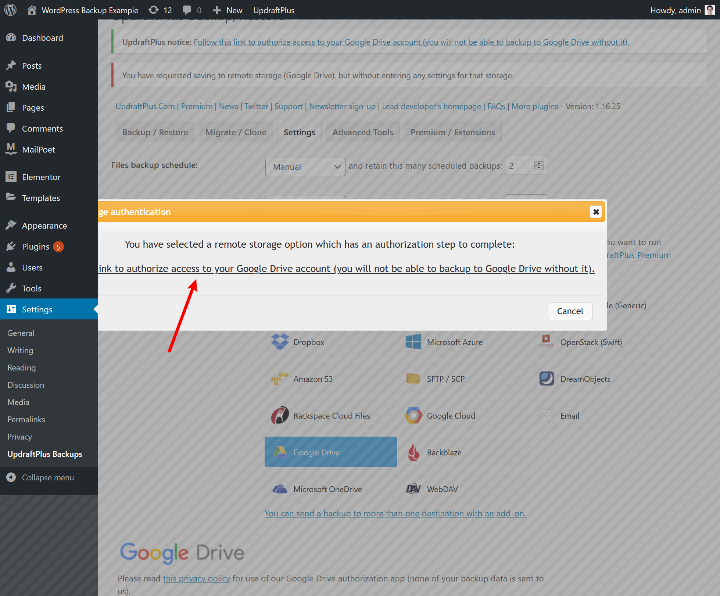
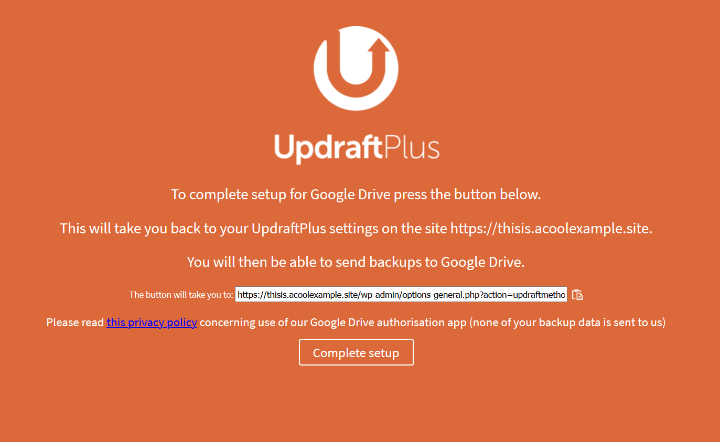
You’ll then go through the standard Google authorization process. Once you do that, UpdraftPlus will ask you to click a button to complete the setup process:
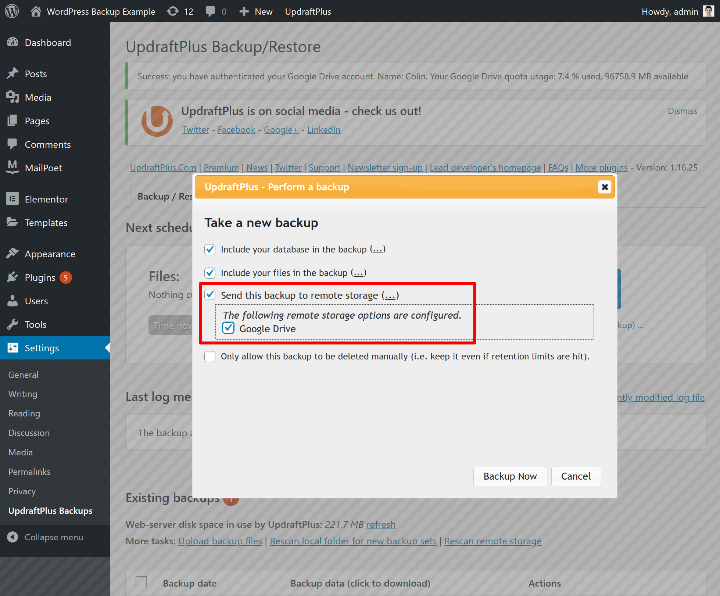
Now, you’ll be able to back up your site to your remote destination by checking the box to Send this backup to remote storage (after clicking Backup Now):
How to Create an Automatic Backup Schedule
To make it easier to maintain recent backups, UpdraftPlus lets you create your own automatic backup schedule.
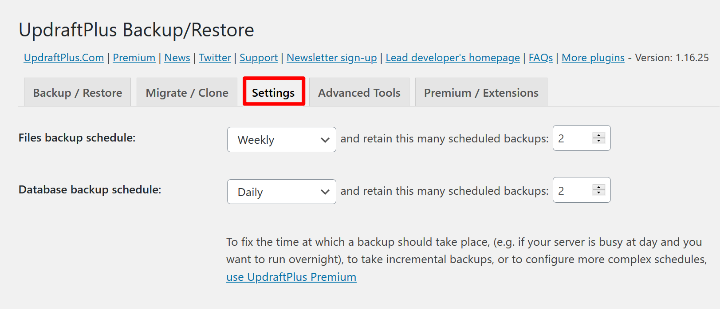
To create your schedule, go back to the Settings tab and look for two drop-downs at the top:
- Files backup schedule
- Database back schedule
You can use the drop-down to set your preferred frequency for each type of data. You can also choose how many backup copies to retain.
For example, if you retain two backups, UpdraftPlus will store the last two copies of your backup (and then overwrite the oldest copy when it needs to make a new backup).
Again, the optimal backup schedule depends on your site. However, a good starting point that should work for most WordPress sites is the following:
- Files backup schedule – Weekly
- Database backup schedule – Daily
How to Restore a Backup With UpdraftPlus
If you need to restore from one of your backups, UpdraftPlus also makes that easy.
To restore a backup, go to the Existing backups section and click the Restore button:
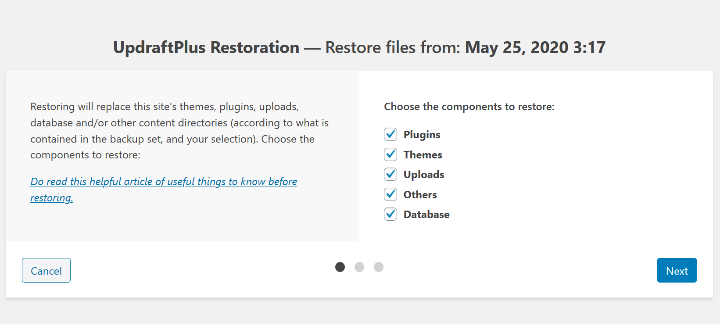
That will open a popup where you can choose what content to restore. For example, you could opt to only restore your database.
To restore everything, check all five boxes. Then, click Next to finalize the process and restore your site:
If you want to manually upload a set of backup files to restore, such as files from your local hard drive, you can click Upload backup files next to More tasks in the Existing backups section.
How to Manually Back Up WordPress Site
For most people, using a WordPress backup plugin is a much better approach.
However, you might find yourself in a situation where you need to manually back up your WordPress site.
As you learned above, there are two “parts” to backing up a WordPress site:
- Files
- Database
To manually back up WordPress, you’ll need to:
- Download all of your site’s files using FTP*
- Export your database using phpMyAdmin (or an equivalent tool at your host)
*Note – you don’t technically need to back up the core WordPress files as you can always download the latest version from WordPress.org. However, for simplicity’s sake, we’ll just have you download all the files in the tutorial below.
How to Download WordPress Files
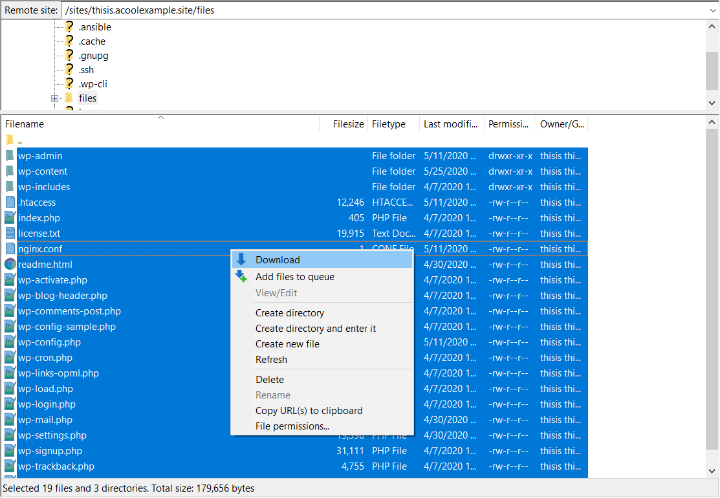
To back up your WordPress site’s files, you’ll need to connect to your WordPress site’s server via FTP or cPanel File Manager. For FTP, you can use FileZilla to connect and you can get your FTP credentials from your host.
From there, download all of your site’s files to your local computer:
How to Export WordPress Database with phpMyAdmin
To back up your site’s database, you can use phpMyAdmin, which most WordPress hosts should offer.
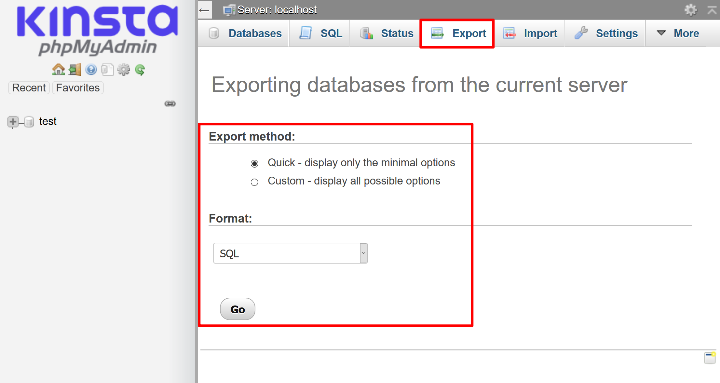
In phpMyAdmin:
- Open your WordPress site’s database
- Go to the Export tab
- Select the Quick method
- Choose SQL for the Format
- Click Go
How to Restore a Manual WordPress Backup
To restore from a manual backup, you just reverse the process:
- Upload all of your files to your server
- Use the Import tool in phpMyAdmin to import your database backup*
*To make things simpler, you can create a new database to import your backup. You would then need to update your wp-config.php file to reflect the credentials for this new database.
How to Back Up WordPress Multisite
If you need to back up a WordPress Multisite network, we recommend using UpdraftPlus because it includes dedicated Multisite support. To enable Multisite support, you’ll need to purchase the Network / Multisite add-on, which costs $25.
With the add-on, you’ll be able to back up your entire network. You cannot back up individual network sites.
However, it does include a useful feature that lets you import a backup of a single site WordPress install as a network site in your Multisite network.
Jetpack Backup does not support Multisite networks. BackupBuddy has an experimental mode for Multisite, but it’s not officially supported.
How to Back Up Multiple WordPress Sites From One Spot
So far, everything that we’ve focused on above is how to easily backup your own WordPress site.
However, what if you’re using Elementor to create websites for clients and you’re hosting those websites? Or, maybe you just have your own large network of sites and need a more convenient way to keep their data safe.
In either situation, there are tools that can help you back up all of your WordPress sites from one spot.
Some of the best options are:
- MainWP – you can still use your preferred backup plugin, such as UpdraftPlus.
- ManageWP – includes its own backup tool. You can run it anywhere from monthly to real-time with options to automatically store backups on remote cloud storage.
- iThemes Sync – has an integration with the BackupBuddy plugin from above.
Final Thoughts
If you have a WordPress site, you need to have a regular backup strategy in place.
If you host with a premium managed WordPress host, your host might already have a solid off-site website backup policy for you. However, most “regular” hosts do not offer reliable backups, which means that you’re responsible for backing up your WordPress site.
To safely back up a WordPress site, you’ll want to store your backups in an off-site location, such as remote cloud storage or your local computer (ideally both).
How often you back up your site depends on how frequently its content changes. A good starting point for most WordPress sites is to back up files once per week and the database every day.
To automatically back up your site, you can use a WordPress backup plugin. Three of your best options are:
To start taking automatic, off-site backups for free, you can use UpdraftPlus and follow the tutorial from this post.
Do you still have any questions about how to back up a WordPress website? Leave a comment!
Looking for fresh content?
By entering your email, you agree to receive Elementor emails, including marketing emails,
and agree to our Terms & Conditions and Privacy Policy.
