Table of Contents
There was no doubt that the current crisis would heavily affect the global economy. But with the sudden surge of online business, we would expect small and medium businesses (SMBs) to be doing quite nicely.
Unfortunately, there is no shortage of SMB owners and web creators who are still intimidated by the notion of creating an online store. Perhaps they remember it as the complex process that it was over a decade ago.
By showing how we can build a fully functioning online store, in 5 simple steps, that will include defining products, setting up WooCommerce, and shipping classifications, we are hoping to change this.
What We’ll Need for This Masterclass
To create our online store we will need the following items:
- A basic functioning WordPress website.
- Product/s
- Elementor web builder (installed)
- WooCommerce, the preferred ecommerce plugin for WordPress
- An account with a payment gateway/s (online payment services, e.g. Stripe, or Paypal)
Our Test Case
Our test case will be a small business, a brick-and-mortar sports equipment store, “Simon’s Sporting Goods”. Till now they’ve only needed their website for basic information about the store and special offers.
But with local health regulations forcing the store to remain closed, they have no choice but to start selling products online.

Because we want to grab our customers attention from the get-go we’ve come up with a great product to launch on our new online store, a “Home Fitness Package” that will include:
- A skipping rope
- A pair of wights
- A roll-up mattress
- A pair of resistance training straps
Converting Our Website to an Online Store
Before we begin the build, whether we’re professional or not, it’s considered good practice to first put our site in Maintenance Mode.
In the WordPress dashboard, we’ll just go to the Elementor tab, and select Tools, and there we’ll select the Maintenance Mode tab.
In the mode drop-down menu, we’ll select the Coming Soon mode, as it serves our purpose much better.
Of course we could also use the dropdown menu here to upload a template, or create a customized design for a template in Elementor (by clicking on the link labeled create one). We could also prepare this in advance by creating a “Coming Soon” page, and saving it as a template, as we did here.
If you are looking for the top free WordPress Template resources, check out this article.
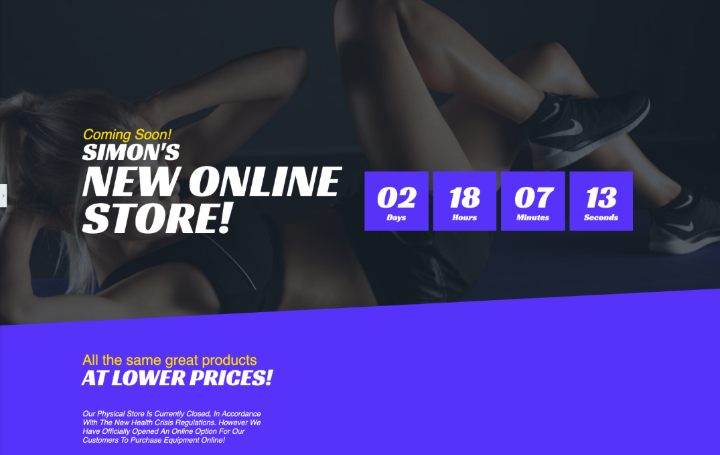
Once we’re done, we’ll click on save and get to work on the build itself.
Step #1: Download and Install WooCommerce
We install WooCommerce the same way that we install any other plugin.
On the WordPress dashboard, we’ll go to the Plugins tab, and click on Add New.
We’ll use the search box to search for WooCommerce, and having found it, we’ll click Install, It may take a minute to install, and once that’s done we’ll click on Activate.
With the plugin activated, the WooCommerce Setup Wizard should appear.
If it doesn’t, we’ll click on the WooCommerce tab (that has appeared on our dashboard), select Settings, and in the settings section, in the top right-hand corner, we’ll click on Help.
In the expanded Help section, locate the Setup Wizard on the far left, then again on the Setup Wizard button that will appear in the same section.
Step #2: Setting up WooCommerce Using the Setup Wizard
The guys behind WooCommerce have done a great job of making the setup process user friendly.
On the Setup Wizard’s first page we’ll input our store details. At the bottom of this page, you’ll notice that there is a drop-down menu with options to sell digital or downloadable products in our store. As we’re only selling physical products, we’ll select the appropriate option, then click on the Let’s Go button to continue on to the next page.
At this point we may see a WooCommerce popup asking us if we agree to their use of User Tracking. Click Continue.
Payment Gateways
In the Payment settings, we’ll select our Payment Gateways. These are online payment services with great reputations for online transaction security.
We can link any of these gateways to our accounts, using our email address.
There are lots of options, and each gateway has its Pros & Cons.
If you can use Stripe, then I would definitely add that as an option. It takes a little longer to set up but they provide good service for low fees.
If not, PayPal is great too. The fees are a little higher but it’s quick and easy to set up, and customers can use it whether they have an account or not.
As you can see, there are some other options below for offline payments but we strongly suggest using the online payment gateways because we’ll save a lot of time and effort on security, and even the design.
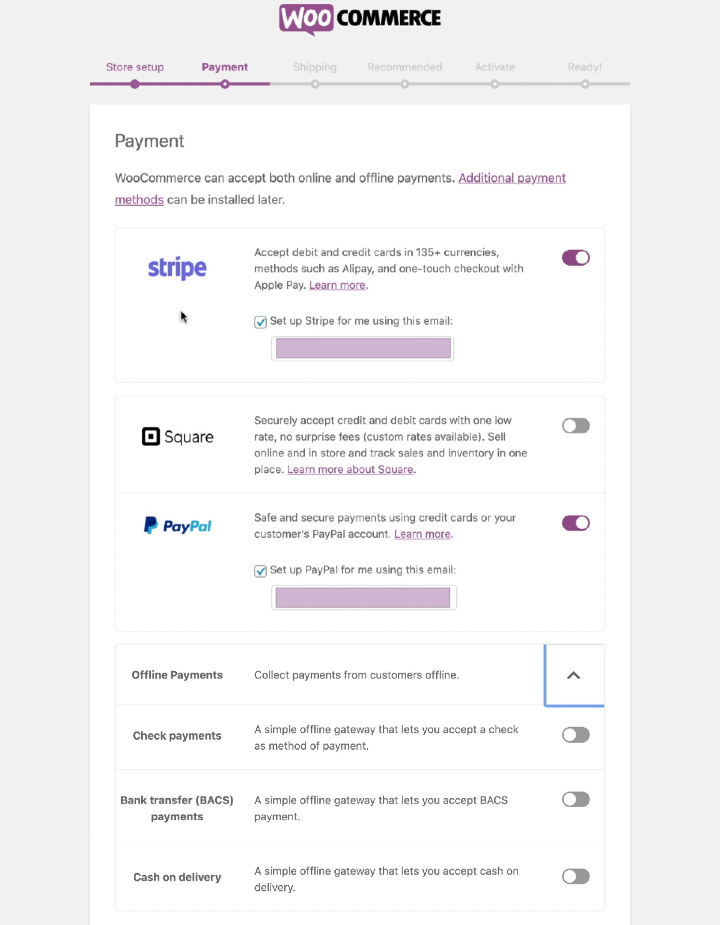
With the payment options set up, we’ll move on to the Shipping page, where we’ll select the weight and measurement units that will be simplest for our customers to use.
The next few pages are for recommended plugins that you could use if you wish.
We’ll deselect them because we already have the option to link things like our Facebook and MailChimp account to our site via Elementor, so for us, this is redundant.
We also don’t really need JetPack either, so we can skip this too, which takes us to the wizard’s final page.
And with that, we’ve completed the primary setup for WooCommerce.
Step #3: Create or Add Our First Product
With the wizard’s final page still open, we’ll click on the Create a Product button which will take us back to the Products tab (just below the WooCommerce tab) on the WordPress Dashboard.
This is where we’ll be able to add, remove, and edit all of our products.
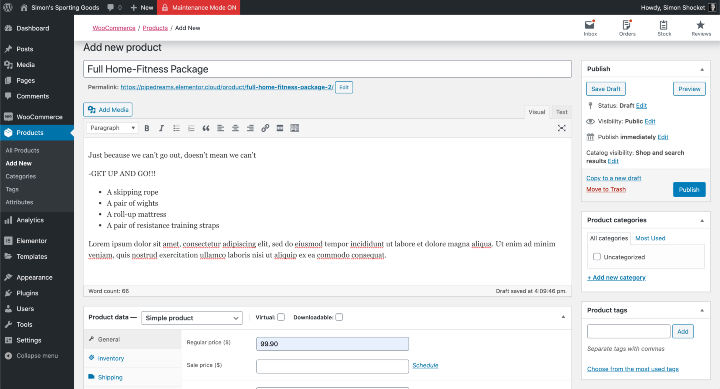
Going into the Add New Product section, we’ll fill in all of the necessary details of our product:
- Product name – we suggest you make this a catchy name
- Description – This is where we’ll add an informative description of the product
The bottom half of this section is where we’ll fill in the following Product Data:
- Type of product – our test case is an example of a Simple Product (not virtual or downloadable)
- Price
- Short description – a brief blurb about the product
The panel on the right of this section is where we’ll add our Product Image. This will be our products featured image. Should we want to add more images, we can do so in the main description box.
Above the Product Image box, we have the option to add tags to our product, and assign categories.
And with that, all that’s left to do is review our product’s info before clicking Publish.
Surprising as it may seem, but we’ve actually completed the hard part.
Step #4: Add Our Product to the Page
This is the fun part of the process, where we showcase our product and tweak our website’s design to better suit its new purpose as an online store.
To do this, we’ll open our website’s main page (you could also create a whole new page dedicated to the products of your store) in Elementor.

As you can see, we’ve made a few small changes already. Such as removing the old special offers and adding an announcement that the physical store will be closed due to the health and safety regulations of the current situation.
The easiest way to add a product to our page is by going to the Widget Library in the Editor panel and searching for the WooCommerce Products widget.
We’ll drag and drop it into the section where we want it to appear. Notice that the widget automatically displays our product, but this is because we currently have only one product listed in our store.
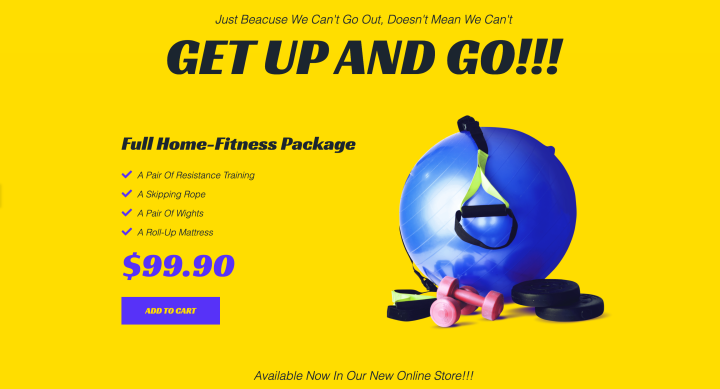
If we have more than one product, having positioned the Products widget in place (with the widget selected), on the edit panel (left side), in the Content Tab, we’ll go to the Query section. We’ll select our source as Manual Selection; then, we’ll use the Search & Select for exactly that, and locate the product that we want to sell here.
We can then go into the Style tab and customize the widget to suit the rest of our page’s design. With that done, we’ll click on Publish or Save Draft.
Using Elementor to Create a Fully Customizable Product Display
If you’re a more experienced user, you might want to try the more customizable alternative solution.

The product display in the image above was created using some basic Heading and Text widgets, a simple Image Box, and an Icon List widget. Finally, we added a Customizable Add to Cart widget, also from the widget library.
I would strongly suggest that you at least try the latter method as it will offer you unmatchable flexibility to make your design truly eye-catching and unique.
Once we’re happy with the way our product or products look on our page, we could move on to our Cart and Checkout pages.
Tweaking the Design of the Cart & Checkout Pages
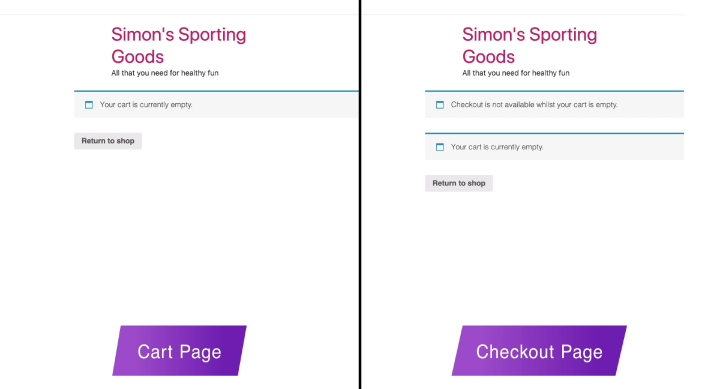
These two pages were automatically created when we installed WooCommerce, and being WooCommerce pages, there isn’t too much that we can customize.
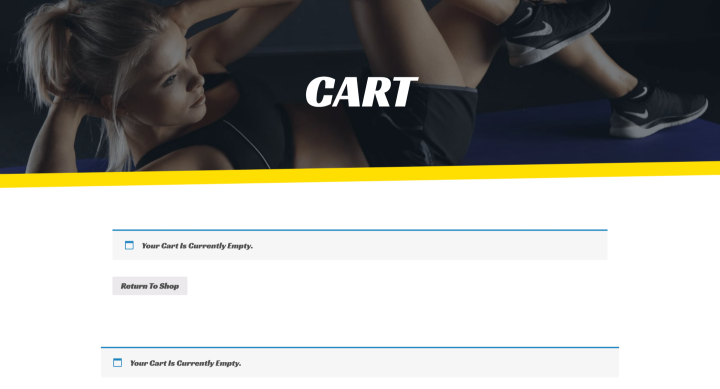
So to make these pages look better, we created two separate headers in the Elementor Theme builder. In the conditions, we assigned each header to only appear on the cart or checkout pages, respectively.
The safest and simplest way to keep the design of these pages consistent with the rest of our site is by defining our website’s default fonts accordingly in the new Theme Style feature. This is because these are the settings that WooCommerce will turn to, to know how to present these pages.
The Thank You Message
As you know, it has become customary to display a Thank You massage once the customer has completed their online purchase.
WooCommerce includes a generic Thank You message that comes with its standard confirmation email and I feel that this is sufficient for this type of store.
Should we ever want our Thank You message to appear a little more upscale, we could always use the Theme Builder to create a popup with a Thank You message, designing it exactly the way we want to, and create a condition to have it appear after leaving the Checkout page.
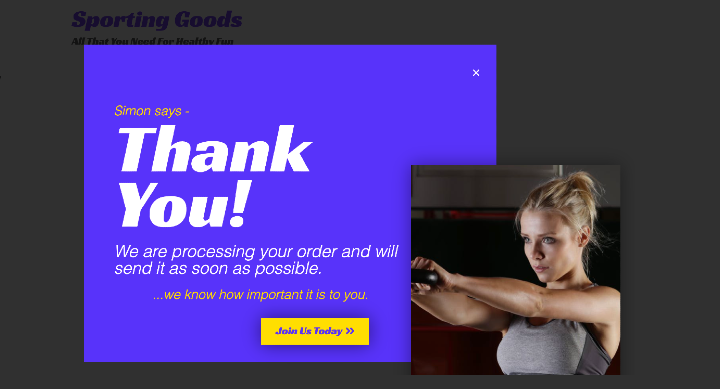
Alternatively, you could invest in a WooCommerce addon that will provide your site with a customizable Thank You page or popup, but these do cost extra.
With our site’s design and build done, we can move on to the final step.
Step #5: Main WooCommerce Setup and Definitions
Most of the default settings should be good for the vast majority of the online stores.
These settings can be found under the Settings section in the WooCommerce tab on the WordPress dashboard.
Here, in the General settings we can edit things like:
- Store address
- General options.
- Currency Options
In the Products’ settings, in the Add to Cart Behaviour subsection, we’ll find a helpful option that redirects customers to the Cart page after successful addition or selection of a product. Something that we’ll select here as right now we only have the one product.
The Shop Page subsection is where we define our store page. Right now, we’re showcasing our product on our homepage, but we could just as easily create another page and use this option to link our site to that page.
The Products settings is also where we can also edit and define Measurements, Reviews, Inventory, and so on.
I wouldn’t play around with the default settings in the rest of these tabs, definitely not those in the Taxes Tab.
However, I would like to spend a few moments in the shipping section because, after all, it is an important part of an online retail business.
Setting up Shipping
Yes, there are plenty of efficient plugins and addons that could provide you with shipping calculators, even ones that are service-specific, and calculate shipping via FedEx or the USPS. And yes, some are free, but most do cost money.
However, right now, we’re trying to save money, or least avoid extra costs, and, if possible, also avoid adding anything to our platform that could slow down our site or create conflictions.
As it happens, we can do this, right here, safely and securely, and with no extra cost.
Top Tip: Research Packaging and Shipping Costs Thoroughly
I would strongly suggest that you research the price of shipping and delivery to the areas that you want to do business with. Find what it will cost you to package and ship each product according to its weight. You might want to ship via registered mail, or you might want to add an Express Postal service — research here is important. Charge too little, and you’ll lose money. Charge too much, and you’ll lose customers.
The way that this system works is based on Shipping zones and Shipping classes.
Setting Up Your Shipping Classes for WooCommerce
The product that I’m currently selling includes a couple of dumbbells or weights. But I may decide to sell some of the athletic clothing too, and in terms of shipping costs, these are two different categories or Shipping Classes.
Which is why we should begin by defining our Shipping Classes.
For this demonstration, we’ll just define two simple classes.
In the Shipping Tab, we’ll click on Shipping Classes.
Once we’re in the Shipping Classes section, we’ll click on Add a Class.
We’ll then define this class by naming it “Heavy Items.”
(The slug line isn’t that important, and WooCommerce can fill it automatically anyway.)
In the definition box, we’ll add a brief explanation (e.g., “Items weighing over 2KG”) for ourselves, our employees or coworkers.
Next, we’ll create a separate class the same way. This time we’ll name it “Light Items” and define it as “Items weighing less than 2KG”.
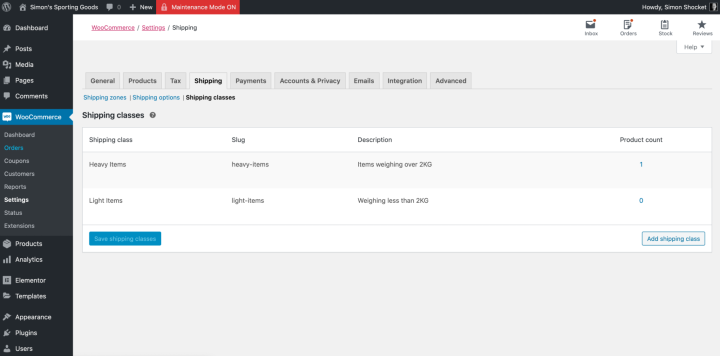
It’s at this point that we must remember that the system also needs to know which of our products are “Heavy” or “Light” items.
Defining Shipping Classes Per Product
Going back to the WordPress dashboard, we’ll enter the Products Tab, and locating our specific product on the list of products, will click on the Edit option just beneath it.
This will open up the Edit Product section, where we’ll scroll down to the Product Data area and select the Shipping tab.
This is another of those places where we can keep it simple. There really is no need to define the product’s weights and sizes. Instead, we’ll just select the appropriate Shipping Class for this specific product in the dropdown menu.
With that done, we’ll click on Update (on the left panel), and return to the WooCommerce Settings, and back to the Shipping tab.
Setting Up Your Shipping Zones and Methods for WooCommerce
As we know, besides weight, the other important variable that dictates our shipping costs is location. And that is what we are going to do now in the Shipping Zones section.
Here we’ll click on Add Shipping Zone and name this zone “Domestic.” Next, we’ll select the appropriate region for our test case (UK). If possible, you can also select regions according to postcodes or zip codes.
Next, we’ll add a Shipping Method.
As I’m mostly interested in local business, and because I would personally like to make my life much simpler, we’ll click on Add Shipping Method and select the option for Free Shipping.
I have already calculated the cost of post and packaging, rounded up that number, and added to the final advertised price. In fact, it’s the base price of the product I am selling.
Now, this is all well and good, but what if we’re interested in expanding to western Europe, for example, and we don’t want to offer free shipping.
We can always just add another Zone, name it Europe, and enter all of the countries we want to sell to. Next, we’ll Add A Shipping Method, and this time we’ll select Flat Rate.
I realize that the term “flat rate” might seem confusing to some of you right now, but it’s just a temporary definition.
As you know, if we ever want to make any changes to our shipping preferences, or indeed almost everything on the WordPress platform, we can always come back here and click on the Edit option that appears under each category in each section.
By clicking on Edit, beneath the shipping method that we just created, we’ll open a dialog box where we’ll define this shipping method more specifically.
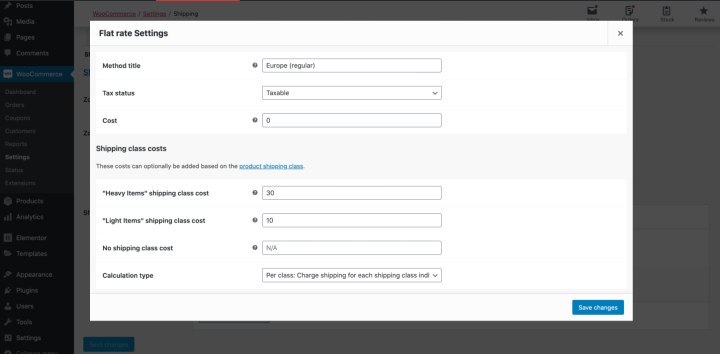
The first thing that we’ll do is change the name in the Method Title from “Flat Rate” to “Europe (regular shipping).” We’ll leave the Tax option alone.
Notice that we have the Cost option for adding a general shipping cost to this Shipping Zone.
However, we can define our shipping method according to the shipping classes we’ve already set up.
For example, I can define the shipping costs so that a European customer will pay 30 dollars shipping for a heavy item, like the Home fitness package; or 10 dollars shipping if they order a light item, like a pair of sweatpants.
The default calculation type should suit almost all of our needs, so we recommend leaving it as is.
As always, we’ll click save changes, before we forget.
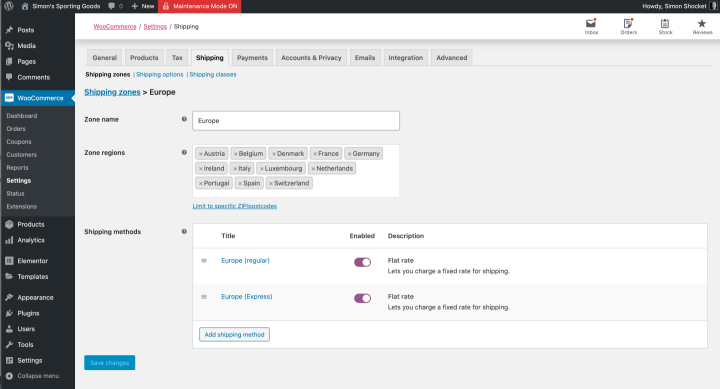
Many of us would also like to offer our customers Expedited shipping, and we can do this simply, in the very same way.
We’ll add an additional shipping method to our “Europe” shipping zone, by adding a new method, selecting Flat Rate, then clicking on Edit.
Once in the dialogue box, we’ll change the Method Title to “Europe (Express)” and enter the costs of this method according to shipping class (Heavy/Light).
And of course, we’ll click on Save Changes.
While you’re in the Shipping settings, you may also want to check out the Shipping Options where there are some helpful options that are self-explanatory.
Just a few more WooCommerce Settings
In the Payments tab, we might want to rewrite the default description for the PayPal payment option. This is in case we don’t have a separate Credit Card option; we’ll want to be sure that our customers know that they can also click on PayPal to pay via credit card.
To do this, we’ll go into the Payment tab, and next to the PayPal option, we’ll click on Manage to access the details we want to edit, in our case, the PayPal description.
Notice that there is a PayPal Standard option as well as a Paypal Checkout option. I prefer using the later as it includes a checkout stage and makes things easier.
Back in the Settings, we’ll skip the Accounts settings, because we’ll be running our transactions the same as we would in the physical store, where we didn’t use accounts. Perhaps, our online store will grow, which would be fantastic, but also an entirely different type of online store.
The last thing that we should consider is in the Advanced tab, where we can make sure that all the pages are linked correctly.
But more importantly, we might want to create a page for Terms & Conditions that are specific to our online business, and this is where we would like it to our site.
Last but not least, we’ll want to save all of our changes, and we are practically finished.
I say practically because we shouldn’t be launching anything without testing it first.
Testing Our Online Store
Before we conduct our tests, we’ll first go to the Product Edit page on the WordPress dashboard and temporarily change the price of the product, from $99.90 to 99 cents.
This is so that when we run test after test, we’re not transferring 100 dollars each time.
If you do this, it is extremely important to remember to change the price back to what it should be, once you’re done with the testing.
To test that everything in our store is in order, we’ll go to our site (in preview mode), and there, we’ll click on the product’s Add to Cart button.
This will take us to the Cart page. From here will click to go to the Checkout page.
We’ll fill in our details, and proceed through the process as if we were customers.
For this demonstration, I used a Paypal account, as it’s probably what we’re all most familiar with.
With everything running smoothly, so far, once we’ve completed our test purchase, we’ll go back to the WordPress Dashboard and in the WooCommerce Tab.
There we can already see that our order has registered, and if we go to the Orders section and click on our order, we can see that our test order has registered correctly.
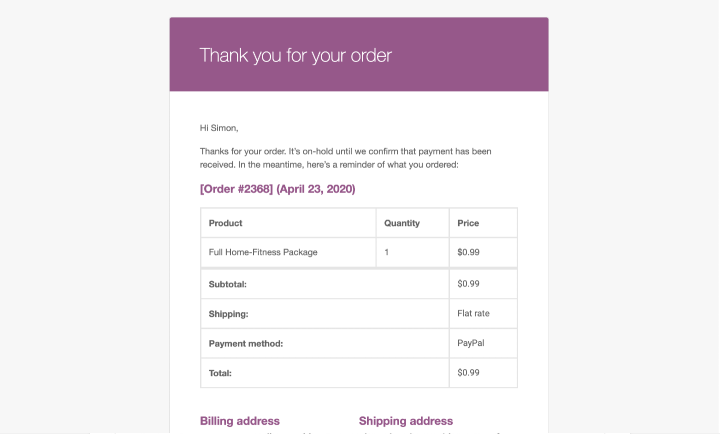
Of course, we should also check our email account to make sure that we received our order confirmation correctly.
Summary
This week we looked at how we can take a standard website for a small business and transform it into something as complex as an online store — but — in the simplest way possible.
It’s no secret that our main reason for doing this is to help the small businesses and self-employed professionals in our community to get ahead, rather than lose out as we all see our way through this crisis as best we can.
If you have any tips and advice that could help other users with designing and setting up their first online store, please add them in the comments below.
Should you have any criticisms, we are equally interested in your thoughts.
After all, our goal is to be the best at helping others excel at their craft.
Looking for fresh content?
By entering your email, you agree to receive Elementor emails, including marketing emails,
and agree to our Terms & Conditions and Privacy Policy.
