Table of Contents
Have you always wanted to try something new with your website? Maybe to add a new plugin, change the theme, or make a complete overhaul of your design?
But alas, you are afraid that a mistake here or there may break your website and make it unusable. You are afraid that by implementing new changes, you may push your users away from the website, and this fear limits your desire for discovery and experimentation.
Well, fear no more. There’s a way where you can do anything you want to your website, break it even, and it won’t affect your users’ experience. All you need a staging site.
This step-by-step guide will be written under the assumption that your WordPress website is already up and running. If, however, you are unsure how to create a WordPress site, we have a great tutorial that can help you.
What Is a WordPress Staging Site?
A staging site is, in essence, a clone of your live website. It’s an environment that we create where we can experiment and test our website before it goes live so that your active site is not affected.
Here you can fix things like bugs and plugin conflicts or try something new like changing the theme, adding new plugins and code snippets — all without an ounce of risk.
And, once you are done with all the changes and updates, you can easily upload them to the live server.
The Importance of a Staging Site
To understand the importance of a staging site, let’s use drug testing as an analogy. The best place to develop a drug would be in a laboratory, where you have complete control of the environment and materials. Later, once we’ve got it working, it’s ready to go to its first trials, where we test the drug on subjects.
When it comes to website building, the local environment or staging site is our lab. It’s where we have the highest level of control that we could hope for. The online environment or live site is more like the trial phase. It’s where the environment is less predictable and offers more realistic and practical variables.
Using a staging site has several advantages.
Troubleshooting
There are no perfect websites. No matter how hard you try, there will always be a WordPress error here or there. You may have plugin conflicts, bugs, and other unsavory technical issues. Clearly, you want to fix them. But, you know, sometimes you fix one issue, only to create 10 more.
A staging site is a perfect place to tackle those issues. Since, even if you create more issues than you fix, this will not, in any way, affect your live website and the users’ experience. A staging site is a safe environment to work on your website until all the technical issues are solved. It’s a great place for quality assessment.
Safety
As we’ve mentioned, a staging environment is a safe area where you can work on your website. Additionally, however, it’s also a good place to create backups of your website.
Since a staging site is basically a clone of your current, live website, creating a staging site will make sure that you have a safe copy of the hard work you’ve done. And, should something happen, you’ll always be able to go back to the latest copy of your website, save yourself a huge amount of time, and keep your users satisfied.
Practice
A staging site is a great place to conduct your experiments. Since it’s not available to the public, so users won’t see your experiments, they will not experience any issues or downtime.
Also, if you tweak the settings, you can make sure that Google or other search engines will not see this website, and hence, you will not have negative SEO results.
Here you can do absolutely anything to your website. Change it from the ground up, try new things, practice with code snippets, animations, and more, with no repercussions.
3 Ways to Create a WordPress Staging Environment
There are three primary methods of creating a staging site.
- Create a staging site through your WordPress hosting provider. Several major web hosting platforms like Elementor Hosting, Bluehost, WP Engine, SiteGround, and Flywheel, offer services that create an online staging site from their respective dashboards.
- Create a staging site using a WordPress plugin. You could use a plugin such as WP Staging or WP Stagecoach, to create a staging site.
- Create a staging site manually. This is less recommended for beginners.
How to Create a WordPress Staging Site Through Your Hosting Provider
There are many hosting companies, but we’ll focus on these:
- Create a staging site on Elementor Hosting
- Create a staging site on Bluehost
- Create a staging site on SiteGround
- Create a staging site on WP Engine
- Create a Staging site on Flywheel
Create a Staging Site on Elementor Hosting
Staging sites are available to Elementor Hosting subscribers who’ve purchased a Business, Grow, or Scale subscription.
It’s easiest to make a staging site by copying or cloning your existing website. Here’s what you need to do:
- Go to your My Elementor dashboard.
- Locate the card of the website you want to copy.
- Click Manage this website.

4. Scroll down to the Staging Environment section.

5. Select Create Staging.
6. Confirm you want to create a staging site and click Create Staging.

7. Your live site will be copied over to your staging site.
8. The details of your staging site will be added to the Staging Environment section.
Create a Staging Site on Bluehost
Bluehost offers a one-click staging solution for your site. Assuming that your hosting provider is Bluehost, all you need to do to set up a staging site is the following:
1. Login to your WordPress Admin area (http://www.yoursite.com/wp-admin/). From here, choose ‘Bluehost on the left-hand sidebar, and then choose Staging.

2. Next, click on the Create Staging Site button and wait for the process to finish.
3. Click on the Go to staging site button.
4. You will now be in the staging area. The red button on top will indicate that this is a staging environment.

5. Once you are ready to deploy the changes, go to the staging page again (from your WP admin area), scroll down to the Deployment Options, and choose the option that best fits you. Confirm your selection and wait for the process to be done.

6. That’s all there’s to it if you are using Bluehost.
Creating a Staging Site on SiteGround
SiteGround, another popular hosting provider, also offers a one-click solution.
1. Login into SiteGround’s dashboard, scroll down to WordPress Tools and click on the Staging option.

2. Add your website to the staging site manager, then click Add WordPress.

3. Select the URL of your website. Once the website is detected by SiteGround, you can click on the Create Staging Copy.

4. Add a password and provide your login credentials.
5. You can now edit your copy.

6. Once done, you can go to the SiteGrounds dashboard, and publish your site by going to Manage Staging Copies and clicking the Push to Live button, and voila, you’ve got a live WordPress site with the changes you’ve made.

Creating a Staging Site on WP Engine
WP Engine is another popular hosting provider, and like the rest, it offers a one-click solution that they call Legacy Staging.
To deploy a live website into a legacy staging you’ll need to do the following:
- Open the WordPress wp-admin area.
- Click on WP Engine on the left-hand side.
- Select the Legacy Staging option
- Now, click on the blue Copy Site From Live To Staging button.
- To publish your website, or as WP Engine puts it, to deploy legacy staging to live, you need to do the following:
- Go to the wp-admin area and click on WP Engine on the left-hand side column.
- Select the Legacy Staging option and click on the red button Deploy Site From Staging To Live.
- Select a database mode, and click on the red button Deploy Site From Staging To Live.
Creating a Staging Site on Flywheel
Another hosting provider, Flywheel, offers a simple way to turn a live website into a staging site.
1. Go to Flywheel’s dashboard and choose the Advanced tab.

2. Next, under the Staging option, simply toggle the switch to On. It may take a few minutes to complete the process.

3. You can access your staging site through the URL that’s listed under the Staging tab.

To publish your site to live, all you have to do is go to the Staging tab, in the dashboard and choose the Move Staging Changes to Live Site.


How to Create a WordPress Staging Site using Plugins
Next, we’ll cover how to create a staging site using a plugin. Mind you, that unlike the one-click options above, this option is a bit more advanced and has some disadvantages, namely that there’s limited control over the hosting server, and that the plugins will store the staging site on their servers, effectively raising privacy concerns and data protection issues.
We’ll discuss two staging plugins:
- WP Stagecoach
- WP Staging
WP Stagecoach
One of the more popular plugins for creating and publishing staging sites is WP Stagecoach. After the installation, the process is fairly easy to do.
- Once you install the plugin, you will be able to access it through the WP dashboard.
- You will need to enter a username and a license key, which can be found in the confirmation email or on the plugin’s website, under your account information.
- Now, click on WP Stagecoach in your WordPress dashboard, and click Ride the Stagecoach.
- Go through the guided wizard process that includes several steps to finish setting up the staging site.
- Once done, you will be given a URL where you can view the staging site and start editing it.
- To publish it, you’ll have to Import Changes, as WP Stagecoach puts it. You can do so by accessing WP Stagecoach from the WordPress dashboard and click on Import Changes. It may take a few minutes to finish the process.
Once done, you’ll have an option to choose one of three kinds of import. Select the one you need, and click Import. Give it a minute, and you are done.
WP Staging
WP Staging is another popular staging plugin that you can use.
- Install the plugin.
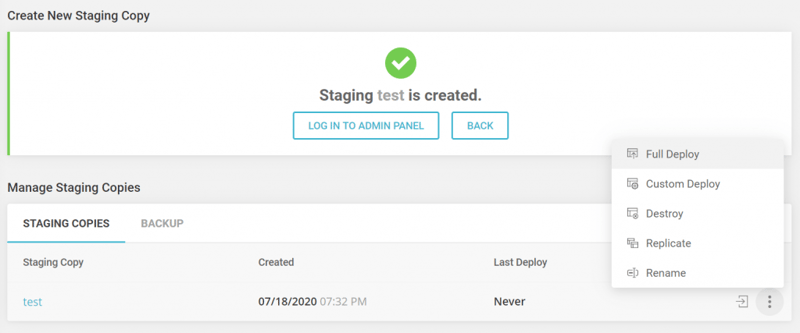
- Click on the WP Staging tab in the WordPress dashboard and choose Create New Staging Site.
- Give a name to the staging site and click Start Cloning.
- The plugin will start making the staging site, and once it’s finished, you can access it by following the prompt.
- You will know that you are on the staging site by the orange admin bar at the top.
How to Create a WordPress Staging Site Manually
This is for the more advanced users as it requires more work and some know-how. There is a major disadvantage to this method as the website will be temporarily unavailable when you deploy the changes from the staging site, to the live one.
Here’s how you do it:
- First, you need to create a subdomain for the staging website. Go to your hosting account’s dashboard and click on the Subdomains link, most, if not all, hosting providers will have this option.
- Provide a name for the subdomain and click on the Create button.
- The hosting provider’s dashboard, or control panel, will now add the subdomain and you will see it.
- Next, you need to create a dedicated FTP account for the staging environment. This will make sure that everything is kept separate and that you don’t accidentally make changes to the live website. Just go to the FTP accounts section in your hosting provider’s dashboard and fill in the fields. One important caveat is that you need to make sure that the Directory matches the directory of the subdomain.
- Now, you need to upload the live site to the staging area. To do so, you need to find the phpMyAdmin option on your hosting provider’s dashboard and choose Operations or something similar. Here, you need to choose the option to Copy Database To and enter the database name of the staging site. If for some reason this option is unavailable, you can create a database backup, and then import it.
- Now you can start copying plugins, themes, and other elements and roll out your changes as you sit fit.
Conclusion
Creating a staging site is a great way to work on your website, without having the fear of breaking something up. Essentially, it’s a copy of your website where you can experiment with it, troubleshoot problems with your website, and change the design before the website goes live.
You will not risk your website getting penalized for SEO, nor will you risk creating a bad user experience. A staging site is your playground, you can do anything you want there.
There are several ways to create a staging site. Through a hosting provider is clearly the easiest, and perhaps the safest way to do it. There are also numerous plugins that offer the service, albeit there are some privacy concerns related to data protection.
And, lastly, you can do it manually, via your local server. This process is more complicated, and it has its disadvantage in that it will make your inaccessible while uploading the changes from the staging site to the live one.
Looking for fresh content?
By entering your email, you agree to receive Elementor emails, including marketing emails,
and agree to our Terms & Conditions and Privacy Policy.


