Table of Contents
If you want to improve your WooCommerce store, learning how to use WooCommerce custom fields is a great tool to have in your toolbelt.
Custom fields let you collect and display extra information about your WooCommerce products, which is really useful for customizing your store.
With the right tools, WooCommerce custom fields don’t have to be complicated, either. While you certainly can use code to insert custom fields, Elementor offers an easier way to work with custom fields that lets you do everything from Elementor’s visual interface.
In this post, we’re going to cover everything you need to know about WooCommerce custom fields, including the following:
- A deeper look at what WooCommerce custom fields are and how they help improve your store.
- The different types of custom fields you can add to WooCommerce.
- When to use WooCommerce custom fields vs product attributes/taxonomies.
- How to create WooCommerce custom fields on the backend.
- How to display custom fields on the frontend of your store, using Elementor Pro or custom code.
Let’s get started!
Table Of Contents
- What Are WooCommerce Custom Fields?
- Backend
- Frontend
- Different Types of WooCommerce Custom Fields
- Additional Product Data Fields
- Custom Input Fields
- WooCommerce Custom Fields vs Attributes (Taxonomies)
- How To Create WooCommerce Custom Fields
- How To Create WooCommerce Custom Product Data Fields
- How To Create Custom WooCommerce Product Input Fields
- How To Display WooCommerce Custom Fields
- Elementor
- Functions.php File
What Are WooCommerce Custom Fields?
WooCommerce custom fields let you store and display additional information about the products on your site. They’re just like regular WordPress custom fields, but they specifically collect information about your WooCommerce products.
By default, WooCommerce offers high-level fields that apply to most products, such as prices and product descriptions. But it doesn’t give you a way to create fields that are unique to your store.
That’s where custom fields can be useful.
Backend
On the backend, custom fields make it easier to store unique details and information about your products. Instead of trying to put custom information into the unstructured product description box, you can create dedicated fields for all the important details, which makes it easier to manage and update products.
Frontend
On the frontend, custom fields help you display all of that information in a structured manner. If needed, they also give you a chance to collect additional information from shoppers, such as letting them enter a custom engraving message to include on a piece of jewelry that they purchase from your store.
If you’re still not quite sure how all this comes together – don’t worry! In the next section, we’ll give you some real examples of how you can use custom fields to enhance your store.
Different Types of WooCommerce Custom Fields
There are two common types of custom fields you’ll see for WooCommerce stores:
- Product data fields – these let you store additional information about a product. As the store admin, you’ll enter this data from your backend WordPress dashboard. Then, you’ll display the data on your product pages.
- Custom input fields – these let you collect additional information about a product from shoppers. Typically, this is to help you create some type of customizable product. The key difference here is that your shoppers enter the data from the frontend of your site.
Depending on your store’s situation, you might use just one type of WooCommerce custom fields. Or, you might use both types so that you can both display extra information and collect extra information from your shoppers.
Let’s look at them in more detail.
Additional Product Data Fields
The most common use of WooCommerce custom fields is to display additional information about a product. The backend WooCommerce input fields are “one size fits all”, but you might have situations where you want to display unique information about your products in a structured manner.
For example, maybe you have an online book store and you want to include snippets of positive reviews from critics about the books you’re selling. Sure, you could include them directly in the product description, but using custom fields would let you give these quotes dedicated input fields and you’d have more control over where you place them.
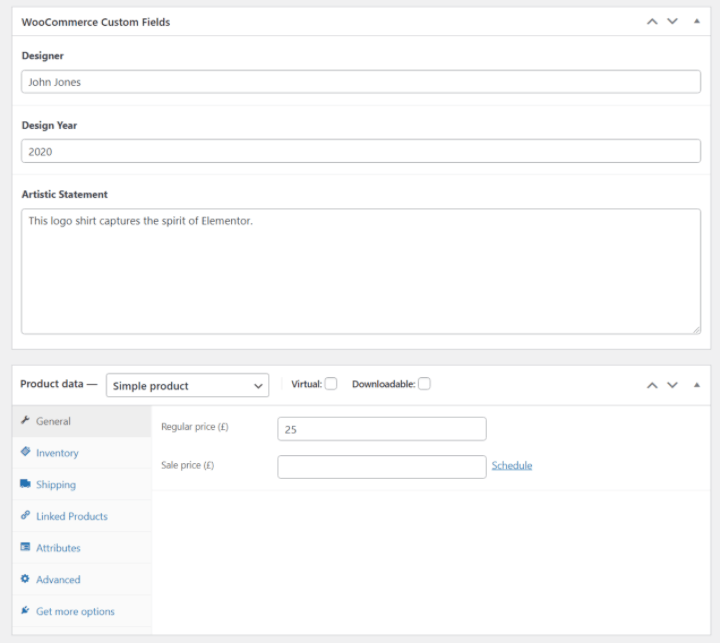
Or, maybe you sell graphic t-shirts and you want to collect and display information about the designer of each shirt.
Here’s an example of adding some custom fields on the backend:
And then you could display that information wherever you want on your product pages like this:
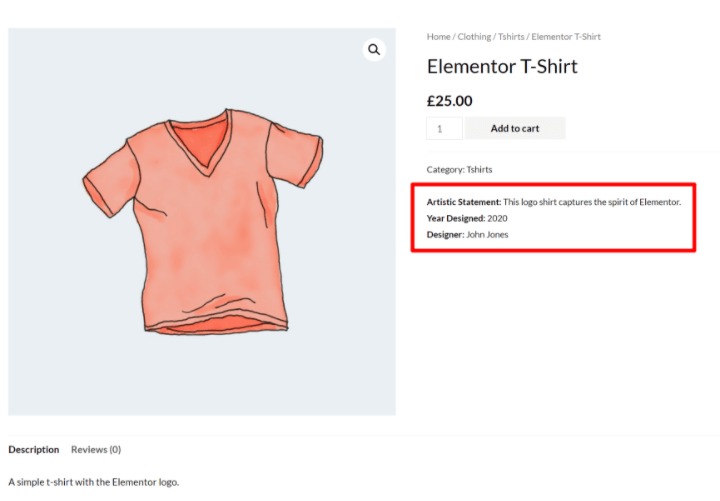
Basically, if you ever want to display any type of additional information about a product, putting that information in custom fields can be really useful for the following reasons. You can…
- Create dedicated input fields, which makes it easier to add information and to update information in the future.
- Display the information exactly where you want to put it. You can place it anywhere on your product pages. And with Elementor, you don’t even need to know any code to do this.
- Format the information however you want. For example, you could add colors to draw attention, borders, etc.
Custom Input Fields
Another option for using WooCommerce custom fields is to create custom input fields on your single product pages so that shoppers can customize the product or provide additional information.
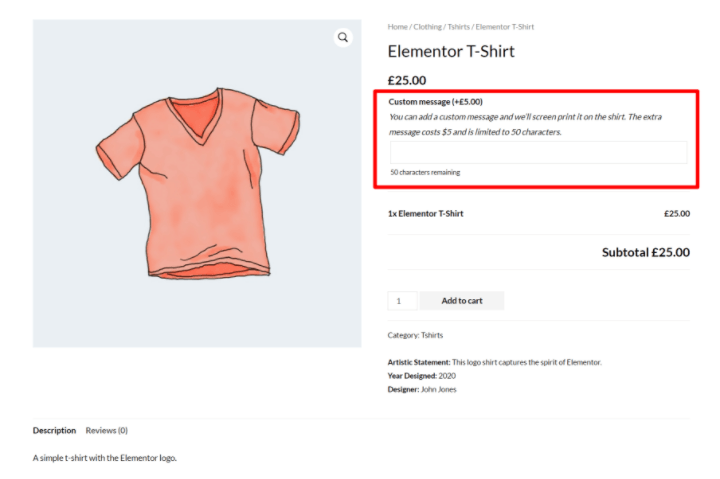
For example, maybe you sell a certain type of jewelry and you want to give your shoppers the ability to create a custom engraving on the item that they purchase. Or maybe you want to let shoppers enter a custom message to screenprint on a shirt.
To accomplish these use cases, you could add a text input field to the frontend product page.
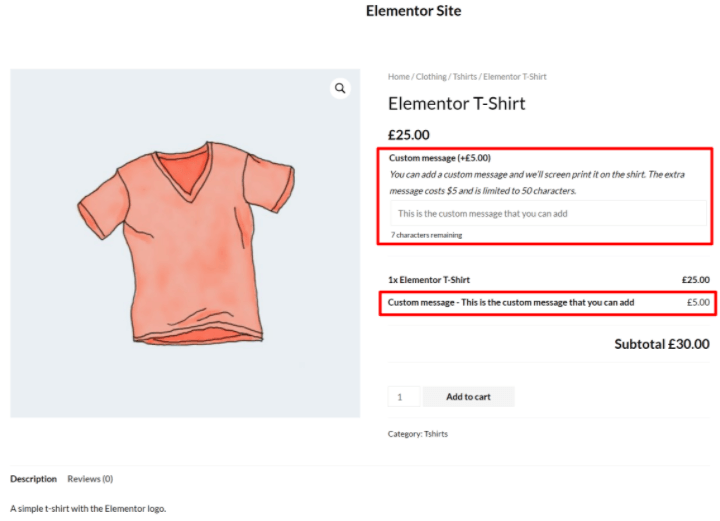
Here’s an example that adds such an input field in addition to the custom data fields from the previous section:
WooCommerce Custom Fields vs Attributes (Taxonomies)
If you want to collect additional product data, another popular option is WooCommerce attributes and taxonomies. You’ll just see these called “attributes” when you’re customizing a product, but what WooCommerce does on the backend is create a new custom taxonomy for every attribute that you create.
Attributes and taxonomies are also a very useful way to store information about a product, but they serve a different function so it’s important to understand the difference:
- Attributes/taxonomies – you use these to group products together, kind of like a category. Your shoppers could use this information to filter out all of the products with a certain attribute. WooCommerce already includes two taxonomies by default – product categories and tags – but you can use attributes to add unlimited custom taxonomies.
- Custom fields – you use these to store information that’s unique to each individual product. Products are not grouped together by the custom field information.
Let’s look at some examples of when to use each…
First, let’s say you sell a range of different t-shirt designs in different colors. You want a way to store information about the color of each t-shirt so that your shoppers can filter out all of the shirts in the color(s) that they’re interested in.
For this use case, you would want to use a product attribute (taxonomy). This will group different items together by their assigned color and let shoppers filter them. For example, browsing all of the green shirts.
But then let’s say you also want to add a note about how the product fits. For example, whether it fits true to size or if it’s a bit tighter or looser than normal. This information is unique to each t-shirt and not something most shoppers will want to filter by, so you would be better off putting these details in a custom field.
There are some situations where both an attribute and a custom field could fit and you might choose a different approach depending on your specific needs.
For example, let’s say you want to add information about the graphic designer who created each t-shirt that you sell. Here are the different scenarios where you might want to use each option:
- Attribute – you’d use this if you’re selling multiple shirts from each artist and you want to give shoppers an option to filter out all of the shirts from a specific artist.
- Custom field – you’d use this if you want to store and display the artist, but you don’t need to make it filterable. For example, maybe the artist isn’t really what shoppers are interested in or maybe you only sell a single shirt from each artist.
How To Create WooCommerce Custom Fields
There are two parts to working with WooCommerce custom fields:
- You need to create the custom fields on the backend so that you can add more information to your products.
- You need to display the information from those custom fields on the frontend of your store.
In this first section, we’re going to show you how to create the WooCommerce custom fields in the backend. Then, in the next section, we’ll go through how to display them.
How you create your custom fields depends on if you want to show additional product data fields or if you want to display custom input fields. Let’s go through both…
How To Create WooCommerce Custom Product Data Fields
To collect and store additional data about WooCommerce products, you can use any custom fields plugin. Popular options that integrate with Elementor include:
We have a detailed comparison of ACF vs Toolset vs Pods if you want to learn more about those offerings, but we’re going to use ACF for this example because it’s popular, free, and flexible. The same basic idea will hold true for all of the plugins, though.
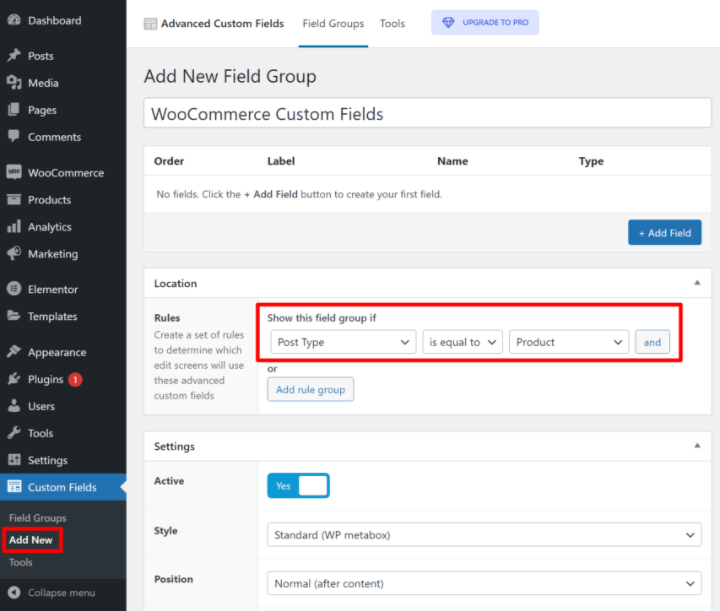
To get started, install and activate the free Advanced Custom Fields plugin from WordPress.org. Then, go to Custom Fields → Add New to create a new “Field Group”.
A field group is exactly what the name says – a group of one or more custom fields that you want to add to some or all of your WooCommerce products.
To begin, use the Location rules to control which products you want to add the custom fields to.
First, set the Post Type equal to Product. If you want to display these custom fields on all of your products, that’s all you need to do:
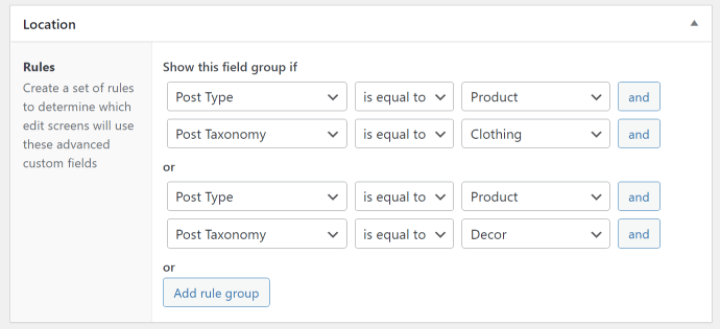
If you only want to display these custom fields on certain products (e.g. products in a certain category), you can add more rules as needed. For example, here’s what it looks like to target products in either the “Clothing” or “Decor” categories:
Then, you can add your custom fields using the + Add Field button at the top of the interface. For each field, you can choose from different field types (e.g. number vs short text vs long text, etc.) and configure other details about that field.
For example, here are three custom fields to collect…
- The designer’s name.
- The year that the designer created the design.
- A statement about the design from the designer.
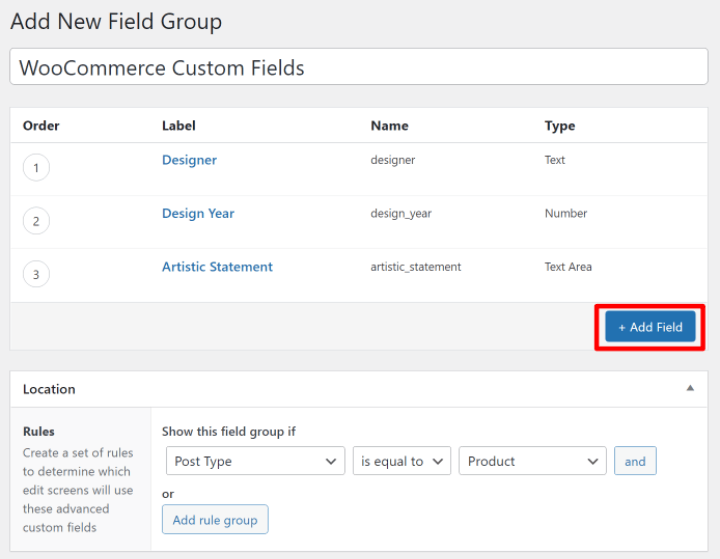
Once you’re happy with how everything looks, go ahead and Publish your field group.
Now, when you edit a product, you’ll see those new custom fields in the product editing interface:
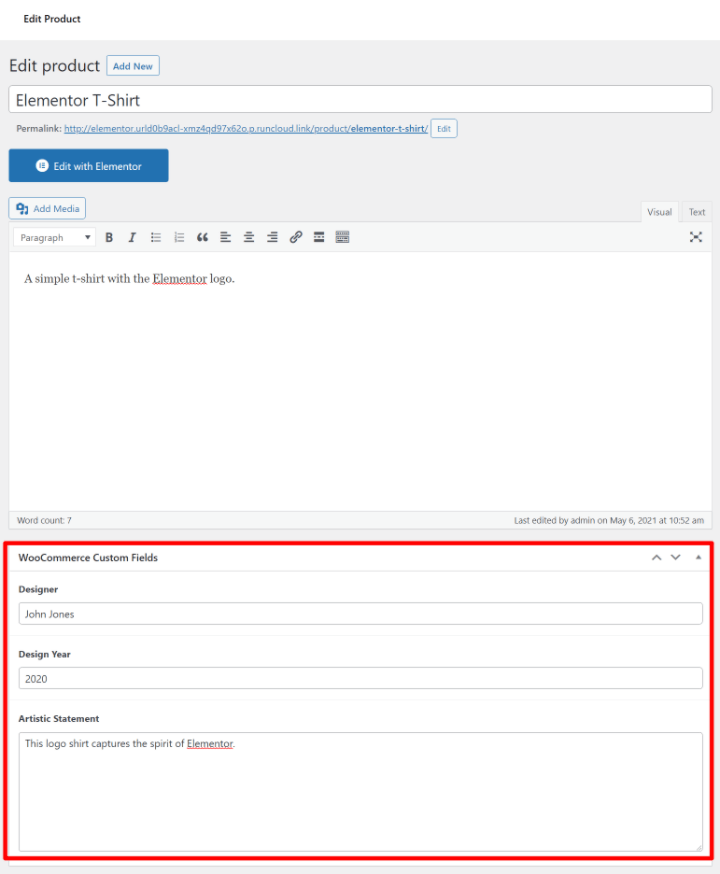
In the next section, we’ll show you how to take the information in these custom fields and display it on the frontend of your WooCommerce store.
But first – let’s talk about the other type of WooCommerce custom fields – custom product input fields.
How To Create Custom WooCommerce Product Input Fields
The plugins above are great if you want to collect additional information about a product and display it on the frontend of your site. However, they aren’t great for collecting custom input from your shoppers on the frontend. For example, letting shoppers enter a custom engraving message that will be added to the product.
For this use case, you’ll usually want a WooCommerce product add-ons plugin. These plugins are specifically designed for accepting product input from shoppers on the frontend of your store.
You can find a lot of plugins to meet this need, but two good places to start are:
We’ll show you how it works using the official Product Add-Ons plugin from the WooCommerce team, but the basic idea will be the same with all product add-on plugins.
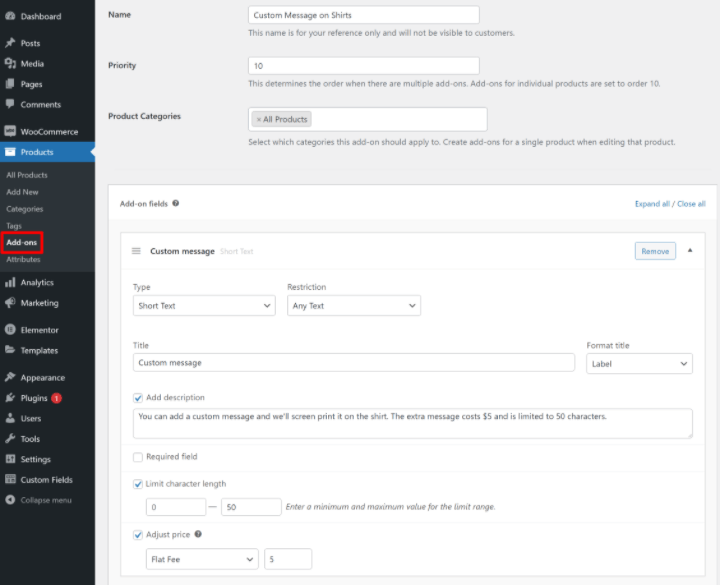
With the plugin installed, you can go to Products → Add-ons to create the custom input fields that you want to display on some/all of your products.
Just as with setting up ACF, you can target your fields to all products or only certain categories of products.
You can also add as many fields as needed and choose from different field types.
The one key difference is that you also have the option to adjust the price of a product based on the choices that a shopper makes.
For example, you could charge an extra $5 if the shopper wants to add a custom engraving/message:
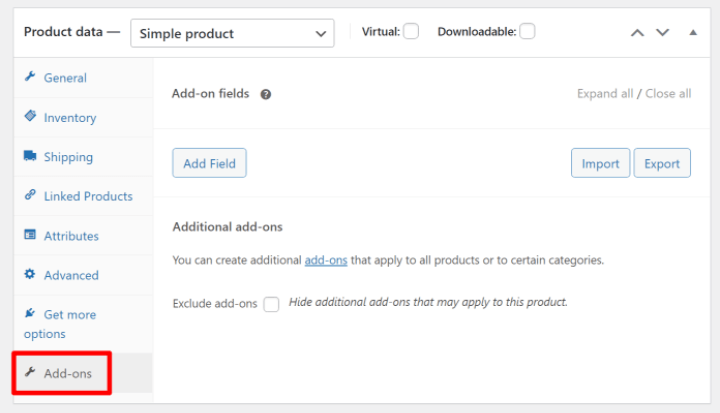
You also have the option to add custom input fields directly to products when you’re working in the product editor. You can do this from a new Add-ons tab in the Product data box:
The Product Add-Ons plugin will automatically display these custom fields on the frontend of your store. But in the next section, we’ll show you how you can manually control their placement using Elementor.
How To Display WooCommerce Custom Fields
Now that you’ve created your custom fields and added information to them, you’re ready to display that information on the frontend of your site.
We’ll show you two options here:
- Elementor
- Custom code via the functions.php file
Elementor
The easiest way to display your WooCommerce custom fields is with Elementor Pro and Elementor WooCommerce Builder. Using Elementor’s visual, drag-and-drop interface, you can create one or more product templates that include data from your custom fields.
To begin, go to Templates → Theme Builder and create a new single product template.
You can then choose from one of the pre-made templates or create your own product design from scratch. If you need some help here, you can check out our full guide on how to customize the WooCommerce product page design.
When you’re ready to insert your WooCommerce custom fields, add a regular Text Editor widget and then choose the option to populate it with dynamic tags. In the dynamic tags drop-down, choose ACF FIeld:
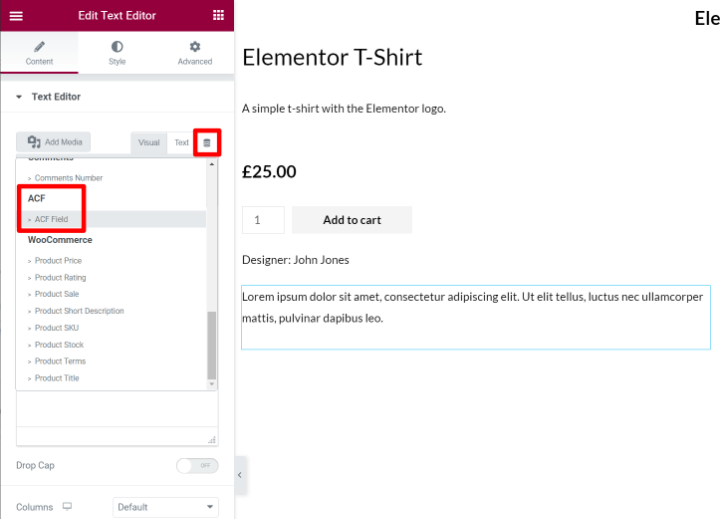
On the next screen, click the wrench icon and use the Key drop-down to choose the exact custom field that you want to display:
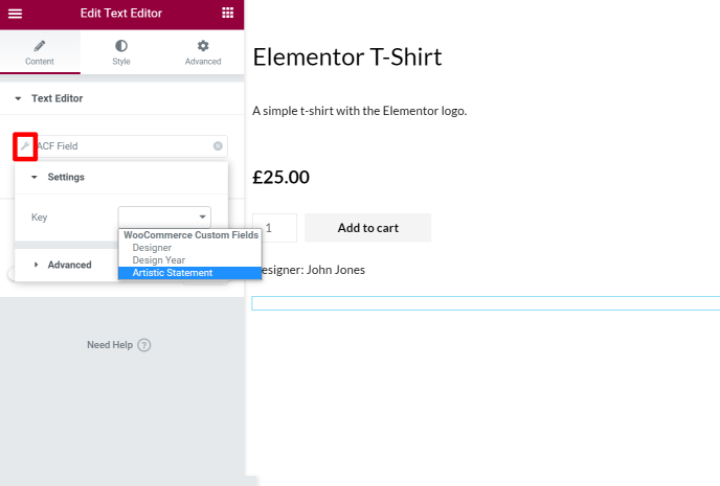
You can also use the Advanced options to add static text before/after the information from the custom field.
And that’s it! Elementor will now dynamically pull in the custom field data for the product that you’re previewing.
You can also use your custom fields for populating more than just text. For example, if you added a number custom field, you could use that number to populate star ratings, counters, and more.
Or, you can also dynamically populate links. For example, you could create a custom field that includes a link to the product’s documentation and use that link to populate a button on the single product page.
To learn more about this feature, you can read our full guide to dynamic content in Elementor Pro.
Or, for another way to display this information in Elementor, you could also create a product table that includes your custom field data.
What About Product Input Fields in Elementor?
If you’ve created custom product input fields with one of the plugins above (such as the official Product Add-Ons plugin that we mentioned), those plugins will usually automatically display those fields on the frontend of your store, so you won’t need to manually include them in your Elementor templates.
In Elementor, these add-on fields will typically display wherever you add the Add to Cart widget in your designs. So, if you want to move them around, you can adjust the placement of the Add to Cart widget.
Functions.php File
If you know your way around code, you can also add WooCommerce custom fields to the product page using your child theme’s functions.php file or a plugin like Code Snippets. However, we don’t recommend this method for most people because it’s complex.
Not only will you need to understand code to set it up, but you also won’t get a real-time visual preview and it will be hard to place your fields. This is why Elementor makes a better option for most store owners.
If you do want to use the manual code method, you’ll rely on WooCommerce hooks to place your custom information. If you’re not familiar with “hooks”, they basically let you inject code or content at certain parts of your WooCommerce store.
For example, you can find different hooks to inject content above the product title, underneath the product title, below the add to cart button, etc.
To begin, you’ll want to choose the hook for the location where you want to inject content from your custom fields. To make it easier to visualize these locations, you can use Business Bloomer’s excellent visual WooCommerce hooks guide.
In addition to finding the hook that you want to use, you’ll also need the PHP to display your field from ACF. If you’re not sure how to get this, ACF has very detailed documentation.
Then, you can use a code snippet like below to display the field, where insert_hook_location is the hook location that you want to use and field_name is the field name slug from ACF:
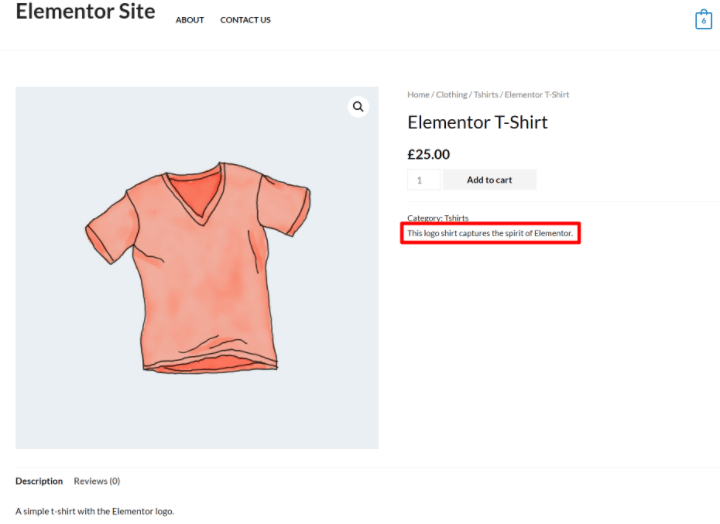
For example, the snippet below would display the artistic statement custom field underneath the WooCommerce product meta details:
Here’s what that might look like on the frontend of your store:
You can repeat the process to display additional custom fields.
Get Started With WooCommerce Custom Fields
Understanding how to use WooCommerce custom fields is really useful for creating custom, optimized WooCommerce stores.
You can use them to offer a structured way to input additional product data in the backend dashboard and display that information on your frontend site. Or, you can also create custom input fields to let shoppers customize your products.
To create custom fields for additional product data, you can use a plugin like Advanced Custom Fields (ACF), while custom input fields require a dedicated product add-ons plugin.
Then, for the easiest way to display those custom fields on the frontend of your store, you can use Elementor and Elementor WooCommerce Builder. With Elementor, you can create your own custom product templates that include unlimited dynamic information from your custom fields – no code required.
Do you still have any questions about how to use WooCommerce custom fields on your store? Leave a comment and let us know!
Looking for fresh content?
By entering your email, you agree to receive Elementor emails, including marketing emails,
and agree to our Terms & Conditions and Privacy Policy.
