Table of Contents
So many community members have told us of how they’ve always wanted to teach an online course or wondered about becoming a web-creating guru themselves, that I wouldn’t be surprised if the same is true of you.
Whether your goal, in sharing your knowledge, is to promote your skills and services, or perhaps to monetize your years of valuable experience and expertise, this goal is more achievable than you think.
Yes, creating a great website is one thing, and teaching a great course is quite another. However, this week, we hope to help alleviate any and all hesitations and concerns that have thus far prevented you from following your ambitions in this field.

As with everything else we’ve looked at in these Masterclasses, the best way to approach a task and see great results is to begin with thorough preparation and planning.
Research for Creating an Online Course
The first thing we want to do is to set the time aside in our calendar to work on our course. Determine how long to spend on research and planning, writing and recording, etc., and set a deadline for when you will launch the course. This is to keep us focussed and time-efficient.
To make our research and planning stage more efficient, we can break it down into segments.
Audience Interest
Speak to clients and colleagues about what they’re interested in learning.
Visit community news feeds and learn what they are most interested in or passionate about.
By now, you’ve probably already acquired plenty of skills while working on Elementor and WordPress sites that other web creators are interested in learning.
As professionals, we’re always looking to learn something that will improve our own skills.
There are plenty of related topics that could do just that. Such as SEO, copywriting, caching, site performance, web design, and so on.
Once we have a basic idea for our course, we should ask friends and colleagues, even past clients, what they think about a course on this subject? Is it something that they would like to learn? Do they know of other people who would be interested? Would they consider paying to learn these things? How much should we charge?
The goal of any content we create is to draw the attention of clients or prospective clients. We usually succeed in doing this by striking a chord with a topic that interests them. So make this one of your primary factors when deciding on your course topics.
Keyword Research
I realize that this is something that gets thrown around ad nauseam, but researching keywords is as essential to the Internet as salt is to cooking.
It will give you tremendous insight.
For example, which of these two course titles do you think would rank better in search results:
- How to Master Adobe Photoshop
- Adobe Photoshop 101
They might seem as though there’s very little difference, but that difference translates into our search ranking being on the top or on the bottom of the pile.
So having found the best keywords for your subject, use them to phrase the title of your course, the tags and the descriptions.
Researching the Competition
Knowing what our competition is doing will help us avoid similar mistakes and perhaps even do something that they hadn’t thought of.
Check out their courses, are they offering the same content that we want to offer? How can we make ours better? What can we provide our students to give them a better value?
This will not only help to inspire us, but it will also help us understand the competitive landscape of what alternative options exist for our prospective students.
Assess Practical Value
Practicality must be the best thing any tutor could offer their students.
It’s the bottom line, the brass tacks. What can our course provide our students that will be relevant and applicable the moment they complete the course? What will enable them to move ahead with their own career ambitions?
Once we’ve identified the practical skills that we can provide, we should make sure to highlight them throughout the course description. Prospective students will look for courses with actionable outcomes. Let’s make it easy for them to find those outcomes when they read about our course.
With a good sense of what our prospective students are interested in, and how to help them find what they are looking for, it’s time to plan our course.
A simple way to approach this planning stage is through following the A, B, C.

The A-B-Cs of Lesson Planning
A, for Actualize the Outline
We should be creating an outline for every form of content that we provide because it helps us stay focused on the goal of that content.
But by actualizing your outline, we are adding practical value to our lessons and our course overall.
Think of it as a well thought out workflow.
B, for Begin With the Basics
Start with simple basic concepts and tasks, and build upon each lesson till you reach the goal.
C, for Keep It Coherent and Linear
This makes the context logical and easier to remember. Going forward, then backtracking to prepare something else for the next step is complicated and confusing.
D, for Drive Your Audience
Make sure that in each lesson, one part leads logically to the next, and each lesson leads to the next. This relates to a linear lesson plan (see what I did there?).
We can do this by explaining, reflecting, the reason behind our lesson plan, or explaining the logic behind the workflow that you are leading them through.
E, for Expand Where Needed
We must ask ourselves if our students need to understand the theory behind the process? Could we help them understand it in a more simplified way? Remember that we want to keep our students on the right track and in the right direction to what they want to achieve. That said, we could always go the extra mile to make things easier to remember or comprehend, showing short examples, explaining things as an analogy, or creating mnemonics, like our A, B, Cs for making a practical lesson plan.

A great way to see what a well-planned outline looks like is by going to places like Amazon. There we could browse the table of contents of the best selling books and videos on similar subjects to see what material they cover and in what order.
With our outline perfected, we can flesh out our lessons. Obviously, this may also require additional research and study on our part.
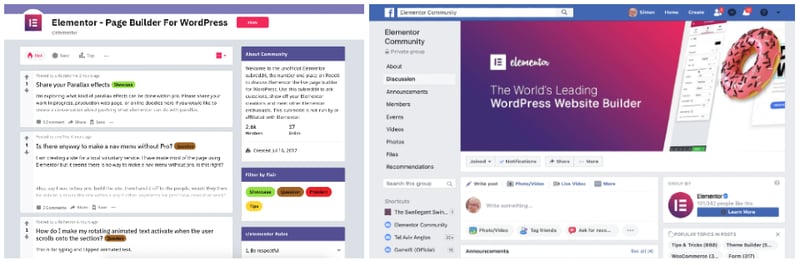
Some great places to look for the kind of material that will inspire your students are professional blogs and forums such as Reddit or Facebook groups. Other online courses are also a great resource. Better yet, conversations with community members and fellow web creators are always my default source of practical and inspirational knowledge.
Once we’ve finished creating our lessons, we’ll move on to creating the place where these lessons will appear — our very own online course website.
Setting Up Your Online Course Website
We’re going to begin by uploading and setting up the lessons and the content for our online course, to an existing site, in 3 simple steps.
As some of you already know, Elementor recently released a brand new template kit, purposely designed to provide a simple means for users to set up and manage a complete and dedicated website for their online courses.
A great thing about template kits is that we can just pick and choose the templates we want to use. Which, since most of us are looking to add an online course to our existing site, is perfect.
Step 1: Creating the Course Page
We’ll install the templates we need, from the template kit, the same way as we would any other template.
On the WordPress Dashboard, we’ll go to Pages and Add a New Page to our site.
This page that we’re creating will serve as a place to introduce visitors to our course.
Naturally, we’ll name this page “Course” and click on Edit with Elementor.
In Elementor, we’ll open the Templates library.
(Obviously, we’ll have to be connected to our Elementor account to be able to access the library.) There, we’ll search for “Online Course,” and from the results, we’ll select the Course Page template, clicking Insert to add it to our new page.
As with all of our Template Kits, you can add or remove widgets, and use the options in the Style tabs of the widgets themselves to design the page to better suit the rest of our site.
When we’re done, we’ll be sure to click on Save Draft and move on to focus on the lessons themselves, the content that is essential to our purpose.
Step 2: Setting Up & Adding Lesson Content
The way that the Online Course Template Kit works is by utiliזing the advantages of WordPress, as a content management platform, to organize posts and archives.
We’ll be creating each lesson as a separate post, that will then be archived together as a course.
We’ll also be using WordPress’ Category option to create dynamic links to our lessons, or posts.
This is done by going to the Posts tab on the WordPress Dashboard, and selecting Categories.

Here, we’ll set up each lesson as a category by basically copy/pasting the title of each lesson from the lesson plan that we created earlier.
(Even though the course that we’re using for this demonstration only has 3 lessons, you can have as many as you need.)
With the categories set and saved, we’ll create our lessons, adding our lesson material the same way as we would any other content.
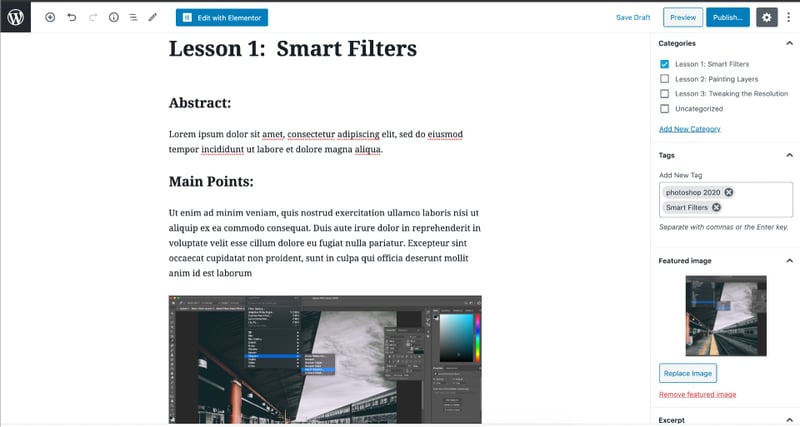
Clicking on New Post, will take us to the familiar dialog box where we’ll name the post with the title of our lesson, and assign it to the category of the same name.
Next, we’ll copy/paste the text and images for our lesson. I’m sure that many of you are itching to add a video to your lesson page, and you could do that right here.
This is also where we’ll want to add a Description, Excerpt, and Tags using those great keywords that we discussed earlier.
When we’re done, we’ll click on Save Draft, because it’s always better to be safe than sorry.
There are a couple of things that we could add to give our course a more professional look.
It’s considered good practice, as well as a good incentive for students, to set up a timing system, and monitor time management for our lessons.
We could do this by adding some custom dynamic fields to our post pages, showing the estimated time it should take a student to complete each lesson.
Important Note: You may have to reload your page for this change to take effect. So be sure to save your draft first.
To set up these custom fields, we’ll click on the menu icon (three vertical dots) in the top right-hand corner of the Edit Post page (on the WordPress Dashboard). Scrolling down the to the bottom of this menu, we’ll click on Options, and in the list of options, we’ll make sure that the Custom Fields option is selected.

With the custom fields option accessible (appearing just below the post’s content-box), we’ll click on Enter New to create an entirely new field, with a new name.
The label that we assign here is purely for us to be able to recognize the field, which is why I would prefer to name this field “Estimated time to complete lesson.”
We’ll also add the value, the duration of this particular lesson, which I’ll estimate as being “25min.” and click on Add CustomField to complete this quick procedure.
Another thing we could do to spruce up our lesson pages is to design a cool template for them.
Step 3: Creating and Designing a Lesson/Post Template
While we’re already on the WordPress Dashboard, we’ll go into the Templates tab. With the Theme Builder feature selected, we’re going to set up a template for our lesson posts the same as we would any other type of post.
We’ll click on Add New, select Single from the first drop-down menu, then select Post as our type of single asset. We’ll name it “Lesson,” and click on Create Template.
From here, we could go straight to the Elementor Editor to create a design from scratch, or we could use another template from the library to save ourselves time.
In the Library dialogue box, we’ll search for the “Course single” post or “single” lesson template (part of the kit we’ve already borrowed from).
Here you may find 2 almost identical templates. The difference between them is the button in the lower right-hand corner.

This second single lesson template serves as a template for the last lesson of the course, with the button there for the student to click on, to activate a popup, or open a page to congratulate them upon finishing the course.
We also use the button’s dynamic links to register the student as having completed the course.
As we’re creating a course as simply as possible, we’ll select the simple of the two templates and click on Insert.
While we’re editing and designing our single lesson template, we could add the Estimated Time field that we created earlier.
To do that, we’ll go to the widget library, on the Editor panel, and search for the Post Info widget. We’ll then drag and place it on our page.
With the widget selected, we’ll return to the Editor panel and in the Content tab, we’ll delete all of the superfluous fields, leaving one, and clicking on it to access the options.
In these options, we’ll change the Field Type to Custom. Then, just beneath that, we’ll click on the Dynamic Tags icon to access the menu, where we’ll select the Post Custom Field.
With the Post Custom Field linked, we’ll click on it to access its settings and select our “Estimated Time field” in the Key option.
If we want, we could also go to the Advanced section and add a label (“Estimated time to complete this lesson:”) to appear before the value field.
We can then go into the Style tab and set the typography, and color of the field any way we wish.

Once we’re happy with our template design, we’ll publish it. As soon as we do, the conditions page will appear. There we’ll set the conditions to have our lesson template appear according to specific categories, which in our case are also specific lessons, clicking Save when we’re done.
This would be a good time to check our posts to be sure that everything is ok.
We are now practically done with this setup. However, I would like to go to our Course page, because I’d like to quickly link up our individual lessons.
The original course page template has a nice toggle widget where we can list all of our lessons. All we need to do is select the widget, and on the Editor panel, in the Content tab, we’ll edit the text to suit our lessons.

We’ll then add a link in each section of the toggle to our actual lessons. My preference would be to add some text (e.g. “Begin this lesson now”), and use the hypertext options in the editor to turn the text into a hyperlink. Next, we’ll click on the link settings or link options, and select the appropriate lesson from the list that appears.
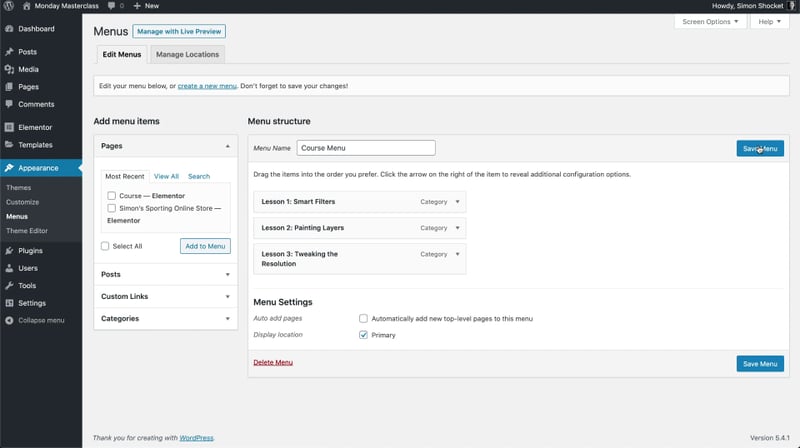
We could just as easily create a Menu back on the WordPress Dashboard, by going to the Appearance tab, and selecting Menus. And there in the dialogue box, create a menu using the Categories option, thus creating a lesson menu that we can link to a Navigation or Nav Menu widget on our course page.
Don’t forget to save, update or publish your post so that you don’t lose any changes that you’ve made.
Monetization
With our lessons set up online and our website organized, the next step is Monetization.
While it is an optional step for some, for many others, especially as we see our way through the COVID-19 crisis, monetizing their online course is crucial.

Either way, it’s a very simple step.
The simplest way to monetize your content that we could recommend is by creating a popup in the Elementor Theme Builder.
In practice, this popup serves to block the content from view, only granting access to viewers who have paid for a subscription to your content.
As you may have noticed, the Online Course template kit doesn’t include a payment system where you can charge users for the course. This requires a professional, purpose-built Learning Management System (or LMS) plugin.
If once you’ve completed setting up your website, you prefer to monetize your online course using an LMS. There are some great tools out there.
Among them, we would highly recommend LifterLMS, Learndash, or Memberpress.
These will also help you manage the financial transactions involved in course enrollment.
Lessons Learned
This week we looked at Online Courses, not just at what makes a course great, but also how to set up our very own online course and recommended ways you could use to monetize it.
This masterclass is one of several that we’ve produced over the past eight weeks to help the small businesses and self employed professionals in our community to get ahead, rather than lose out as we all see our way through this crisis as best we can.
We sincerely hope that you find that this and our previous masterclasses help in bringing you a whole new world of business opportunities and revenue.
If you have any tips and advice that could help other users, plan, set up and monetize their online courses or other valued content, then please add them in the comments below.
Should you have any criticisms, we are equally interested in your thoughts.
After all, our goal is to be the best at helping others excel at their craft.
To get started, purchase Elementor Pro today
Looking for fresh content?
By entering your email, you agree to receive Elementor emails, including marketing emails,
and agree to our Terms & Conditions and Privacy Policy.


