Table of Contents
Creating a website for your business or portfolio is easy thanks to WordPress and plugins such as Elementor. It’s a great way for potential clients to notice you and find you online. But, just as clients in your country can easily find you, so can potential clients from the rest of the world.
And if you run the type of business who can serve clients from all over the world, wouldn’t it be nice if you could direct them to the version of your site that displays in their native language?
Fortunately, WordPress is available in many languages thanks to the translations contributed by the community. But, what happens when you need a website that’s available in more than one language?
That’s where plugins like TranslatePress come in handy. In today’s post, we’ll give you a brief overview of what TranslatePress does and then show you how you can easily use it with Elementor to translate your site’s pages directly from the front-end.
What Is TranslatePress?
TranslatePress is a translation plugin for WordPress that can be downloaded for free and used to translate your entire site directly from the front-end. The plugin is even compatible with WooCommerce so you can easily translate your entire storefront. Main features include:
- User-friendly interface which displays translation in real-time
- Fully compatible with all themes and plugins
- Support for both manual and automatic translation (via Google Translate)
- Ability to translate dynamic strings added by WordPress, plugins, and themes.
- An editorial control allowing you to publish your language only when all your translations are done
- And more.
It’s worth mentioning that the plugin does have a premium version which offers several add-ons which allow you to add unlimited languages, automatically detect a visitor’s language, display different navigation elements for different languages, and more.
Why You Should Use TranslatePress Instead of Google Translate
You might be wondering why you should be using TranslatePress instead of Google Translate. The main benefit of using TranslatePress is that you are able to translate all the pages on your site yourself. As good as Google translate is, a machine-translation can never compare to the accuracy of a human translator.
When it comes to similar translation plugins, TranslatePress offers all the functionality you need for free and includes a much more intuitive user interface than other popular plugins.
How to Use TranslatePress With Elementor
Now that we’ve covered what the TranslatePress plugin offers, let’s take a look at how we can use it to translate pages built with Elementor. Here’s a step by step walkthrough of the process.
1. Install and Activate the Translatepress Plugin

The first step is to install and activate the TranslatePress plugin. Start by logging into your WordPress dashboard and navigate to Plugins > Add new. Search for TranslatePress, install it, and then activate it.
2. Configure the Plugin’s Settings

After the plugin has been installed, go to Settings > TranslatePress. From there, you will be able to set your desired language and configure other settings of the plugin. As you can see from the screenshot below, you can choose how the language name displays, whether you want to use Google Translate, purchase and activate add-ons, and more.
For the purposes of this tutorial, we’ve set the desired language to Italian but you can choose whatever language you want. When you’re done configuring the settings, save the changes.
3. Create a Page to Be Translated

Once you’ve set up the plugin, we’re going to create a new page that will be translated with the help of the TranslatePress plugin. Go to Pages > Add New. Name your page and then click Edit with Elementor.
For this tutorial, we’re starting off with an About page template. If you want to follow along, use the About – Personal Page template, otherwise, feel free to use any template you want.

We’ll change the text to include English text and then we will add some extra elements which include a form as well as a few buttons below the infoboxes. We’ve also added the header and footer using saved templates in Elementor.
When you’re done adding your information, click the Publish button to make your page live. You can learn more about publishing a website in the online course we created. Here’s how our demo site looks after we’ve made all the changes:

4. Translate the Page
To start translating the page, you’ll need to go back to your dashboard, head on over to Pages > All Pages and then click on View under the page you’ve just created. Once the page loads, you can click Translate page from the top admin bar.
In case you have the admin bar disabled, you’ll need to add your page to your main menu by going to Appearance > Menu. There, find your page, add it to the menu, and then click Save. You can then click on Translate Site which will load your homepage by default. To go to the Demo page we’ve created earlier, click on it in the navigation menu.
Once your demo page loads, you’ll notice the plugin’s interface on the left and your page on the right-hand side of the screen. Translating your page is as simple as hovering over the text you want to translate and clicking the pencil icon. Let’s start by translating the Contact Us menu item first.

Hover over the Contact Us and click the pencil icon. You can then enter the translation in the plugin’s interface and when you’re done, click the Save Translation button.
You can preview your translation by changing the language at the top of the TranslatePress’ interface:
Next, let’s translate the heading in the infobox for Workshops. Click on the pencil icon, enter the translation, and then hit Save. Your translation will appear on the page:

In a similar fashion, you can translate buttons. Hover over the button you want to translate and follow the same process. In this example, let’s translate the Apply now button:

Lastly, let’s translate the form elements in our appointment booking form at the bottom of the page. Clicking individual field labels will allow you to translate the entire form into another language. The translated text will appear on the labels and on the buttons.
To translate the rest of the site, continue in this manner, following the steps above to find the text you want to translate and then entering the appropriate phrase or sentence in the target language. Once you’re done with that page, you can easily continue with the next page by clicking on it in the menu or by viewing it from the dashboard and then clicking Translate Page.
5. Display Different Widgets or Sections Based on Language (Optional)
Now let’s say you would like to have different content for each language on your page.
TranslatePress makes it really easy to display or exclude certain widgets or sections based on language. You can do this directly from Elementor’s interface.
To achieve this, simply click on a widget or section then go to the Advanced tab, where you’ll find boh Restrict by Language as well as Exclude from Language option.
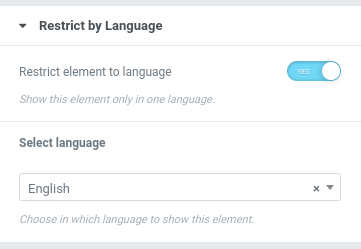

Using these 2 options you can either display a widget or section for a certain language only or exclude it from specific languages.
This gives you a lot of flexibility when it comes to having different content for different languages.
Final Thoughts
Creating a multilingual site or translating pages created with Elementor is not as daunting as it seems. With the help of the TranslatePress plugin, you can easily translate all of your pages directly from the front-end and instantly see the translation. Use the tips in this article to guide you through the process. Happy translating!
Looking for fresh content?
By entering your email, you agree to receive Elementor emails, including marketing emails,
and agree to our Terms & Conditions and Privacy Policy.


