If you’re looking to generate leads on your WordPress site, the Form widget in Elementor Pro makes it easy to create front-end forms to collect as much or as little information as needed from your leads.
Once you’ve done that, though, you need a way to organize and manage those leads after they’ve submitted your form.
The Form widget gives you plenty of options — you can connect directly to several email marketing/CRM services, or you can use Zapier to connect to the thousands of apps that are available on Zapier.
In this post, I’m going to show you how to connect Elementor to one specific app using Zapier – Google Sheets.
Google Sheets is a super simple (and free) way to manage leads. Plus, because most of us are familiar with working on spreadsheets, it’s easy to get up and running, and you’ll feel right at home when managing your leads.
Keep reading for a step-by-step guide on how to connect Elementor to Google Sheets to automatically add new leads as rows in your spreadsheet.
What You Need to Connect Elementor to Google Sheets
To follow this tutorial and connect Elementor to Google Sheets, you’re going to need a few things:
- Elementor Pro – you need Elementor Pro to access the Form widget and Zapier integration. Zapier is what lets you connect to Google Sheets, so this is essential.
- A Zapier account – you can register for a free account, though you might need to pay depending on how many leads you plan to collect. No matter what, you can follow the tutorial for free.
- Google Sheets access – if you have a Google account, you already have access to Google Sheets. You can open the dashboard here.
Once you have those three things, here’s a high-level look at the steps that you’ll follow in the tutorial:
- Create your Elementor lead form
- Set up a Zapier Webhooks trigger
- Connect Webhooks to your Elementor Form
- Add your Google Sheets action in Zapier and map form fields to columns in your spreadsheet
Grow Your Sales
- Incredibly Fast Store
- Sales Optimization
- Enterprise-Grade Security
- 24/7 Expert Service

- Incredibly Fast Store
- Sales Optimization
- Enterprise-Grade Security
- 24/7 Expert Service
- Prompt your Code & Add Custom Code, HTML, or CSS with ease
- Generate or edit with AI for Tailored Images
- Use Copilot for predictive stylized container layouts

- Prompt your Code & Add Custom Code, HTML, or CSS with ease
- Generate or edit with AI for Tailored Images
- Use Copilot for predictive stylized container layouts
- Craft or Translate Content at Lightning Speed
Top-Performing Website
- Super-Fast Websites
- Enterprise-Grade Security
- Any Site, Every Business
- 24/7 Expert Service

Top-Performing Website
- Super-Fast Websites
- Enterprise-Grade Security
- Any Site, Every Business
- 24/7 Expert Service
- Drag & Drop Website Builder, No Code Required
- Over 100 Widgets, for Every Purpose
- Professional Design Features for Pixel Perfect Design

- Drag & Drop Website Builder, No Code Required
- Over 100 Widgets, for Every Purpose
- Professional Design Features for Pixel Perfect Design
- Marketing & eCommerce Features to Increase Conversion
- Ensure Reliable Email Delivery for Your Website
- Simple Setup, No SMTP Configuration Needed
- Centralized Email Insights for Better Tracking
- Ensure Reliable Email Delivery for Your Website
- Simple Setup, No SMTP Configuration Needed
- Centralized Email Insights for Better Tracking

- Ensure Reliable Email Delivery for Your Website
- Simple Setup, No SMTP Configuration Needed
- Centralized Email Insights for Better Tracking
How to Connect Elementor to Google Sheets
1. Create Your Lead Capture Form
To get started, you need to create your lead capture form using the Form widget in Elementor Pro.
You have a few options here. You can:
- Create a dedicated landing page that includes the Form widget.
- Create a popup that contains the Form widget and display it anywhere on your site using Elementor Popup Builder.
- Add a form to an existing page using a template and its shortcode.
No matter which method you choose, the setup steps will be the same because all of the configuration happens within the Form widget’s settings.
As long as you’re using the Form widget in Elementor Pro, you’ll be able to sync up with Google Sheets. It doesn’t matter where you display the Form widget.
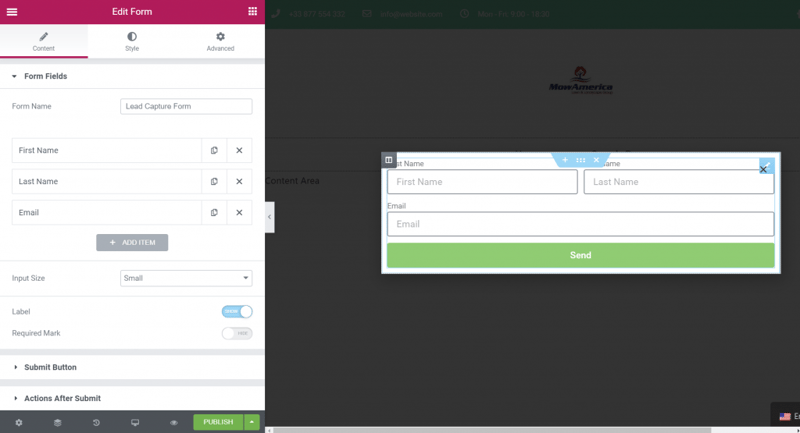
For this example, I’ve created a popup that contains the Form widget. In the form, I’ve set up three fields for:
- First name
- Last name
- Email address
You can add as many (or as few) fields as needed, though. Later on, you’ll be able to map all of the fields to columns in your Google Sheets spreadsheet:
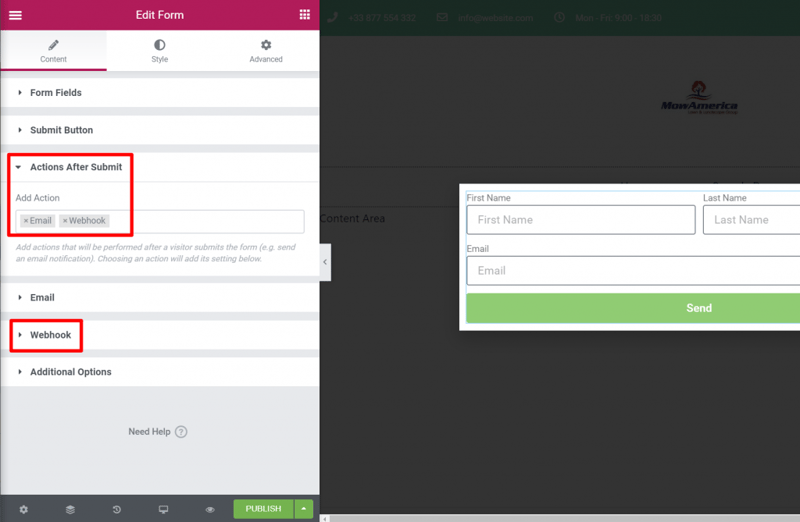
Once you’ve set up your form, go to the Actions After Submit settings in the Content tab of the form’s settings. Then, add an action for Webhook. This is what lets you connect your form to Zapier (and subsequently Google Sheets).
Once you add the Webhook action, you should see a new settings area for Webhook. Keep this handy because you’ll need to use it in the next steps:
2. Create a Zap in Zapier and Set Up Trigger
Now, without closing the Elementor interface, open another tab and go to Zapier’s website.
Then, click Make a Zap in the top-right corner:
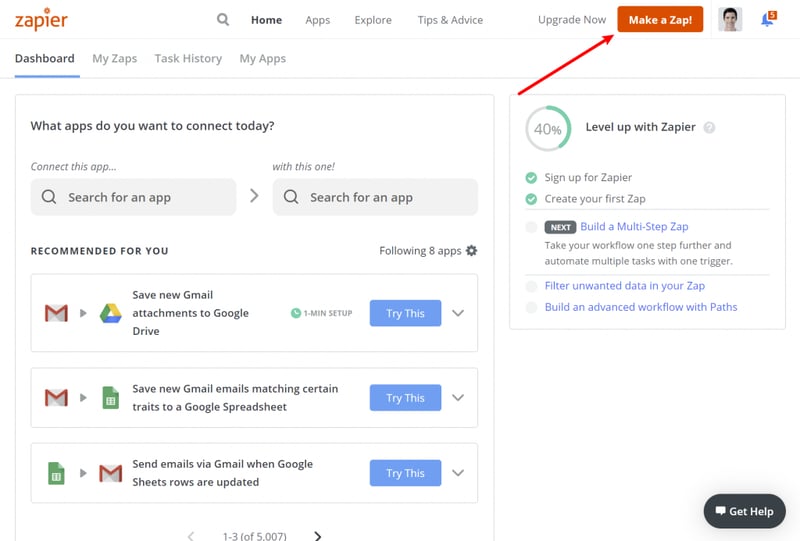
This will open the Zapier editor.
In the Choose App & Event box, search for and select Webhooks by Zapier.
Then, in the Choose Trigger Event box, select Catch Hook.
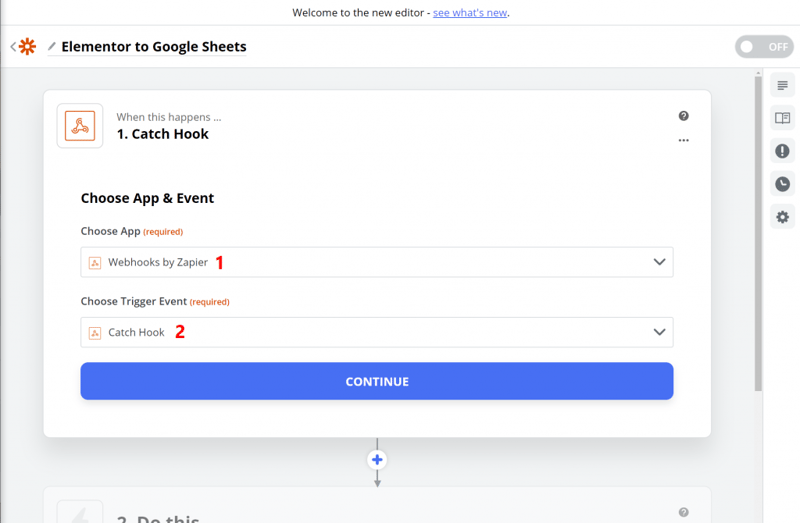
Click Continue to advance.
3. Add Zapier Webhook URL to Elementor and Test Connection
Once you click Continue, Zapier should give you your own Custom Webhook URL:
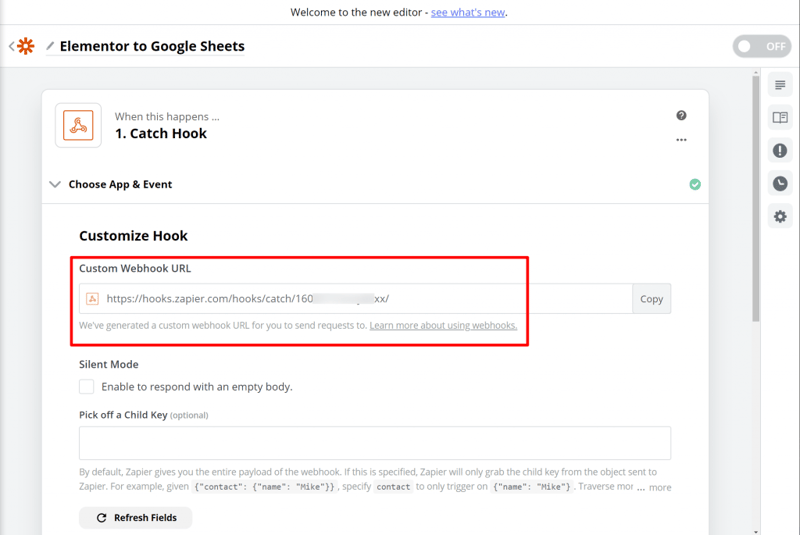
Copy this value and then go back to the Elementor interface.
Open the Webhook settings in the Form widget and paste in the Webhook URL that you got from Zapier:
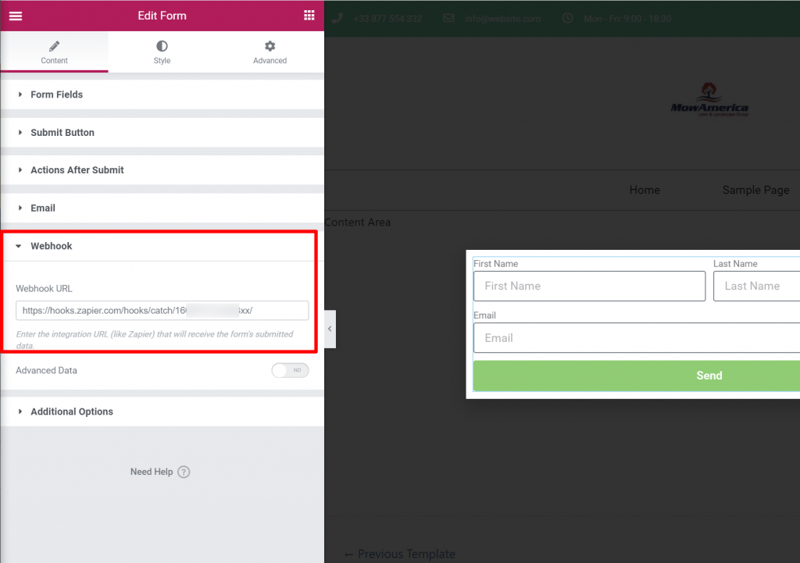
Then, save your Elementor design.
Once you publish your Elementor form, open a page that contains your lead capture form, and submit some test data — you’ll use this to test if the Zapier connection is working.
Then, go back to the Zapier editor and click Continue to advance to the next step. You should see an option to Test & Review:
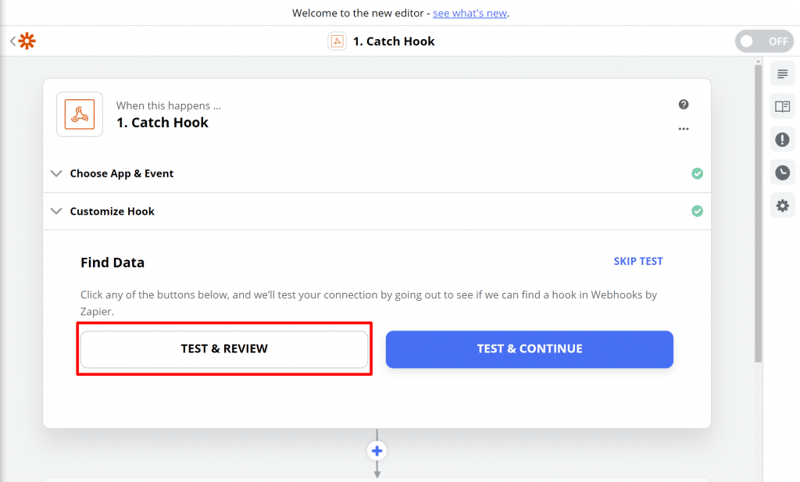
When you click that, you should see the data from the Elementor form that you just submitted:
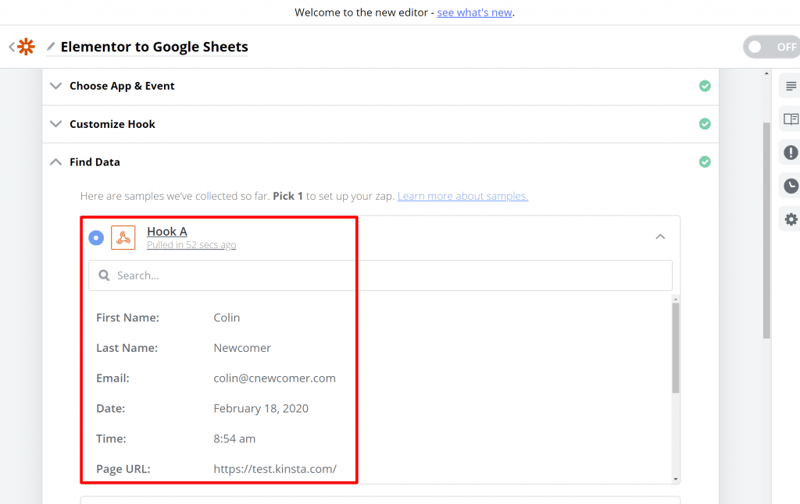
If all looks good, click Done Editing to advance to the next step.
4. Set Up Action in Zapier
At this point, you’ve set it up so that Elementor will automatically forward new form submissions to Zapier. Now, you need to tell Zapier to add that data to Google Sheets.
First, you need to create the actual spreadsheet to hold your leads.
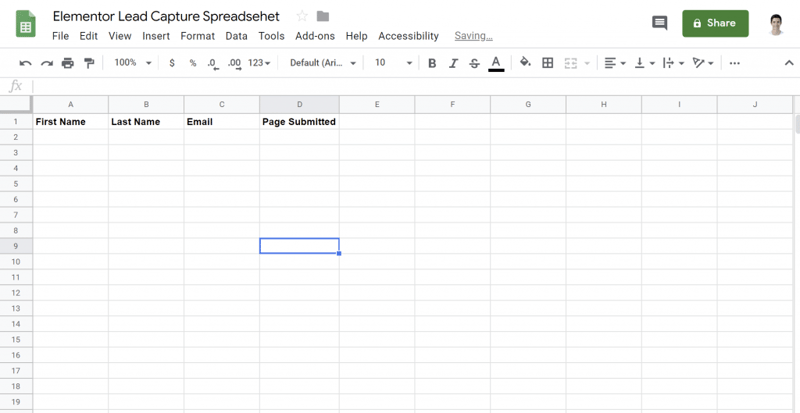
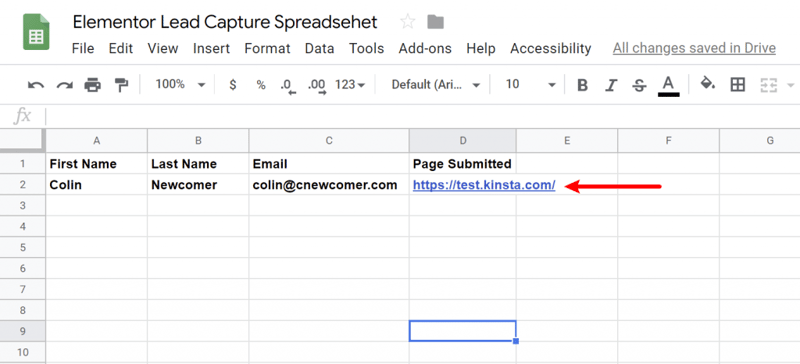
To do that, open Google Sheets and create a new spreadsheet. You can set up column headings for all the information that you want to collect about your leads (this should include all the fields from your Elementor form).
You can also add extra columns for additional information, like the page where someone submitted your lead capture form or the date:
Then, go back to the Zapier interface.
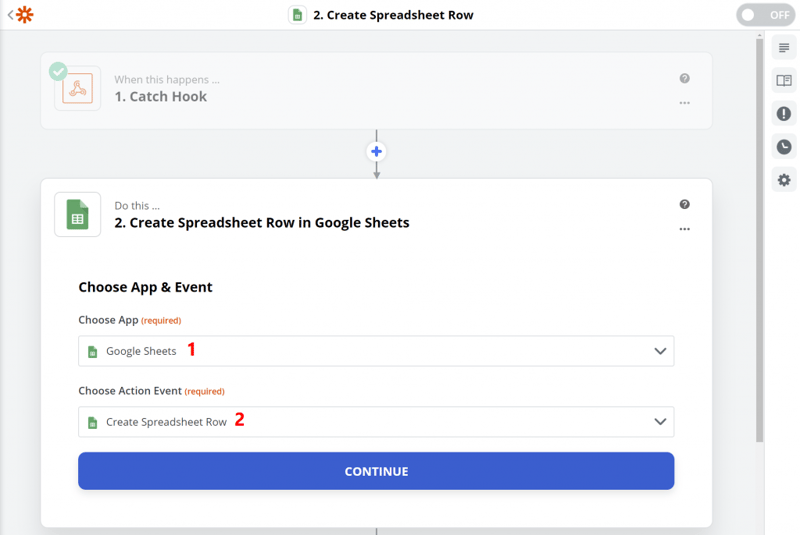
In the Do this box, search for and select Google Sheets. Then, in the Choose Action Event box, select Create Spreadsheet Row.
This tells Zapier to add a new row to the spreadsheet for each new form submission in Elementor:
Then, click Continue.
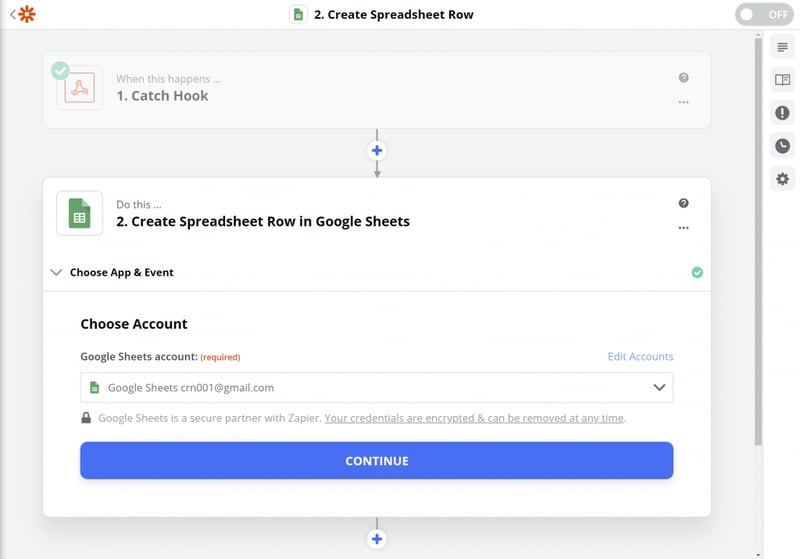
On the next screen, you’ll be prompted to sign in to Google Sheets and give Zapier access. This uses the standard Google auth process.
Once you’ve added your Google Sheets account, click Continue to advance:
Now, you need to select the spreadsheet to add information to:
- Drive – select your Google Drive account.
- Spreadsheet – select the spreadsheet that you created a moment ago.
- Worksheet – select the worksheet within that spreadsheet (usually, you can just leave this as the default).
Then, you need to map the information from the Webhook to the columns in your spreadsheet. This includes your Elementor form fields, as well as any other information that you want to collect.
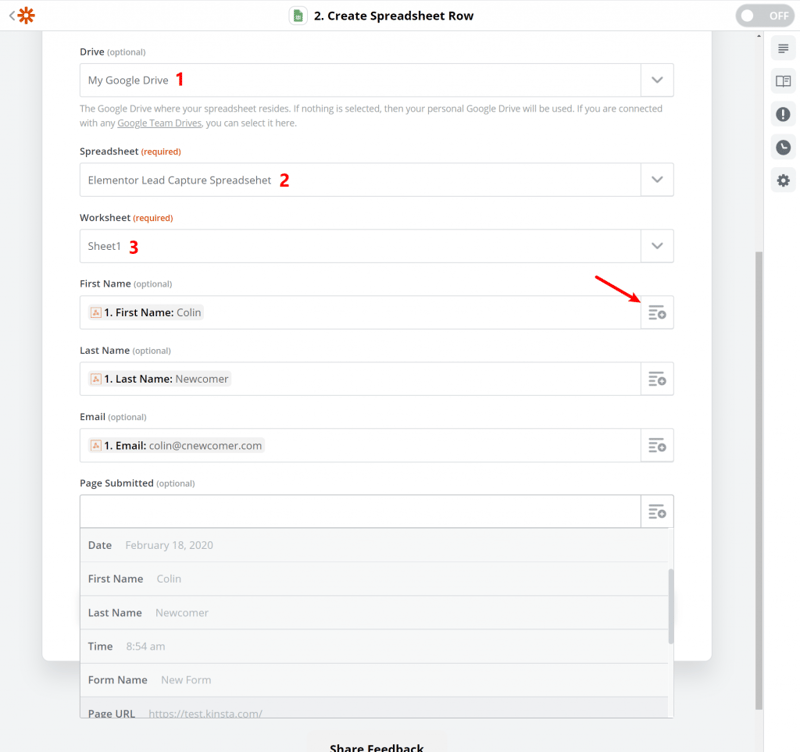
Once you’ve mapped all of the information, click Continue to finish things out.
Zapier will then prompt you to run another test:
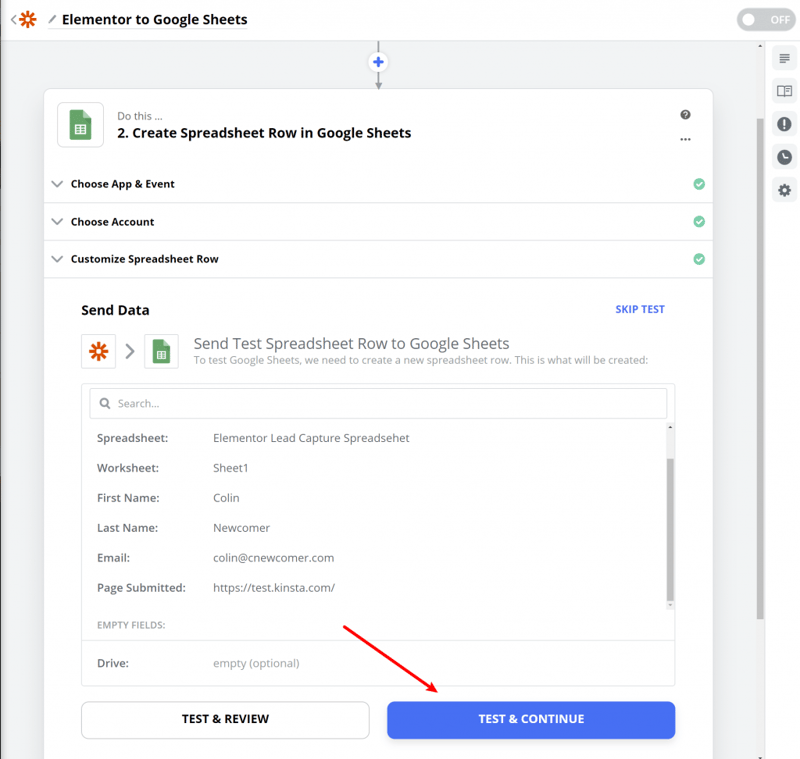
And if everything went well, you should see the test data that you submitted via your Elementor form in Google Sheets:
To finish things out, all you need to do is turn on your Zap:
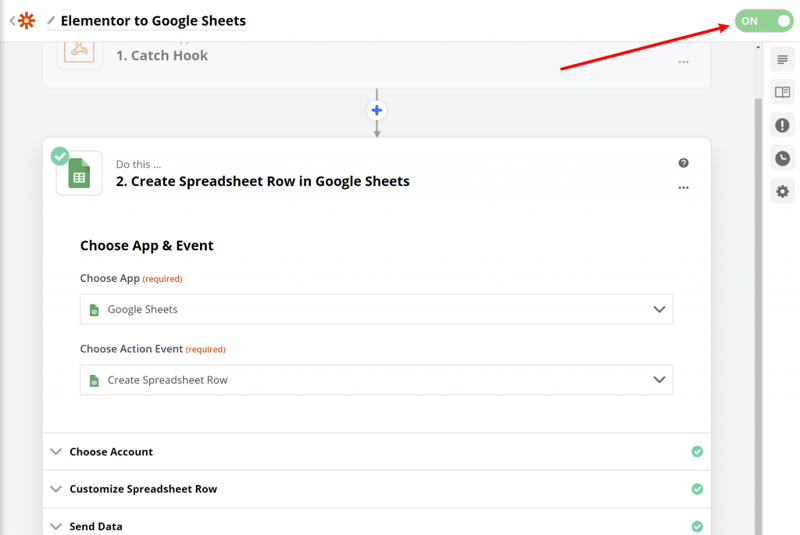
And that’s it! You just successfully connected Elementor to Google Sheets using Zapier.
Conclusion
With the Form widget in Elementor Pro and Zapier, it’s easy to create lead generation forms that connect to Google Sheets (or any of the other apps on Zapier).
You can set up your spreadsheet so that it meets your business needs and customize all of the information that you collect.
To get started, purchase Elementor Pro today and then follow the steps in this tutorial to set up the integration.
Do you have any additional questions about how to connect Elementor to Google Sheets? Ask away in the comments section!
Looking for fresh content?
By entering your email, you agree to receive Elementor emails, including marketing emails,
and agree to our Terms & Conditions and Privacy Policy.

