Table of Contents
Learn how to create an automated Zapier workflow with Elementor, following your user from the first form submission to the integration to your marketing tool.
In this article, I’ll be giving you practical information and actionable advice on how to automate the part of your sales workflow that happens through Zapier after someone fills in your contact form. This includes:
- Automating emails and connecting to email marketing apps using the Elementor form
- Using webhooks via Zapier to give you automation superpowers
- Constructing natural-sounding auto-replies
- Automatically sending emails from your email address
- Enriching contact data and scoring your leads
- Plenty of automation tidbits along the way
While not a necessity, the contact form has become a staple of the Contact Us page. It remains one of the easiest ways to collect leads for your business.
According to HubSpot “Your ‘Contact Us’ page is one of the most important pages on your website. For most companies, it’s typically one of the most-visited site pages.”
For this post, we’re going to assume that you know how to create a form in WordPress with Elementor. Getting into the nitty-gritty of what should be on a form, where to place it and making sure you conform to privacy laws is a whole post on its own.
Our starting point will be someone who has a form set up, has people filling in that form but would like to automate as much of the follow-up as possible.
Zapier Integration via the Elementor form
Before venturing into any other app, there are some things you can do in Elementor to make your life easier:
Automatically email the person who filled out the form, including data from fields in your form (like name, for example).
There’s a great video on the Elementor YouTube page that goes through the setup process in detail, so I suggest you check that out:
A few points about automatically sending an email:
Because it’s sent right away, nobody will think that you sat down and typed this response after receiving their message. So how can you maximize the effectiveness of the email?
First, you can ask some questions that will help you provide the best possible service to this person. If you start with a form that doesn’t ask many questions (which has been shown to increase the number of form fill-ins) you can include those in the follow-up email.
It’s possible the person won’t read the email, but if they do, there’s no harm in asking them to elaborate. I find that I’m more willing to type things out in an email than in a form (even if I realize that it’s an autoresponder).
Second, make it sound authentic and not like a lifeless and dull canned response. Use this opportunity to show some personality, and if it’s applicable, you can show off some skills for which they may be trying to hire you. If they want you to manage their social media, you should come off as likeable and approachable.
You can also include some links to pages on your website that they may not have seen, that would be relevant to them. Maybe you have FAQs or a pricing page that would be useful. Or case studies, or a portfolio. Many people will go right to the contact page so they can get answers. Promote the excellent and informative stuff you’ve already created.
Use one of the built-in integrations to automatically send those contacts to your email marketing app.
Elementor supports several of the more popular email marketing apps, so you can directly integrate with them and add contacts.
The options include MailChimp, Drip, ActiveCampaign GetResponse and ConvertKit. If you use one of these, Elementor makes it easy to connect your account.
Then, as an alternative to sending an email via the Email 2 in the form, you can set up an autoresponder, a set of drip emails and/or an automation directly from your email marketing app.
I’ll use ConvertKit as an example, and demonstrate each of these.
Autoresponder: this would be a single email that you send when someone fills in the form. With ConvertKit it would be a sequence with just a single message. You can add a delay, to make the response seem less like an automated one.
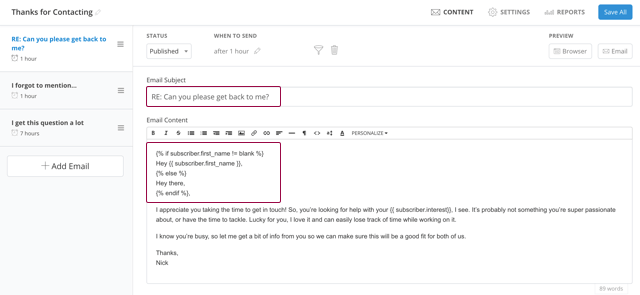
Series of drip emails (or a sequence as ConvertKit calls them): instead of a single email, you could send several. As above, you’d want to add delays. For example, you could send an email a little bit after that first one to give the person a valuable resource (like case studies). Then after that one, follow-up with something else of value, like a teaser of some content that’s in a blog post.
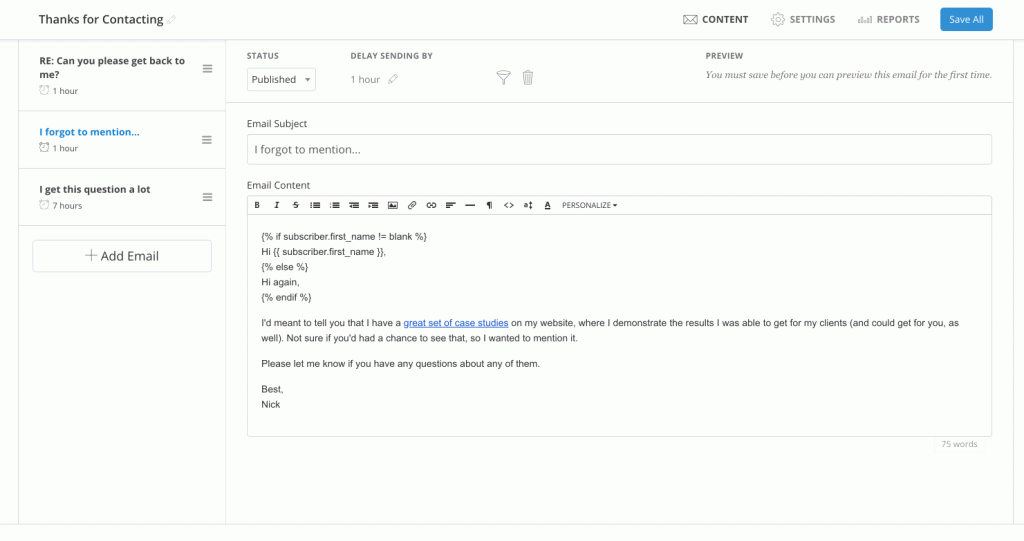
Automation: here, you can add on to that sequence by incorporating some more advanced elements.
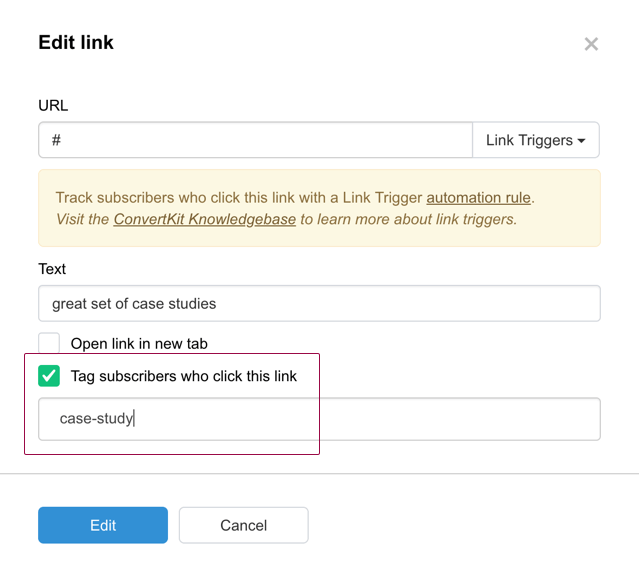
Let’s say that in the sequence above, we want to know when someone clicks on the case studies links and when they do they get added to another sequence. In ConvertKit, we’d start with this:
Then build out a Zapier automation, which you can do visually in ConvertKit:
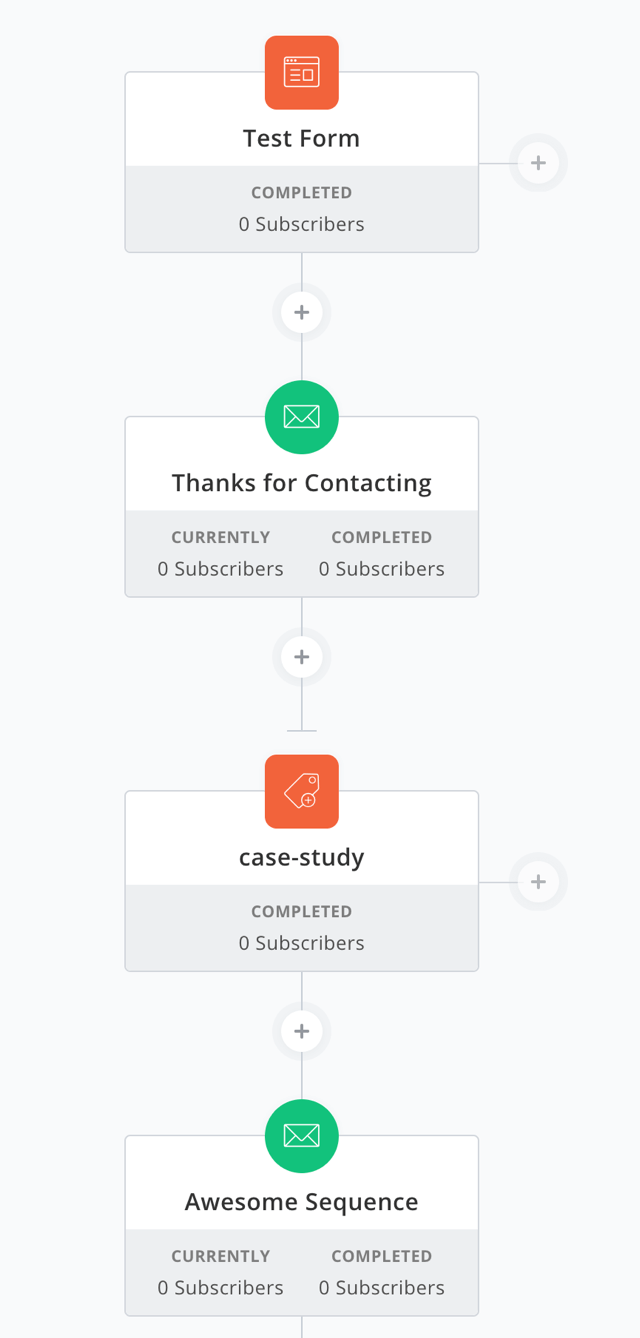
You may not have these options in your email marketing app, but many of the more popular ones offer something similar. This example was to demonstrate the varying levels of automation that you can employ.
It may not seem like anything revolutionary since you probably receive emails like this all the time. But here we’re talking about doing this for entries to your general contact form, as opposed to someone signing up for your blog posts or something.
If you’d be sending follow-up emails manually anyway, then why not set them on auto-pilot?
Using Zapier Webhooks to Supercharge Your Forms
There’s another action that you can take after someone submits to your Elementor form, and that’s to send a webhook.
If you’re not quite sure what a webhook is, you can think of them as notifications. The concept can be a bit overwhelming at first, and you may feel like they’re reserved for developers, but webhooks can supercharge your form automation.
So how the heck do you use a webhook, you ask? Well, one really easy way is with Zapier. There are other methods but this one is pretty straightforward to understand, and you then have over 1,000 apps you can integrate with. There are over 40 integrations with email marketing apps!
Let’s walk through the process of creating a Zap that waits for form submissions, then performs an action of your choosing.
Step 1 – Create new zap
Create a new Zap and use the Webhooks app as the Trigger

Step 2 – Select hook
Select the Catch Hook option then click Save + Continue
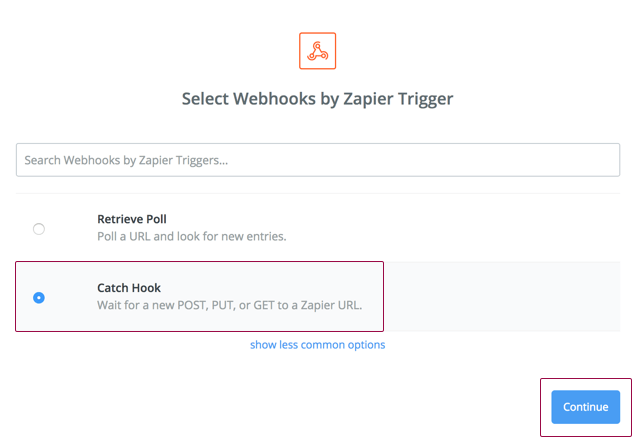
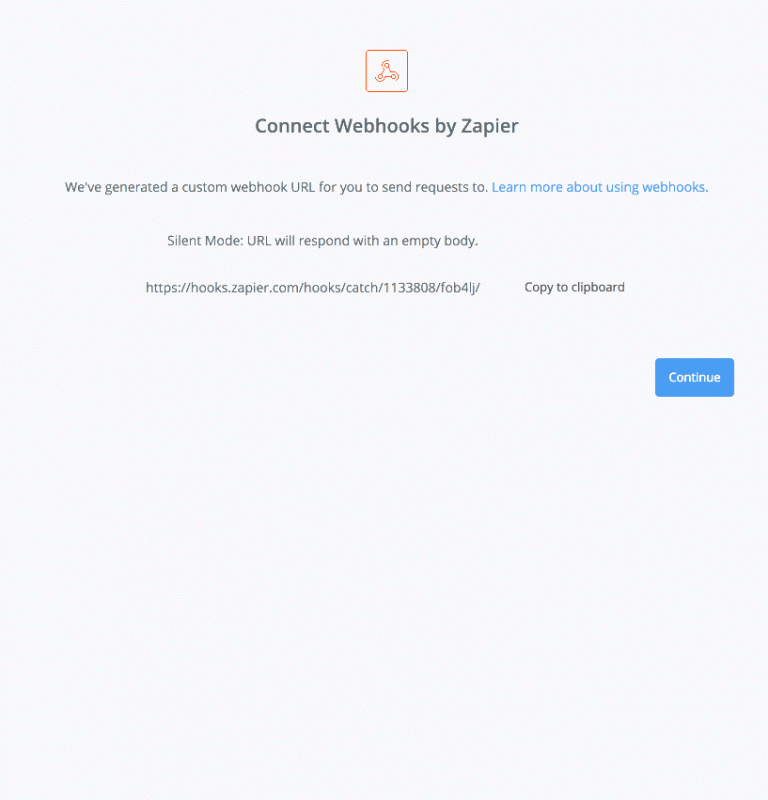
Step 3 – Setup Webhook
Click on Set Up Webhook and then on Copy to clipboard
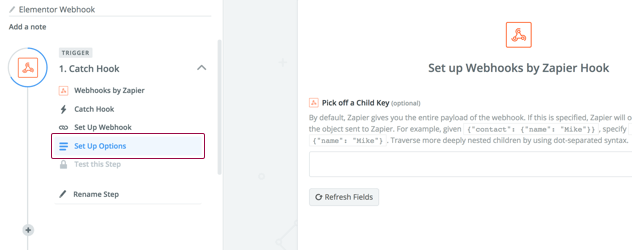
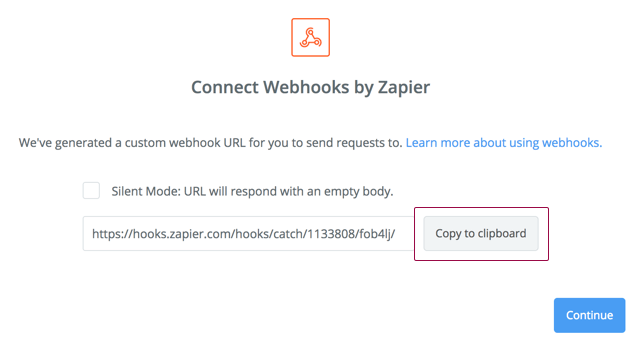
Step 4 – Paste Zapier webhook
In Elementor form settings, go to Actions After Submit and select Webhook, then paste the Zapier webhook URL

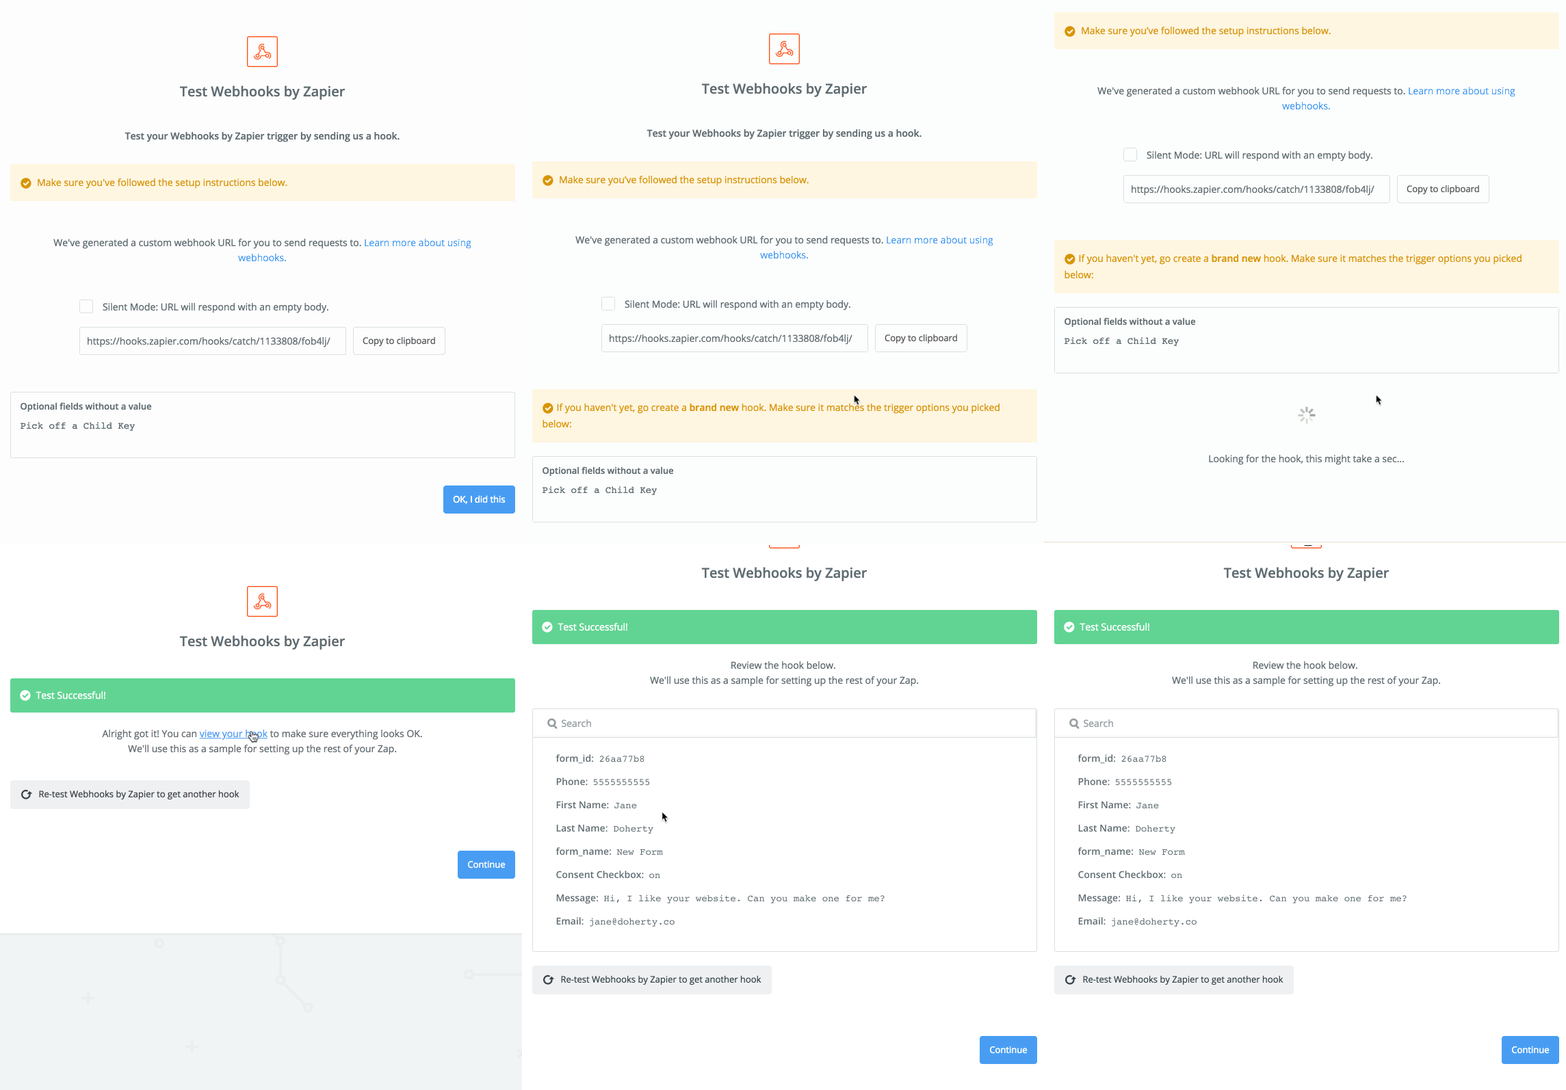
Step 5 – Submit form
Submit something to your Elementor form then test your Zap Trigger
Step 6 – See submission via Zapier
Watch as your form submission arrives, automagically
Adding an Action step to Zapier to send data to other apps
Now the real fun begins!
It’s time to map those fields to another app, or with multi-step Zaps, you can send data to as many apps as you’d like. In this example, let’s use MailChimp.
Even though there’s a built-in integration within Elementor, I want to briefly show you the process of choosing a list and mapping a couple of fields.
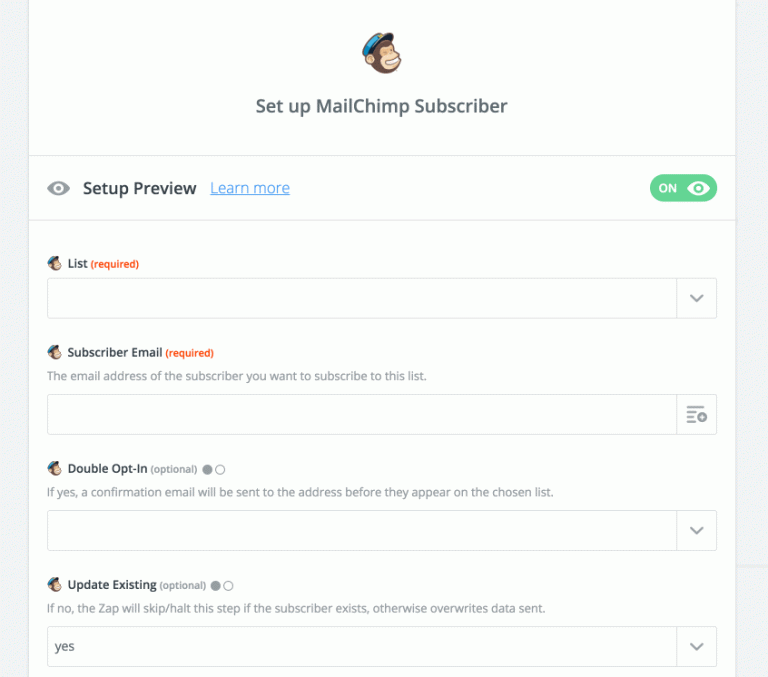
It’s as simple as that. Point and click, and you’ve successfully used a webhook to automate form submissions being added to your email marketing app. Pretty cool, huh?
Adding a Zapier Filter step to create more complex workflows
- To create multiple Zaps, with each adding contacts to a different list based on a choice they made in the form
- Not adding a contact at all if they didn’t include specific information (like an email address)
- Only adding contacts if they filled out a particular form on your website
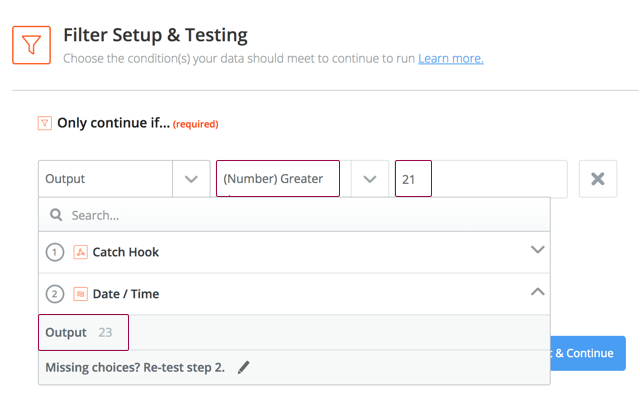
Now you can build multiple Zaps and perform different actions, depending if your conditions have been met.
Adding a Delay step to Prevent Actions From Running Immediately
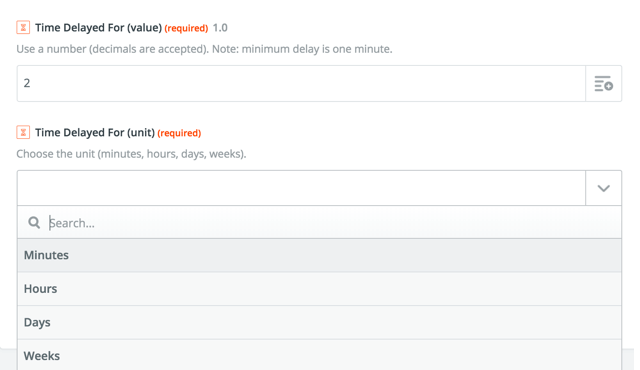
With a Delay step, you can either delay FOR an amount of time or delay UNTIL a particular date/time.
When would you use the delay FOR option?
- If the action is sending an email or text, maybe you want to wait 10 minutes before doing it
- You’ve added a step to email right away, and then you want to delay an hour before sending a text message
When might you delay UNTIL a later time?
- The time of submission is 3:30 am, and you’d rather wait until the morning to have Zapier send an email
- You have a specific time of day that you want to perform your action (adding to an email sequence, for example)
Delay steps are super straightforward to set up:
Send responses from your personal email account, via Zapier
As mentioned above, what if you want Zapier to send an email to the person that filled out your form? Connecting a Gmail or Office 365 account, for example, means that emails are sent right from your email address (as opposed to being a marketing email).
There are several reasons to go this route, including the fact that you can then continue the conversation via email if they respond. If you use the delay technique above, it can feel like you sat down and wrote that email after you received their submission. It’s one thing the Email 2 option in Elementor doesn’t include. Those go out right away.
You can also include an attachment if you’d like. Maybe you’ve got a fantastic case study PDF that you love showing prospective customers. Or, you’ve got a pricing list that’s not on your website. Depending on the form submissions, it could be the case that you like to send contracts or agreements.
Let’s use everything we just learned to create an amazing Zap
The Scenario
Let’s say that you’re a wedding photographer. You don’t include prices on your website, as you prefer to have people fill in a brief form. There are three packages to choose from: Bridal Bliss, Wacky Wedding, and Maximum Matrimony. Your form asks for the first name, email address, to select one of the packages and also to select the maximum they’re willing to spend.
Someone comes to your website at 10 pm on a Sunday night, loves your photo gallery, reads about the packages but doesn’t see pricing info. They pick the Wacky Wedding and say that their budget is at most $500. They include their first name and email address. They click Send Message.
Your Automation Works Its Magic
The Zap triggers and the first Action is something we didn’t discuss above (a magician can’t reveal all his tricks at once). It lets you get the date/time that your Zap triggered (read more: https://zapier.com/help/modifying-dates-and-times/#time-stamps), which you can then use in the Filter step. Plus, we’re going to format it so we get the hour (in 24-hour format):
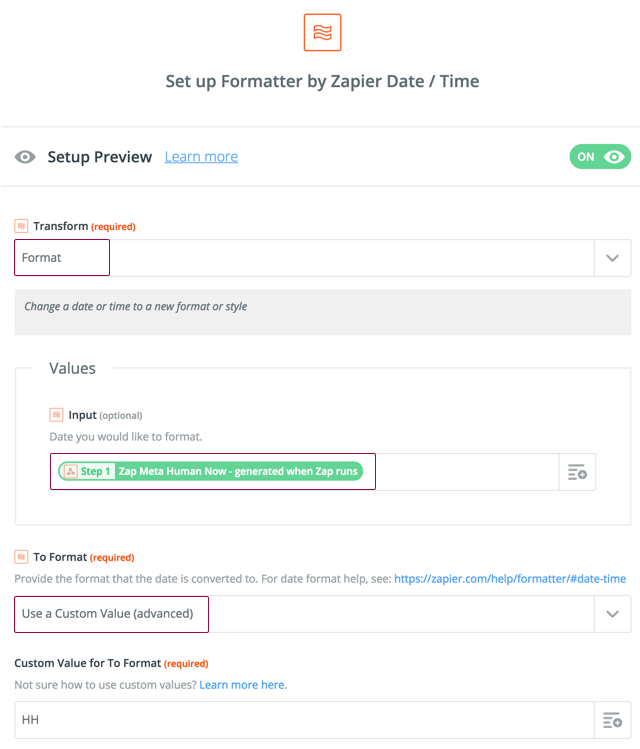
Now we’re ready to use this in our Filter, to check whether the submission came in after 9 pm.
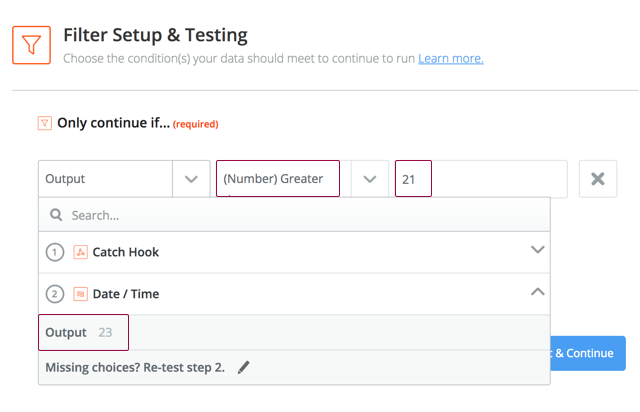
Next, we add a Delay step and use the FOR option. Because we know that the hour is higher than 21, that means it was 22 or 23. We’ll delay for 10 hours, to get us to the following morning. Then we have a Gmail step that looks like this:
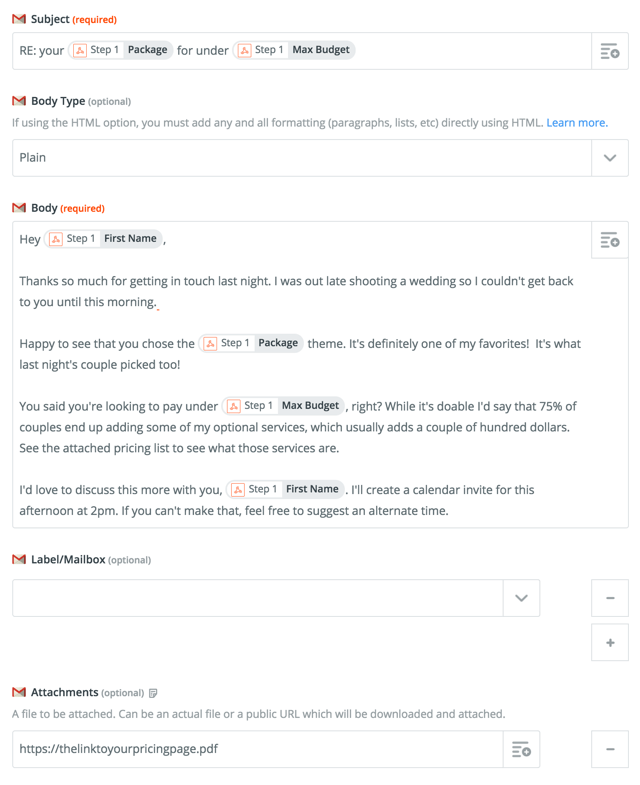
Let’s break it down.
Subject
No matter which package or price they choose, the subject will always reflect their chosen options. The RE: makes it seem like you read their message and then typed their choices in there.
The Body
You use the person’s first name, making it more personalized. You give them a reason that you couldn’t get back to them last night (you were out doing your job for other happy clients). That may or may not be true, but it’s nice to appear in-demand.
You reiterate the package they chose and say that it’s one of your favorites. It’s nice for them to hear that they made a good choice. Heck, it’s the photographer’s favorite, and he’s a pro. Not only that, but the couple from the previous night also chose that. It’s popular!
You confirm their max budget and warn that though you CAN do it, most people spend a bit more. It doesn’t matter what their max is; you’re telling them that they should consider a bit more. And why? Because you’ve got some tricks up your sleeve, and those cost more.
You also say that you’re going to create a calendar invite. Wow, you’re doing so much work already! How amazing will you be when they hire you? Of course, this will be another step in your Zap. Ssshhhh.
The Attachment
Those aforementioned extra services, well they happen to be in the PDF that you attached. How unbelievably convenient that is!
We’re not done yet!
Next, we’ll add a short delay of about 10 minutes, followed by a Create Detailed Event step for Google Calendar. Wow, you’re so quick. You’re sending thoughtful emails with attachments, and you’re setting up meeting times!
Now, why not add the person to a list in your email marketing app ALSO so that you can send them promotional information. If you’re thinking ahead, you probably realize that people won’t need a wedding photographer once they’re already married! Well, we can have another Zap that triggers on a paid invoice (after they’ve hired and paid you) and then removes them from that particular list.
Let’s Recap, Shall We?
So what work did we NOT do manually (yes, the initial set up but that’s only once)? We didn’t check form submissions, fire up our email, type out a message that included information from the form, create a calendar invite and add the person to our email list. And how much of it do they probably think you did manually. Likely all of it.
Now, imagine you’ve got an ad out there or were featured in your local newspaper, and all kinds of people have come to your website seeking your services. You have a business to run. You can’t be responding to 100 people this week. Now you don’t have to.
That’s the power of automation, and now it’s helping your sales process!
Qualifying Leads — Prioritizing the Right People
In a perfect world, everyone would be equally as worthy of your time. But time is precious, and it never hurts to have more information about a person, to give you the extra context that you may otherwise not have. That knowledge can help you make decisions for your business.
So far we’ve looked at how to automate responses to leads — all leads. And everyone would receive essentially the same answer, with no difference in response time.
What if you wanted to customize responses or response times based on who filled out the form? Here are some examples:
- Maybe you want to send genuinely custom replies to people who work at specific companies, or who have prominent roles, instead of automated ones.
- You might consider quoting a higher (or lower) price depending on who contacts you.
- If someone has an email address with a well-known domain, you might want to send yourself an instant alert to make sure you jump on it right away.
If you’re sending the data to a CRM as part of your automation, wouldn’t it be amazing to have enriched data like the company, company size, industry, location, etc.?
Lead Score by Zapier Enriches Contact Data
There are lots of reasons you could want to score your leads and/or enrich the data you have for a contact, and an easy way to do it is by using one of Zapier’s built-in apps: Lead Score.
All you have to do is map an email address from your contact form into the search input of the Zapier step, and it scours the Internet for extra info about that person.
Full disclosure: I work for Zapier, which in addition to meaning that I know the product super well, gives me this excellent rating when I run my work email through Lead Score:
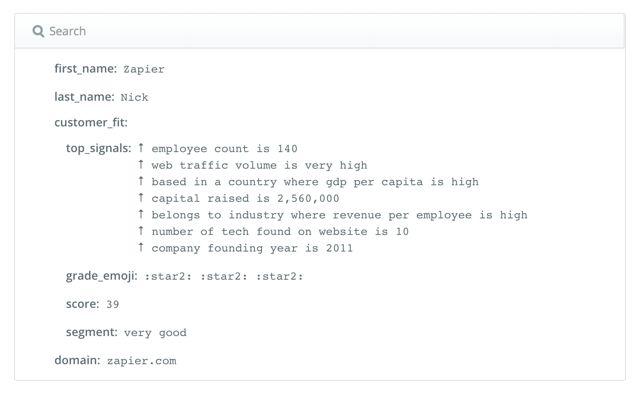
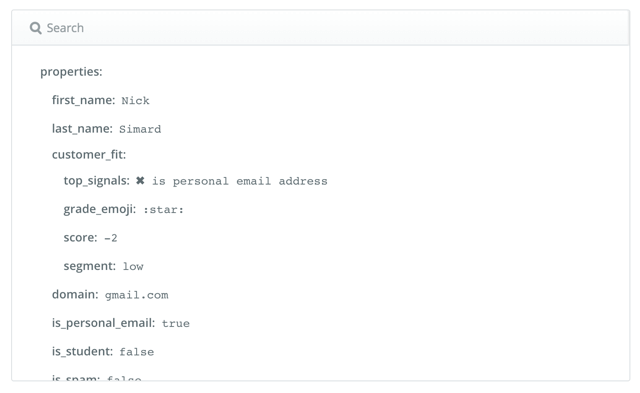
Now, I don’t know about you, but I’d be more interested in someone with the first score and enriched data than the second. That isn’t to say that someone with a Gmail account isn’t worth your time, or that a work email means the person has a considerable budget and wants to sign up their whole company.
But knowledge is power, and it helps to know these things about your leads. At the very least, you could work in some of that data into your automated responses.
Hey [first name],
Thanks so much for getting in touch. I see that you work at [company name]. I really like what your company is doing. I took a quick look and was surprised to see that your team’s size is about [number of employees] or so. I also didn’t realize you guys had been around since 2026.
Etc, etc. You get the idea. Even if the person thinks that you picked a few key facts from the Internet, at least it seems like you cared enough to take that time. You can also get more creative than I’ve shown with the enriched data.
Adding Enriched Data to CRM
Now here’s the super powerful part. If you’re keeping track of these contacts in a CRM, you can beef up their profile with the enriched data you get from Lead Score. You can then do all sorts of neat things with that data in your CRM (or email marketing app).
You can build lists, create filters, build custom campaigns and more! You can create a company/organization in addition to just adding a contact. Compare that to just having a person’s name and email address, but nothing else.
Hunter helps you verify professional email addresses
This is another app you can use (with the Zapier integration) to verify a few things about your leads. If the email address is for a company and you’re curious about how many people might work there, you can use the Count Email option.
As the name implies, it checks to see how many email-addresses Hunter has for that company. It may not be 100% accurate, but if anything the number would be higher than what they show.
Let’s say you’re primarily interested in serving small to medium-sized businesses; then with this feature, you could set up Filters to perform different actions when Hunter finds more than X number of email addresses for a given company.
Another option that Hunter provides in the Zapier integration is Verify Email, which checks if a given email address is deliverable and has been found on the Internet. There’s no sense adding email addresses to your apps, or sending responses if that email address can’t even receive them. There’s a chance that someone has mistyped their email address, in which case you would want to know.
What if you set this whole system up, sending automated emails and they never even receive that message because of a typo? Meanwhile, you’ve been waiting for them to respond. That would be one good reason to ask for a phone number so that you could contact them that way (assuming the typo isn’t an obvious one, like gmal instead of Gmail).
Build your own system with Zapier built-in apps
Instead of — or in addition to — using any of the above methods, you could employ some of Zapier’s other built-in apps to build a system of your own.
We already talked about Filters, where you can set up separate Zaps that have conditions that must be met before the Actions are run.
While Zapier doesn’t have a way to use if/then logic (yet), you can get around that with a little creativity and ingenuity 🙂
One way is with Lookup Tables. What the heck is that, you ask. The easiest way to explain it is that you take incoming data and when it matches one of your entries, you output something else.
For example:
Let’s take the wedding photographer example from earlier. There’s a field for the package and one for the budget. Maybe you’d like to take the incoming package name, but instead of passing THAT on to your Action steps, you’d prefer to use something else.
What if each package has its own Group in your MailChimp account? Instead of building three different Zaps you can use a Lookup Table to output the corresponding value that MailChimp wants.
Here’s what MailChimp expects:
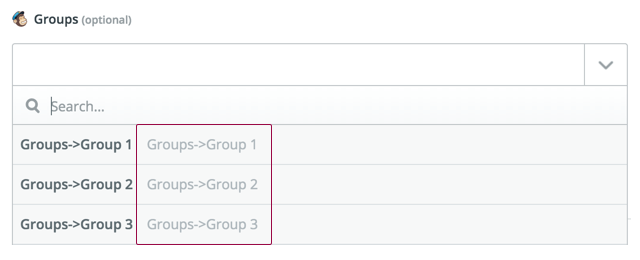
MailChimp wants this instead of the package names from our form

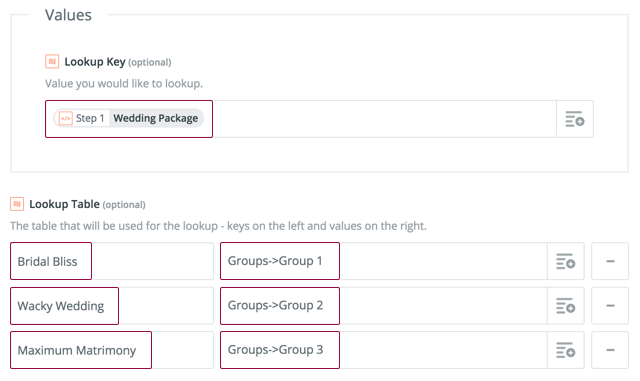

You can use Lookup Tables for all sorts of things, besides email marketing.
For example:
- When Bridal Bliss comes in, output “one of our newest packages”; for Wacky Wedding output “my favorite package”; for Maximum Matrimony output “the deluxe package.” Then insert that in emails.
- Output different numbers for the packages and the budgets. Then give a final score. This can help you do some scoring of your own, so for higher numbers you write the email directly (meaning they don’t get put into the automation).
- For $300-500 output “means you’ll miss out on some of the best perks”; for $500-$1000 output “will get you a high-quality experience”; for $1000+ output “comes with everything on the attached list.”
For that last example, you could use it like this in an email:
I see that you have a budget range of [budget from the form]. That [means you’ll miss out on some of the best perks OR will get you a high-quality experience OR comes with everything on the attached list].
If you’re creative, you can compose entire emails with this technique. Think of what their selections mean and then output the appropriate values.
Wrapping Up
What I’ve presented here is just the tip of the iceberg when it comes to automating your sales process. My hope is that by showing you some examples, that it inspires you to get creative and consider how you could automate parts of your workflow.
With great power comes great responsibility. Please test your automation to make sure that everything works as you intend it to. When correctly set up, they’ll save you hours, but nobody wants to wake up to people asking why you’ve sent them emails with missing words or gibberish in them.
Happy automating!
Looking for fresh content?
By entering your email, you agree to receive Elementor emails, including marketing emails,
and agree to our Terms & Conditions and Privacy Policy.
