Should you choose one design for your landing page or the other? Which one is better? How would you know?
To answer these questions and similar ones, web creators can turn to implementing A/B testing to choose the best option.
A/B testing gives you a way to make data-backed decisions and improvements to your website. Instead of trying to guess which version of a design will generate more conversions or create a more user-friendly experience, you can turn to the data to get a real answer.
Better yet, running A/B tests on WordPress isn’t that complicated and doesn’t cost any money. If you can put 30 minutes or so into some basic setup, you can start testing your site for free using a simple visual editor.
In this post, we’ll show you step-by-step how to start A/B testing WordPress and Elementor content using the free Google Optimize service.
Beyond that, we’ll also share a native WordPress plugin option for Elementor users that lets you set up split tests from inside the Elementor editor.
Ready to start testing? Let’s dig in!
Table Of Contents
- What Is A/B Testing?
- Why Should You Consider A/B Testing?
- How To Perform an A/B Test on WordPress
- Part 1: Create Your Original Variant (if You Haven’t Done So Already)
- Part 2: Add Google Analytics and Google Optimize to Your Website
- Part 3: Set Up an A/B Test in Google Optimize
- A Native WordPress A/B Testing Option for Elementor Users
- 1. Create a New Test
- 2. Set Up Test in Elementor
- 3. View Test Results
Grow Your Sales
- Incredibly Fast Store
- Sales Optimization
- Enterprise-Grade Security
- 24/7 Expert Service

- Incredibly Fast Store
- Sales Optimization
- Enterprise-Grade Security
- 24/7 Expert Service
- Prompt your Code & Add Custom Code, HTML, or CSS with ease
- Generate or edit with AI for Tailored Images
- Use Copilot for predictive stylized container layouts

- Prompt your Code & Add Custom Code, HTML, or CSS with ease
- Generate or edit with AI for Tailored Images
- Use Copilot for predictive stylized container layouts
- Craft or Translate Content at Lightning Speed
Top-Performing Website
- Super-Fast Websites
- Enterprise-Grade Security
- Any Site, Every Business
- 24/7 Expert Service

Top-Performing Website
- Super-Fast Websites
- Enterprise-Grade Security
- Any Site, Every Business
- 24/7 Expert Service
- Drag & Drop Website Builder, No Code Required
- Over 100 Widgets, for Every Purpose
- Professional Design Features for Pixel Perfect Design

- Drag & Drop Website Builder, No Code Required
- Over 100 Widgets, for Every Purpose
- Professional Design Features for Pixel Perfect Design
- Marketing & eCommerce Features to Increase Conversion
- Ensure Reliable Email Delivery for Your Website
- Simple Setup, No SMTP Configuration Needed
- Centralized Email Insights for Better Tracking

- Ensure Reliable Email Delivery for Your Website
- Simple Setup, No SMTP Configuration Needed
- Centralized Email Insights for Better Tracking

- Ensure Reliable Email Delivery for Your Website
- Simple Setup, No SMTP Configuration Needed
- Centralized Email Insights for Better Tracking
What Is A/B Testing?
A/B testing is the process of showing two different versions of a page to different visitors so that you can see which version of the page performs better.
For example, let’s say you have a call to action button on your landing page and you want people to click it. Should you make the text of the button “Create an Account” or “Start Free Trial”? With A/B testing, you can try both variants to see which version drives more clicks.
Depending on what you want to test and how complex you want to make it, you can use different types of tests. Here are some of the common tactics:
- A/B testing – the “standard” test. You can compare two different versions of a page against one another to see which version performs better. You can also go further and create A/B/n tests to add more variations to the mix.
- Multivariate testing – similar to an A/B test, but a bit more complicated. You can test changes to multiple sections of a page and then create variations for all of the possible combinations of those many changes. The idea is that you don’t just see which version of the page performs better, but you can actually see which specific changes made the biggest impact.
- Split URL testing – you divide traffic between two completely different URLs instead of testing different versions of the same page like with an A/B test or multivariate test. You might also see this called a “redirect test”.
- Multi-page testing – this lets you test consistent changes over multiple pages. For example, if you have a multi-page sales funnel, you can see how different changes perform when consistently made across the entire funnel.
For most people, you’ll want to just get started with traditional A/B testing, as the other types of testing can be a bit more complicated. You can always graduate to those other types of tests once you have a good understanding of the basics.
Why Should You Consider A/B Testing?
At a high level, A/B testing is a way to optimize your website using data. Instead of guessing which change will work the best, you can run your test and get a real answer.
What’s more, the goal that you’re optimizing for can be different, which makes A/B testing very flexible.
Depending on how you set up your A/B tests, you can use A/B testing to optimize…
- Conversion rates – see which variants drive more conversions, which can positively affectthe your business. You could test lead generation from conversions, e-commerce conversions, and more.
- Bounce rates – find which variants keep more people on your site instead of letting them bounce away.
- Visitor pain points – find ways to make your site more user-friendly by testing different ways to solve common visitor pain points and finding the most effective variant.
- Website redesigns – get data to back up your design decisions so that you can make more informed choices.
You can also use multiple A/B tests to optimize for these different goals. For example, you might optimize your landing pages for conversions so that you can maximize your revenue and return on investment (ROI), while you might optimize your blog pages for engagement to find a way to reduce bounce rates on your content pages.
Once you learn how to start A/B testing WordPress content, you’ll be able to experiment with these different goals as much as needed.
How To Perform an A/B Test on WordPress
Now that you know why A/B testing can be so useful, let’s get into the actual “how to” part of A/B testing WordPress sites.
For this first tutorial, we’re going to use the free Google Optimize service.
Google Optimize is a free service from Google that lets you A/B test any content and design on your website. It’s not WordPress-specific, but it does work great with WordPress sites, including designs that you create with Elementor (and any other plugins that you might be using).
The process of setting up an A/B test with Google Optimize can be roughly divided into three parts:
- Create your original test variant. If you haven’t already created the page that you want to test, you’ll want to have that up and running before you get started.
- Set up Google Optimize on your site. This involves adding your website via the Google Optimize interface and including a code snippet on your site. You also need to be using Google Analytics to enable Google Optimize, so you’ll need to set that up if you aren’t already using Google Analytics.
- Set up a new A/B test in Google Optimize. You can use a visual editor to set up your variant, including changing text and design.
We’ll break our tutorial down into those same three parts. Let’s get started!
Part 1: Create Your Original Variant (if You Haven’t Done So Already)
If you’ve already created the page that you want to test, you can skip ahead to the next part. But if you’re starting from zero, your first step is to create the design that you want to test.
This will be the baseline in your test and you’ll be able to add one or more variants later in this tutorial.
To create your original page, you can just use Elementor like you normally would. You can either create your page from a blank canvas or start from one of Elementor’s many included templates.
If you need some help, you can check out our guide on how to make a landing page with Elementor.
Once you’ve created your page, make sure to publish it so that it’s publicly accessible – this will be important when you’re setting up Google Optimize.
Part 2: Add Google Analytics and Google Optimize to Your Website
Before you can start creating A/B tests with Google Optimize, you first need to:
- Add your website to Google Optimize.
- Add the code snippet that Google Optimize gives you to your website’s <head> section.
To use Google Optimize, you’ll also need to be using Google Analytics. So if you haven’t already set up your WordPress site with Google Analytics, you’ll also need to do that before you can get to the Google Optimize part.
The process is similar for Google Analytics – you first need to add your site via the Google Analytics interface and then you need to add a code snippet to your WordPress site.
There are lots of ways you can add the code snippets for both sites. For advanced users, you can add the code snippets manually. Or, for people who don’t want to use code, you can use a plugin.
There are several plugins that support both Google Analytics and Google Optimize. Here are some of the best:
For this part, we’re going to use the free GA Google Analytics plugin because it’s lightweight and makes the process pretty simple. However, you can choose a different plugin or the manual method if you feel comfortable doing that.
1. Set Up Google Analytics Universal Analytics Property
If you haven’t already set up your site with Google Analytics, you’ll need to do that before you can add Google Optimize to the mix.
We have a whole guide on adding Google Analytics to WordPress, but here’s the quick version.
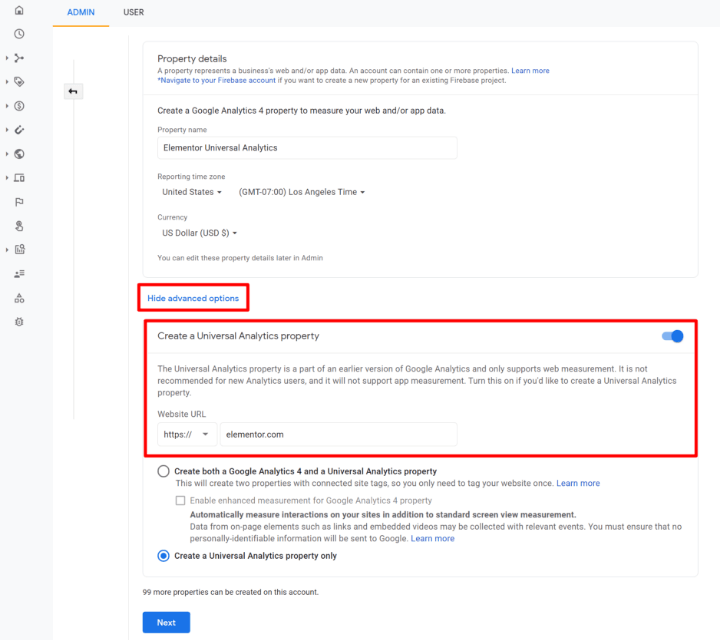
To get started, go to Google Analytics and log in to your account. Then, follow the instructions here to create a Universal Analytics property.
It’s very important that you use the Universal Analytics version of Google Analytics as you can’t currently link the new Google Analytics 4 to Google Optimize (though Google says this is coming later this year).
To create a universal property, you need to show the Advanced options when you’re setting up your property. You can then use the toggle to enable the universal option:
Once you create the property, Google Analytics should show you a screen that includes your Tracking ID (or you can follow these instructions to find it). Keep this handy because you’ll need it to set up your WordPress site:
If you’re using the GA Google Analytics plugin (again – this is what we’re using for the tutorial), you just need to paste in your GA Tracking ID to the plugin’s settings (Settings → Google Analytics).
Make sure to choose the proper Tracking Method, which is Universal Analytics:
Note – if you already added Google Analytics to your site in the past, it’s very likely that you’re already using the Universal Analytics option unless you just created your site within the past couple of months.
2. Create a Google Optimize Container and Add Code Snippet
Next, you need to add your site to Google Optimize and then add the code snippet that it gives you to your WordPress site.
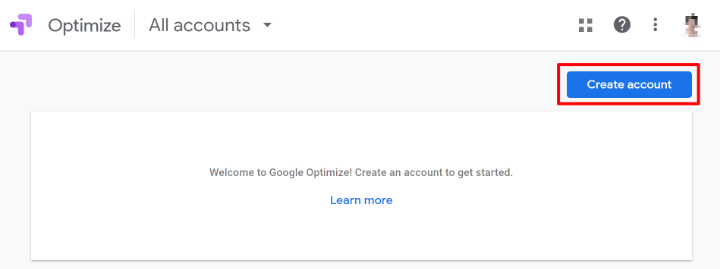
Go to the Google Optimize website and sign in using your Google account.
You should then see a prompt to create an account – click the Create account button:
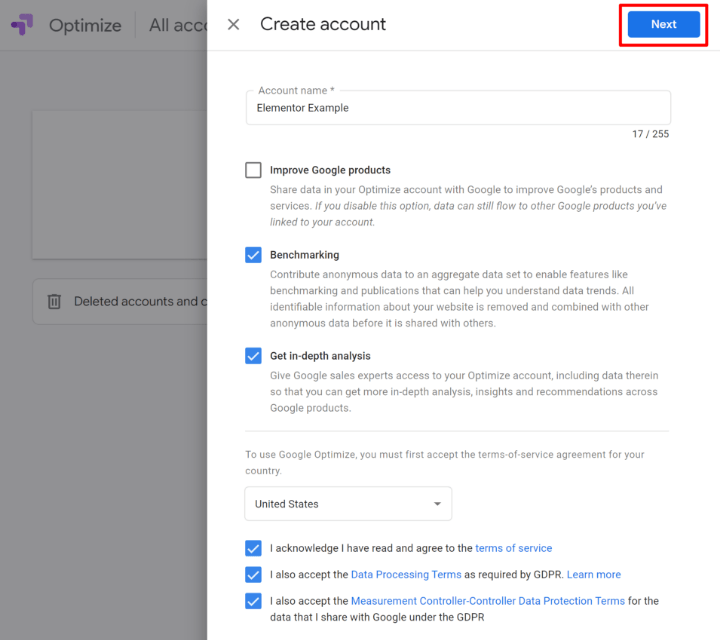
Give it a name – e.g. “Personal Websites” – and use the checkboxes. Then, click Next:
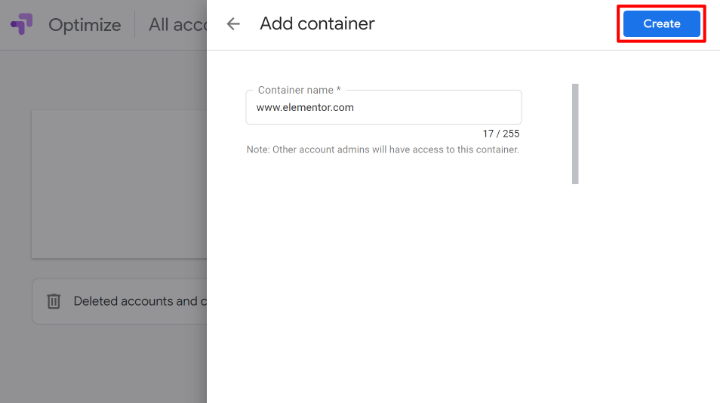
Now, you’ll be prompted to create a Container. Enter your site’s name or domain name as the Container name and then click Create:
You should now be in the settings area for your container. Click the Settings option to expand some new options in a slide-out panel:
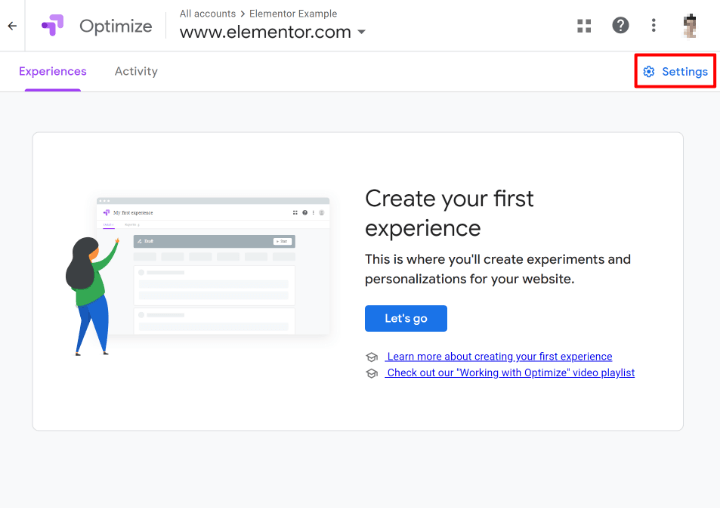
You’ll need to do a couple of things here.
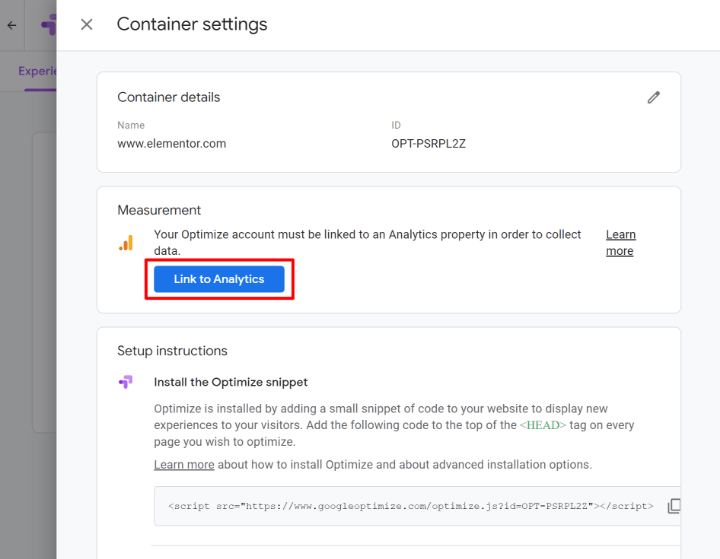
First, click the Link to Analytics button to link your Google Optimize container to your site’s property in Google Analytics. This is what allows Google Optimize to collect data on your test variants:
In the Link a property settings, choose your site’s web property in Google Analytics and click Link:
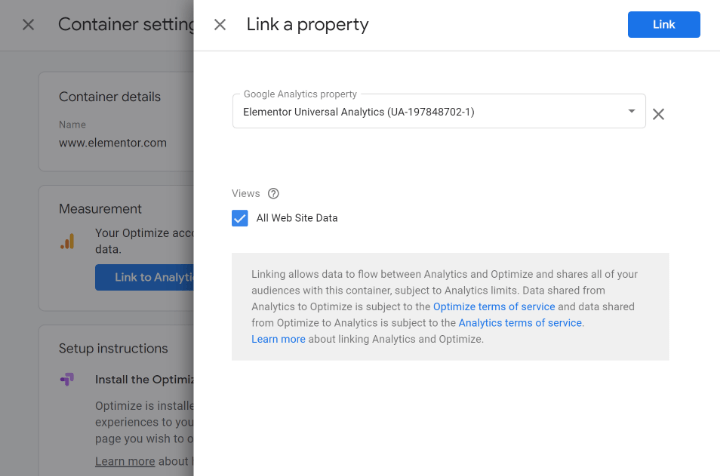
If Google Optimize won’t let you link the property, you might’ve accidentally created a Google Analytics 4 property instead of using the Universal Tracking method. Go back to the previous step and make sure that you set up Google Analytics Universal Tracking property.
Next, you’ll need to install the Google Optimize code snippet, which you’ll see under Setup instructions:
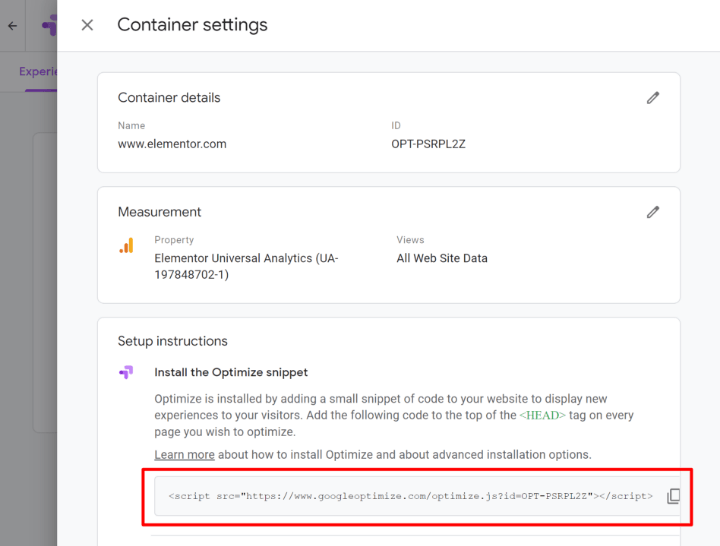
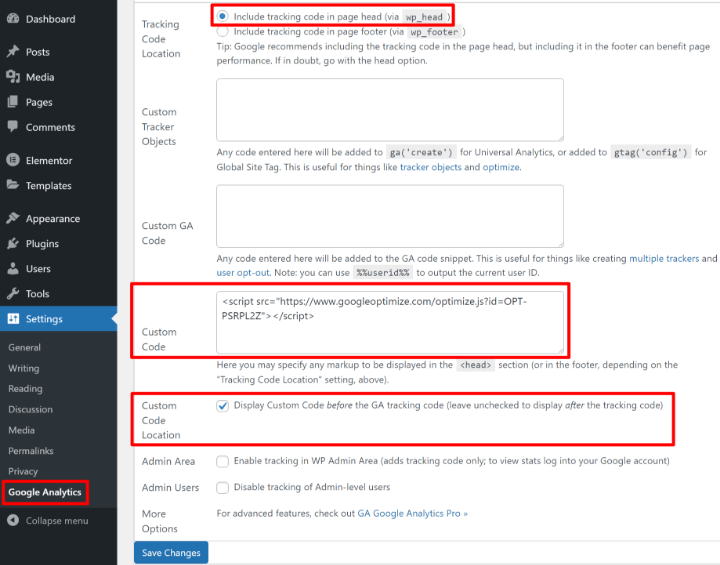
You need to add this snippet to your WordPress site’s <head> section. If you’re using the GA Google Analytics plugin, you can do so by going to Settings → Google Analytics and pasting the Google Optimize snippet into the Custom Code box.
Make sure that the Tracking Code Location is set to page head (the default) and also check the Custom Code Location box so that your site loads the Google Optimize script first:
Later on, we’ll share a diagnostic tool that Google Optimize offers to make sure you set up the code snippet properly. But for now, you should be good to go as long as you followed these instructions.
Part 3: Set Up an A/B Test in Google Optimize
Now, you’re ready to start creating your test variants. Google Optimize calls each test an “Experience”. Once you create an experience, you’ll be able to set up your test variants.
Before getting started, make sure that you’re using the Chrome browser. You’ll also want to install the official Google Optimize Chrome extension, which is what lets you use Google Optimize’s visual editor to set up your test variants.
1. Create an Experience
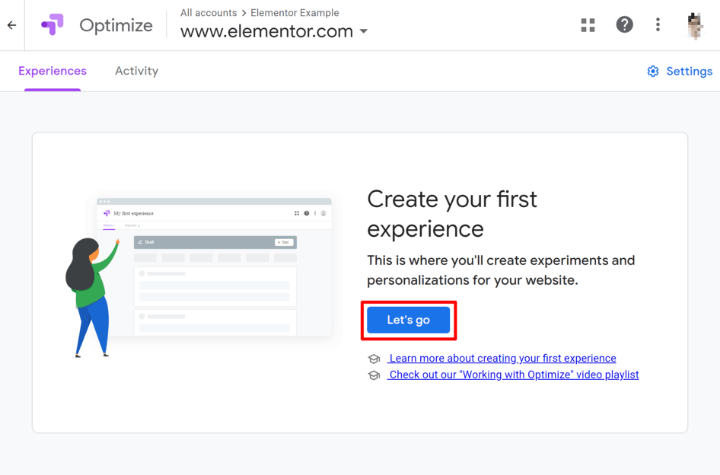
If you open your site in Google Optimize, you should see a prompt to create your first experience by clicking Let’s go:
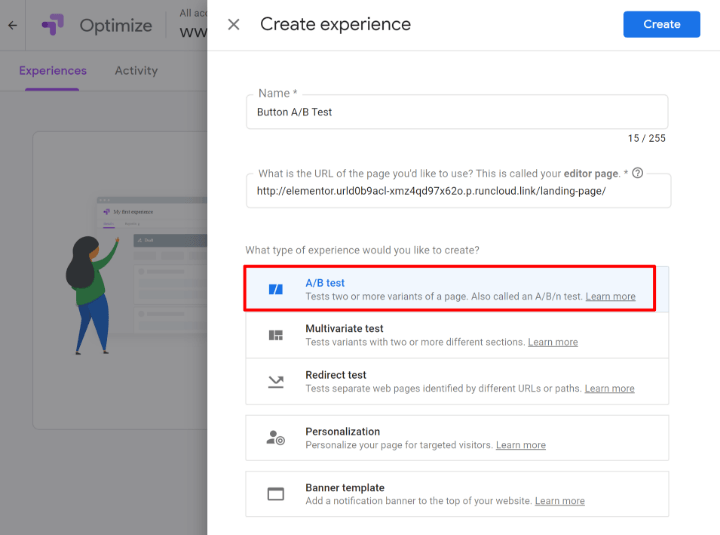
This will open a slide-out:
- Give your experiment a name – e.g. “Testing Different CTA Buttons”.
- Enter the URL of the page that you want to test (this is what you created in Part 1).
- Choose A/B test as the experience type. You can experiment with different test types later on, but we’ll keep things simple for now.
Then, you’ll be in the dashboard for your experience.
2. Create a Variant
In the experience dashboard, you should see a prompt to create a new variant – Add variant to get started:
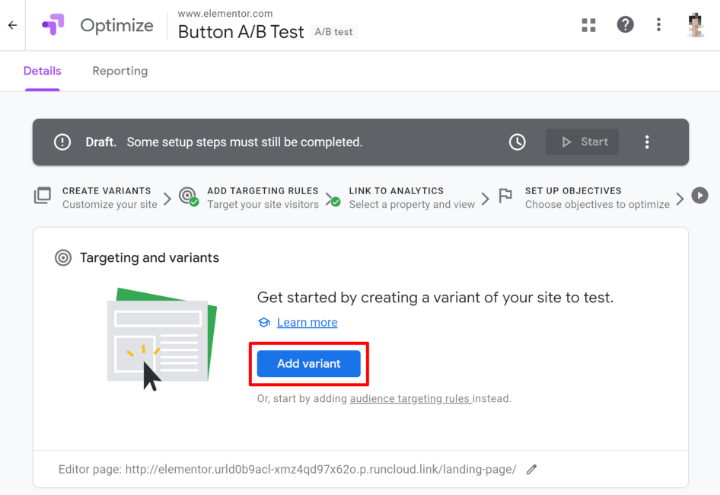
In the slide-out, give it a name and click Done.
You should then see it show up in the list of variants. To make the design changes, click the Edit button (make sure that you’ve already installed the Google Optimize Chrome extension before doing so):
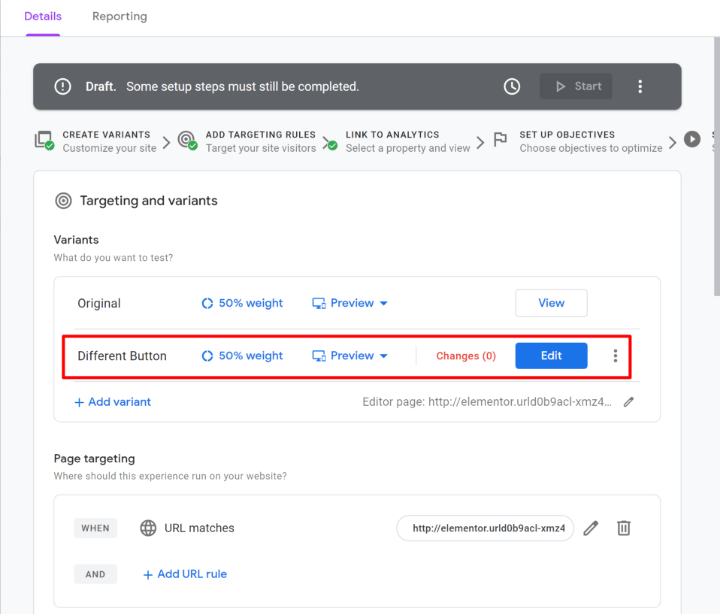
This will launch the visual editor, which works a lot like Elementor. To change an element’s content or design, you can click on it to open its settings.
For example, to change the button text from “Get Started” to “Download Now”, you would click on the button and select Edit element to be able to edit the text or HTML:
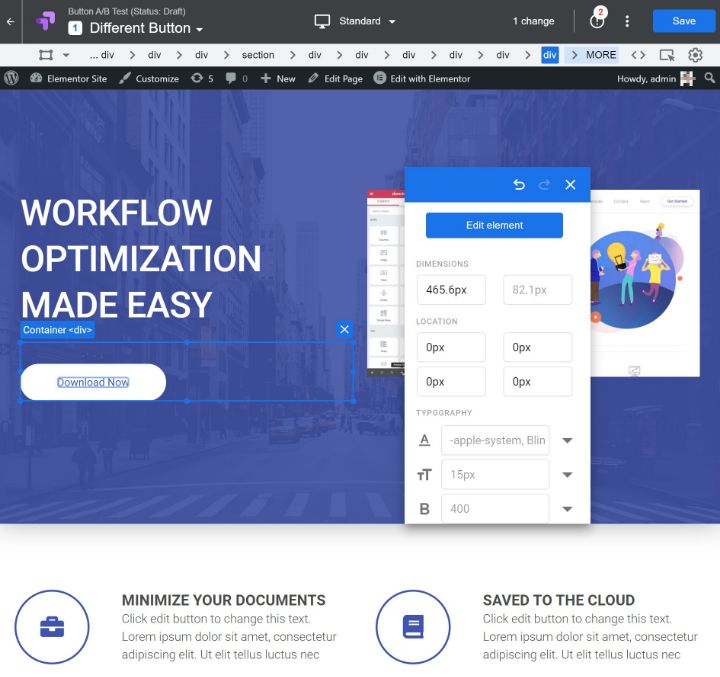
For some elements, it can be tough to edit text directly, so you sometimes might need to edit an element as HTML and change the content that way.
You can make as many changes as you want. Just click the Save button when you’re finished. Then, click Done to go back to the Google Optimize interface to finalize your A/B test.
3. Configure Other Settings and Run Diagnostic
Once you exit the visual editor, you should be back in the Google Optimize interface. You can scroll down in this area to configure other settings as needed.
For example, you can add more variants, change the traffic weight between variants, only target specific types of users, and more.
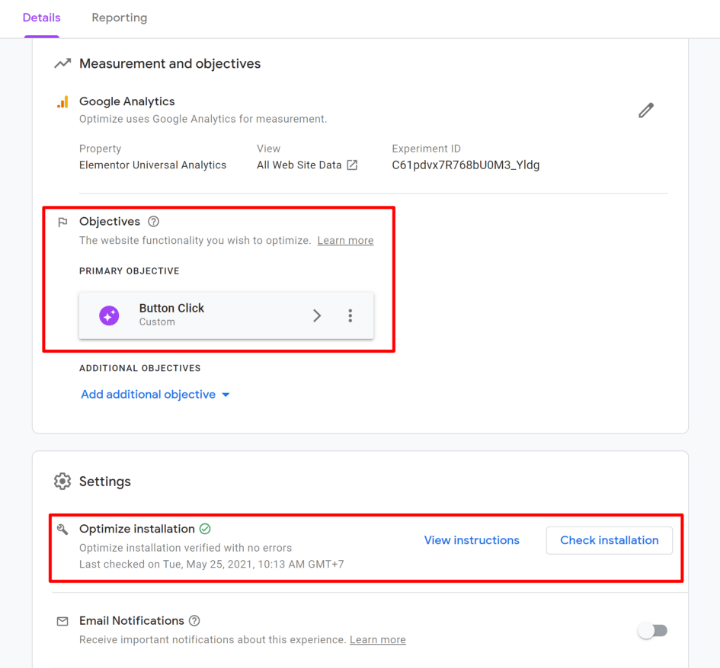
Make sure to choose a primary objective in the Objectives settings, as this is what Google Analytics will be measuring between the variants. You could set up custom events to track button clicks (tutorial here) or you could test generic things like bounce rate.
In the Settings area at the bottom, you’ll also see a prompt to Check installation, which lets you verify that you installed the Google Optimize code snippet correctly.
If you’re using an ad blocker, make sure to disable the ad blocker on the website where you’re running tests before running the diagnostic. Google Optimize will open the actual site in your browser to run the diagnostic – so if you have an ad blocker enabled, the ad blocker might block the Google Optimize script and your site will “fail” the diagnostic even if you properly installed the script.
So – save yourself some frustration and make sure you disabled your ad blocker before you go on a wild goose chase trying to find what’s going wrong.
4. Start Your Test
Once you’ve gone through the settings, scroll back to the top of the page and click the Start button to begin your A/B test:
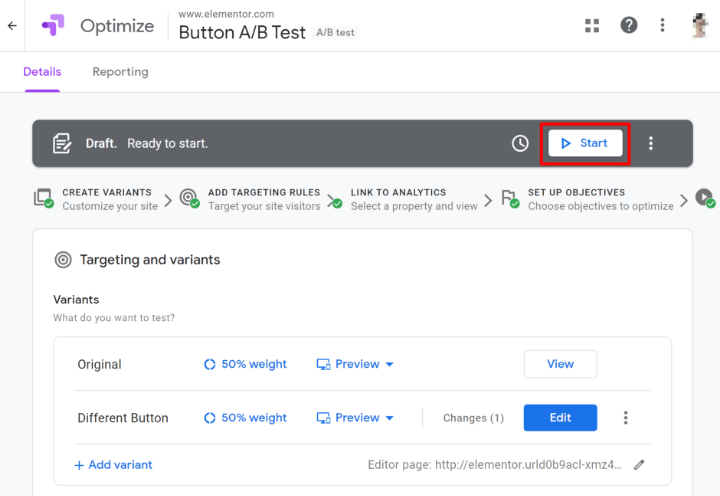
Or, you can click the clock icon to the left to schedule the test to run at some point in the future.
You’ll then see a popup to confirm – click Start again to make the test live.
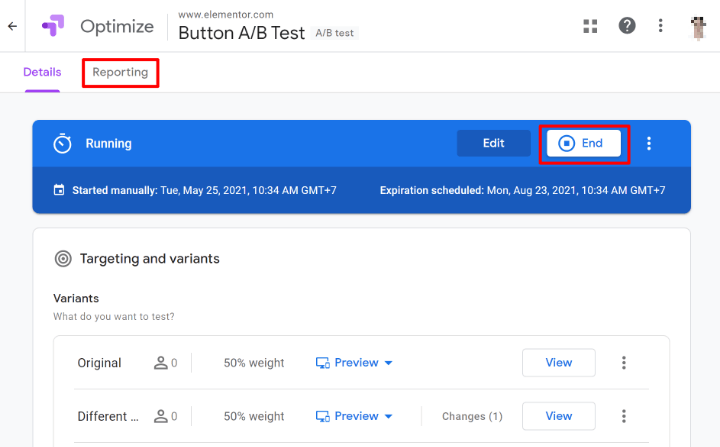
And that’s it! You just started your first WordPress A/B testing experiment. By default, Google Optimize will add an expiration that’s four weeks in the future. You can always manually end your test earlier by clicking the End button and you’ll be able to view experiment performance from the Reporting tab:
A Native WordPress A/B Testing Option for Elementor Users
Google Optimize works for A/B testing any type of WordPress content. That includes your Elementor designs, but it also works with content from the regular WordPress editor, your theme, and anything else you might be using.
If you specifically want to A/B test Elementor content, though, there’s also a dedicated plugin that lets you do that and has a much simpler setup process – Split Test For Elementor.
Split Test For Elementor is a third-party plugin from a different developer, so the Elementor team doesn’t have direct control over it. But it is well-rated and fully working at the time that we’re writing this guide.
There’s a free version at WordPress.org, though you’ll need the premium version if you want to enable page caching for the designs that you’re A/B testing (because the premium version includes a “cache busting” feature).
Here’s how to use it:
1. Create a New Test
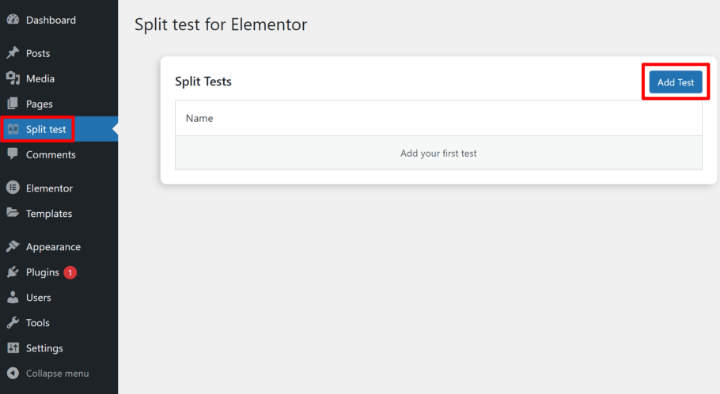
Once you activate the plugin, you can go to Split test → Add Test to create a new test:
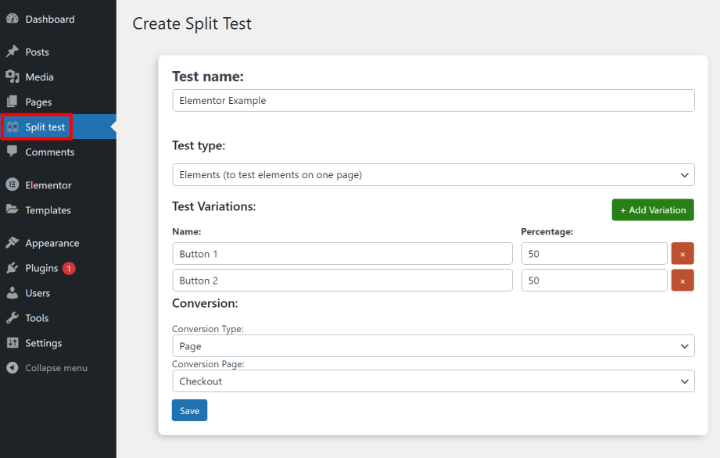
You can choose between two different test types:
- Elements – test different elements on the same page (widgets, sections, etc).
- Page – test completely different pages against one another.
Once you select your test type, you’ll need to enter names for two or more variations, as well as how you want to divide traffic.
Below that, you can set your conversion goal, which is an internal or external page (the plugin isn’t as flexible as Google Optimize when setting conversion goals):
2. Set Up Test in Elementor
Once you’ve created your test, open the Elementor editor for the design that you want to A/B test.
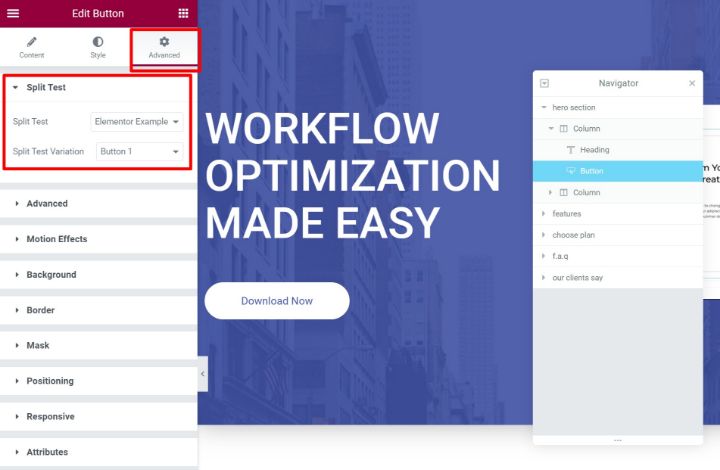
Then, open the settings for the original variant of the element that you want to test – e.g. a button widget. When you go to the Advanced tab, you’ll see a new Split Test option.
Choose the Split Test that you created in the previous step and then assign the Elementor widget/section to one of the Split Test Variations.
Any element assigned to this variation will only display on this specific variation:
Now, create the other element(s) that you want to use for the other variant(s) and follow the same steps to assign them to different variants.
For example, if you were A/B testing two different buttons, you would actually see two buttons in the Elementor editor:
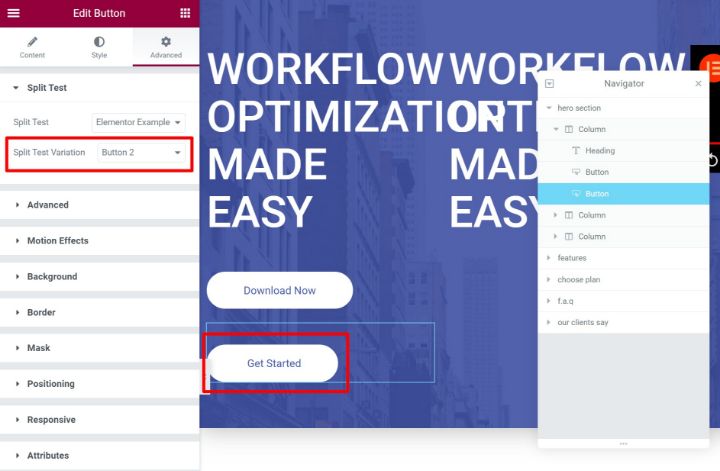
However, because you’ve assigned each button to a different variant, your visitors will only see one button at a time. The exact button that they see depends on which variant they’re viewing.
Make sure to save the changes to your Elementor design when you’re finished.
3. View Test Results
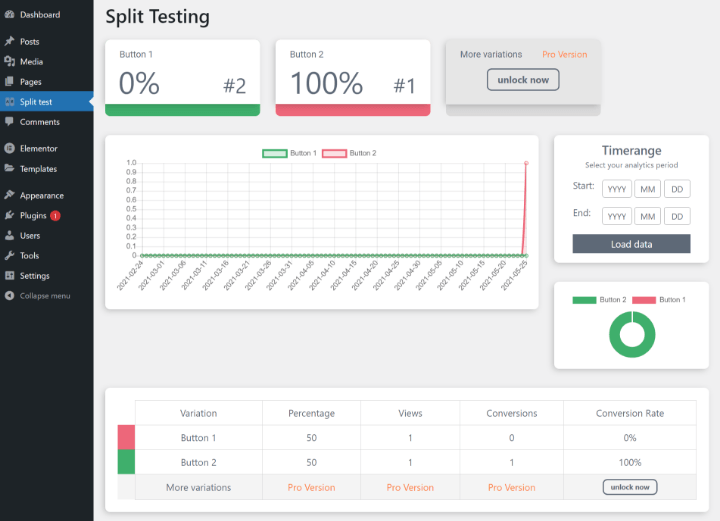
Now, your test is live. To see how it’s going, go to the Split test area in your dashboard and click the Statistics button next to your test.
You’ll then see basic conversion rate data for each variant:
Implement A/B Testing To Find the Most Appealing Design for Your Visitors
Overall, A/B testing WordPress is a great way to improve your website using real data.
The most common use case is to use A/B testing to improve the conversion rates of your lead capture forms or landing pages, but you can also use A/B testing to reduce bounce rates, solve user pain points, and otherwise just create a more effective website.
If you’re using WordPress and Elementor, one of the most flexible A/B testing solutions is to use the free Google Optimize service. There is a bit of a learning curve to actually set up your site with Google Optimize. But once you get it working, you can easily create new test variants using Google Optimize’s visual editor.
For an Elementor-specific option, you can also consider the third-party Split Test for Elementor plugin. This plugin isn’t quite as flexible because it only lets you test limited conversion goals, but it’s simpler to use and you can set up your variants using the regular Elementor editor.
Do you still have any questions about A/B testing for WordPress? Ask us in the comments section and we’ll try to help!
Looking for fresh content?
By entering your email, you agree to receive Elementor emails, including marketing emails,
and agree to our Terms & Conditions and Privacy Policy.

