Table of Contents
When you’re building an ecommerce website, there are a lot of processes and moving parts to manage. However, among the most important are order fulfillment and shipping operations. Between determining rates and fees, selecting shipping zones, and choosing order fulfillment methods, there are a lot of elements to consider.
Fortunately, if you’re a WooCommerce user, setting up your shipping options is a relatively simple process. By following a few quick steps, you can configure your WooCommerce shipping to optimize the online shopping experience for your customers.
In this post, we’ll introduce you to WooCommerce shipping. Then we’ll provide you with a detailed walkthrough of how to configure and set up each option. Let’s get started!
Table Of Contents
- An Introduction to WooCommerce Shipping
- How to Set Up WooCommerce Shipping Options (In 5 Steps)
- Step 1: Setting Up Shipping Zones
- Step 2: Choosing the Right Shipping Method
- Step 3: Setting Up Shipping Rates and Fees
- Step 4: Adding Shipping Classes
- Step 5: Setting Up the Order Fulfillment Operation
- WooCommerce Shipping, Inventory, and Fulfillment Extensions
An Introduction to WooCommerce Shipping
WooCommerce is a popular WordPress plugin you can use to create and manage an online store directly from your website. You can use it to sell digital or physical goods:
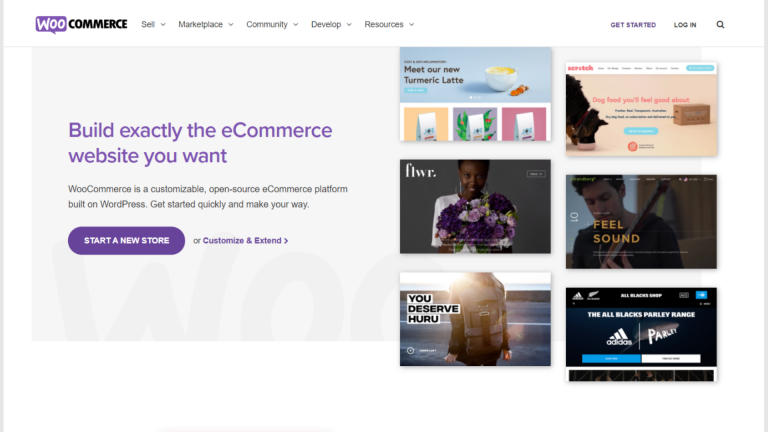
If you plan to sell tangible items in your WooCommerce store, you’ll need to configure your shipping options. Understanding your choices is key to making sure you choose the right setup for your business, as well as your customers. It’s crucial to strike a balance between fast and affordable shipping.
There are a lot of options to choose from, and sorting through them at first can feel a little daunting. However, the more you know about what each setting means, the better positioned you’ll be to ensure that you’re selecting the most practical solutions and beneficial strategy.
Providing a solid shipping experience has always been a critical part of ecommerce. However, given the rise of online shopping since the COVID-19 global pandemic, it’s perhaps more essential than ever before and has become an important ecommerce trend. With so much competition among e-commerce businesses, a sound shipping strategy can help set you apart.
For example, let’s say a shopper is torn between you and one of your competitors. If you offer free shipping to their country, but the other company charges a fee, they’ll likely be more inclined to go with your business.
By default, WooCommerce comes with a handful of built-in shipping options. However, there are also WooCommerce plugins you can use to extend the platforms’ features and functionality. We’ll touch on a few worth considering at the end of this post. For now, let’s focus on how to set up your basic WooCommerce shipping options.
How to Set Up WooCommerce Shipping Options (In 5 Steps)
Now that you understand a bit more about WooCommerce shipping, it’s time to get to work. For this tutorial, we’ll assume that you already have a WooCommerce online store set up.
If not, you’ll want to start there. To configure your shipping options, you’ll first need to have your WooCommerce shop and payment gateways set up. If you need help designing and building your store, feel free to check out our WooCommerce Builder. Once that is out of the way, you can move onto the shipping settings.
Step 1: Setting Up Shipping Zones
The first step in configuring your shipping options is to select your WooCommerce shipping zones. In a nutshell, this refers to the geographical locations you’ll be delivering your products to. You can choose different countries, and then further narrow down the locations by specific regions.
After you select a shipping zone, WooCommerce will ask you to choose a shipping method for it. You can also apply different shipping rates to each zone.
To get started, navigate to WooCommerce > Settings in your WordPress dashboard. Under the General tab, scroll down to the general options section:
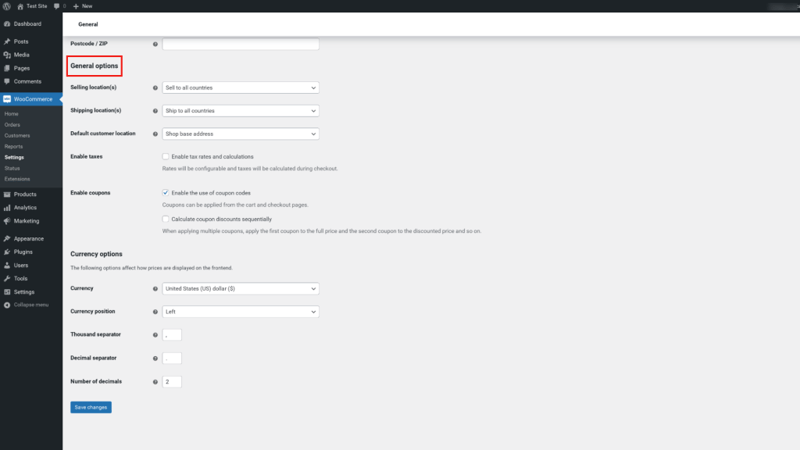
From the drop-down menu, you can choose which locations to ship to. For example, you could select Ship to all countries or Ship to specific countries only. We’ll use the former for the sake of this tutorial.
Next, click on the Shipping tab:
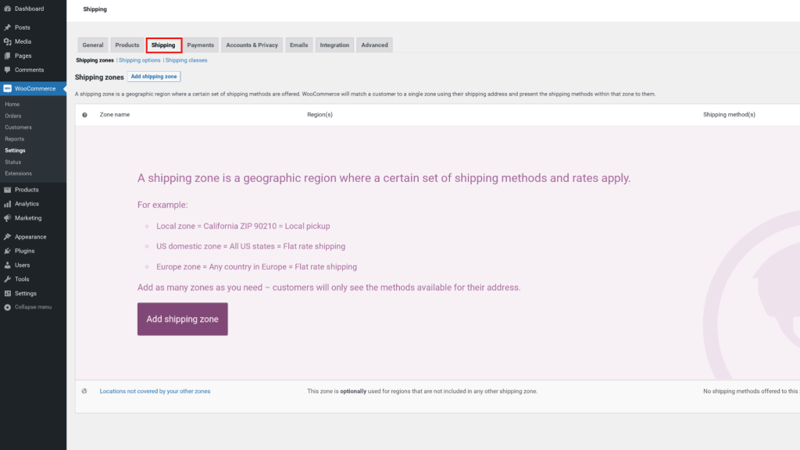
On this screen, you will find the default WooCommerce shipping settings. Go ahead and select Shipping Zones, followed by the Add shipping zone button:
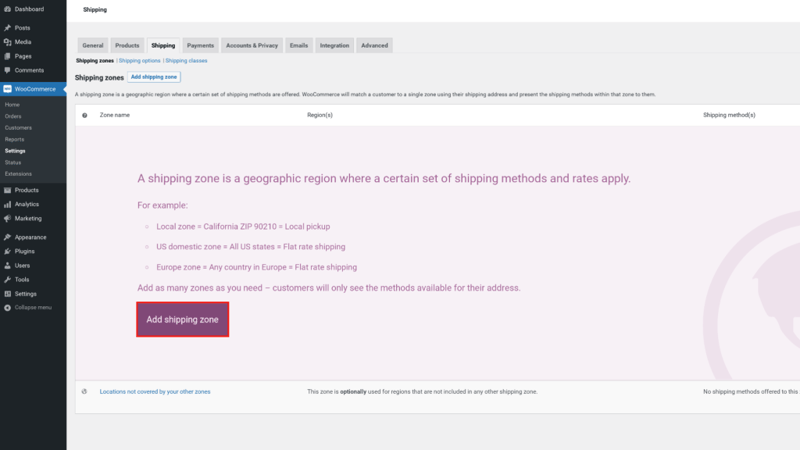
Next, you can enter a Zone Name, as well as a Zone Region from the drop-down menu. We’ll select the United States and Canada as an example:
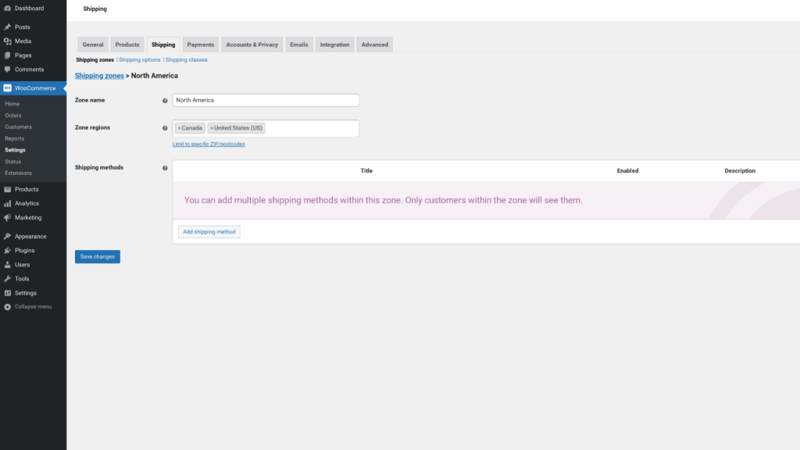
Note, your customers will only be able to see the shipping options for the zones they are located in. For example, if you also ship to the United Kingdom, those shoppers won’t be able to see your shipping options for the U.S. You can further specify the shipping zone by clicking on the Limit to specific ZIP/postcodes link.
Once you’ve chosen your shipping zones, the next step is to choose your shipping method for that zone. Let’s take a look at how to do that in the following section.
Step 2: Choosing the Right Shipping Method
On the same screen we just used to select Shipping Zones, you can find the option to select a shipping method. To do so, click on Add shipping method:
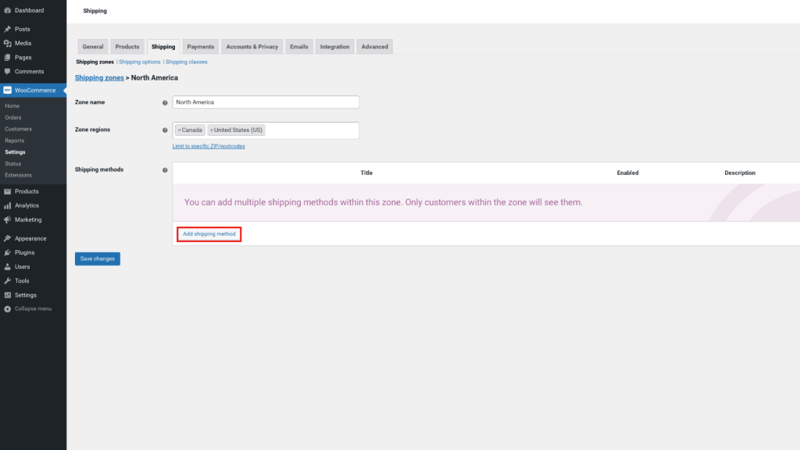
Out of the box, WooCommerce offers you three standard shipping methods. We’ll discuss each option in more detail below.
Flat Rate Shipping
Flat rate shipping is when you charge customers a fixed rate based on shipping calculations for a particular zone. You can add multiple flat rates per zone. This includes setting a standard rate per item, shipping class, or order. For example, you could add a flat fee or a percentage of the order total (such as 10 percent of the total purchase amount).
If you select Flat rate as your shipping method, you can click on the Edit link under the name, and a new window will open:
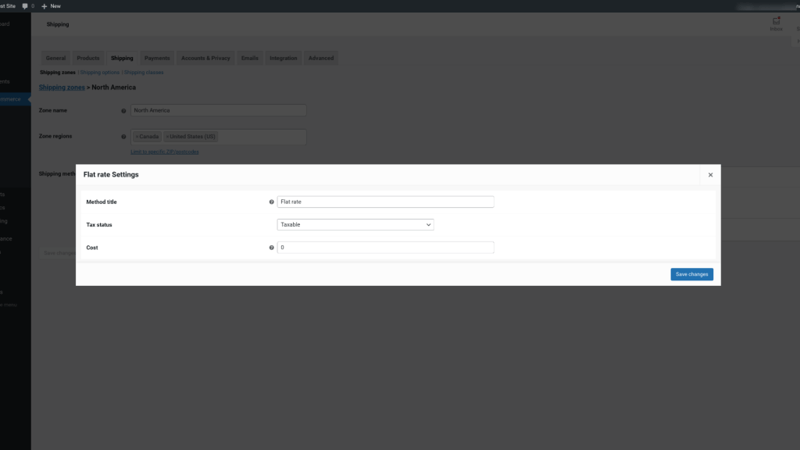
On this screen, you can enter a method title, which will be visible to customers, and configure the tax status, meaning whether the shipping will be taxable. You can also set the shipping method cost. For example, if you want to charge $2.00, you would input “2.00”.
This cost amount will apply to the entire shopping cart. For more information on your options for advanced costs, you can click on the question mark icon next to the field title. We’ll get into more detail when we discuss rates and fees. When you’re done, click on Save changes.
Free Shipping
Free shipping is one of the best perks you can offer your ecommerce customers. As we mentioned earlier, it can be a powerful way to increase sales and conversions.
Of course, offering free shipping to your customers isn’t without its downsides. You’ll need to determine whether the incurred costs of providing free shipping, as well as relatively fast delivery times, is a cost-effective approach for your business.
As with flat rate shipping, if you select this as your shipping method, you can click on the Edit link from the WooCommerce > Shipping screen. A new window will open where you can enter a method title and select a requirement for free shipping:
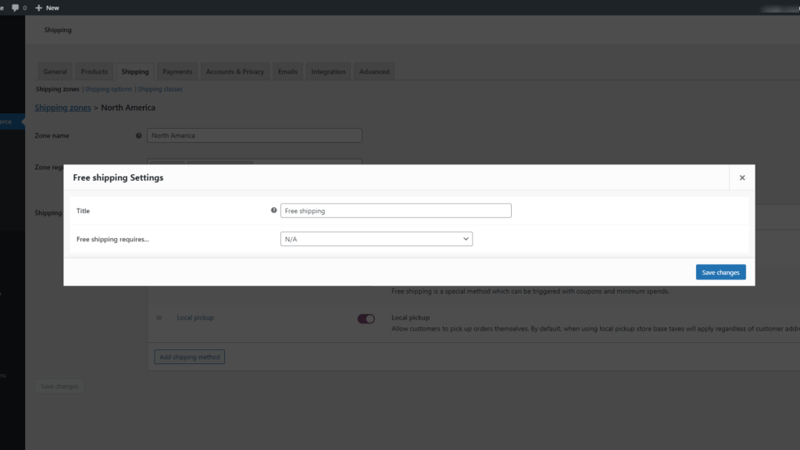
For this section, you can choose N/A if you don’t want to specify any criteria to qualify orders for free shipping. Alternatively, you can choose between:
- Valid free shipping coupon
- Minimum order amount
- Minimum order amount OR a coupon
- Minimum order amount AND a coupon
When a customer adds a product to their WooCommerce cart, they will be able to see which shipping options are available. When you’re done, click on the Save changes button.
Local Pickup Shipping
A third option is local pickup. As with flat rate shipping, you can use this option to add your own title, apply taxable status, and configure the cost for shipping:
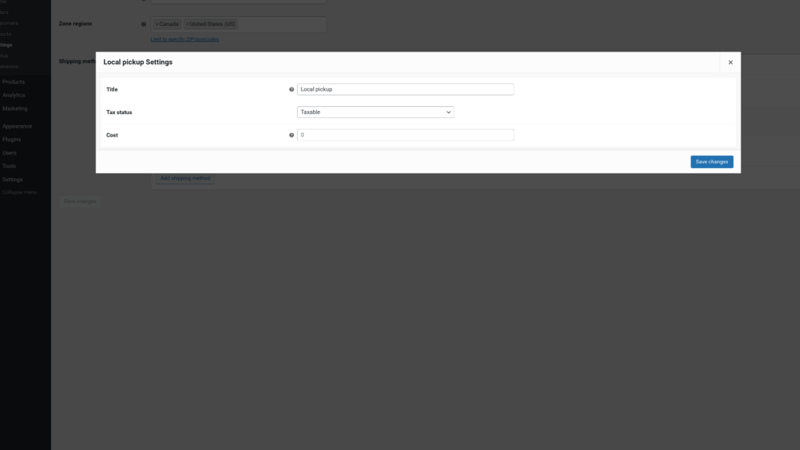
Considering that this is a situation where the customer will be picking up their order, likely from your brick-and-mortar store, you probably won’t need to enter an amount for the shipping cost. Also, note that by default, the local pickup WooCommerce shipping option will calculate taxes based on the store’s location, rather than your customers’ addresses.
Step 3: Setting Up Shipping Rates and Fees
So far, we’ve discussed the rates for the main types of shipping methods. However, let’s go a bit deeper to help you fully understand your options.
For flat rate shipping, you can choose from a handful of advanced options. This includes:
- [qty]: You can use this to charge customers shipping rates based on the number of items they have in their carts.
- [fee]: This enables you to add shipping charges based on the total cost of the orders.
If you want to use the [fee] setting, you’ll have additional arguments to choose from:
- percent: Set additional shipping fees as a percentage.
- min_fee: Define a minimum value for additional charges.
- max_fee: Set a maximum value for additional charges.
Let’s say you choose flat rate shipping as your shipping method. In the Cost field, you could enter one of the above placeholders. If you used the [qty] placeholder, you could charge an additional fee for every item a customer adds to their shopping cart. For example, if you put “2 + (5 * [qty])” in the Cost field, this means you would be charging your customers a flat rate shipping fee of $2.00, plus an additional $5.00 for every product they add to the cart.
On the other hand, if you chose the [fee] placeholder, you could add an extra shipping charge based on a percentage of the order total. For instance, you could add “2 + [fee percent=”5” max_fee=”20”]”. This means that the shipping would have a base fee of $2.00, plus 5 percent of the total purchase cost without exceeding $20.00.
If all of these options get a bit confusing, don’t worry. There are some additional settings and tools you can use to simplify the process.
Shipping Options and Calculations
Next, you can navigate to Shipping > Shipping Options:
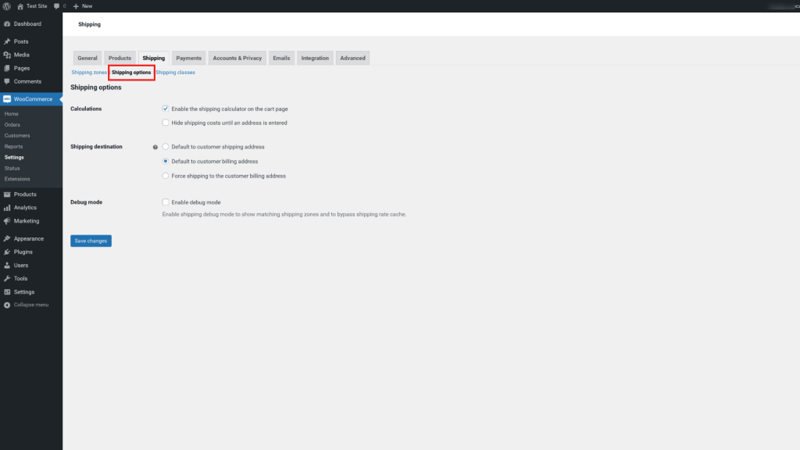
All of the settings on this screen are optional. However, there are a handful of helpful features that you might want to consider using. For example, you can opt to Enable the shipping calculator on the cart page.
With this setting selected, your shoppers will be able to see how much shipping fees will cost while adding items to their carts. This can help ensure transparency, so they’re not caught off guard when they check out.
You’ll also have the option of selecting the default shipping destination as:
- The customer shipping address
- The customer billing address
- Force shipping to customer billing address
When you’re done, make sure to click on the Save changes button at the bottom of the screen to apply your preferences.
Step 4: Adding Shipping Classes
You can also set the flat rate shipping costs based on product shipping classes. For example, you may want to implement a different cost based on whether the customer has requested regular or expedited shipping.
Shipping classes are used to group similar products and apply the same type of shipping methods and fees. For example, you can also categorize products into classes based on weight, such as bulky items versus small ones.
Let’s say that you sell snowboarding gear, apparel, and equipment. You’re likely going to charge more to ship a helmet or boots than you would a t-shirt or pair of gloves.
To add a new shipping class, you can navigate to the Shipping tab, and then click on the Shipping classes link, followed by the Add shipping class button:
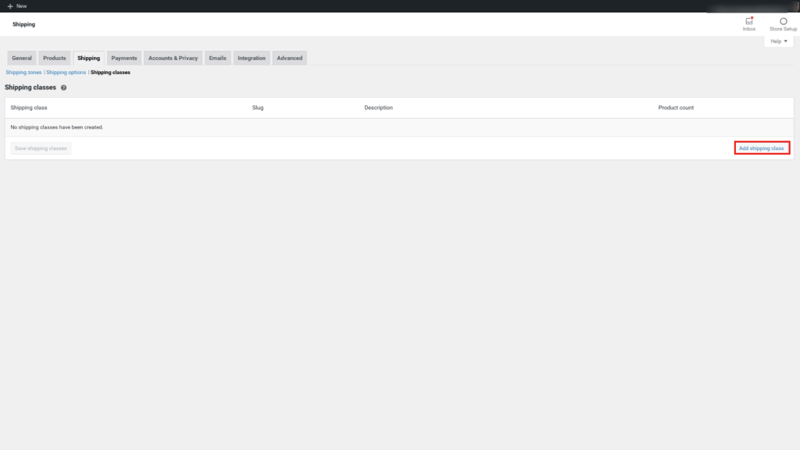
On the next screen, you can enter a title for the shipping class, a slug, and a description. As an example, we’ll use “shoes”:
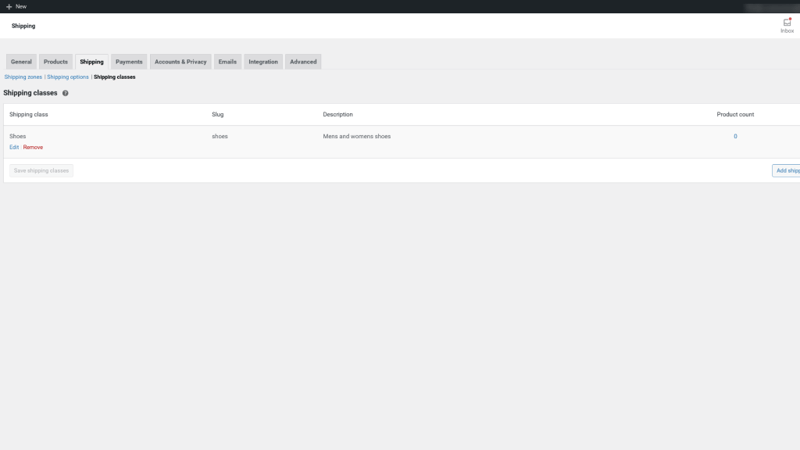
When you’re done, click on Save shipping class. Next, assuming that you’ve already enabled at least one type of shipping method (which we covered how to do in the previous sections), you can simply select that method for this class.
To do so, navigate back to Shipping Zones, and then browse to the Shipping methods section. Click on the Edit link under the shipping method you want to use:
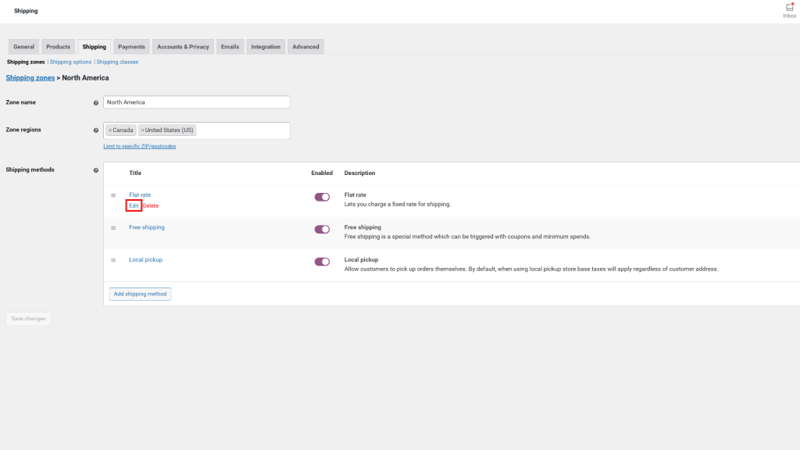
Now, the same Flat rate shipping window will appear as before. However, this time there will be an extra Shipping class costs section:
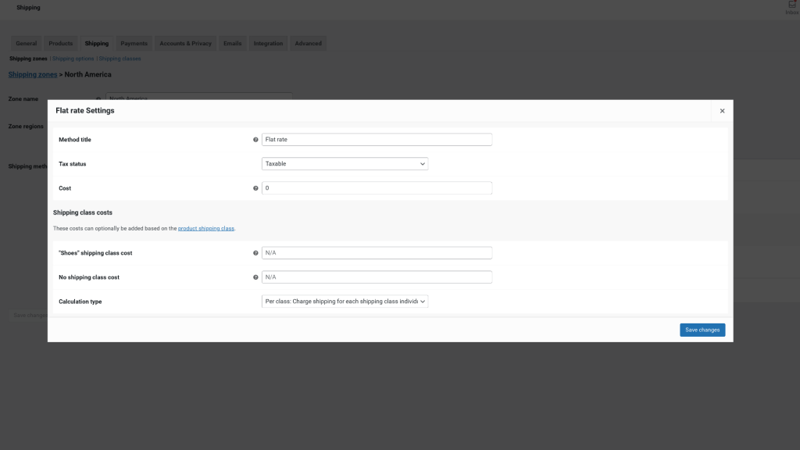
Within this area, you can select the specific shipping costs for this class and define a calculation type. For the latter, you have two options:
- Per class, meaning the shipping class influences the shipping cost
- Per order, in which the item in the order with the highest price will determine the shipping cost
You can repeat this process for each type of shipping class you want to create for your WooCommerce products. When you’re done, click on Save changes.
Step 5: Setting Up the Order Fulfillment Operation
Once you have your shipping zones, methods, and rates squared away, you’re already mostly finished configuring your WooCommerce shipping. However, you still need to tackle your order fulfillment operation(s).
Order fulfillment refers to your process for storing products and organizing inventory, as well as packing and shipping your orders. Of course, some of your operations, such as where you store your products and inventory, will depend on your business, just as the carriers you use will likely depend on your locations.
However, WooCommerce does offer a range of order fulfillment and inventory settings that you’ll want to be aware of. For example, to manage your inventory options, you can navigate to WooCommerce > Settings > Products > Inventory:
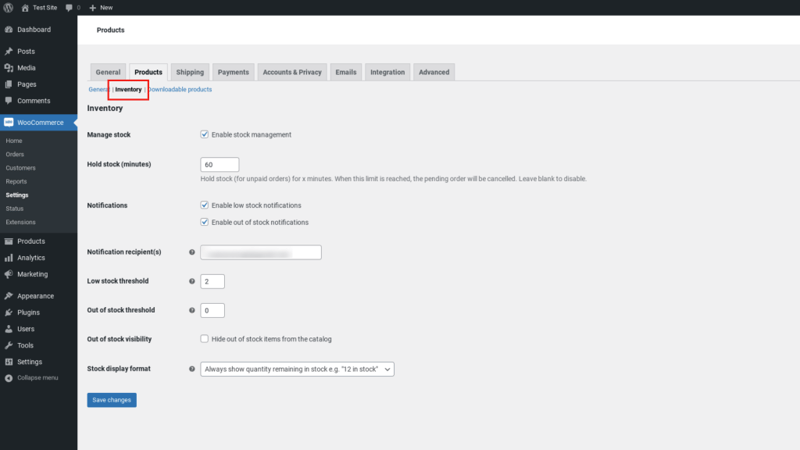
On this screen, you have a handful of options for inventory management. For example, you can enable low and out-of-stock notifications, as well as set thresholds for each.
You can also choose to manage stock. If you enable stock management, inventory for your physical products will be managed automatically. You can simply enter the amount, and WooCommerce will subtract items as customers purchase them. If you leave this option unselected, you will need to enter the inventory status manually.
WooCommerce Shipping, Inventory, and Fulfillment Extensions
At this point, we’ve covered the basics of WooCommerce shipping options. However, as you might recall, the settings that come with the plugin by default are not the only options at your disposal.
To enhance your WooCommerce shipping and order fulfillment experience, you might also consider using a third-party extension or plugin. There are a wide variety of these tools to choose from, including:
- WooCommerce Shipping: A handy extension you can use to print shipping labels directly from your website dashboard. In addition to being free to use, it also lets you print labels for both USPS and DHL. Powered by Jetpack, this plugin can help expedite your order and fulfillment process by eliminating the need for you to manually enter the details of each order into your labeling software. The extension connects with WooCommerce directly, so it does all the heavy lifting for you.
- ShipStation Integration: A free tool you can use to streamline your WooCommerce shipping and fulfillment operations. With it, you can automatically import orders from WooCommerce, or other platforms such as Amazon. Then, you can connect to an extensive list of carrier choices, leveraging USPS rates and discounts in the process. You can also customize notification emails, shipping labels, and packaging slips, and provide a tracking page with your business’ branding.
These are just two of many plugins you could use to extend the functionality and features of your WooCommerce shipping operations. To explore more options, you can navigate to WooCommerce > Extensions from your dashboard.
Optimize Your Shipping Options To Maximize Your Users' Shopping Experience
WooCommerce is a robust and powerful tool for starting and managing an ecommerce store. However, a critical part of optimizing the online shopping experience for your customers is making sure you provide them with the best shipping options possible.
As we discussed in this post, WooCommerce offers a wide variety of shipping options. Some come built-in with the plugin, while others are available through premium tools. By following this guide, you can quickly configure your shipping settings to the specific needs of your business (and target audience).
Do you have any questions about configuring WooCommerce shipping options? Let us know in the comments section below!
Looking for fresh content?
By entering your email, you agree to receive Elementor emails, including marketing emails,
and agree to our Terms & Conditions and Privacy Policy.
