Table of Contents
Table of Contents
- What is WordPress Multisite?
- How Does WordPress Multisite Work?
- How is Data Stored With WordPress Multisite?
- When Should You Use WordPress Multisite?
- Can You Use WordPress Multisite to Host Client Sites?
- How to Create a WordPress Multisite Network
- 1. Enable WordPress Multisite in wp-config.php File
- 2. Run Network Setup Tool in WordPress Dashboard
- 3. Add Code Snippets to wp-config.php and .htaccess
- 4. Manage Multisite Network from Network Admin Dashboard
- Can You Use Elementor Pro with WordPress Multisite?
What is WordPress Multisite?
WordPress Multisite is a feature that lets you create an entire network of sites powered by a single WordPress install. The network shares a database and file system, which means you can control everything, including the themes, features, and user roles from a single dashboard.
You can choose to keep your network private – like a local business creating a network site for each location. Or, you can make your network public and allow people to register and create their own sites in your network, like WordPress.com.
How Does WordPress Multisite Work?
WordPress Multisite is a core WordPress feature, though it’s not enabled by default.
Once you enable it, you’ll get a new Network Admin dashboard where you can manage all the sites in your network. WordPress Multisite also adds a new Network Admin user role, which is the only type of user account that can access the aforementioned dashboard.
There, you can make decisions like:
- Whether or not users can register and create their own sites.
- Which themes and plugins are available to network sites.
- How much control individual site owners have, like whether or not they can manually deactivate some of the plugins that you’ve made available.
Each site will also get its own WordPress dashboard where people can manage content, themes, and plugins. However, unlike a regular WordPress site, individual site admins cannot install their own themes or plugins – they can only choose from the options that the overall network admin has enabled.
How is Data Stored With WordPress Multisite?
WordPress Multisite allows you to create unlimited network sites, but there’s a big difference in how WordPress stores the data for these sites.
If you were to create multiple single sites WordPress installs, each site would get its own database and files.
However, with WordPress Multisite, all the sites share the same database and files.
Misha Rudrastyh has a great breakdown of how a Multisite database works if you want a deeper technical look, but basically:
- WordPress will create some new database tables for each network site.
- WordPress shares some tables between all the network sites.- most notably wp_users.
Additionally, to organize the files for each network site, WordPress adds a folder for each network site in the uploads folder. For example:
- Single site – uploads stored in wp-content/uploads/year/month
- Multisite – uploads stored in wp-content/uploads/NETWORK_SITE/year/month
When Should You Use WordPress Multisite?
WordPress Multisite is a good option if you’re:
- Building a network of sites with similar functionality.
- Looking to create a place where individual users can create their own sites, like WordPress.com. Some membership plugins can even integrate with Multisite so that you can charge people to create a site on your network.
To the first use case, a few examples would be a:
- Physical business with a separate site for each different location.
- University with a separate site for each department or faculty member.
- Real estate/insurance agency with a separate site for each agent.
- Etc.
For example, the Georgia State University website is a WordPress Multisite install with over 150 network sites for various departments, functions, etc.
Can You Use WordPress Multisite to Host Client Sites?
With WordPress Multisite domain mapping, you have the option to use a completely custom domain name for each site on your network, which might have you wondering whether or not you can use WordPress Multisite as an easier way to manage multiple client sites.
Well…it definitely is possible, and I do know that there are some WordPress developers who opt to go this route for basic client sites without any special functionality.
However, I don’t think it’s the best approach for a few reasons:
- Shared database – all your clients’ sites would share a single database, which isn’t great from a privacy perspective.
- Single point of failure – because you’d essentially be running all your client sites from a single WordPress install, anything that happens to that WordPress install will pull down all your clients’ sites.
- Shared hosting resources – all your network sites share the same hosting resources, which can be a problem if one network site uses a lot more resources than the others.
- Hard to migrate – if you ever need to migrate your client’s site somewhere else, it’s going to be a pain. While it is possible to “extract” a single site from a Multisite network, it’s a lot more involved than your normal migration process, or you’ll need to purchase something like WP Migrate DB.
How to Create a WordPress Multisite Network
Below, I’ll show you the manual process for how to create a WordPress Multisite network.
However, a lot of hosts have now built WordPress Multisite into their auto-installer tools. So before you go jumping into this WordPress Multisite tutorial, you might want to check if your host’s auto-installer gives you a one-click Multisite option:
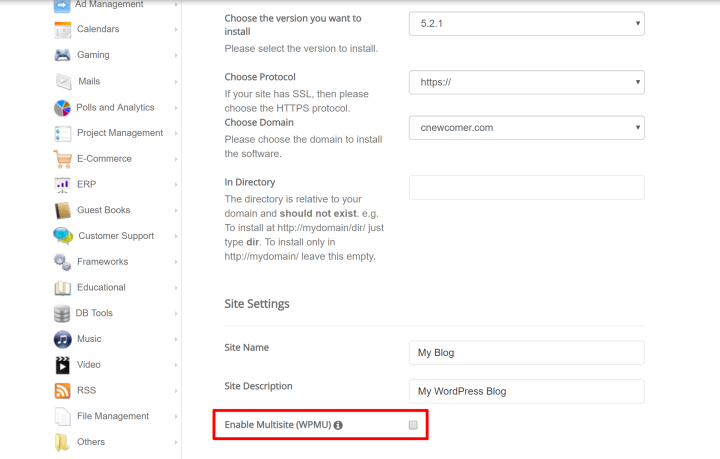
If not, or if you want to enable Multisite functionality on an existing site, here’s how to set everything up…
1. Enable WordPress Multisite in wp-config.php File
Typically, it’s simpler to create a fresh WordPress install for your Multisite network, but you can also enable it on an existing WordPress site (just make sure to deactivate all your plugins first).
To get started, you’ll need to connect to your site via FTP or cPanel File Manager and edit your wp-config.php file. Then, add the following code snippet above the /* That’s all, stop editing! Happy publishing. */ line:
/* Multisite */
define( ‘WP_ALLOW_MULTISITE’, true );
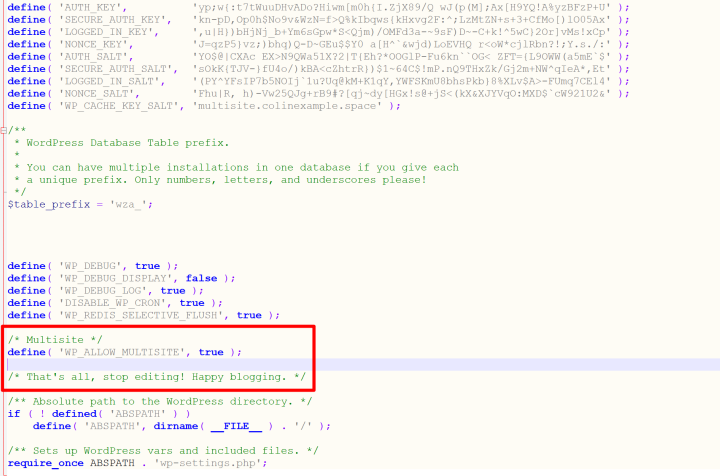
Then, save the file and upload it back to your server.
2. Run Network Setup Tool in WordPress Dashboard
Once you’ve added that line to the wp-config.php file, log in to your WordPress site’s dashboard and go to Tools → Network Setup:
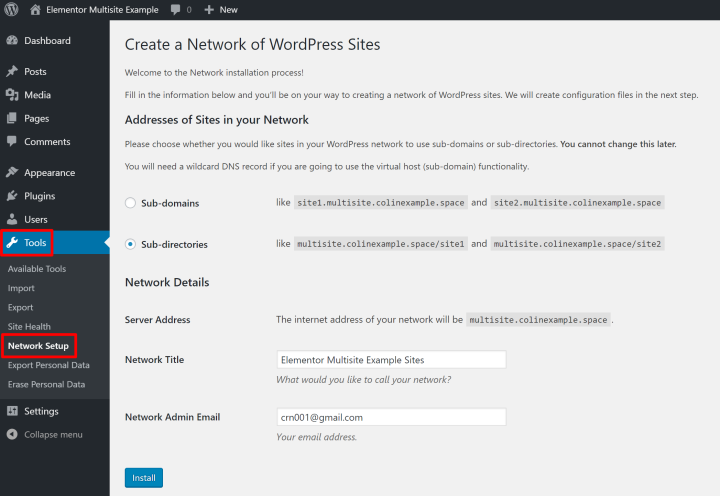
Here, you’ll make a very important choice about the URL structure of your network. Specifically, whether each site in your network should get its own:
- Sub-domain — like site1.yournetwork.com. If you choose subdomains, you’ll also need to add a wildcard DNS record.
- Sub-directory — like yournetwork.com/site1. There’s no further configuration with this method.
There’s no right answer — just make sure to think things through as you cannot change this structure later.
Additionally, there’s also a third option – domain mapping, which lets you use a custom domain for each network site – e.g. site1.com, site2.com. If you want to go this route, just choose sub-directories for now, as you’ll need to set domain mapping up later. If you’re interested in domain mapping, check out this Multisite domain mapping guide.
Once you’ve made your choice and configured the basic Network Details, click Install.
3. Add Code Snippets to wp-config.php and .htaccess
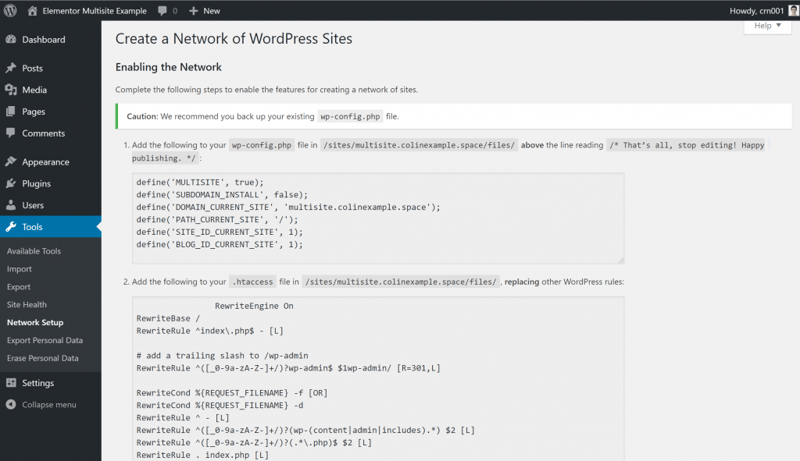
On the next page, WordPress will give you two code snippets that you’ll need to add to your site’s files:
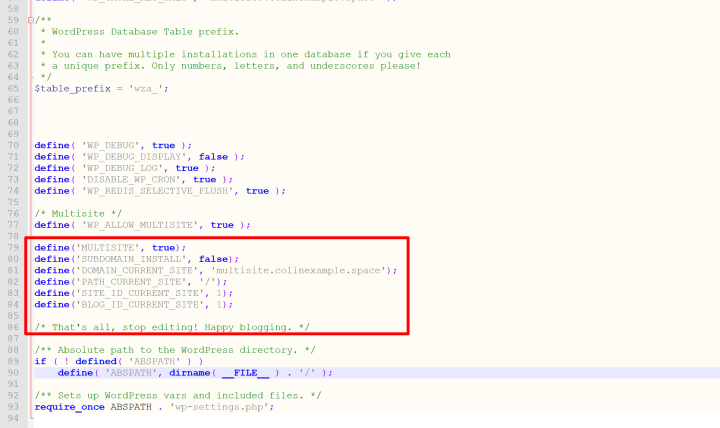
- The first code snippet goes in wp-config.php above the /* That’s all, stop editing! Happy publishing. */ line.
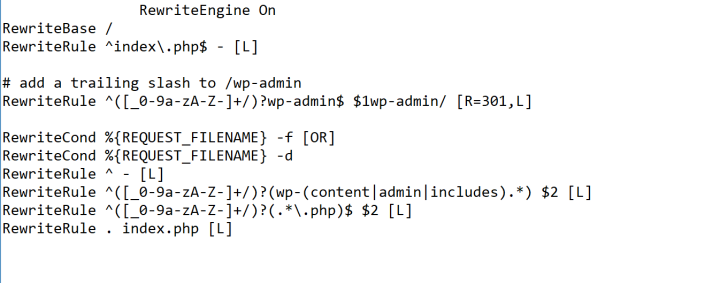
The second code snippet goes in .htaccess and replaces the existing WordPress rules.
Here’s what your wp-config.php file should look like:
And here’s what your .htaccess file should look like — notice how you’re replacing the existing WordPress rule:
Now — your Multisite network is active!
4. Manage Multisite Network from Network Admin Dashboard
After completing the previous step, you might need to log in to your WordPress dashboard again.
Then, you should see the new Network Admin area. You can access it from the My Sites option in the WordPress toolbar, or you can go to yoursite.com/wp-admin/network:
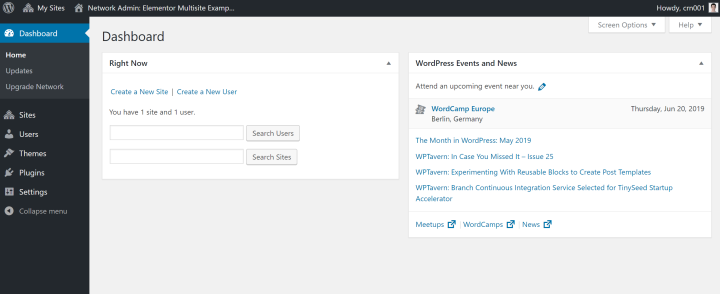
Much like how the regular WordPress dashboard lets you manage a single site install, the Network Admin lets you manage the settings for your entire network.
Let’s go through some of the important functionality here.
Network Settings
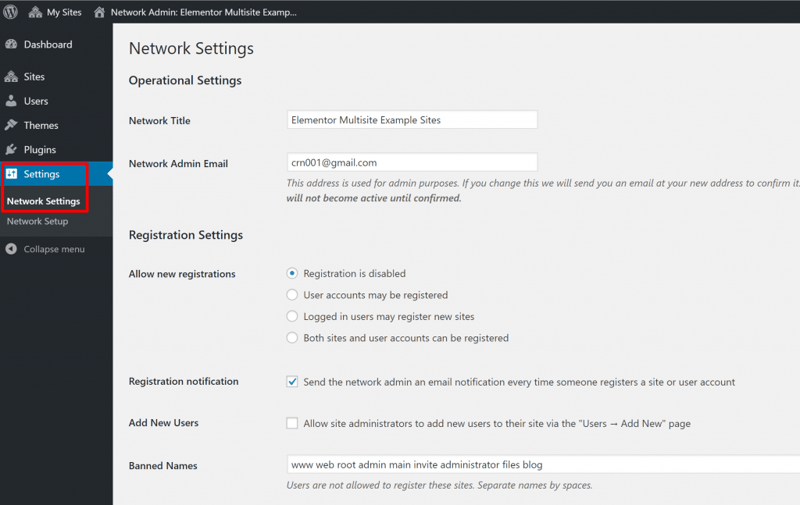
To set things up, you’ll first want to go to Settings → Network Settings. There, you can configure basic settings for how your network functions, like whether or not people can register and/or create new sites, as well as the default content that is installed on new sites:
Themes
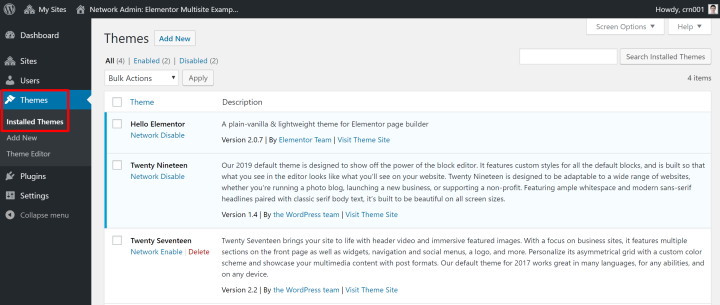
Then, the Themes tab lets you choose which themes are available to individual site owners. Individual site owners will be able to choose from all the themes that you’ve Network Enabled, and you can install new themes just like you would on a single site install:
Plugins
The Plugins area is similar, with just a little tweak:
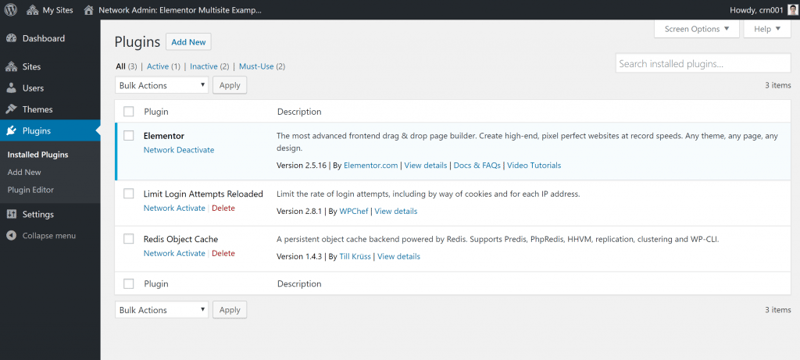
- When you install a plugin, you can Network Activate it, which automatically makes it active for each individual site in the network. Individual site owners cannot deactivate it – it’s always active.
- Or, if you enable the Plugins administration menu in the Network Settings area, individual site admins can choose whether or not to activate any plugins that you’ve installed, but haven’t specifically Network Activated.
For example, if you wanted Elementor to be active on every single network site, you could Network Activate it:
Creating New Sites
Finally, to manually create a new network site, you can go to Sites → Add New:
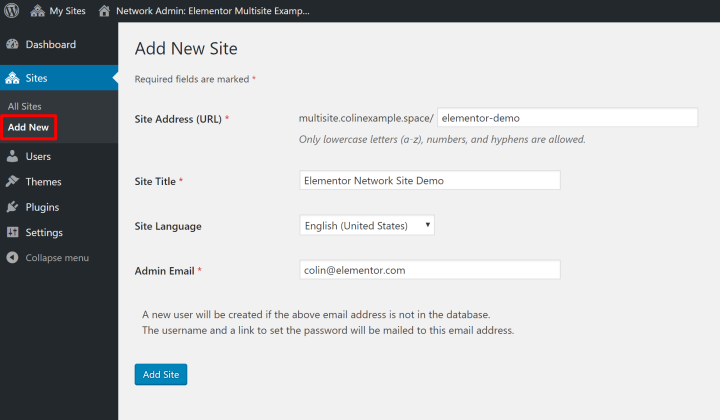
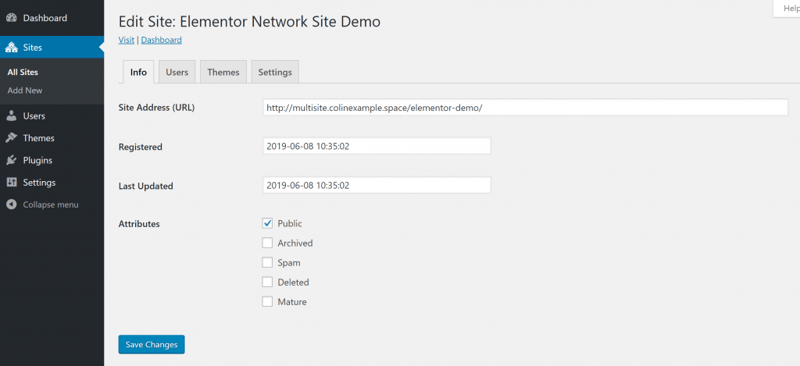
Once you click Add Site, you can edit that site to configure/view additional information, like the users, themes, and settings for that site. For example, you could enable a theme for just a single site, rather than network enabling a theme and making it available to all sites:
Individual Site Admin Dashboard
In addition to the Network Admin area, each individual site also gets its own WordPress dashboard, which looks and functions a lot like the normal WordPress dashboard for single-site installs.
The biggest difference is that individual site admins cannot install new themes or plugins (and they might not even be able to view the Plugins area, depending on how you’ve configured things).
For example, an individual site owner can choose to activate the Hello Elementor theme, but there’s no option for them to install their own theme:
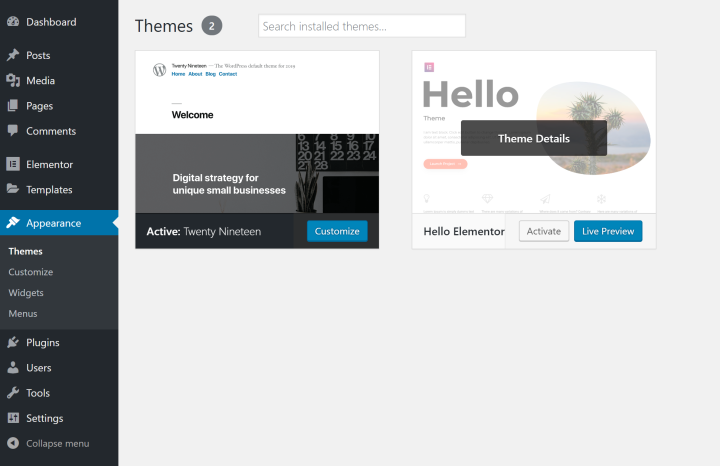
Similarly, because Elementor is network activated, individual site owners can access all the regular Elementor features, but they wouldn’t be able to install their own plugins or deactivate Elementor.
And that’s all there is to it!
Can You Use Elementor Pro with WordPress Multisite?
Yes, you can use Elementor Pro alongside WordPress Multisite. However, you will need an active license key for each individual network site, rather than just using one license key for the entire network.
Summary
WordPress Multisite is not the right solution for every situation involving multiple WordPress sites, but it does make a great option if you need to create a network of similar websites, like some of the examples I laid out earlier.
To set up WordPress Multisite, most WordPress autoinstallers now let you activate Multisite with the check of a box. If not, or if you’re adding Multisite to an existing WordPress install, you can follow the manual method that I detailed in this post.
Any questions about how to use WordPress Multisite or whether it’s the right tool for your situation? Ask away in the comments!
Looking for fresh content?
By entering your email, you agree to receive Elementor emails, including marketing emails,
and agree to our Terms & Conditions and Privacy Policy.
