Table of Contents
If you’re using Instagram to connect with your audience, Instagram only gives you one option to send visitors to your website – the link in your Instagram bio.
Because you cannot link individual Instagram posts, some people resort to manually updating their link in bio every time they publish a new blog post on their website.
In this post, you’ll learn a better way that allows you to keep the same link in your bio, while still being able to make sure that your visitors can always access your latest content from the link in your Instagram bio.
To achieve this, you can use Elementor to create a dedicated link in bio landing page for Instagram. Your link in the bio landing page will follow a similar design to Instagram for a seamless experience, while also letting you dynamically feature your latest blog content without lifting a finger.
How to Create an Instagram Link in Bio Landing Page WIth Elementor
If you want to see the full tutorial with every step detailed, you can watch the full video tutorial above. Otherwise, keep reading for a text-based tutorial that follows along with the video.
Note – to follow this tutorial, you will need Elementor Pro so that you have access to the Posts widget. The Posts widget is what lets you dynamically feature content without needing to edit your landing page every time you publish a new blog post.
1. Create a New Page
To get started, create a new page in your WordPress dashboard (Pages → Add New).
Then, add a title (e.g. Link in Bio) and click the button to Edit with Elementor to open the Elementor interface.
In the Elementor interface, click the gear icon ain the bottom-left corner and then set the Page Layout equal to Elementor Canvas. Then, go to the Style tab and use a light color for the background of the Body Style.
2. Add a New Section for Your Header
Next, click the plus icon to create a new section and choose a three-column layout.
In the section’s settings, set the Content Width equal to Boxed, and the width equal to 940. This helps you keep the look and feel of Instagram’s boxed layout.
Set the section background equal to white and add a solid grey border to the bottom.
Then, add your content to the design:
- Add an image widget to the left-most column to display your image logo. You can set a dynamic link to your homepage using the Link setting.
- Add another image widget to the middle column to display your wordmark logo (or text, if you don’t have a wordmark)
- Add a button widget to the right-most column and set the CTA and the page to which you want to link. Then, style the button.
Once you’ve added your content, open the settings for the first column, and change the width to 10% so that the image widgets are nicely aligned.
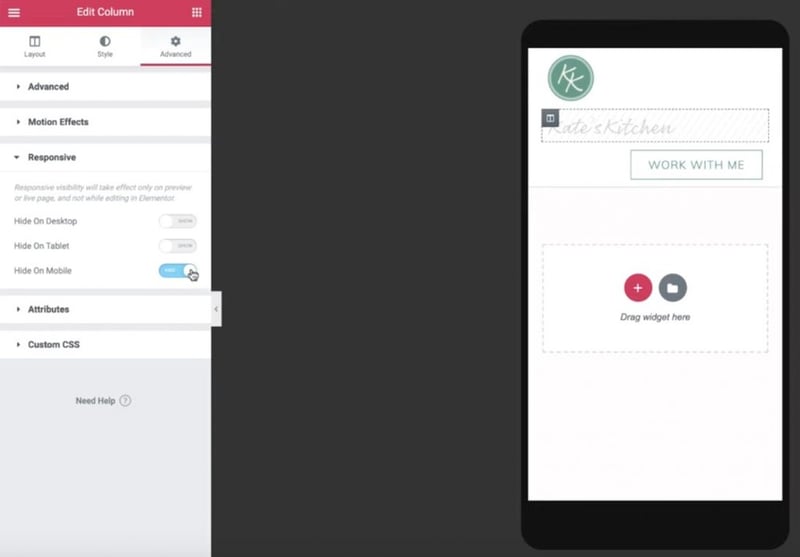
Then, open the Mobile preview using the icon in the bottom-left corner. If needed, make some adjustments so that the mobile version of your landing page looks good. Remember, most of your Instagram visitors will be on mobile devices.
If needed, you can hide the middle column so that your logo and button are horizontally aligned:
3. Duplicate Header Section to Create Featured Post Section
Now, go back to the desktop view and right-click on your header section to duplicate it.
In the settings for the duplicated section, go to the Style tab and set the background color to transparent.
Then, use right-click to delete the second and third columns. Once you do that, you should be left with just your logo.
From there:
- Open the remaining column’s settings.
- Go to the Advanced tab.
- Set the padding on all sides equal to zero.
- Delete the remaining image widget (your logo).
Once you’ve deleted everything, you can drag in a Heading widget and add some text about your site. Make sure to set the color and typography to match your site.
Then, duplicate the Heading widget and set the text equal to the URL for your site. Next, add a dynamic link that contains the site URL.
Once again, you’ll want to go to the mobile preview and make some adjustments. For example, you might need to change the column width and edit the padding for mobile devices.

4. Add Your Recent Posts
Now, you can use the rest of the space on your landing page to showcase your recently published content.
To showcase your recent post(s), go back to the desktop preview and add a Posts widget below the two heading widgets.
In the Posts widget settings:
- Set Columns equal to 1
- Set Posts Per Page equal to 1
- Set the Image Ratio equal to 0.3
Hide the Title and remove the Meta Data.

Then, use the Query setting to control which post to display:
- Set Include By equal to Term
- Set the Term equal to Linkinbio
You’ll need to create a new WordPress blog post category called “Linkinbio”. Any posts that you add to this category will automatically be featured on your Instagram landing page.
Then, go to the Style tab to style the excerpt text.
Finally, add a new Divider widget to create a bottom border. Match the same light grey from your first section’s border.
5. Create Instagram Grid
Now, you need to create the Instagram grid that appears below your featured post.
To get started, right-click on your existing Posts widget to copy it. Then, paste it below the bottom grey border from the previous section.
Now, you just need to make some changes to your duplicated Posts widget:
- Change Columns to 3
- Set the Posts Per Page to a multiple of 3 to ensure you always have a square grid.
- Set the Image Ratio to 1
- Hide the Excerpt
You can also use the Style tab to adjust the spacing of the images.
Then, go to the mobile preview to adjust your mobile design.
You might want to:
- Hide the large featured post image and divider
- Set the posts grid equal to 3 on mobile
And that’s it! You just created a custom Instagram landing page:
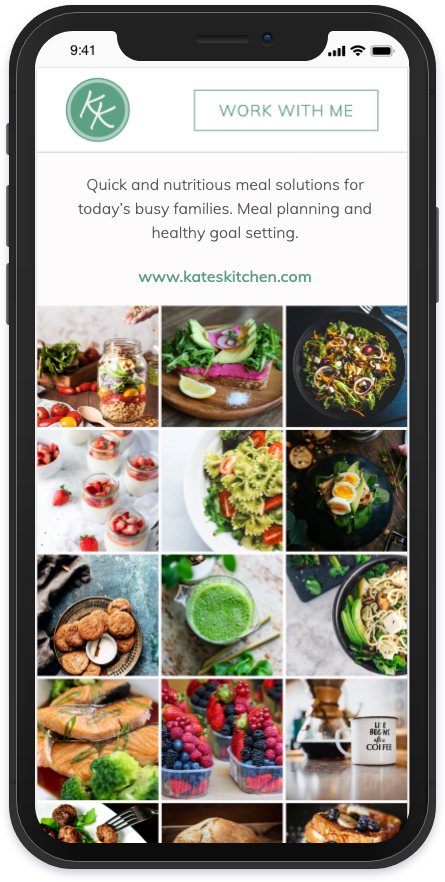
Whenever you publish a new blog post with the Linkinbio category, it will automatically show up on this page.
To finish things out, all you need to do is add the link to your landing page to your Instagram profile. Now, you won’t need to update the link every time you publish a new post. Cool, right?
To get started with your own Instagram link in bio landing page, purchase Elementor Pro today.
Looking for fresh content?
By entering your email, you agree to receive Elementor emails, including marketing emails,
and agree to our Terms & Conditions and Privacy Policy.


