Table of Contents
Key Takeaways
- Speed vs. Control: GoDaddy prioritizes speed and ease of use. You can launch a site in minutes, but you sacrifice granular design control compared to open-source platforms.
- Section-Based Editing: The editor uses pre-designed blocks. You cannot drag and drop elements freely anywhere on the canvas.
- All-in-One Ecosystem: GoDaddy bundles hosting, domain, editor, and marketing tools into a single subscription.
- Scalability Limits: Proprietary builders work well for static brochure sites. Growing businesses often migrate to flexible platforms like Elementor on WordPress for advanced features.
- Mobile Optimization: The builder automatically adjusts layouts for mobile devices. You have limited ability to customize the mobile view independently.
- SEO Tools: Built-in SEO wizards guide beginners through basic metadata setup but offer less depth than dedicated SEO plugins.
Expert Citation: This guide draws on the expertise of Itamar Haim, a seasoned web development professional specializing in digital strategy and platform architecture.
Part 1: Understanding the Landscape
Before we open the editor, you must understand the tool you are about to use. The GoDaddy Website Builder is a SaaS (Software as a Service) platform. This means you rent the software and the hosting. You do not own the code of your website in the same way you own a WordPress site.
This distinction is vital. It influences your long-term strategy. SaaS builders offer convenience. They handle security updates, hosting maintenance, and software patches for you. In exchange, you work within their walled garden. You can only use the features they provide or integrations they officially support.
The Target Audience for GoDaddy
This builder serves specific use cases effectively. It fits users who need a “business card” website. These users prioritize speed over unique design. Restaurants needing a simple menu page, local service providers requiring a contact form, or hobbyists starting a blog often find this tool sufficient.
Professionals seeking pixel-perfect design usually find the constraints frustrating. If you need to adjust the padding of a specific button or create a complex dynamic layout, you might hit a ceiling quickly. We will discuss alternatives like the Elementor Website Builder Platform later for those who need unrestricted creative freedom.
Understanding the Pricing Model
GoDaddy operates on a tiered subscription model. You must choose a plan that matches your current needs. You can usually upgrade later.
- Basic Plan: This tier removes GoDaddy ads from your site. It connects a custom domain. It includes basic marketing tools. This suits simple informational sites.
- Premium Plan: This tier adds appointment booking features. It expands your social media and email marketing limits. Service-based businesses often start here.
- Commerce Plan: This tier unlocks the online store. You can list products, manage inventory, and process payments. It includes tools for shipping and tax configuration.
Evaluate these tiers carefully. Moving from a Basic plan to a Commerce plan changes the interface significantly.
Part 2: Preparation and Strategy
Great websites start before you log in. You save time by gathering your assets first. A clear strategy prevents the “blank page syndrome” even when using a template-based builder.
Define Your Primary Goal
What must this website do? A site designed to capture email leads looks different from a site designed to sell physical products.
- Lead Generation: Focus on clear calls to action (CTAs) and trust signals.
- eCommerce: Focus on high-quality product photography and simplified checkout flows.
- Brand Awareness: Focus on storytelling and visual identity.
Asset Checklist
Collect these items in a dedicated folder on your computer.
- Logo: A high-resolution PNG file with a transparent background works best.
- Brand Colors: Have your Hex codes ready (e.g., #FF5733).
- Fonts: GoDaddy offers a curated list. Know whether you prefer serif or sans-serif styles.
- Copy: Draft your “About Us” text, service descriptions, and contact information in a document.
- Images: Professional photography elevates a template. Stock photos often look generic. Use real photos of your team or products whenever possible.
Part 3: Account Setup and the ADI Interface
GoDaddy uses a system often called Artificial Design Intelligence (ADI). It builds a draft site based on your answers to a few questions.
Step 1: The Initial Questionnaire
Create your account and select “Start for Free” or purchase your plan. The system asks for your industry. Be specific. If you type “Restaurant,” the system offers generic food layouts. If you type “Italian Restaurant,” it might suggest a menu section with pizza and pasta imagery.
Next, you enter your website name. This becomes your site title. You can change this later, so do not overthink it.
Step 2: Selecting a Theme
The ADI generates a preview. You will see a homepage with stock images and placeholder text. You now have the option to change the “Theme.”
In GoDaddy’s ecosystem, a theme controls the font pairing, color palette, and general button style. It does not dictate the layout as rigidly as older platforms. You can swap themes at any time.
- Action: Click the “Theme” button in the top right corner.
- Try This: Scroll through the options. Notice how the content remains the same, but the “vibe” changes. Pick one that aligns with your brand assets.
Step 3: The Grid Limitation
You will notice the editor interface. You have a preview on the left and a control panel on the right. You cannot click an element on the preview and drag it three inches to the left.
GoDaddy uses a stacked section structure. You pile horizontal strips (sections) on top of each other. You can change the order of these strips. You can change the layout of the content inside the strip from a few preset options. You cannot break the grid. This ensures mobile responsiveness but limits artistic expression.
Part 4: Building the Core Structure
You build your site by adding and configuring pages. A standard business site needs a Homepage, About Page, Services Page, and Contact Page.
Managing Pages
Locate the “Website” tab in the right-hand sidebar. This panel manages your site navigation.
- Click the “+” icon to add a new page.
- Select “New Page”.
- Name the page (e.g., “Services”).
- Decide if this page appears in the navigation menu or footer.
- Click “Create Page”.
You can also create “Drop-down” menus here. This groups related pages under a single main menu item. This keeps your navigation bar clean.
Designing the Homepage
Your homepage serves as the lobby of your digital business. It directs traffic to other rooms.
The Hero Section: This is the top section of your site. It makes the first impression.
- Click on the header section in the preview.
- Use the right sidebar to change the “Cover Media.” You can upload a photo or video.
- Edit the “Headline” and “Description.” Keep the headline punchy. It should state exactly what you offer.
- Configure the “Action Button.” Link this to your most important page (e.g., “Shop Now” or “Contact Us”).
Adding New Sections: Hover your mouse over the border between two existing sections. A “+” button appears with the label “Add Section.” Click this button. The sidebar opens a library of pre-built sections.
- Content: Text blocks, lists, and FAQs.
- Audio & Video: Embed YouTube or Vimeo links.
- Photo Gallery: Grids and carousels for images.
- Social: Instagram feeds and social icons.
- General: Contact forms, maps, and hours.
Choose a section type. Click “Add.” The section appears on your page.
Customizing Sections: Click on the new section. The sidebar changes to show specific options for that block. You can usually toggle elements on or off. For example, in a “Team” section, you might turn off the “Social Links” for individual team members if you do not have them.
You can also change the “Layout” of the section. A “Content” section might offer options for “Image Left,” “Image Right,” or “Center Text.” Cycle through these to find the best balance.
Neutral Comparison Note: Platforms like the Elementor Website Builder allow you to design these sections from scratch. You can place an image, then a heading, then a star rating, then a button, in any order. In GoDaddy, you choose the “Image + Text” section and accept the layout provided.
Part 5: Working with Content and Media
High-quality content separates professional sites from amateur ones. GoDaddy integrates with Unsplash to provide royalty-free stock photos. While convenient, unique photos build more trust.
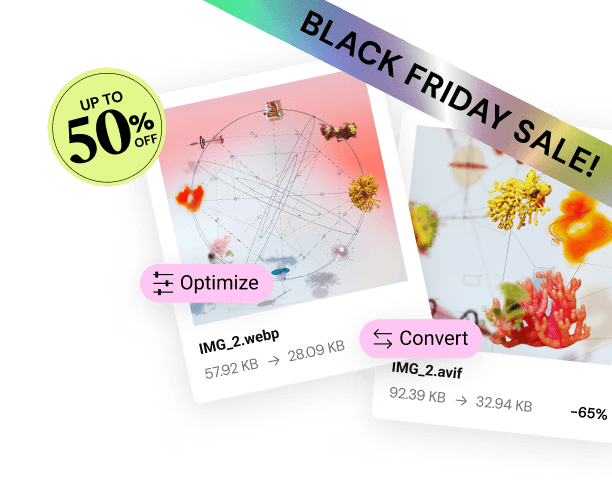
Image Optimization
Large images slow down websites. Slow websites rank poorly on Google. Before uploading, ensure your images are:
- Relevant: They support the text.
- Compressed: File sizes should rarely exceed 500KB.
- Formatted: JPEGs for photos, PNGs for graphics.
GoDaddy handles some optimization automatically. However, uploading a 5MB raw photo is never a good practice. Tools like the Image Optimizer by Elementor allow WordPress users to automate this, but on GoDaddy, you should optimize files before upload.
Writing for the Web
People scan websites; they do not read them.
- Use short sentences.
- Use bullet points.
- Use descriptive headings.
- Avoid jargon.
Active Voice: Write “We deliver results,” not “Results are delivered by us.” This sounds more confident and professional.
Part 6: Integrating Commerce
If you selected the Commerce plan, you have a store backend. This acts differently than the visual editor.
Adding Products
Navigate to your Dashboard (exit the editor). Find the “Store” dropdown. Select “Products.”
- Click “Add Product”.
- Product Type: Choose Physical or Digital.
- Title & Description: Write detailed descriptions. Include keywords people might search for.
- Pricing: Set your standard price and a “Sale” price if applicable.
- Inventory: Enable inventory tracking to prevent overselling.
- SKU: Assign unique codes for internal tracking.
Categories
Organize products into categories (e.g., “Men,” “Women,” “Accessories”). This creates a better browsing experience. You can display specific categories on specific pages of your site using the “Featured Product” section in the builder.
Shipping and Payments
Payments: GoDaddy Payments is the default processor. It integrates fully. You can also connect third-party gateways like PayPal or Stripe depending on your region. Check the transaction fees for each provider.
Shipping: You can set flat rates, weight-based rates, or offer free shipping.
- Tip: Free shipping increases conversion rates. Build the shipping cost into your product price if necessary.
Part 7: Marketing and SEO Tools
A published site creates no value if no one visits it. GoDaddy includes a suite of marketing tools to drive traffic.
GoDaddy Studio
This tool competes with Canva. It allows you to create social media graphics, logos, and email banners. You access it from the dashboard. It uses templates consistent with your site design. This helps maintain visual coherence across your brand.
Email Marketing
You can capture email addresses using a “Subscribe” section on your site.
- Go to the Marketing tab in the dashboard.
- Select Email Marketing.
- Choose a template.
- The editor works similarly to the website builder. You add sections and edit text.
- Send the email to your subscriber list.
Note: The native email tool is basic. Advanced marketers often integrate dedicated platforms like Mailchimp or Send by Elementor (on WordPress) for complex automation sequences. GoDaddy’s tool suits newsletters and simple announcements.
The SEO Wizard
GoDaddy offers a guided SEO (Search Engine Optimization) tool. It optimizes your site for Google.
- Keywords: The wizard asks you to identify keywords relevant to your business.
- Page Titles: It suggests titles for your browser tabs.
- Meta Descriptions: It helps you write the short blurb that appears in search results.
Reality Check: This tool covers the basics. It ensures you have titles and descriptions. It does not replace a comprehensive SEO strategy involving content creation, backlink building, and technical optimization.
Part 8: Mobile Responsiveness
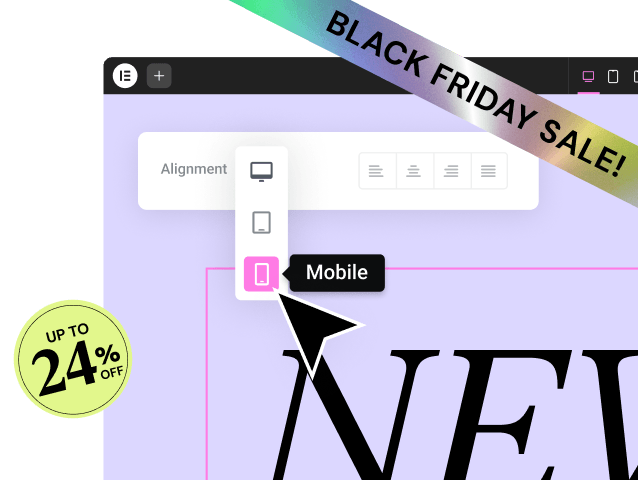
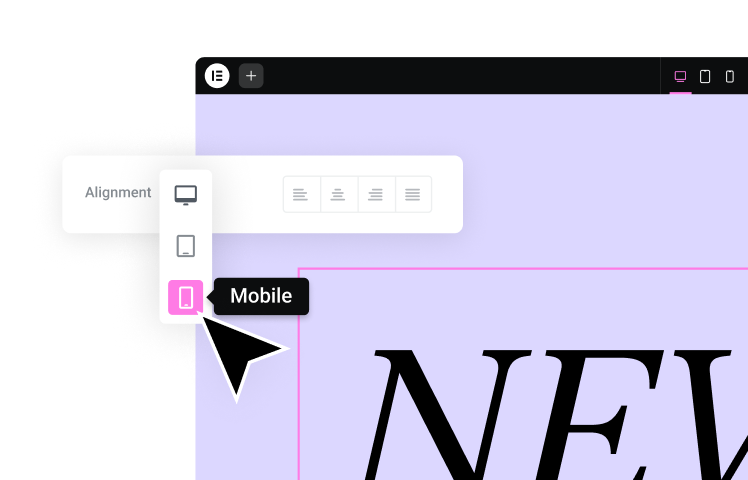
Mobile traffic often exceeds desktop traffic. You must verify your site looks good on phones.
In the editor, click the “Mobile View” icon in the top navigation bar. The preview switches to a narrow screen. GoDaddy automatically stacks your content. A three-column section on desktop becomes three stacked blocks on mobile.
Limitations: You generally cannot change the mobile layout independently of the desktop layout. If a font looks too large on mobile, shrinking it changes the size on desktop too. This is a trade-off for the platform’s simplicity. Platforms like Elementor allow you to define specific font sizes and paddings for Desktop, Tablet, and Mobile devices separately.
Part 9: Publishing and Domain Connection
You designed the site. You added content. You configured the store. Now you launch.
Connecting a Domain
A custom domain (e.g., yourbusiness.com) establishes credibility. You can buy a domain directly through GoDaddy.
- Click “Settings”.
- Select “Manage Domains”.
- Follow the prompts to connect a domain you own or purchase a new one.
The Pre-Flight Checklist
Do not click publish until you verify these items:
- Links: Click every button. Do they go where they should?
- Forms: Submit a test entry on your contact form. Does the email arrive in your inbox?
- Spelling: Read every paragraph. Typos destroy trust.
- Images: Do they load? Do they look crisp?
- Legal: Do you have a Privacy Policy and Terms of Service linked in the footer?
Going Live
Click the “Publish” button in the top right corner. The system creates your live site. It provides a URL. Share this URL on your social media profiles and Google My Business listing.
Part 10: When to Consider a Platform Switch
GoDaddy Website Builder excels at speed. It gets you online fast. However, businesses often hit a ceiling as they scale.
You might encounter these friction points:
- Design Homogeneity: Your site looks “templated.” You cannot achieve a specific visual effect.
- Feature Gaps: You need a specific function (e.g., a complex calculator or a specific booking logic) that GoDaddy does not offer.
- Ownership: You want to move your hosting to a faster provider, but you cannot take your GoDaddy site with you.
The Ecosystem Alternative
At this stage, many creators look for a “Website Builder Platform.” This concept differs from a simple page builder. A platform, like the Elementor Ecosystem, combines the ease of visual editing with the power of open-source software.
- Design Freedom: You control every pixel. You can adjust margins, z-index, and motion effects.
- Extensibility: You tap into the massive library of WordPress plugins. You can add any feature imaginable.
- Ownership: You own your data. You can move your site to any host.
- AI Integration: Tools like Elementor AI offer context-aware content generation directly in the editor, often surpassing the capabilities of basic ADI tools.
Migrating from a closed system to a platform requires rebuilding the site. It is often a necessary step for businesses ready to graduate from a “starter” site to a professional digital asset.
Frequently Asked Questions
1. Can I move my GoDaddy website to WordPress later? No, you cannot export the code or design. You must rebuild the website from scratch on the new platform. You can, however, transfer your domain name and text content manually.
2. Is GoDaddy Website Builder good for SEO? It covers the basics. It is sufficient for local businesses targeting low-competition keywords. It lacks the technical depth and plugin ecosystem required for competitive national ranking strategies.
3. Does GoDaddy take a commission on sales? GoDaddy charges transaction fees on sales processed through their payment gateway. These fees are competitive with industry standards. They do not charge a platform commission on top of the payment processing fee for the Commerce plan.
4. Can I add custom code to my GoDaddy site? You have limited ability to add HTML sections. You can use this for embedding simple widgets like third-party calendars or forms. You cannot edit the site’s CSS or PHP files directly.
5. How do I remove the “Powered by GoDaddy” banner? You must upgrade to a paid plan. The free trial and lower-tier options often retain this branding in the footer.
6. Is the GoDaddy Website Builder mobile-friendly? Yes, all templates are responsive by default. They adapt to screen sizes automatically. You have very little control over how this adaptation happens.
7. Can I use a domain I bought elsewhere? Yes. You can connect a domain registered with Namecheap, Google Domains, or others. You will need to update the DNS settings at your registrar to point to GoDaddy.
8. What happens if I stop paying for my subscription? Your website goes offline. GoDaddy may retain the data for a short period, but you eventually lose the content. You do not own a permanent copy of the site files.
9. Can I have a blog on my GoDaddy site? Yes. There is a built-in blog module. It allows for basic posts, categories, and comments. It does not offer the advanced categorization or author management features of WordPress.
10. How does GoDaddy support compare to others? GoDaddy offers phone and chat support. This is a benefit of a managed platform. Open-source platforms often rely on community forums or third-party developer support, although managed hosting options like Elementor Hosting bridge this gap by providing dedicated support teams.
Conclusion
The GoDaddy Website Builder serves a distinct purpose in the digital landscape. It removes the technical barriers to entry. It allows anyone with an internet connection to publish a functional, secure, and mobile-responsive website in a single afternoon.
For many small businesses, this is exactly what they need. It solves the immediate problem of visibility. However, you must recognize the trade-off. You trade freedom for convenience. You trade ownership for management.
As your digital maturity grows, you may find yourself seeking tools that offer greater precision and power. Whether you stay with GoDaddy or eventually migrate to a comprehensive platform, the most important step is the first one: getting online and starting the conversation with your customers.
Elementor Website Elementor Hosting Elementor Template Library Elementor & WordPress Elementor AI WooCommerce Builder Elementor Pro Elementor for Designers AI Site Planner Elementor Themes Elementor Ecommerce Hosting Image Optimizer Site Mailer Ally Web Accessibility AI Website Builder Send by Elementor Free Download Free Domain Name
How to Use GoDaddy Website Builder Tutorial Advanced Design Customization eCommerce Setup Guide Marketing Integration Tutorial SEO for GoDaddy Sites
Looking for fresh content?
By entering your email, you agree to receive Elementor emails, including marketing emails,
and agree to our Terms & Conditions and Privacy Policy.