Table of Contents
Tired of your run of the mill Sans Serif fonts like Arial, Helvetica, and others? Fed up with all of all those default fonts that you get? Surely you want to stand out from the crowd. So why not try a different font — a custom font.
While Elementor comes pre-built with 800+ different Google fonts to choose from, sometimes, the default, easy Google fonts are simply not enough.
Given how beneficial it can be to invest in a website’s web typography, many web designers want to be able to create that extra branded and professional style, achieved only with custom fonts. Now, we bring you a new easy way to upload your own custom fonts with no additional fonts plugins.
Simply upload your custom font formats, and see them instantly appear inside the widget typography settings. We’ve also added a seamless integration to Typekit fonts, letting you sync and use all your Typekit fonts with a simple click. Get total font control and change fonts as much as you’d like with Elementor.
Adding Custom Fonts to WordPress Manually
There’s a method to add custom fonts to WordPress manually, but it requires some tech-savvy and may be difficult for some users.
This method involves working with WordPress folders.
1. Add a new “fonts” folder to your theme’s folder via an FTP client. The new folder should be located under wp-content/themes/fonts
2. Once, you’ve added the new “fonts” folder add all font files to it.
3. Now, open the theme’s stylesheet (style.css) and add the following code to it:
					@font-face {
	font-family: 'nameofnewfont';
	src: url("/fonts/nameofnewfont.woff2") format("woff2"),
		 url("/fonts/nameofnewfont.woff") format("woff");
	font-weight: normal;
	font-style: normal;
}
4. Configure the elements that will use this font by adding them to the same stylesheet.
This method can be a pain for beginners. Whenever you’d like to add configurations like “italics” or “bold”, you’ll have to go through the same process and add those parameters. There is a lot of coding involved.
For those who don’t want to deal with that technical mumbo jumbo — that’s exactly where Elementor comes to the rescue. Check out this great video tutorial.
How to Add Custom Fonts to WordPress Using Elementor
In order to get visitors to see custom fonts on your WordPress site, the fonts must be uploaded to your site as standard file formats. There are several such font formats, each offering support for different browsers. The font types include:
- The Web Open Font Format (WOFF) – WOFF is the most recommended format to use since it is supported by all modern browsers
- The Web Open Font Format (WOFF 2.0) – TrueType (TTF) / OpenType (OTF) font that provides better compression than WOFF 1.0
- TrueType Fonts (TTF) – This font was developed in the late 1980s, by Apple and Microsoft.
- SVG Fonts/Shapes – SVG fonts allow SVG to be used as glyphs when displaying text. Make sure to use this format to support old versions of iPhone
- Embedded OpenType Fonts (EOT) – This font file works on IE, but not on other browsers. Make sure to use this format to support earlier versions of IE
In Elementor, we’ve made it easy to upload your custom web font formats:
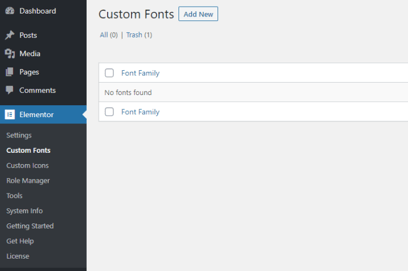
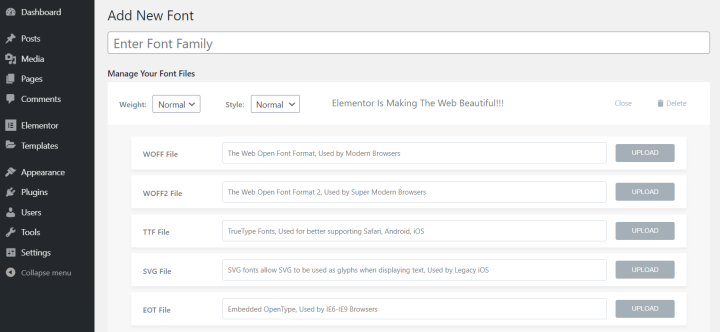
1. Head over to the WordPress Dashboard > Elementor > Custom Fonts, and click ‘Add new’.

2. Now, add any font by adding the font name and uploading its WOFF, WOFF2, TTF, SVG or EOT file. It is recommended that you upload as many font files as possible, in order to provide support for the maximum number of browsers.

3. Once uploaded, your new custom fonts will be available in the typography controls of every widget that contains the text. Head over to Elementor and start using the new fonts in your pages. Add a heading or any other text widget, and under Style > Typography choose your custom font.

Where to Find Custom Fonts
There are many websites that offer free fonts, and the more sophisticated and unique premium fonts like Font Squirrel, DaFont, Fontsly, and others. But there are also some services that offer a more tailored experience, like Adobe Typekit.
Adobe Typekit Now Available in Elementor

Adobe Typekit is a subscription service for fonts which you can sync to your computer or use on a website. With Typekit, you can download any of the thousands of adobe fonts available, and use them on your site.
Adobe offers 2 Typekit fonts for free, so you can try it out first and see how you like it.
The biggest advantage of using Typekit on web design projects is its seamless integration. Designers, who already use Photoshop, get instant access to thousands of professional fonts from within their interface, all synced and easily handy. They don’t need to deal with font downloads or a confusing setup.
Typekit works seamlessly with Elementor. You simply enter your Typekit key in the settings dashboard (Integrations tab), and instantly get all your Typekit fonts inside the various typography settings in Elementor. Using this integration, you don’t need to download, install or code anything to use your Typekit fonts.
Moving from Photoshop PSD to a finished live WordPress design has never been simpler, using this Typekit integration.
Under Elementor > Settings > Integrations you can add your Typekit Kit ID. Once you add it, click on ‘Sync Kit’. Wait a few minutes, and you should see all your Typekit fonts in Elementor. After adding new fonts to your Typekit account, don’t forget to go back to the integrations page and sync your fonts again.
Note: It may take a few minutes for Adobe to update their CDN network and get your fonts into Elementor, so please be patient after adding your key.
Font Weights and Styles
Custom fonts are grouped into families. Each font family includes its own set of weights and styles, uploaded separately.
A font family could include a set of weights, spanning between 100-900, as well as Normal, Bold, Bolder or Lighter weights. It can also include Normal, Oblique or Italic fonts. Any variation of weight & style can be added separately to the font family group.
If you were to CSS code, you’d use commands like font-face, or font-style to make sure that the end result would be exactly as you want it, however, once you upload your font variations, you’ll be able to choose the font inside Elementor and adjust its weight and style accordingly and easily.
Note: If you don’t upload a certain weight, it will not be available in the editor. Instead, supporting browsers — like Firefox, Safari, Chrome, and others, will fall back to the closest available weight.
So, while you can use default fonts, or add google fonts, you can also spice your game up a bit and use custom fonts. Find a custom font that will make your work stand out and start using custom fonts on your own WordPress website projects with Elementor Pro.

Want to Create More Unique Websites?
Looking for fresh content?
By entering your email, you agree to receive Elementor emails, including marketing emails,
and agree to our Terms & Conditions and Privacy Policy.


