Taxonomy Queries allow you to create loops based on post or product categories or tags. For example, if you run a food blog you can create a Loop Grid or Loop Carousel displaying the categories of articles – Appetizers, Soups, Desserts etc..
Create a category page
The example below shows a Taxonomy query for posts in a Loop Grid but the same principles apply to products and to the loop Carousel.
For details about creating a Loop Grid, see Build a Loop Grid.
To create a taxonomy query:
- Drag the Loop Grid to canvas. For details, see Add elements to a page.

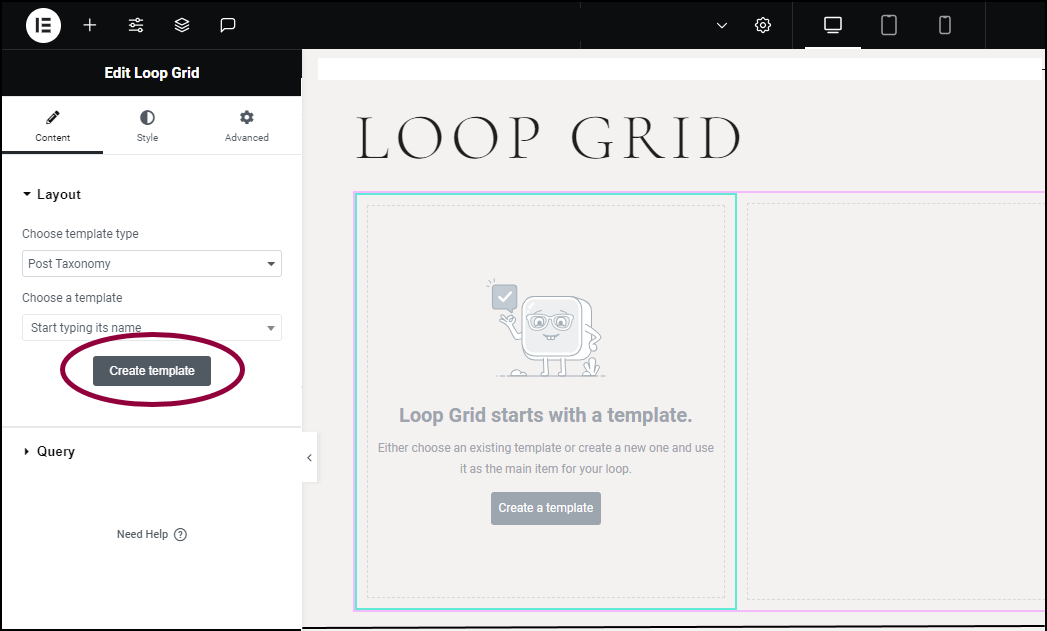
A Loop Grid appears on the canvas. - In the panel, go to the Choose template type dropdown and select Post Taxonomy.

If Woocommerce is installed, a ‘Product Taxonomy’ option will also appear.
- Click Create a template.
When we build the template, we’ll use dynamic information. For example, instead of typing in the category names, we’ll use the dynamic tag ‘Archive Title’. This will automatically retrieve the category names without having to manually enter them. For more information, see Dynamic tags.ImportantTaxonomy loops for Posts can use the following dynamic tags:- Archive Title
- Archive Description
- Archive URL
- You can also add images for your categories using ACF taxonomy images. See Add an image to post categories for more details.

- In the popup window, click Save.

- Drag a Heading widget to the template you just created.

- In the panel, click the dynamic icon
next to Title.

- Select Archive Title from the dropdown.NoteIn WordPress, Post and Product taxonomies are considered a type of archive.

Usually you don’t want the word Category to appear in the loop, so we’ll remove that.
- In the panel, in the Title field, click the wrench icon
to access Settings.

- In the window, toggle Include Context to No.
Now we’ll add the category description.
- Add a Text Editor widget to the template and using the dynamic tag, select Archive Description.

- Click Save & Back to save the template.

You’ll see how visitors will view the page.
You can style the page using the controls found in the Loop Grid or Loop Carousel. For details, see Loop Grid widget and Loop Carousel.
Make the categories clickable
Now that you’ve created a category page you need to make it useful. In general, users expect to click on a category and be taken to a category page.
There are two ways to make the items clickable:
- You can make one of the elements clickable. For example, making the heading clickable so visitors can click the heading and go to the category page.
- You can make the container clickable so visitors can click anywhere in the container and go to the category page.
In this example, we’ll make the container clickable.
To make a category clickable:
- While editing the template, select the container by clicking the icon in the upper left corner.

Container settings will appear in the panel.
- In the panel, open the Additional Options section.

- From the HTML Tag dropdown menu, select a (link).

- In the Link field, click the dynamic tag
icon.

- Select Archive URL from the list.
When visitors click on the container, they will go to the category page.
- In the widget’s Content tab, go to the Link field.

- Click the dynamic tag icon
and select Archive URL.
Removing the category – Uncategorized
Uncategorized is a default category that is always present for WordPress posts and products. You probably don’t want it to appear on your category page.
To hide the Uncategorized category:
- Select the Loop Grid or Carousel widget.

- Open the Query section.

- In the Filter By dropdown menu select Manual Selection.

- In the panel, click Exclude.

- In the Search & Select text box, enter Uncategorized.
The Uncategorized category will not appear in the loop.
Add an image to post categories
You can add images to product categories using WooCommerce and then add those Featured Images to your template. However, for posts you’ll need to use the third-party ACF plugin to add images to your category. For more information about how to attach images to categories, consult the ACF documentation.
Once these images are attached to your categories, you can add them to your loop.
In the following example, the category images are in a field labeled Featured image.
To add images to the template:
- Add an Image widget.NoteThese steps apply to any widget that uses images.

- In the panel, in the Content tab, click the dynamic tag icon
.

- From the dropdown menu, select ACF Image Field.

- In the dynamic field, click the key icon.

- In the Key dropdown, select the field you selected for category images.
The template will now display the category images.

