Issue
Updating Elementor may show specific errors for different situations.
Troubleshooting
Elementor and Elementor Pro: update order and compatibility
Elementor refers to the free Elementor plugin and Elementor Pro refers to the paid Elementor builder. To work properly, you need to install up-to-date copies of both Elementor and Elementor Pro.
Rules to follow:
- Always update the free Elementor plugin first, then update Elementor Pro.
- Keep WordPress core and PHP versions supported by the current Elementor release. For details see Elementor System Requirements.
If you see “Elementor Pro requires a newer version of Elementor”:
- Update the free Elementor plugin by going to WP Admin and navigating to Dashboard > Updates.
- If it’s already the latest, update Elementor Pro to the latest version. Mismatches can trigger false notices.
- If updating is blocked, temporarily deactivate Elementor Pro, update the free Elementor plugin, then update/reactivate Pro.
If your WordPress version is outdated:
- Update WordPress core first, then update Elementor (free), then Elementor Pro.
Error – Update: Could Not Copy File
This error occurs when working with Elementor Pro from a localhost and/or with any Windows Server. There is sometimes an incompatibility issue between Easy Digital Downloads, Windows, and WordPress.
To solve this error:
- Install the Windows Compatibility Fix plugin.
- Try updating Elementor Pro again.
- If this does not help, ask your hosting company to verify your permission settings.
If you’re still facing issues, follow these steps:
- Go to the My Elementor dashboard.
- Click on the download icon at the top of the screen. Wait for the file to download.
- Login to WP Admin.
- Go to Plugins.
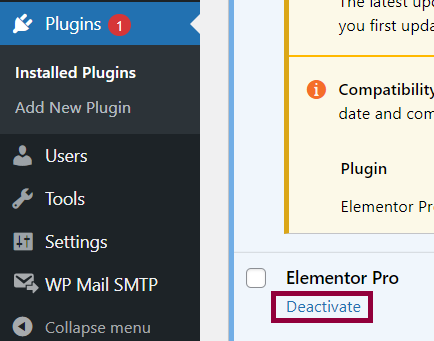
- For Elementor Pro, click Deactivate. The Activate and Delete link displays.
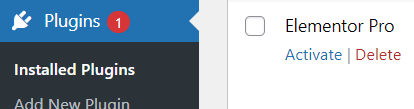
- Click Delete.
- Go to Plugins > Add New Plugin.
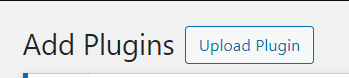
- Click Upload Plugin.
- Upload the downloaded zip file.
Error – Update Failed: Download failed. Unauthorized
To update your Pro plugin, you need an active license.
Deactivate and reactivate the license
- Confirm your license status: In WP Admin, navigate to Elementor > License and confirm that the license is connected. If it is not connected, click Connect & Activate to your Elementor account. If connected, click Disconnect, then Connect & Activate again to refresh.
- Verify your subscription and activations: Log in to your My Elementor dashboard and confirm your subscription is active and you have a free slot for this site. Deactivate old or unused sites if you have reached your plan limit. For details, see Deactivate an Elementor Pro license.
- Check the domain: If you moved the site (new domain, subfolder, or clone), deactivate the license from the old location and activate it on the current, live URL.NoteSubfolders on the same domain count as separate production sites and require a license activation.
- Clear security/network blocks: Temporarily disable firewall/security plugins and CDN WAF rules that may block outgoing requests. Ask your host to allow outbound HTTPS connections to Elementor’s licensing/update services and ensure cURL and OpenSSL are enabled. Then try the update again by going to WP Admin and navigating to Dashboard > Updates > Check again.
- Confirm WordPress can update plugins: In wp-config.php, ensure DISALLOW_FILE_MODS is not set to true and that WP Cron is enabled (DISABLE_WP_CRON should not be true). If your host disables updates at server level, ask them to enable them.
If these steps don’t work, try the following to reset your updates: - Go to the My Elementor dashboard.
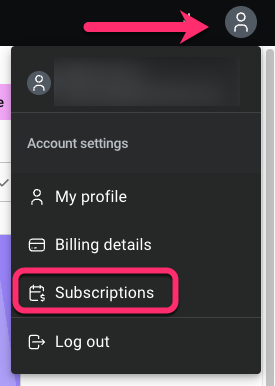
- Click the “My Profile” icon and then select Subscriptions.
- On the Subscriptions page, click on the subscription banner/header where the website is connected
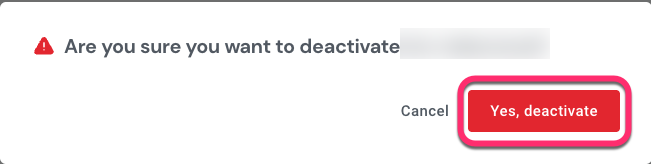
- Under Websites, click on the chain icon next to the relevant site to deactivate it.

- A pop-up appears. Click Yes, deactivate.
- Now, you’ll need to reconnect the license. Follow the steps here: Activate your license.
- If the issue persists, this may be due to a permissions error. Back up your site, delete the current plugin and upload the newest version of the plugin. For details, see How To Install Elementor Pro.
Error “Some files could not be copied because of inconsistent file permissions”
This happens when WordPress tries to write files to your server during the update but did not succeed due to incorrect permissions or ownership on folders/files.
The recommended permissions and ownership:
- Directories: 755
- Files: 644
- Owner/Group: The web server user (for example, www-data, nginx, apache) should own or have write access to wp-content and its subdirectories, especially wp-content/plugins and wp-content/uploads.
Troubleshooting steps:
- Check free disk space and remove read-only/locked attributes if any.
- Use your hosting file manager or SFTP to set folder permissions to 755 and file permissions to 644 recursively for wp-content and its subfolders (especially the Elementor and Elementor Pro folders).
- Ask your host to correct ownership (chown) so the web server user owns the files or belongs to a group with write permissions. Request they also review open_basedir/SELinux restrictions that can block writes.
- Ensure WordPress can write directly: If your host requires FTP credentials for updates, add those in wp-config.php or set FS_METHOD to direct if safe and supported by your host.
- Retry the update. If it still fails, update manually via SFTP: rename the existing elementor-pro folder, upload the new plugin folder, then reactivate in WordPress.
- After updating, clear caches and regenerate CSS. From WP Admin, navigate to Elementor > Tools and click Clear files & data.
Error – Cannot upload Elementor Pro due to size limits
If you see errors about maximum upload size or the upload fails immediately, your server’s limits are lower than the plugin ZIP size.
Check your current limit:
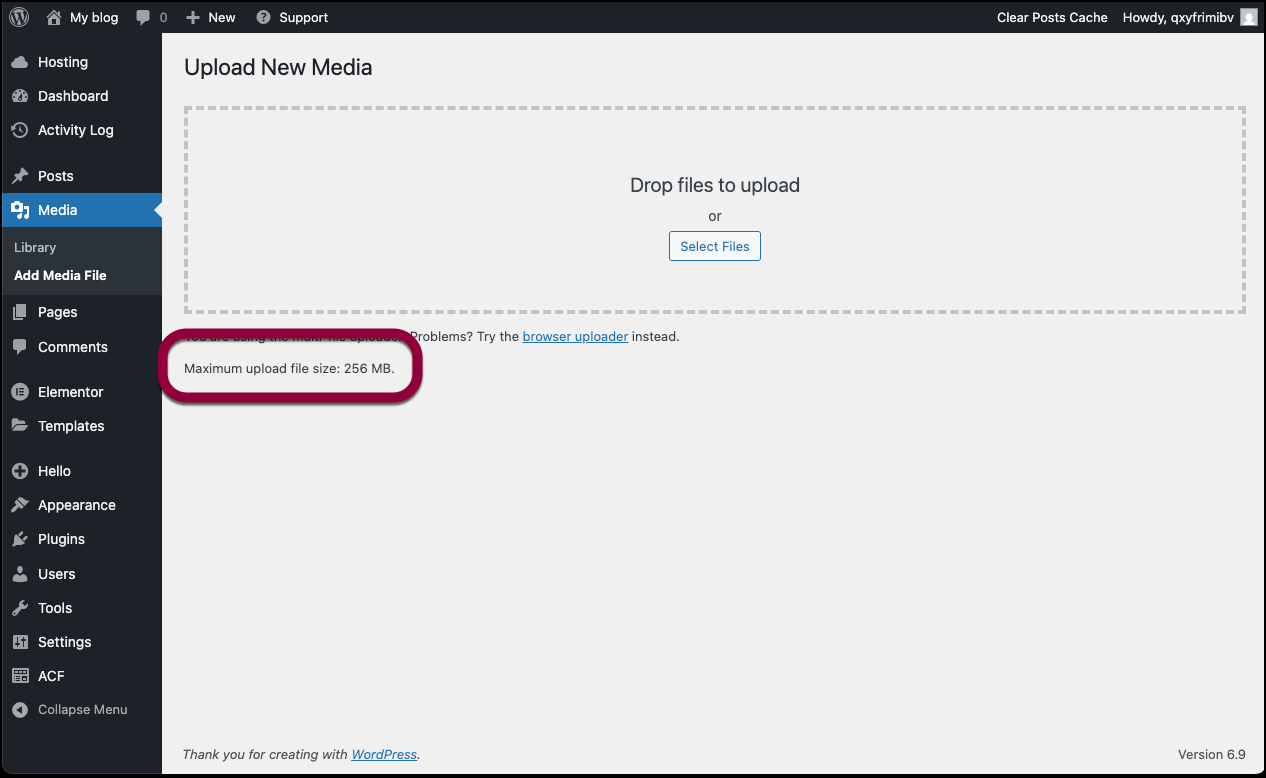
- From WP Admin, navigate to Dashboard > Media > Add Media File.
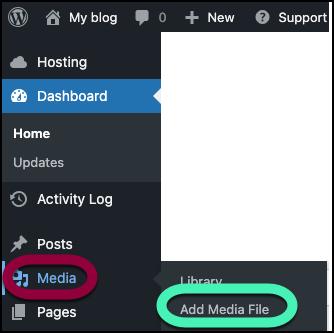
- shows Max upload file size.
Ways to increase limits (host-dependent):
- php.ini: set upload_max_filesize, post_max_size, and memory_limit to higher values (e.g., 256M).
- .htaccess: add or adjust php_value directives if allowed.
- Hosting panel: many hosts provide a UI to raise PHP limits.
- Ask your host to increase the limits and confirm changes are applied to the active PHP version.
Workaround:
- Install/update via SFTP: upload the extracted plugin folder to wp-content/plugins and activate in WordPress.
When to contact your hosting provider
There are some troubleshooting steps that require cooperation with your website host rather than assistance from Elementor support:
- Fixing file/folder permissions and ownership to allow WordPress to write updates.
- Increasing PHP version and server resources (memory_limit, max_execution_time, upload_max_filesize, post_max_size).
- Investigating 5xx errors, timeouts, or blocked outbound requests to Elementor’s servers (cURL/Firewall rules).
- Regaining WordPress dashboard access when you are fully locked out.
- Resolving disk space quotas or server-level caching issues that break updates.
Elementor support cannot change hosting control panel settings or server configurations on your behalf.
Related articles
For details about updates, see Update WordPress And WordPress Plugins.