
Setting up your first website is exciting, but cookie consent rules can feel intimidating at first. You’re not alone there, and it’s simpler than it looks. Below, you’ll find the best practices for setting it up on your WordPress site, from design choices to compliance features, so every visitor feels safe and respected from their first click.
Key Takeaways
- Native integration keeps your WordPress dashboard clean and skips confusing third-party setups.
- Google Consent Mode v2 support matters if you use Google services for ads or analytics in Europe.
- Geo-targeting shows cookie banners only to visitors who legally need them, keeping things clean for everyone else.
- Categorizing cookies correctly keeps essential scripts running while marketing scripts wait for approval.
- Design customization lets your cookie banner match your brand identity without hurting user experience.
Why Cookie Consent Matters for Your WordPress Site in 2026
When you start a website, you want to focus on sharing your passion, selling products, or writing great posts. But the moment it goes live, small files called cookies start working behind the scenes, remembering login details, tracking shopping carts, and showing you how visitors move through your pages.
Because these files can collect personal details, privacy regulators want your visitors to have a choice. Rules like the General Data Protection Regulation (GDPR) in Europe and the California Consumer Privacy Act (CCPA) require you to ask permission before running certain tracking scripts, and ignoring them risks hefty penalties and the trust of the people who support your work.
Browsers are also phasing out third-party cookies, and Google now needs specific settings to measure traffic accurately, which is where Google Consent Mode v2 comes in. If you use Google Analytics or run ads, a reliable consent tool isn’t optional anymore, and with the right practices in place, your site can be compliant, secure, and user-friendly in minutes.
The 10 Best Cookie Consent Implementation Practices
To help you set up your consent system without any confusion, here are the ten best practices for beginners, focused on simplicity, legal safety, and keeping your site fast.
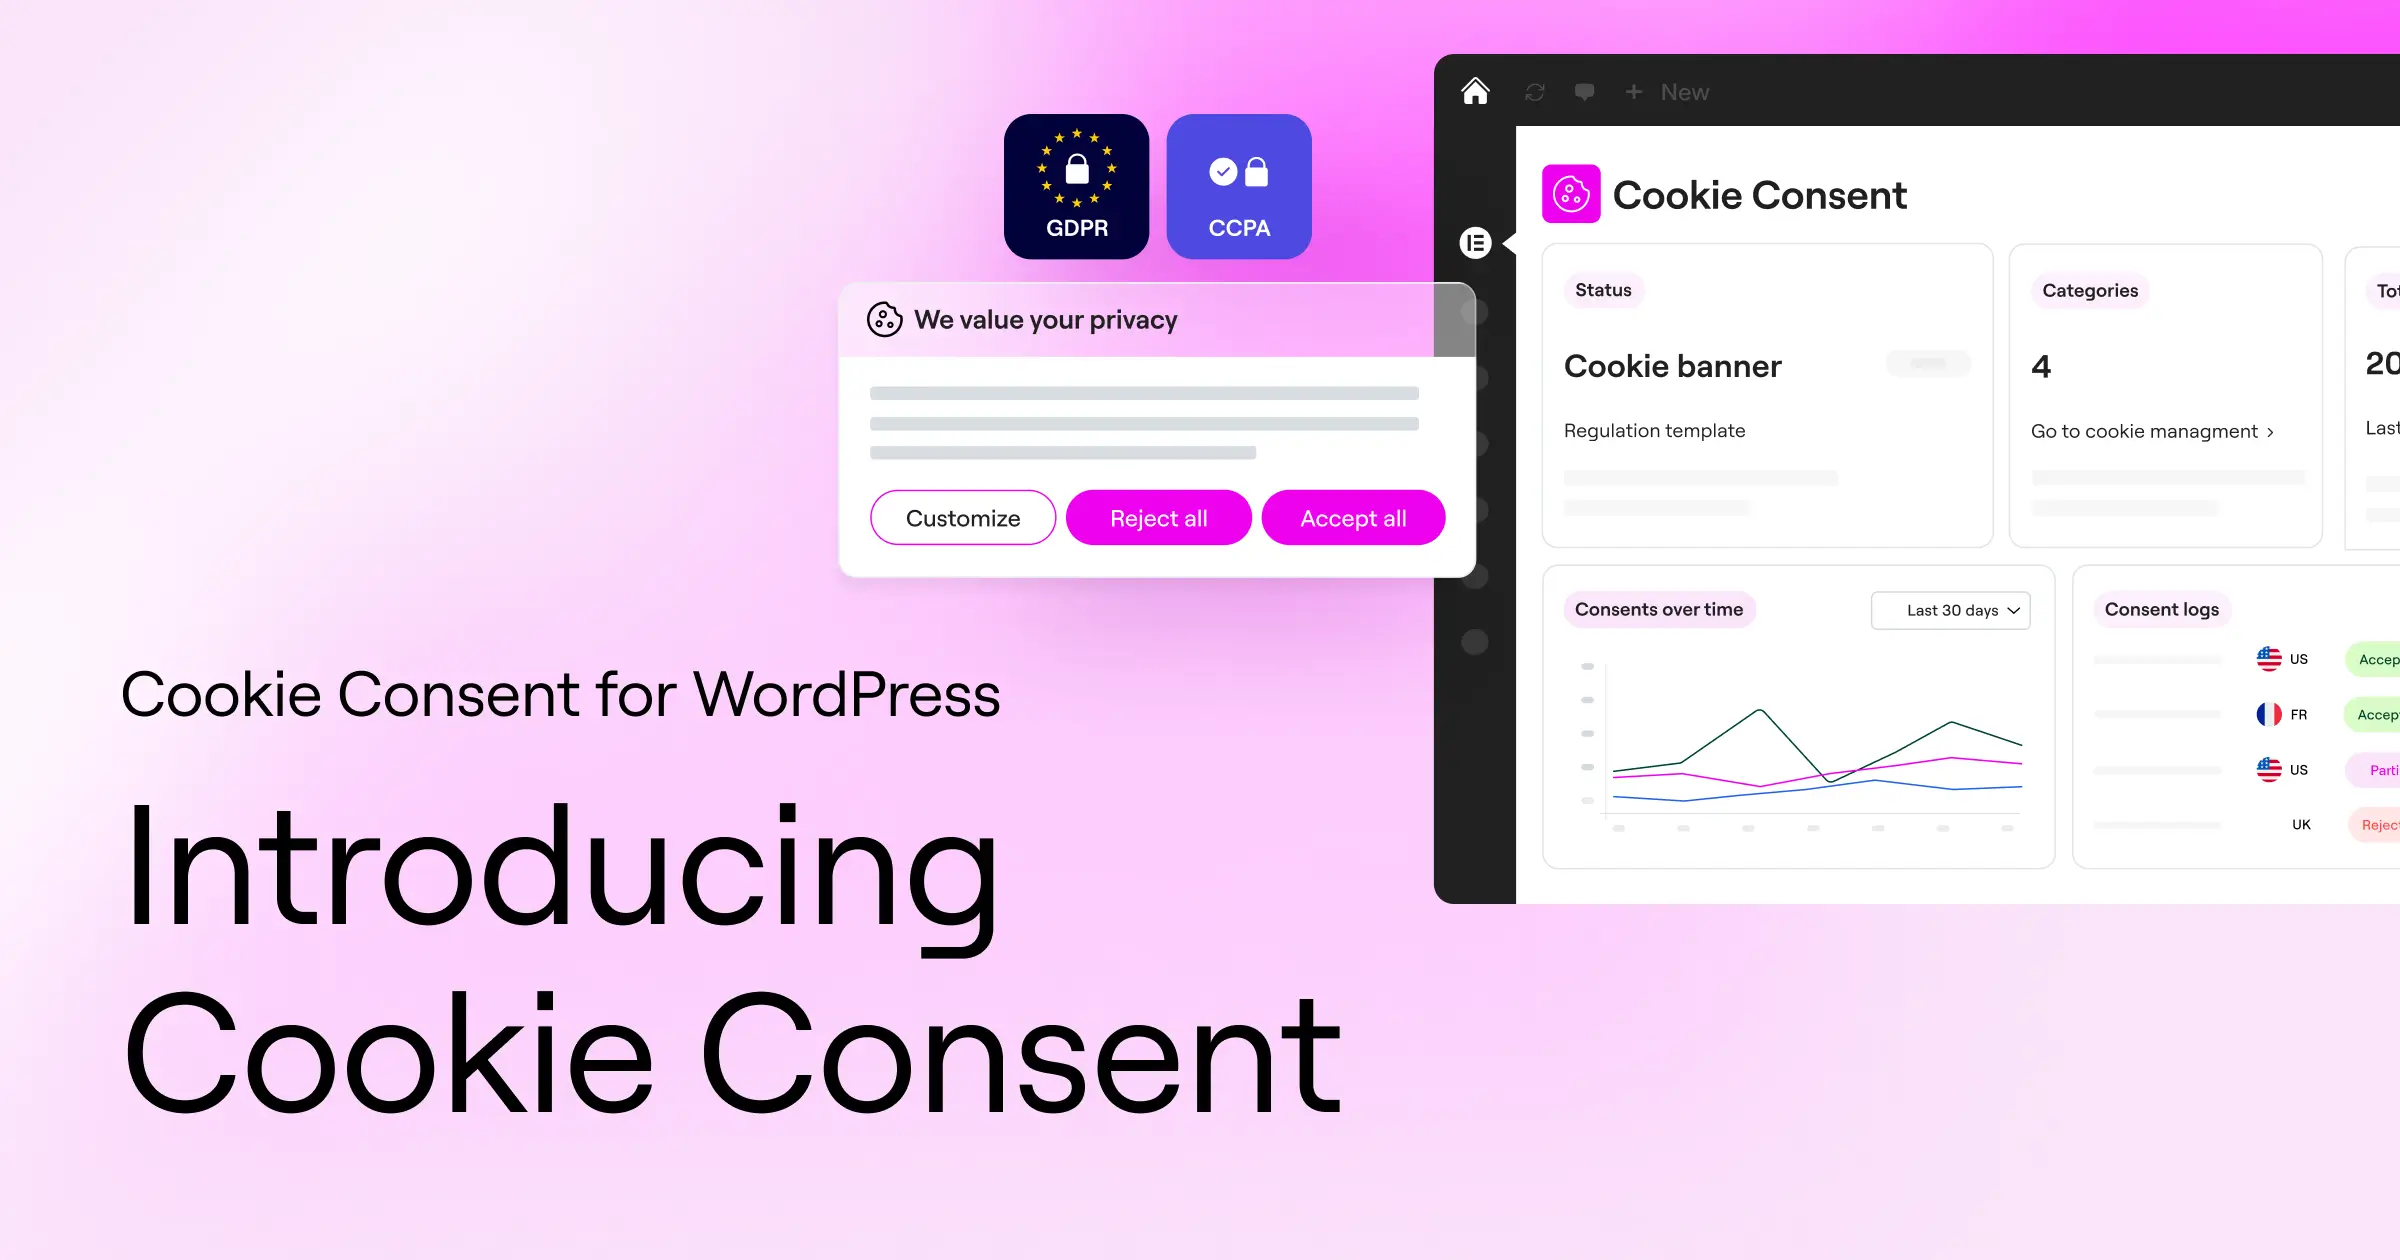
1. Choose a WordPress-Native Capability (Cookie Consent)
Many cookie tools make you sign up for external accounts, paste complicated code into your header, and manage settings from a separate website, which slows down your workflow and your site. To keep things simple, look for a tool that lives entirely inside your WordPress dashboard. The native Cookie Consent capability, built directly into the Elementor ecosystem, lets you manage everything in one place, so you never jump between platforms or worry about API keys breaking during an update.
Here are some of the main capabilities that make a native tool the best choice:
- Manages your entire compliance setup right within your native WordPress dashboard.
- Customizes banner layouts and colors to match your brand without writing custom code.
- Scans your site to find and organize cookies automatically.
- Generates basic privacy policy links to keep your legal pages connected.
- Keeps your site speed fast by avoiding heavy external JavaScript libraries.
2. Perform Regular Automatic Cookie Scans
Your website keeps changing. Every time you add a new tool, social share button, or embedded video, new cookies might land on your visitors’ devices, and tracking them manually is nearly impossible when you’re just starting out. An automated scanner solves this by checking your pages regularly for active trackers, finding what files are being set, what they do, and where they come from, so your banner always shows an accurate list even as your site changes.
Regular scans help you in a few ways:
- Detects newly added cookies from updated tools or embeds automatically.
- Categorizes trackers into standard industry groups so users know what they’re accepting.
- Updates your compliance details dynamically so consent forms never go stale.
- Saves you hours of manual developer work by automating the discovery process.

3. Categorize Cookies and Scripts Accurately
Not all cookies do the same thing. Some are essential for your site to work, while others track behavior or show targeted ads, and privacy laws require you to group these files so visitors can choose exactly what they want to allow. When setting up your banner, organize your trackers into these standard categories:
- Essential Cookies – required for basic site tasks, like keeping a user logged in or holding items in a shopping cart. They don’t require consent to run.
- Functional Cookies – remember choices your users make, like language preferences or text size adjustments.
- Analytical Cookies – help you understand how people use your site, showing which pages are popular and where visitors get stuck.
- Marketing Cookies – track visitor behavior across websites to deliver relevant advertisements.
Why does this matter? A few reasons:
- It keeps your core site functions running smoothly without waiting for user interaction.
- It gives your visitors clear choices, which makes them feel more comfortable sharing their data.
- It stops analytical or marketing scripts from firing before the visitor explicitly clicks “Accept.”
4. Support Google Consent Mode v2
If you use Google Analytics or Google Ads, this practice matters a lot. Google now requires websites to pass consent choices to their systems through a framework called Google Consent Mode v2. When a visitor declines analytics cookies, Google still lets your site collect basic, anonymous data without identifying them, so your reports keep working without violating anyone’s privacy. When choosing a compliance tool, make sure it supports Google Consent Mode v2 natively.
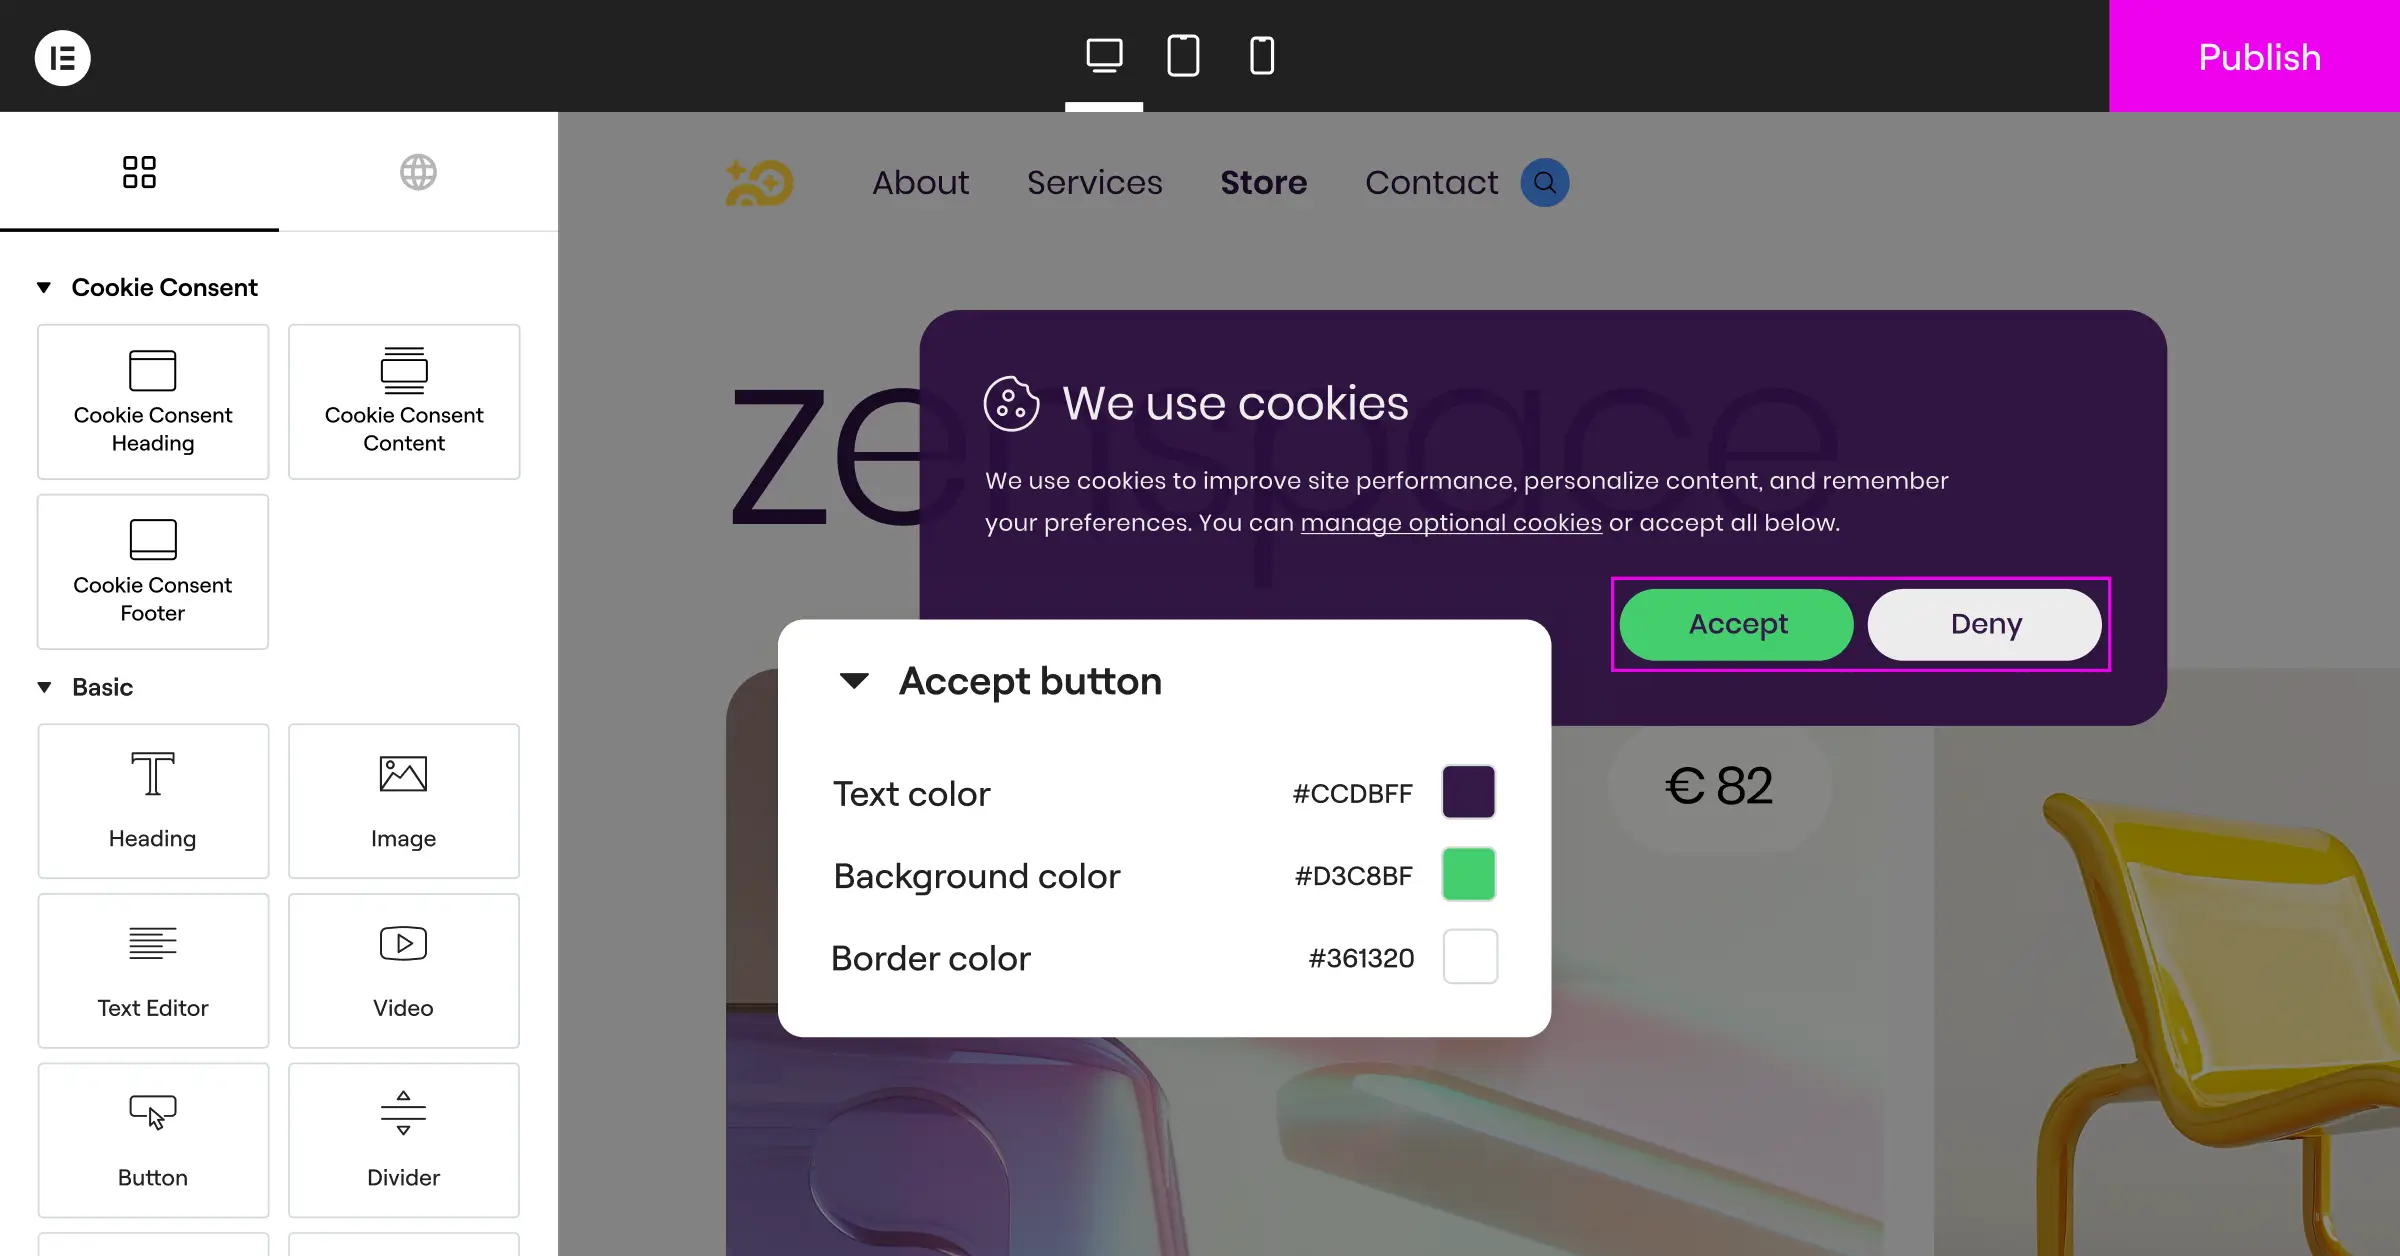
5. Design Banners for Clarity and Usability
Have you ever visited a site where the “Reject” button was hidden, tiny, or hard to see? These are called dark patterns, and they’re quickly becoming illegal under modern privacy laws. Your banner should treat “Accept” and “Decline” with equal visual weight and use clear, friendly language instead of complex legal terms. (This one trips a lot of people up, because they assume a banner has to look boring to be legal, but you can style yours to match your site perfectly while staying completely honest and transparent.)
When designing your banner, focus on these details:
- Uses clear, high-contrast fonts that are easy to read on mobile screens.
- Aligns the “Accept All” and “Reject All” buttons side-by-side so they’re equally accessible.
- Adds a simple “Settings” link where users can toggle individual categories on or off.
- Avoids blocking the entire screen unless your specific legal context requires a strict wall.
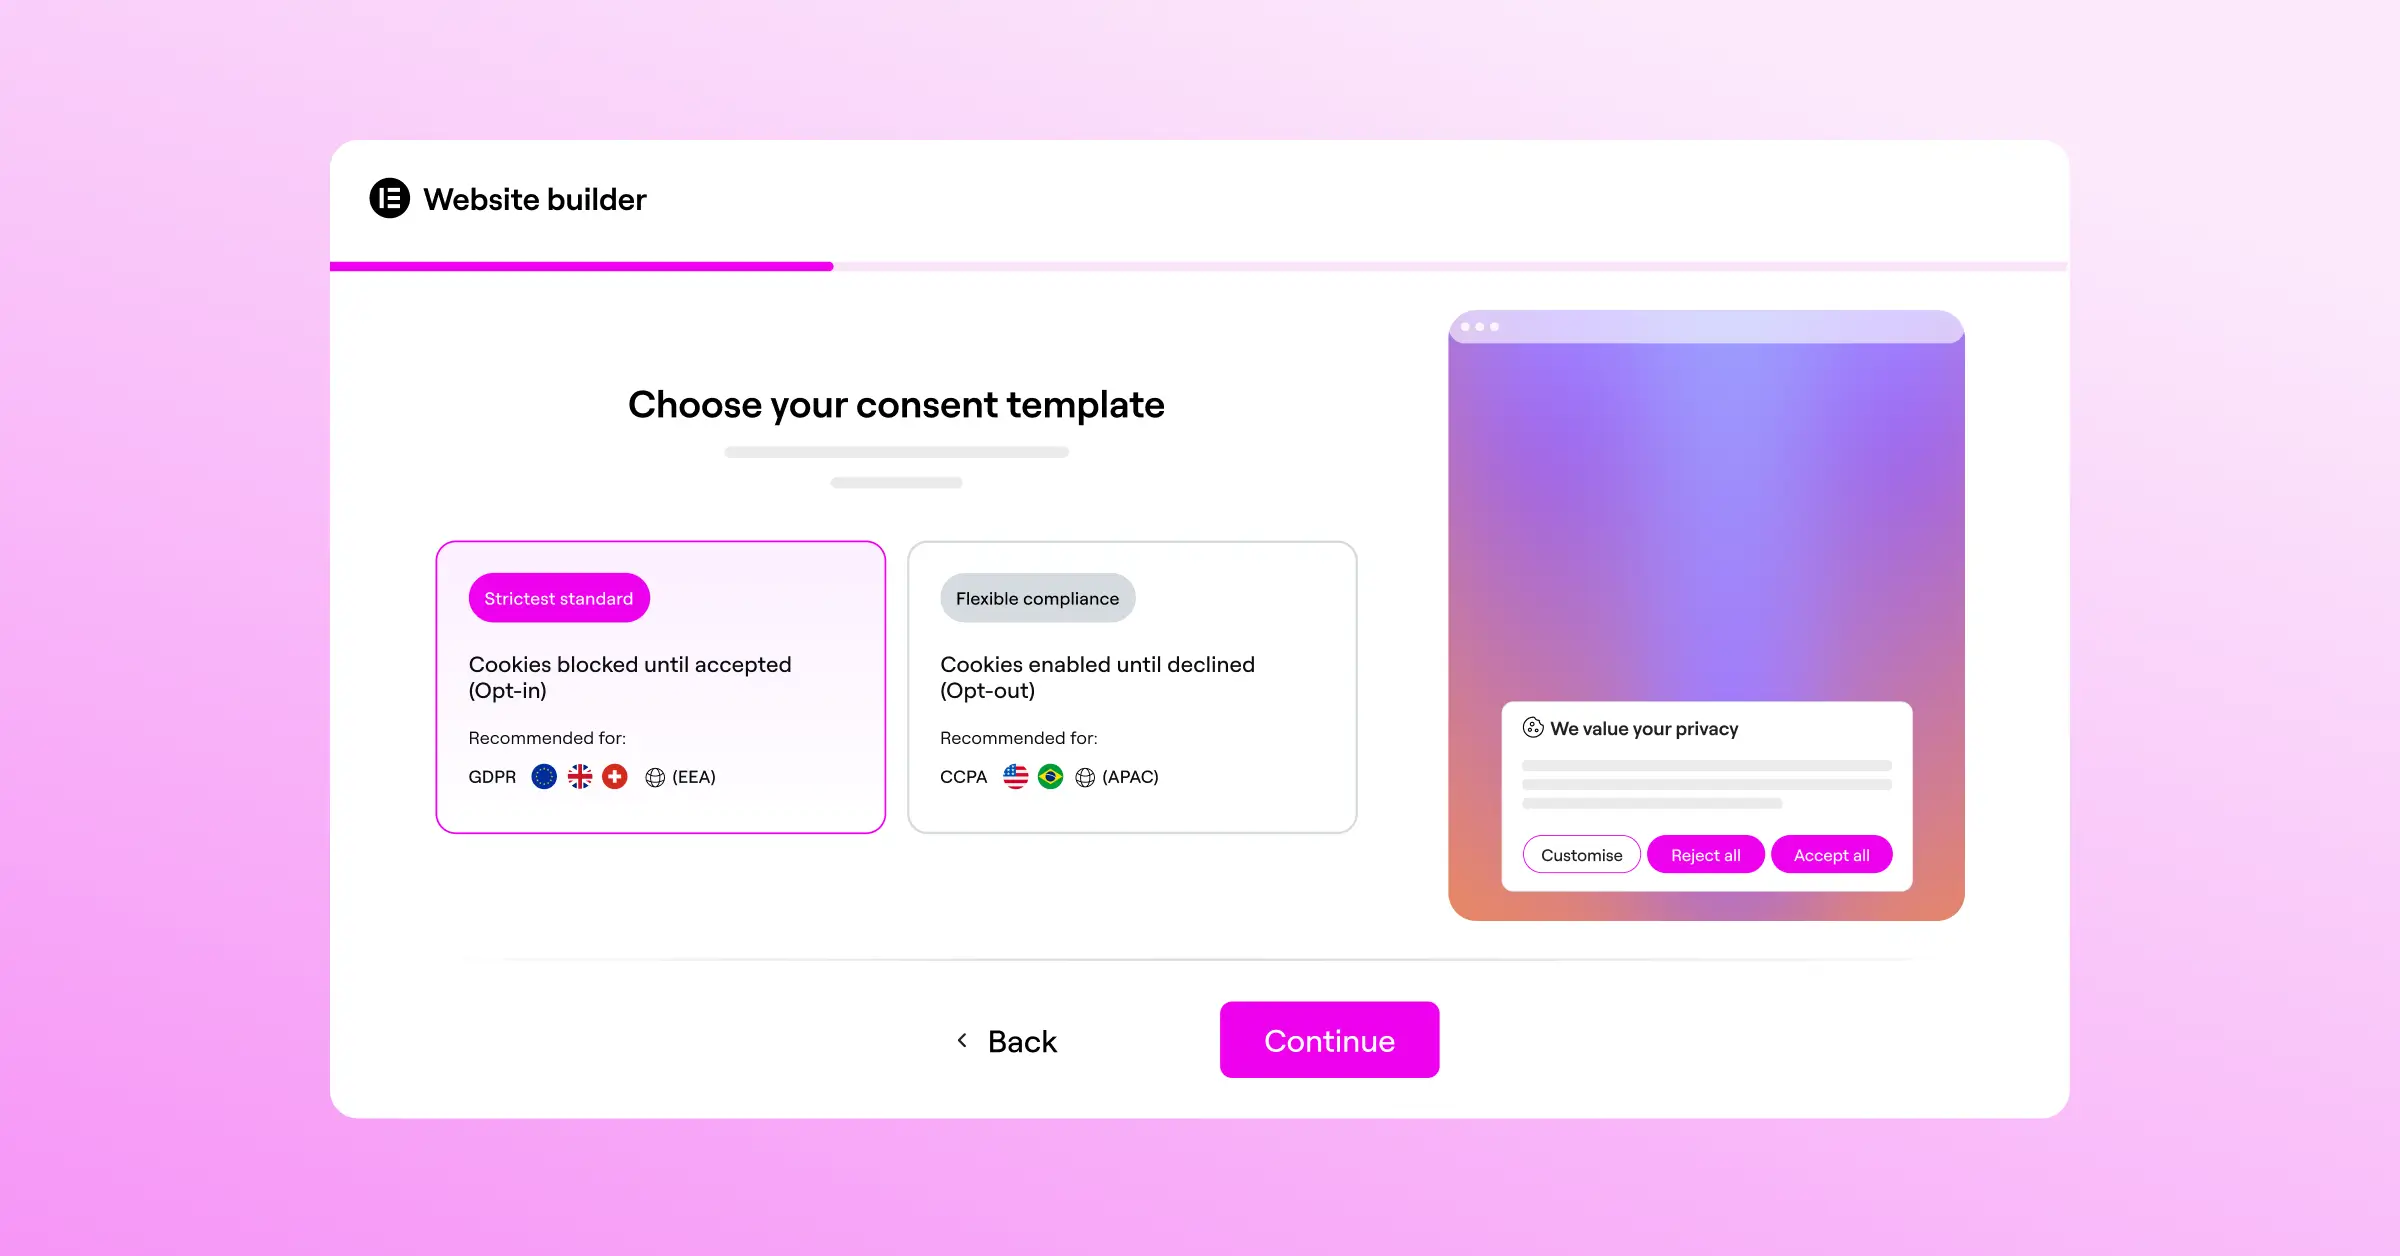
6. Enable Geo-Targeting for Specific Regions
Cookie rules vary depending on where your visitors live. The European Union requires opt-in consent before you set any tracking cookies, while parts of the United States use opt-out models, where cookies can run until someone asks you to stop. Showing a highly restrictive banner to everyone can hurt your user experience and analytics accuracy, so geo-targeting solves this by detecting a visitor’s location and showing the exact banner their local laws require.
7. Keep Secure Consent Logs for Audits
If a privacy authority ever asks you to prove your website is compliant, having a banner isn’t enough. You need to prove a specific visitor actually gave permission to track them, which means keeping secure, anonymous consent logs that store the date and time of consent, the categories chosen, and an anonymized identifier, never sensitive details like full IP addresses. A built-in consent log keeps you prepared for any audit and gives you real peace of mind.

8. Respect Global Privacy Control (GPC) Signals
Many modern browsers now come with a setting called Global Privacy Control (GPC). When a visitor turns this on, their browser sends an automated signal to every site they visit, saying they don’t want their details tracked or sold. Your consent tool should detect this signal on page load and automatically treat it as a “Reject All” for marketing cookies, which keeps you aligned with the latest US state privacy laws.
9. Provide a Simple Privacy Policy Link
Your cookie banner shouldn’t exist in isolation. It needs to connect to a complete privacy policy and cookie disclosure page explaining what cookies you use, why, and how visitors can change their mind later. A built-in policy generator can help you write these documents based on the scripts actually running on your site, so make sure your live banner links to it clearly.
10. Keep Your Consent Banners Multilingual
If your website serves a global audience, your cookie notice should speak your visitors’ language. Showing an English-only banner to a visitor in Spain or France can lead to confusion and a poor experience. (Handling translations is simpler than it sounds once you’re using a modern WordPress-native tool.) Your banner should detect the visitor’s browser language or your site’s current language setting and display translated text right away, so your compliance feels natural and welcoming no matter where someone’s browsing from.
To make translation management easier, follow these simple tips:
- Translates core action buttons like “Accept” and “Decline” accurately without relying on automated tools that might miss context.
- Checks formatting to ensure translated text fits within the banner design without overlapping.
- Keeps the language friendly and clear across all translated versions.
- Links to translated versions of your privacy policy page whenever possible.
Comparing Popular Cookie Consent Solutions for WordPress
To help you choose the best tool for your WordPress site, here’s a comparison of the most popular compliance solutions, looking at how each handles setup, integration, and daily management.
| Feature / Detail | Cookie Consent (Elementor) | Cookiebot | CookieYes | Complianz | iubenda |
|---|---|---|---|---|---|
| Native Dashboard Integration | Yes, built completely inside WordPress | No, uses an external cloud portal | No, uses an external SaaS platform | Yes, uses a dedicated WordPress plugin | No, uses an external compliance suite |
| Google Consent Mode v2 | Yes, supported natively | Yes, supported | Yes, supported | Yes, supported | Yes, supported |
| Geo-Targeting | Yes, available in plans | Yes, paid tiers only | Yes, paid tiers only | Yes, available in premium | Yes, paid tiers only |
| Design Customization | Highly flexible within your site style | Limited styling in basic plans | Standard style controls | Wizard-based styling | Standard configuration portal |
| Set Up Difficulty | Very low (under 5 minutes) | Medium (requires script installations) | Medium (requires connecting external site) | Medium (requires a multi-step setup wizard) | High (requires manual script styling) |
As you can see, there are several solid options out there, but a tool that integrates directly with Elementor simplifies management considerably, since you skip external dashboards and keep your workflow in the same place you build your pages.
“Getting cookie compliance right isn’t just about avoiding a penalty; it’s about respecting your visitors and establishing digital trust right from their first visit.”
– Itamar Haim, Web Compliance Specialist
How to Implement Cookie Consent on Your WordPress Site
Now that you know the best practices, let’s look at how to actually set up a cookie consent banner on your site. The native Cookie Consent tool built into Elementor makes this genuinely straightforward, and you can have everything running in just a few steps.
Step 1: Access the Compliance Tools
First, log into your WordPress site. If you’re using Elementor, you’ll find Cookie Consent right inside your dashboard settings, where the compliance tab opens your consent management page, with settings, cookie lists, and layout options all in one view.
Step 2: Run an Initial Cookie Scan
Before you design your banner, you need to know what scripts are running on your site. Click “Scan,” and within moments the tool inspects your pages and groups every active tracker into essential, analytical, and marketing categories automatically.
Step 3: Customize Your Banner Design
Next, make the banner look like it belongs on your site. Adjust the colors, fonts, and layout, and choose a subtle bottom bar, a slide-in corner box, or a center modal, keeping your “Accept” and “Decline” buttons clear, balanced, and easy to read.
Step 4: Enable Crucial Compliance Integrations
Now turn on the legal features that protect your business and your visitors. Activate Google Consent Mode v2 if you use Google services, enable geo-targeting if you serve visitors globally, and turn on your secure consent log to track choices over time.
Step 5: Review and Publish
Double-check your links to your privacy policy and cookie disclosure pages, then click “Publish” once you’re happy with the layout, and run through these quick testing steps:
- Open a new incognito browser window and visit your website.
- Check that the cookie banner appears at the bottom or corner of the page.
- Click “Decline” and use your browser’s developer tools to verify that marketing cookies weren’t set.
- Open a new incognito window, click “Accept”, and verify that your analytics tools begin recording your visit normally.
Follow this routine, and you can launch your banner with confidence, knowing your site is ready for visitors from anywhere.
Frequently Asked Questions
Do I really need a cookie consent banner if my site is small?
Yes. Privacy laws like the GDPR protect users based on where they live, not where your business is located. If even one visitor from Europe or California lands on your site, you’re legally required to respect their choices, so it’s smart to set up a consent tool early.
What happens if I don’t use a cookie banner?
Without a clear way for visitors to manage cookie choices, you risk legal warnings, regulator fines, or a suspended ad account. Platforms like Google also need proper consent settings to keep your analytics and ad performance accurate.
Does a cookie banner slow down my WordPress site?
It can, if you use heavy third-party services that load large external files. But a native cookie consent capability keeps your code light and fast, since it works directly with your existing setup instead of adding delays.
Can I write my own cookie consent banner text?
Yes, you can edit the text to match your brand’s voice. Just keep it honest and clear about what choice the visitor is making, and avoid hiding the option to reject cookies.
Do essential cookies require user consent?
No. Essential cookies are files your site needs for basic functions, like keeping a user logged in, securing forms, or saving cart items. Since your site can’t run without them, you don’t need to wait for a visitor to accept them.
What is Google Consent Mode v2?
It’s a framework from Google that lets your site pass along visitors’ cookie choices to Google services like Analytics and Ads. It adjusts how those tools behave based on consent, helping you stay compliant while keeping your reports accurate.
How often should I scan my site for cookies?
It’s a good habit to scan once a month, or whenever you install a new plugin, embed a video, or update your tracking tools. Regular scans keep your cookie list accurate for your visitors.


