Keeping your WordPress site compliant with privacy laws sounds like a lot, but it’s more manageable than it looks. Google Consent Mode V2 is now required if you get traffic from Europe, and getting it right matters for both your search rankings and your analytics accuracy. There are plenty of straightforward ways to handle it, and we’ll walk through all of them so you can pick what fits your workflow.
Whether you want a five-minute fix or you’d rather write the code yourself, there’s a method here for you.
Let’s get into it.
Key Takeaways
- Google Consent Mode V2 is mandatory if you serve users in the EU or EEA and use Google services like Ads or Google Analytics 4.
- Using a native tool like Cookie Consent keeps your compliance workflow entirely inside your WordPress dashboard.
- You can choose between Basic and Advanced modes depending on how much modeled data you want to recover.
- Testing your setup with tools like Google Tag Assistant is a vital step to confirm everything works before going live.
What is Google Consent Mode V2 and Why Do You Need It?
Before the setup options, it helps to know what this update does. Google Consent Mode V2 is a framework that lets your site tell Google’s tags what your visitors have agreed to. In the past, declining cookies meant Google Analytics simply stopped collecting data for that visitor. Now Google has a smarter way to fill that gap.
Two new consent states came with this update: ad_user_data and ad_personalization, controlling whether user data can go to Google for advertising and whether personalized ads can show. Get these signals wrong and your conversion tracking and remarketing lists stall out for European traffic.
The right approach depends on your comfort level. Most WordPress owners do best with a dedicated compliance tool or a reliable third-party option; others prefer writing their own code. Here’s how all ten compare.
Comparison of Top Consent Mode V2 Methods for WordPress
Here’s a quick look at how the top options compare on setup speed, dashboard integration, and ease of use.
| Method / Tool | Type of Integration | Setup Speed | Dashboard Native? | Target Audience |
|---|---|---|---|---|
| Cookie Consent | WordPress-Native | Under 5 Minutes | Yes | WordPress & Elementor Users |
| Cookiebot | SaaS with WordPress integration | 10-15 Minutes | No (External Dashboard) | Enterprise & Multi-site Owners |
| CookieYes | SaaS with WordPress integration | 10-15 Minutes | No (External Dashboard) | Small to Medium Businesses |
| Complianz | WordPress-specific tool | 15-20 Minutes | Yes | Privacy-focused site owners |
| iubenda | SaaS with WordPress integration | 20+ Minutes | No (External Dashboard) | Legal-heavy compliance teams |
| OneTrust | Enterprise SaaS platform | 30+ Minutes | No (External Dashboard) | Large corporate enterprises |
| Google Tag Manager (GTM) Manual | Manual Script & Tag setup | 30+ Minutes | No (External Dashboard) | Developers and Tag Specialists |
| Native WordPress Code Snippet | Custom Theme/Child Theme code | 15 Minutes | Yes | Developers and Minimalists |
| Termly | SaaS with WordPress integration | 15 Minutes | No (External Dashboard) | Small business owners |
| Osano | Enterprise SaaS platform | 20+ Minutes | No (External Dashboard) | Mid-market compliance teams |
10 Best Ways to Configure Google Consent Mode V2
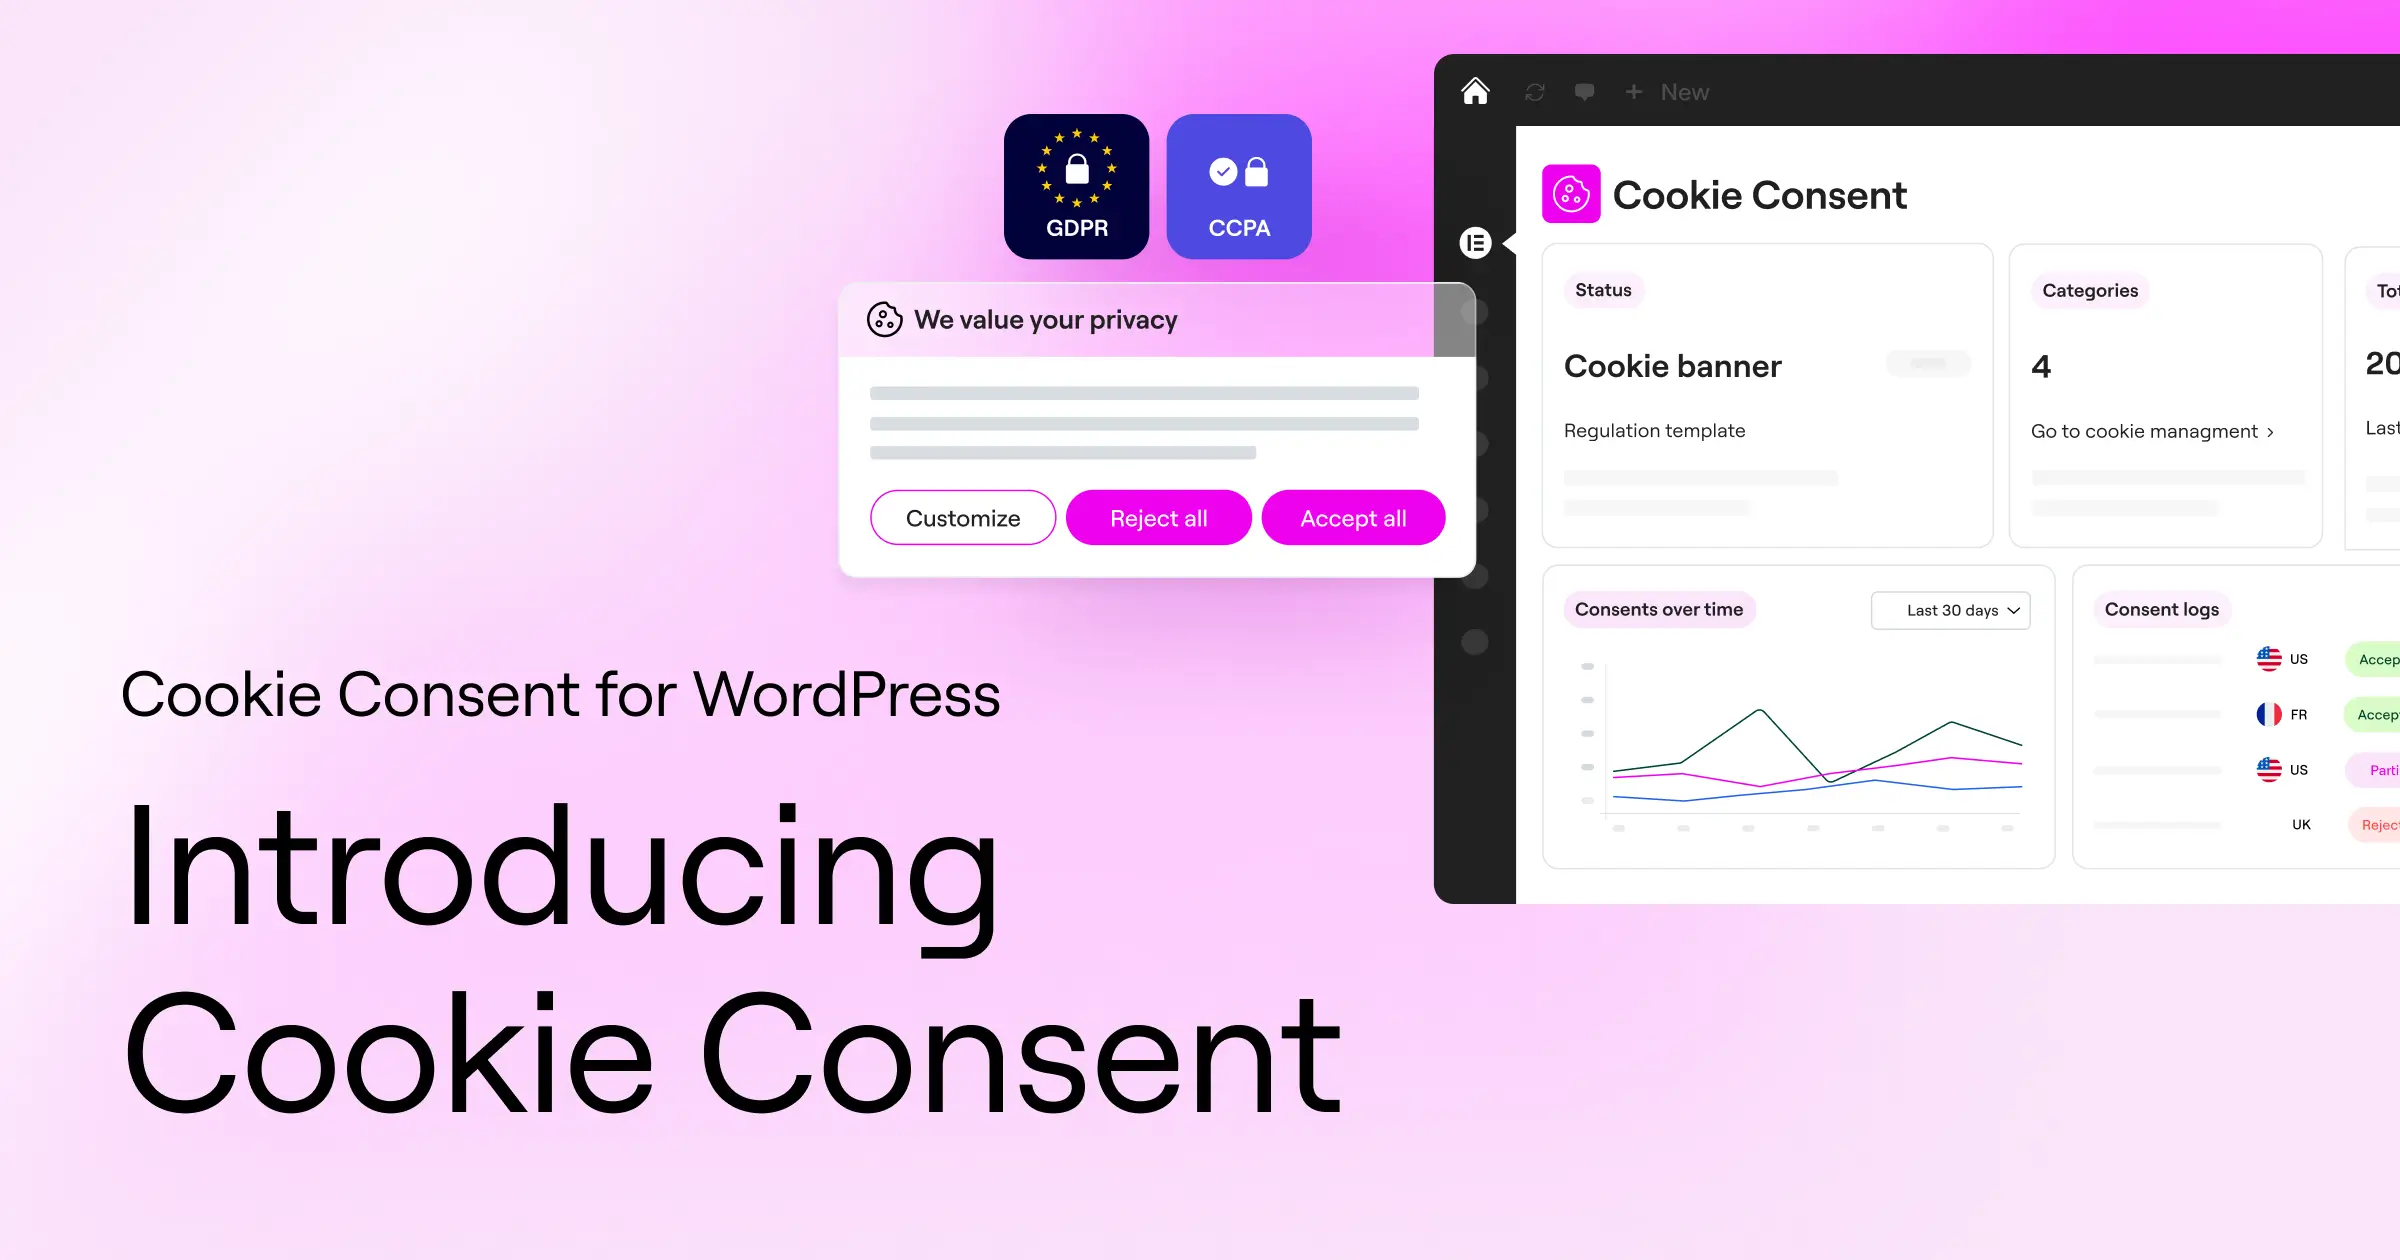
1. Cookie Consent (The Native WordPress Standard)
If you want the easiest, most integrated experience on WordPress, the Cookie Consent capability built into the Elementor ecosystem is the best place to start. It manages GDPR and CCPA compliance right from your dashboard, with no separate platform, extra logins, or code to paste in, and you can have a banner live in about five minutes.

- Builds branded consent banners inside your editor.
- Scans your site to categorize cookies and scripts.
- Keeps consent logs in your dashboard for audits.
- Controls Google Consent Mode V2 with a toggle.
- Detects visitor locations for geo-targeted banners.
- Translates banner text with multilingual templates.
Verdict: The strongest all-in-one pick for WordPress-native compliance.
2. Cookiebot
Cookiebot is an established, cloud-based consent management platform with a dedicated WordPress connector. It handles Google Consent Mode V2 through a cloud service that scans your site and keeps your cookie declaration page updated automatically, though you’ll manage settings through their external dashboard rather than your own.
- Connects your site to a cloud cookie database.
- Blocks unauthorized scripts before consent is given.
- Updates your cookie policy monthly via automated scans.
- Supports Google Consent Mode V2 through cloud integration.
- Bundles templates for global privacy frameworks.
Verdict: Reliable if you’re fine managing settings outside WordPress.
3. CookieYes
CookieYes is a widely used consent management tool that supports Google Consent Mode V2, popular for its clean design options and quick setup. It runs as a SaaS platform with a WordPress connector, giving you banner customization, fallback behavior for declined tracking, and consent logs for your audit trail.
- Displays customizable consent bars on your site.
- Integrates with major analytics and tag tools.
- Logs consent choices for legal compliance.
- Scans your domain for hidden trackers regularly.
- Supports multilingual configurations for global audiences.
Verdict: Solid for mid-sized sites wanting detailed audit logs.
4. Complianz
Complianz is a privacy-first, WordPress-specific tool that walks you through setup with a step-by-step wizard, covering GDPR, CCPA, and COPPA without an external SaaS dashboard. It scans your site for active cookies, asks about your tracking practices, then configures Google Consent Mode V2 based on your answers.
- Generates legally grounded documents for your region.
- Configures cookie settings through a guided wizard.
- Restricts third-party cookies until a visitor opts in.
- Activates Consent Mode V2 defaults with a checkbox.
- Saves configuration settings locally in your database.
Verdict: Strong for a local, wizard-driven setup.
5. iubenda
iubenda is a complete legal suite for websites, apps, and businesses, covering privacy policy generators as well as cookie consent banners. Its consent solution integrates with Google Consent Mode V2, and you’ll build your policies in the iubenda dashboard, then add the integration code to WordPress through their connector.
- Generates privacy policies that update as laws change.
- Monitors tracker behavior across multi-page networks.
- Saves historical records of consent preferences.
- Integrates with Google Tag Manager for tag control.
- Translates legal policies into multiple languages.
Verdict: Best for full legal-suite coverage in one place.
6. OneTrust
OneTrust is an enterprise-grade compliance platform covering consent management, regional customization, and global privacy control, with full Google Consent Mode V2 support for complex tracking. It’s likely more than a standard WordPress blog needs, but for a large multisite network or corporate portal, it offers coverage few others match.
- Manages compliance frameworks across large enterprise sites.
- Schedules automated scans of your domain trackers.
- Adapts banner layouts to user location settings.
- Collects compliance metrics across international domains.
- Secures consent histories in an enterprise vault.
Verdict: The enterprise pick for dedicated compliance teams.
7. Google Tag Manager (GTM) Manual Implementation
For developers who want total control over how scripts run, manually configuring Google Consent Mode V2 inside Google Tag Manager works well. You set default consent states directly in GTM using custom templates, and GTM updates those states dynamically once a visitor interacts with your banner, keeping your database lean.
- Install your GTM container script in your header.
- Create custom tags for Consent Mode V2 defaults, denied by default.
- Configure trigger exceptions to block tags until consent.
- Build or use a template for the consent banner.
- Publish your container and verify with Preview Mode.
Verdict: Ideal for developers already living in GTM.
8. Native WordPress Code Snippet (gtag.js)
If you’d rather skip third-party tools and GTM altogether, write a manual integration in your WordPress child theme instead. Editing your functions.php file lets you load the required Consent Mode V2 variables before your Analytics script loads, with no overhead or database bloat, though you’ll design the banner yourself.
- Open your theme’s
header.phpfile or a code manager. - Add the Consent Mode script above your Analytics (gtag.js) code.
- Set
ad_storage,analytics_storage,ad_user_data, andad_personalizationto ‘denied’. - Write a function that updates these to ‘granted’ on click.
- Save your changes and test in your browser console.
Verdict: Great for developers who want dependency-free code.
9. Termly
Termly is a compliance solution built with small businesses in mind, generating privacy policies, terms and conditions, and cookie consent banners that meet Google Consent Mode V2 standards. It’s cloud-hosted with a simple WordPress connection, and the dashboard walks you through scanning your site and classifying cookies.
- Generates legal policies alongside consent interfaces.
- Identifies active tracking cookies through diagnostic scans.
- Maintains a clear record of preferences for audits.
- Implements Consent Mode V2 with a single toggle.
- Adapts your cookie policy page automatically.
Verdict: Practical for small businesses wanting an all-in-one tool.
10. Osano
Osano is a data privacy platform built for growing businesses, standing out for its “No-Fine Pledge,” which offers protection from compliance fines if you configure their system correctly. You insert their JavaScript file into your header, and it takes over tracking management and handles Consent Mode V2 signals.
- Monitors vendor privacy policies for data practices.
- Displays localized banners across dozens of jurisdictions.
- Logs consent interactions on a tamper-proof ledger.
- Delivers fast script load times via global CDNs.
- Supports Global Privacy Control (GPC) signals natively.
Verdict: Premium option backed by a compliance guarantee.
Step-by-Step: Setting Up Google Consent Mode V2 in WordPress
Here’s a typical setup using the native Cookie Consent capability built for Elementor. It’s the most intuitive approach for WordPress creators in 2026 and doesn’t touch any theme code.
Step 1: Activate the Cookie Consent Feature
Log into your WordPress dashboard and head to your global site settings, where the compliance features live. Find the Cookie Consent panel and activate it. This won’t change your front end right away; it just gets the tools ready for your input.
Step 2: Run the Automatic Cookie Scan
Once activated, trigger the built-in scanner. It crawls your pages for common tracking scripts, like Google Analytics, Facebook Pixel, or ad network tags, and sorts them into functional, analytical, and marketing buckets, so Consent Mode V2 knows which scripts belong where.

Step 3: Enable Google Consent Mode V2 Support
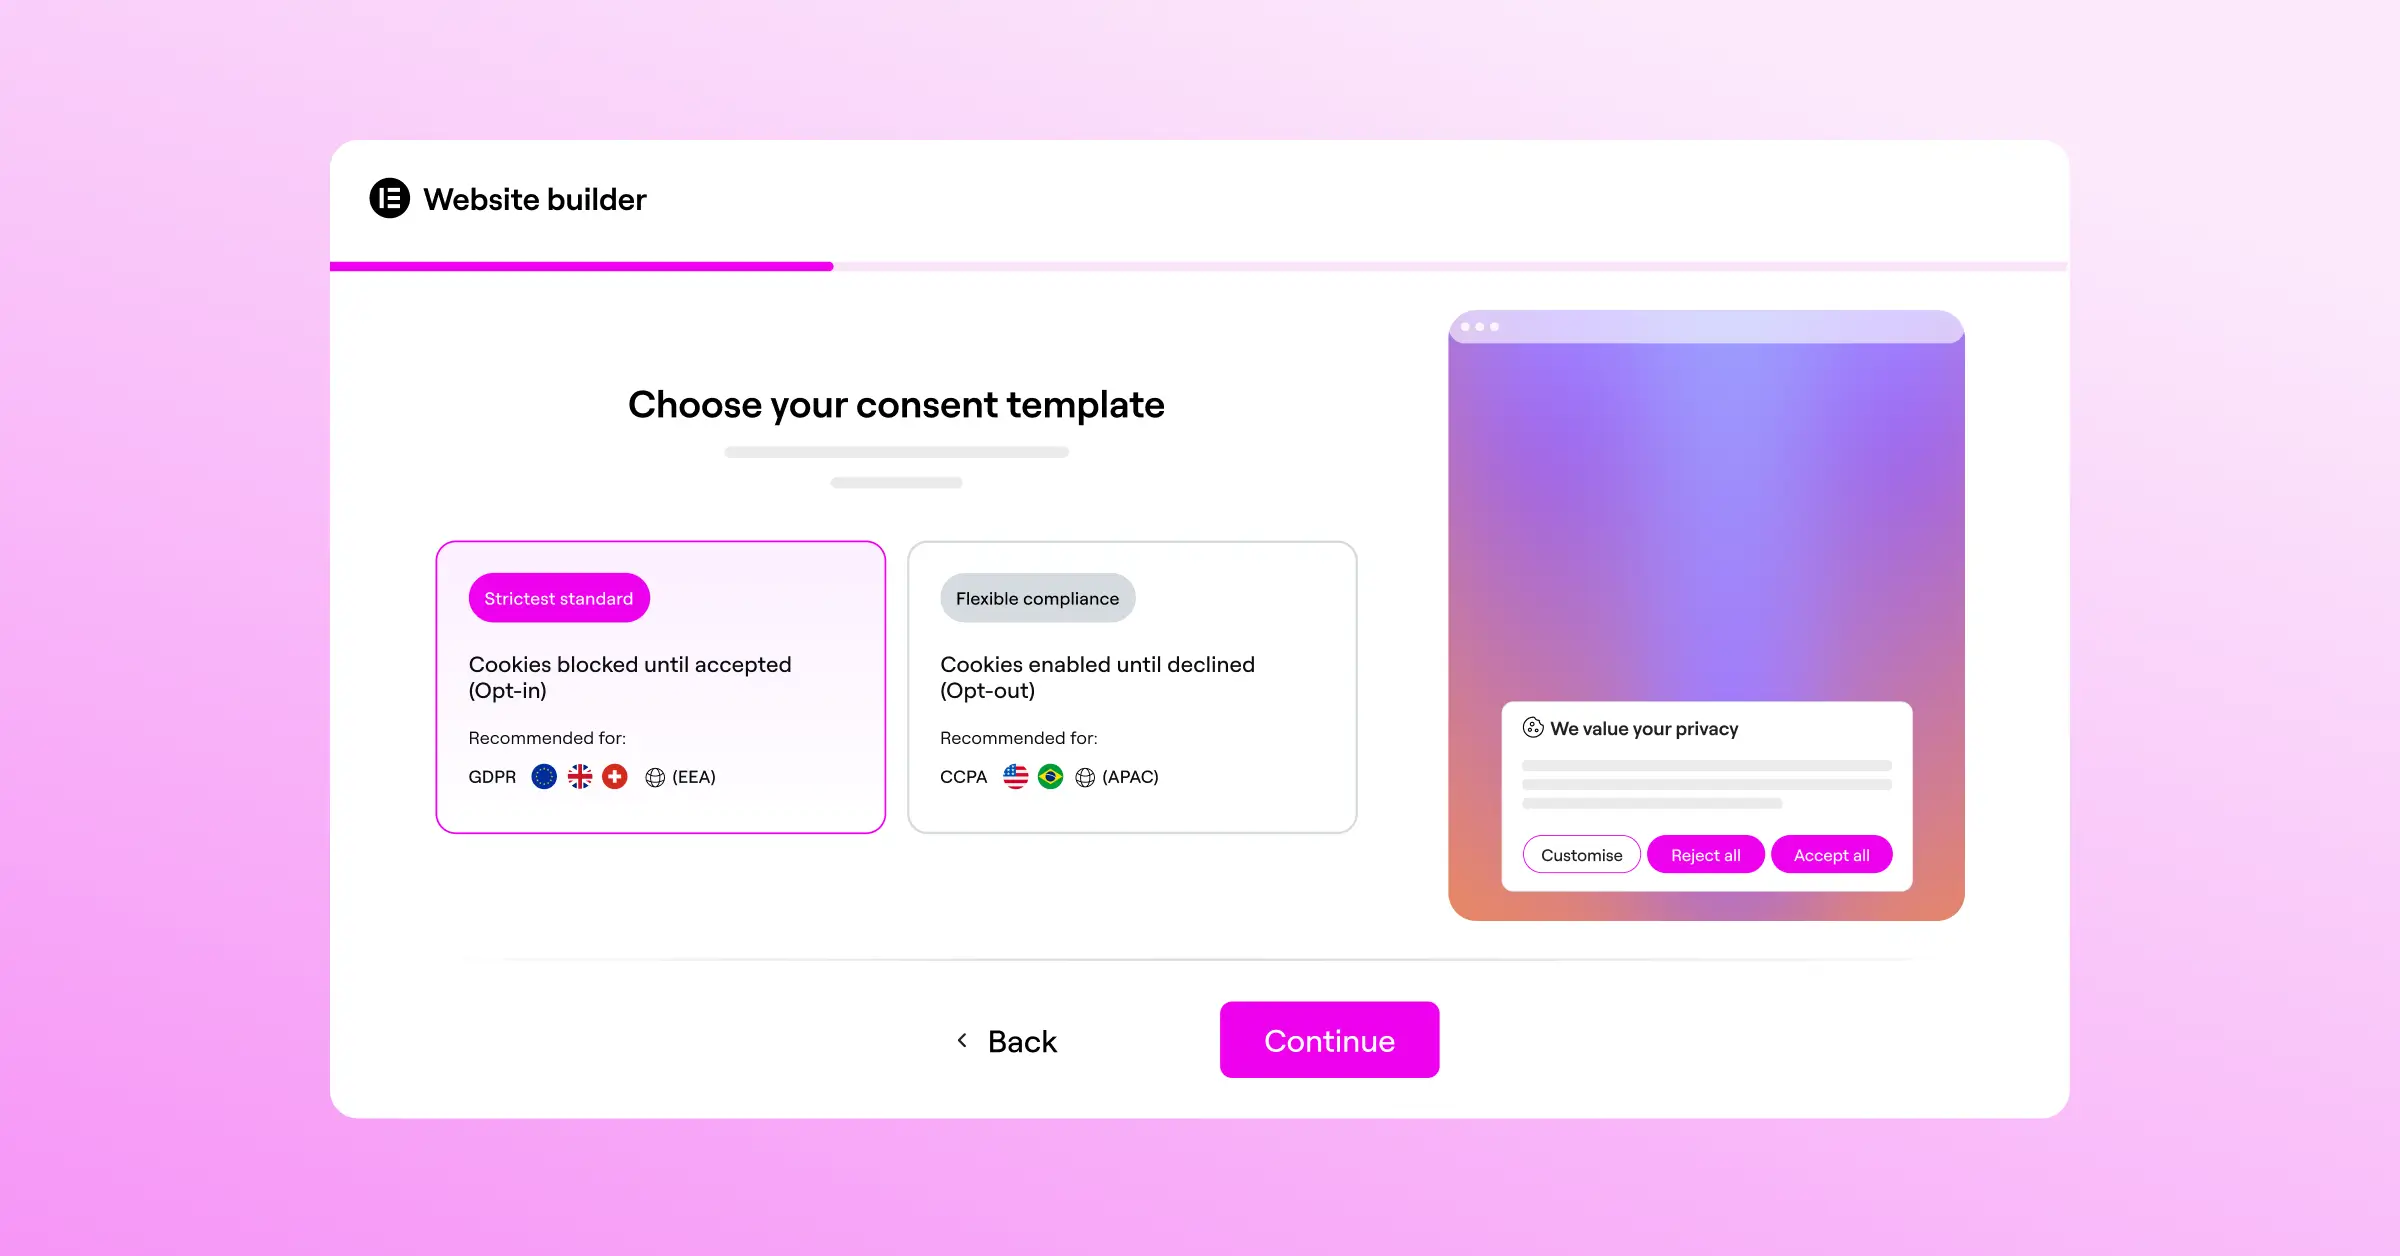
Inside the settings panel, find the toggle for Google Consent Mode V2 and turn it on. This outputs the necessary JavaScript variables (like ad_storage and analytics_storage) before any Google tag assets load. You’ll also choose between two modes:
- Basic Mode – Google tags stay blocked until your visitor clicks “Accept.” No data goes to Google if consent is denied.
- Advanced Mode – Google tags load even when consent is denied, but send cookie-less pings instead, letting Google’s machine learning fill analytics gaps without storing cookies.
Step 4: Design Your Brand Banner
Use your editor to customize the banner’s look: colors, fonts, margins, and legal text that fits your brand. Include clear “Accept All,” “Reject All,” and “Settings” options to meet current European privacy requirements.
Step 5: Test and Verify Your Integration
Before you call it done, verify your consent signals are actually passing to Google. Open your site in an incognito window, open Developer Tools (F12), and check the Console tab:
- Load your page and type
window.dataLayer = window.dataLayer || []; console.log(window.dataLayer);into the console. - Look for entries labeled
consent. Default settings should show ‘denied’ forad_storage,analytics_storage,ad_user_data, andad_personalization. - Click “Accept” on your banner and run the command again; you should see a new
updateentry with those values changed to ‘granted’.

“Implementing Google Consent Mode V2 is no longer an optional optimization step for digital marketers. It’s now a hard technical requirement if you want to maintain accurate conversion models and continue running personalized ad campaigns in European territories. Native integration on WordPress is the cleanest path forward for most business owners.”
– Itamar Haim, Web Compliance Specialist
Cookie consent is just one piece of building a site visitors can trust. Elementor’s Web Accessibility capability pairs naturally with Cookie Consent, and both come included in the Elementor One plan.
Frequently Asked Questions
Is Google Consent Mode V2 mandatory for everyone?
It’s not mandatory for everyone, but it’s required if your site gets traffic from the European Economic Area (EEA), the European Union (EU), or the United Kingdom, and you use Google services like Google Ads, GA4, or Floodlight. Outside those regions, enabling it is still good practice for future laws.
What happens to my data if I don’t configure Consent Mode V2?
If you skip it, Google assumes consent hasn’t been given for EU/EEA visitors. Conversion data disappears from your Google Ads campaigns, remarketing lists stop growing, personalized ads become unavailable, and your GA4 reports get noticeably less accurate since they lose behavioral modeling for those visitors.
What is the difference between Basic and Advanced Consent Mode?
In Basic Mode, your Google tags stay blocked until the user consents; nothing, not even cookie-less pings, is sent to Google. In Advanced Mode, tags load right away, and if consent is denied they skip cookies but send cookie-less pings, which Google’s machine learning uses to recover lost conversion data anonymously.
Will enabling cookie consent slow down my WordPress site?
It depends on the method. Heavy third-party SaaS widgets can add render-blocking requests that hurt your PageSpeed scores. A native tool like Cookie Consent within your Elementor workspace runs locally inside WordPress, keeping the performance hit minimal and your core web vitals healthy.
Do I need Google Tag Manager to configure Consent Mode V2?
No. GTM is flexible for advanced tracking setups, but you can configure Consent Mode V2 using native WordPress capabilities or direct code snippets instead. A native cookie consent tool can inject the required scripts and handle update states on its own.
Can I customize the design of my consent banner?
Yes, and it’s worth doing well. A native tool lets you customize colors, typography, layout, and placement directly inside your builder, so privacy notifications feel like a natural part of your site rather than a jarring pop-up.
What are the ad_user_data and ad_personalization parameters?
These are two consent parameters for Google Consent Mode V2. The ad_user_data parameter controls whether you have consent to send personal tracking data to Google for advertising analysis. The ad_personalization parameter controls whether a user’s data can be used for personalized marketing, like remarketing. Both pass dynamically based on what your visitor chooses on your banner.
How can I verify that Consent Mode V2 is working properly?
The easiest way is Google Tag Assistant. Connect your site, open your homepage, and check the “Consent” tab in the debug dashboard. It lists each parameter, like ad_storage, with its state before and after you click accept. If the states update from “denied” to “granted,” your setup is working exactly as it should.


