
Key Takeaways
- Privacy laws require consent before loading non-essential tracking scripts, no matter how small your site is.
- Manual script management is risky; hand-coding script blocks often leads to broken layouts, slow pages, or compliance gaps.
- Consent tools simplify the process. Using a native WordPress tool like Cookie Consent keeps everything in one dashboard without external accounts.
- Google Consent Mode v2 is essential if you use Google ads or analytics for European traffic, because proper script consent integration is now mandatory.
- Regular script audits matter because new plugins and third-party tools constantly inject fresh cookies, making automated scanning extremely useful.
If you’ve ever stared at a privacy audit checklist and felt your heart sink a little, you’re not alone. Cookie scripts, consent banners, GDPR deadlines, and a dozen third-party trackers all vying for your attention, it can feel like a lot to handle. The good news is that managing cookie scripts on a WordPress site is genuinely more straightforward than it looks once you understand the moving parts. This walkthrough covers the whole process, from auditing your existing scripts to keeping visitors happy and regulators satisfied.
You don’t need to be a developer to get this right. Whether you run a small blog or a busy e-commerce store, the same core principles apply. Let’s go through them together.
Every time you install an analytics tool, set up a tracking pixel, or embed a video, you’re adding cookie scripts to your WordPress site. These scripts are small pieces of code that run in the visitor’s browser, letting third-party services collect data about how people interact with your pages. While scripts like these help you understand your audience and run campaigns, they also gather personal data, and that’s precisely why modern privacy laws require you to manage them carefully.

Understanding Cookie Scripts and Why They Matter for Your WordPress Site
There are two main types of cookies you’ll encounter. First-party cookies are set directly by your own website for basic functions, like keeping a user logged in or remembering what’s in their shopping cart. Third-party cookies are set by external services, like Google or Meta, to track users across multiple sites. That second category is where privacy regulators focus most of their attention.
Major privacy frameworks like the General Data Protection Regulation (GDPR) in Europe and the California Consumer Privacy Act (CCPA) in the United States have strict rules about when and how those scripts can fire. Under the GDPR, you can’t load tracking scripts before a visitor actively gives their consent. If your site automatically fires Google Analytics or a marketing pixel the moment a page opens, you’re likely out of compliance. Proper script management keeps those codes paused until the visitor clicks “Accept” on your banner, and that single change can make a significant legal difference.
The Core Challenges of Managing Cookie Scripts Manually
Some site owners try to handle cookie scripts by editing header files or pasting blocking code directly into theme files. It’s understandable, especially if you want to keep things simple, but this approach tends to create more problems than it solves. One small typo in a PHP or JavaScript file can take your entire site down, leaving visitors with a blank screen and you with a stressful afternoon.
Manual management also introduces a handful of everyday headaches that are worth knowing about:
- Render-blocking errors occur when scripts load in the wrong order and pause page rendering, making your site feel sluggish.
- Premature script execution is surprisingly hard to prevent without complex conditional logic.
- Cache conflicts happen when server-side caching saves a page with scripts already active, then serves that cached version to visitors who never consented.
- Fragmented management across multiple theme files makes it difficult to track what’s running where.
- No audit trail means you don’t have an automatic record of user consents, which becomes a problem during a privacy audit.
- Inconsistent styling leaves custom-coded banners looking mismatched next to your carefully designed templates.
To avoid these pitfalls, most WordPress site owners use a dedicated consent management tool. A central system lets you organize scripts into logical categories, control when they fire, and keep accurate records, all without touching a single line of backend code.
How to Categorize and Audit Your WordPress Cookie Scripts
Before you can block or allow scripts, you need to know exactly what’s running on your site. Many plugins inject scripts quietly in the background, so you might be tracking visitors without even realizing it (this one trips a lot of people up). Running a regular audit is the best way to stay on top of things.
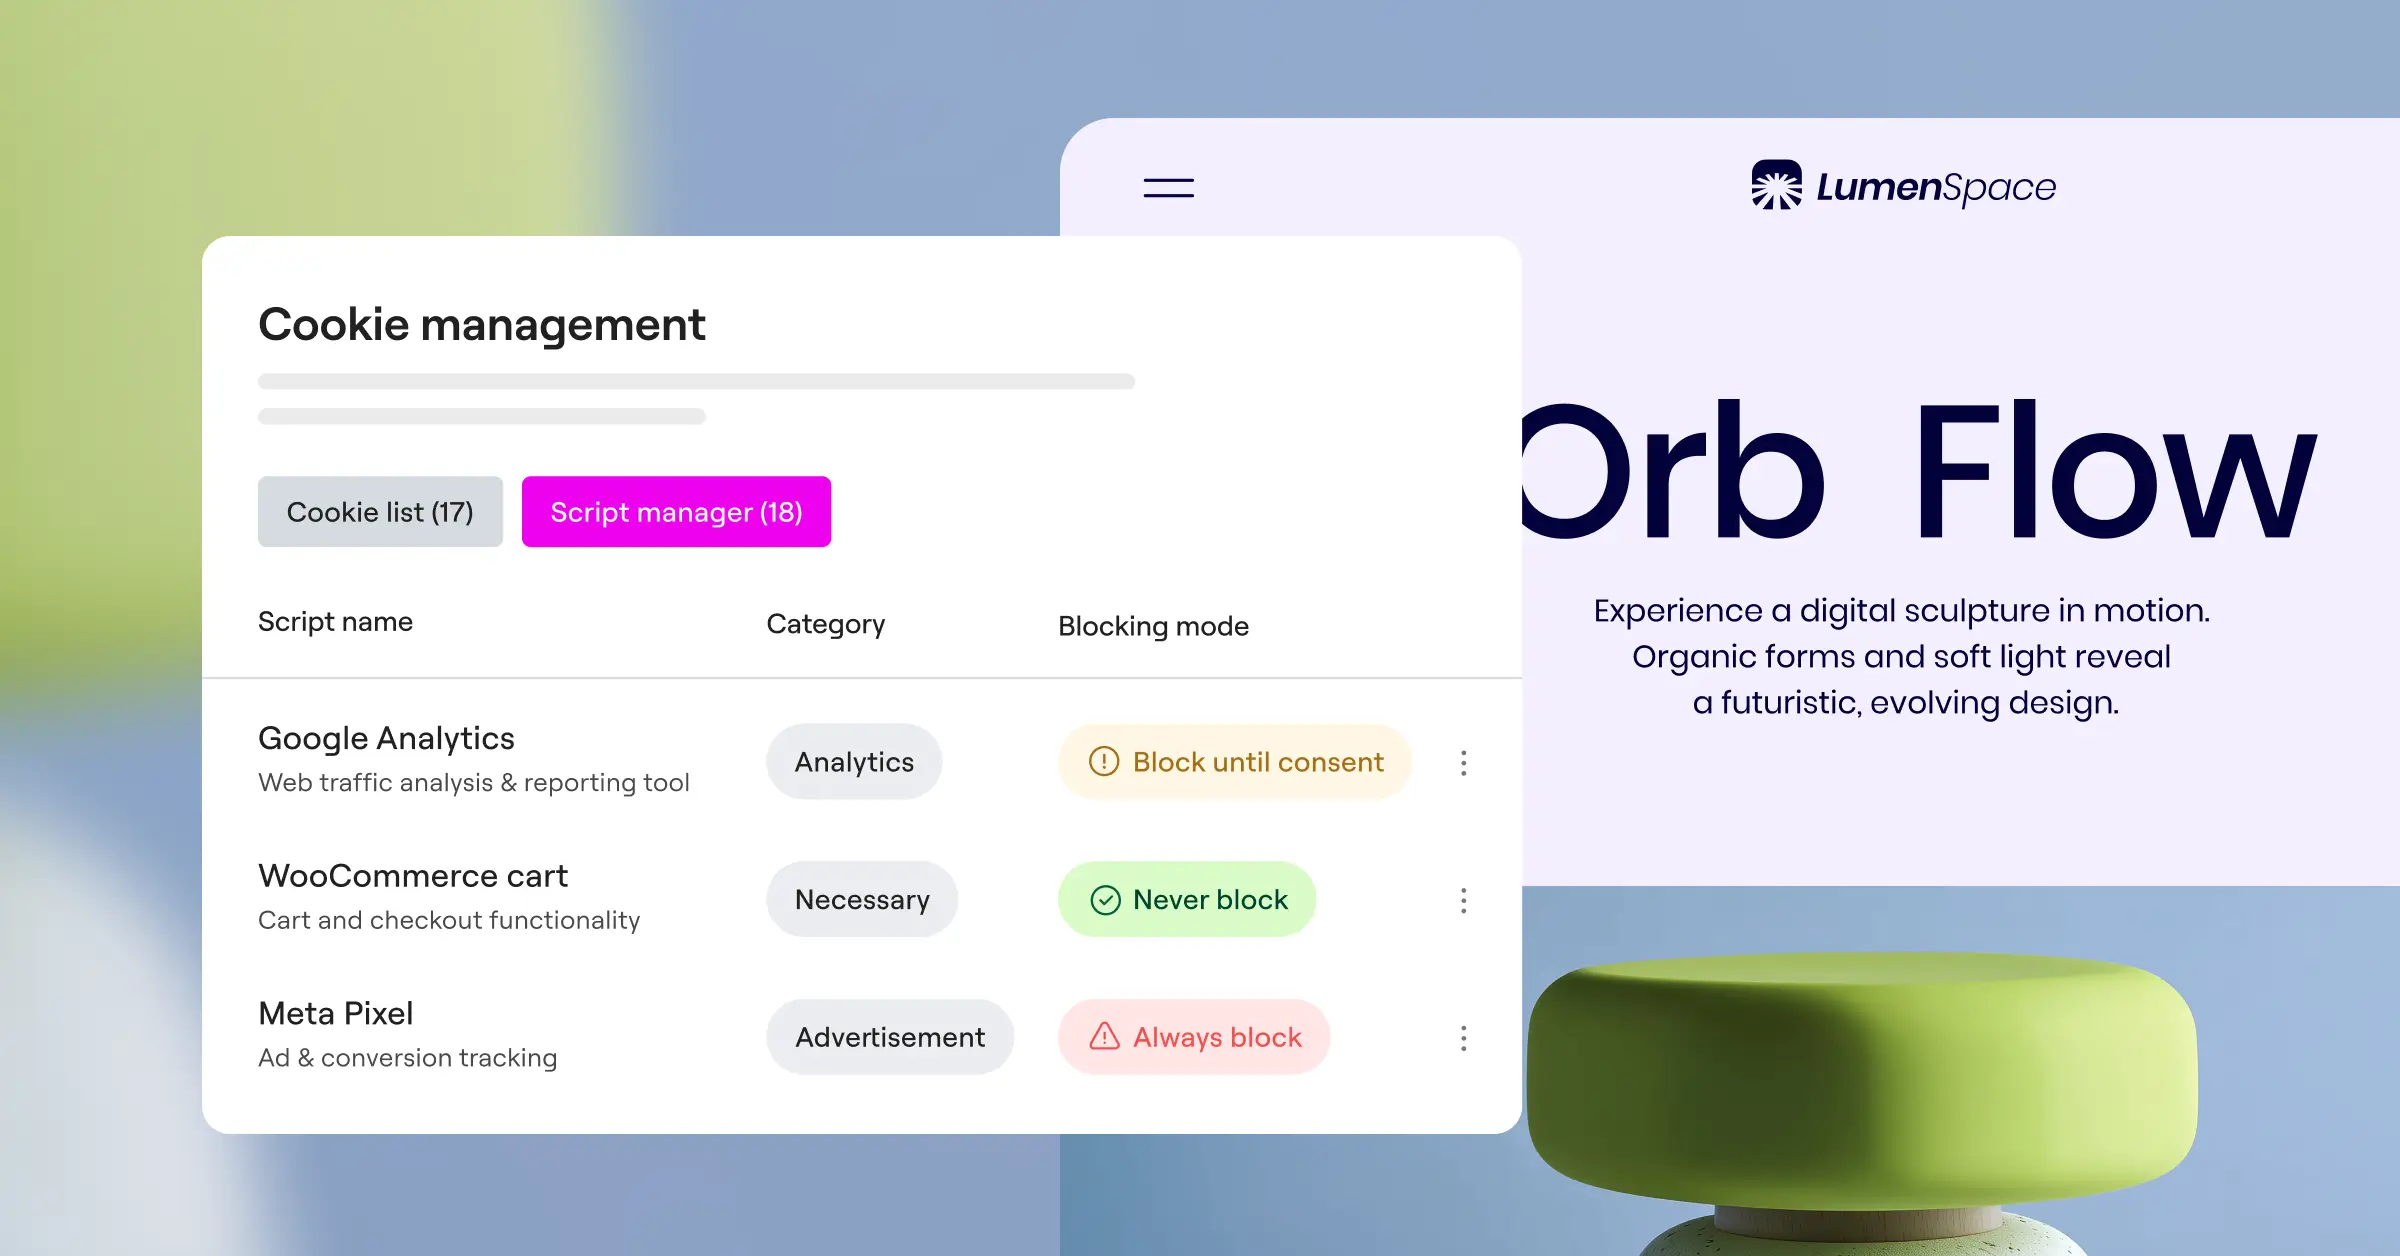
When you audit your site, you’ll sort your cookie scripts into four main groups:
- Strictly Necessary covers scripts essential for basic site operation, like security tools, shopping cart scripts, and user login session handlers. You don’t need user consent to run these.
- Performance and Analytics includes scripts that gather anonymous data about how visitors use your website. Google Analytics is the most common example in this category.
- Functional scripts support helpful but non-essential features, like live chat widgets, video embeds, or language selectors.
- Targeting and Advertising covers scripts that track visitors across websites to build profiles for targeted advertising. The Meta Pixel, Pinterest Tag, and Google Ads tracking codes belong here.
To run a quick audit yourself, open your website in an incognito window, right-click anywhere on the page, and select “Inspect.” Head to the “Application” tab and look under “Cookies” in the left sidebar. You’ll see every active cookie and the scripts that created them. If you spot analytics or ad network scripts loading before you’ve interacted with any consent banner, you’ve got some work to do.

Step-by-Step Guide: Managing Cookie Scripts in WordPress
Setting up proper cookie script management doesn’t have to be painful. Follow these steps and you can have your tracking scripts organized and your consent banner live in a single sitting.
Step 1: Check Your Active Plugins and Themes
Start by reviewing your active WordPress plugins. Look for anything that handles marketing, social media sharing, embedded video players, or web analytics. Write down every tool that might be injecting tracking scripts. Knowing your starting point makes it much easier to configure your blocking rules later, and it helps you catch anything that might slip through the cracks.
Step 2: Install a Native Consent Management Tool
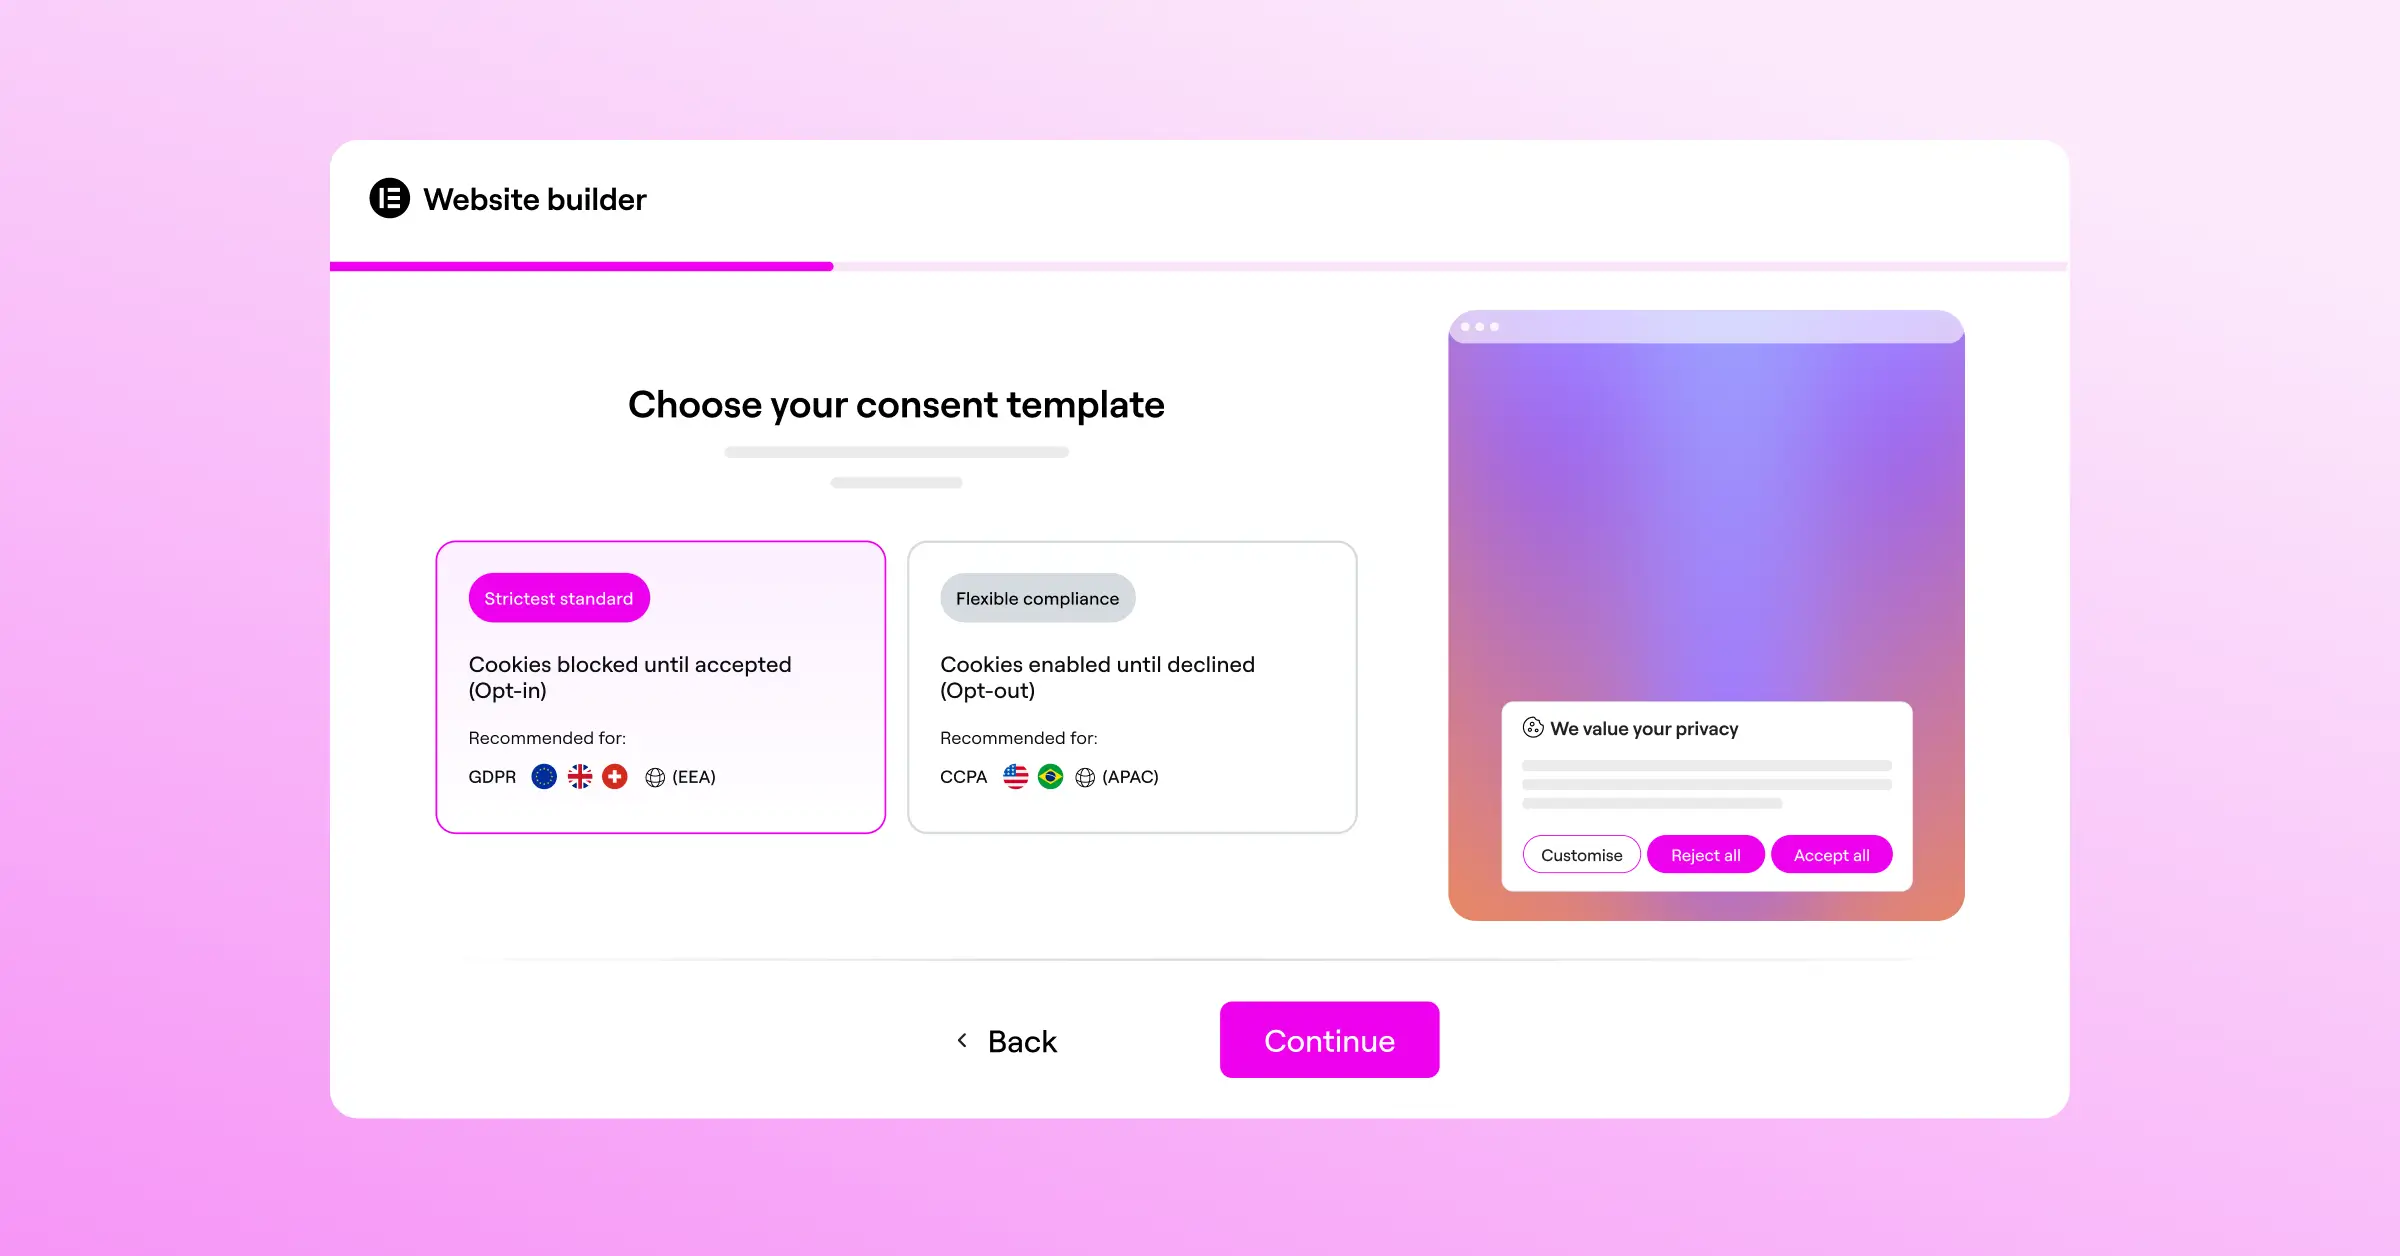
Instead of relying on external services that push you into managing scripts through a separate platform, look for a native WordPress option. The Cookie Consent capability built into Elementor is a strong choice here. Because it’s fully integrated into your WordPress dashboard, you don’t need to juggle external accounts, navigate confusing third-party interfaces, or pay for separate platforms. It lets you build a banner, scan your site for cookies, and control script execution right where you already edit your content. Setup takes under five minutes, which is genuinely easier than it sounds.
Step 3: Run an Automatic Scan
Once you’ve set up your cookie consent tool, run an automatic scan of your website. The scanner crawls your pages, identifies active cookies, and groups them into their appropriate categories. If the tool finds a script it doesn’t recognize, you can manually assign it to the right group, so marketing codes never slip into the “Strictly Necessary” bucket unnoticed.
Step 4: Design a Friendly, Accessible Banner
Your banner should match your brand style while staying easy to read. Avoid tricky language or hiding the “Reject” button in tiny text. Give visitors a clear choice to accept all, reject all, or manage their individual preferences. Placing the banner at the bottom of the screen keeps it visible without blocking navigation, and it tends to feel less intrusive to users who just want to browse your content.
Step 5: Configure Script Blocking and Consent Mode v2
This is the most important step. Configure your consent tool to block analytics and advertising scripts until a visitor gives their explicit consent. If you serve visitors in the European Union, you’ll also want to enable support for Google Consent Mode v2. This feature automatically communicates each visitor’s privacy choices to Google services, letting your tags adjust their behavior dynamically based on whether the user said yes or no. It’s now required for EU-facing sites that run Google advertising or analytics.
Step 6: Test Your Implementation Thoroughly
Before you call it done, open a fresh incognito window and visit your homepage. Use your browser’s inspector to check that no tracking cookies load on arrival. Click “Reject” on your banner and confirm that tracking cookies stay blocked. Then open a new incognito session, click “Accept,” and verify that your analytics and advertising scripts fire as expected. It’s a quick check that can save you a lot of headaches later.
Top WordPress Cookie Script Management Solutions Compared
Choosing the right tool to manage your cookie scripts makes a real difference in your day-to-day workflow. Here’s a factual overview of some of the most widely used options for WordPress users in 2026.
| Solution | Native Dashboard | Design Control | Consent Mode v2 Support | Setup Complexity |
|---|---|---|---|---|
| Elementor Cookie Consent | Yes (Fully Native) | High (Matches your theme) | Yes (Built-in support) | Very Low (Under 5 minutes) |
| Cookiebot | No (External Dashboard) | Medium (Custom CSS required) | Yes (Via connector) | Medium |
| CookieYes | No (Cloud Platform) | Medium (SaaS interface) | Yes (With configuration) | Medium |
| Complianz | Yes (WordPress Admin) | Medium (Settings-based) | Yes (Through settings) | High (Many setup screens) |
| iubenda | No (External Portal) | Medium (Script-based) | Yes (Via code integrations) | High |
External software-as-a-service platforms often bring deep compliance features, but they also push you to manage consent banners outside of WordPress. That can mean slower loading times as your site waits for external servers to deliver the consent script. A native tool keeps your data and assets in one place, which reduces load times and makes it much easier to keep your brand design consistent across your entire site.
Advanced Best Practices for Cookie Management in 2026
As privacy regulations keep evolving, basic compliance may not be enough to satisfy stricter regulatory audits. A few additional practices can help you stay ahead of the curve while actually improving the experience for your visitors.
One of the most useful techniques is geo-targeting. Privacy rules differ significantly depending on where your visitor is located. Visitors from the EU must opt in to cookies before scripts fire, while visitors from California may only need an opt-out option. By showing location-specific banners, you can give your global audience a customized experience that respects local laws without peppering users with consent prompts they don’t legally require. Cookie Consent includes built-in geo-targeting, so you can configure this without needing additional tools.
Another important practice is respecting browser-level privacy signals like Global Privacy Control (GPC). Modern browsers let users set a universal preference to opt out of tracking. Your cookie consent system should detect this signal automatically and disable tracking scripts right away, even if the visitor hasn’t clicked anything on your banner yet.
Finally, pay attention to how your consent tools affect page load speed. Load consent scripts asynchronously so they don’t block your page’s visual content from rendering. When you build your banner using clean, lightweight tools, you avoid layout shifts and keep your Core Web Vitals healthy. That matters both for search rankings and for your visitors’ overall experience.
“Consent management is no longer just about avoiding a fine; it’s about building user trust. When you integrate your consent tools directly into your CMS, you minimize performance lags and keep your design consistent.” Itamar Haim, Web Compliance Specialist
Troubleshooting Common WordPress Cookie Script Issues
Even with a solid setup, you might occasionally run into script conflicts or compliance gaps. Here’s how to work through the most common ones without too much stress.
My Tracking Scripts Stopped Working Completely
If your analytics reports suddenly show zero traffic, check your script categorization first. If Google Analytics or your tag manager was accidentally placed in the “Strictly Necessary” bucket but your blocking script is holding back all untagged elements, the scripts might not load at all. Double-check that all tracking codes are correctly assigned to “Analytics” or “Targeting” and that they’re permitted to fire once a user clicks “Accept.”
The Banner Doesn’t Show Up for Cached Users
Caching is fantastic for speed, but it can occasionally interfere with cookie banners. If your caching system saves a page version where cookies have already been accepted, new visitors might never see the consent banner. To fix this, configure your caching tool to ignore the consent cookie, or use a consent feature that relies on client-side JavaScript to render the banner dynamically regardless of what’s been cached on the server.
The Layout Shifts When the Banner Loads
If your cookie banner pops in and pushes your header content down the page, search engines may penalize your site for Cumulative Layout Shift (CLS). The fix is to use a fixed overlay position, like a bottom bar or a centered modal, that sits on top of your existing layout rather than pushing content around. This keeps your page structure stable and protects your search rankings at the same time.
Frequently Asked Questions
Do I really need a cookie banner if my site has low traffic?
Yes. Privacy regulations like the GDPR and CCPA apply to websites of all sizes, regardless of how much traffic they receive. If even one visitor arrives from a region covered by these laws, you need to follow the rules. Setting up cookie consent early is far less stressful than scrambling to fix things after a complaint lands.
What happens if I don’t block tracking scripts before consent?
If your site fires tracking pixels or analytics scripts before a visitor clicks “Accept,” you’re in violation of major European privacy laws. Regulators actively audit websites for exactly this issue. Using a reliable tool to hold scripts back until consent is given is the only way to stay truly compliant.
How does Google Consent Mode v2 work?
Google Consent Mode v2 acts as a bridge between your visitor’s privacy choices and your Google tracking tags. If a visitor declines tracking, Consent Mode tells your analytics and advertising tags to stop reading or writing cookies. Instead, they send anonymous signals to Google to help estimate conversions without identifying the user or violating their privacy preferences.
Can I customize the design of my consent banner?
You absolutely can. Modern consent tools let you customize colors, typography, buttons, and layout. Keeping your banner style consistent with the rest of your site builds trust with visitors and makes them feel more comfortable managing their preferences. Elementor’s Cookie Consent includes full design customization right inside the WordPress editor, so you don’t need to touch any code.
Is it possible to show different banners to users in different countries?
Yes, and it’s worth setting up if you have an international audience. Geo-targeting lets your cookie consent tool detect a visitor’s location via their IP address and show them the appropriate legal notice for their region. An EU visitor gets a strict opt-in banner, while a US visitor might see a simpler notice or nothing at all.
Why is a native WordPress solution better than a third-party script?
Native solutions run directly on your own hosting server, so your site doesn’t need to make slow external calls to a third-party system every time it loads a consent banner. It also keeps your backend workflow in one place. You can manage compliance settings, scripts, and consent logs from your familiar WordPress dashboard without switching between platforms.
Does a cookie banner affect my site’s search engine optimization?
It can, if it’s built poorly. Banners that cause layout shifts or accidentally block search engine crawlers can hurt your rankings. But a lightweight, well-designed consent tool keeps bots able to index your content normally while giving your visitors a fast, stable experience.
How do I know if my cookie banner is legally compliant?
A compliant banner gives visitors a clear and equal choice to accept or reject cookies. It should also offer granular controls so users can accept analytics while rejecting advertising cookies. And it must block all non-essential scripts until consent is given, while keeping secure consent logs you can produce during an audit.


