Setting up privacy controls on your site can feel like one more chore. If you run a WordPress site, you’ve probably run into strict rules like GDPR in Europe and CCPA in California. You can’t just drop tracking scripts onto a visitor’s browser without asking first, you need to group those cookies into clear categories and let people choose what they’re comfortable allowing.
Here’s the good news: sorting your trackers doesn’t have to be a technical headache. With the right tool, you can get everything sorted in under five minutes. Whether you’re running an online store, a local business site, or a personal blog with basic analytics, getting your categories right protects your visitors and your business at the same time.
Key Takeaways
- Categorization is mandatory under modern privacy laws like GDPR and CCPA, requiring cookies to be grouped by purpose.
- Google Consent Mode v2 is now a critical requirement for any website using Google services to serve European traffic.
- A native WordPress tool like Cookie Consent simplifies the entire setup by letting you handle everything inside your dashboard.
- Prior consent is key, meaning tracking scripts must remain blocked until the user actually clicks the agree button.
- Regular automatic scans keep your website compliant even when you add new tools or marketing scripts.
What Are Cookie Categories and Why Do They Matter in 2026?
When someone visits your site, small scripts save little blocks of data in their browser. Those are cookies. Some are genuinely useful, they keep your cart full or remember a login, while others quietly track behavior across the web for personalized ads. Privacy law requires you to sort them into clear categories instead of a confusing list of fifty technical database keys, so visitors get three or four simple groups they can actually understand.
And 2026 is the year to get this right. Browsers keep blocking third-party trackers by default, and regulators are actively checking sites of every size. If your site touches EU, UK, or California visitors and you run analytics or advertising tools, you need a clear way to organize and block trackers until visitors say it’s okay.
The Core Cookie Categories Explained
Most privacy laws recognize four main cookie categories, and grouping your scripts correctly avoids blocking vital site functions while keeping your marketing tools compliant. Here’s a quick rundown:
- Strictly Necessary Cookies, These keep your site working, handling navigation, security, and shopping carts. You don’t need consent to use them, but you must list them in your privacy policy.
- Functional Cookies, These remember visitor choices like language, region, or font size. They improve browsing but aren’t required for the page to load.
- Performance and Analytics Cookies, These collect anonymous data on how visitors use your site, which pages are popular, and where they hit errors. Google Analytics falls into this bucket.
- Marketing and Targeting Cookies, These track visitors across sites so advertisers can build interest profiles and show relevant ads elsewhere. They need explicit, active consent before they can run.
Here’s how those categories break down under global privacy rules:
| Category Name | What It Does | Requires Consent? | Typical Examples |
|---|---|---|---|
| Strictly Necessary | Keeps the site running, secure, and usable. | No (Always Active) | User sessions, CSRF security tokens, shopping carts. |
| Functional | Remembers preferences and custom settings. | Yes (Opt-out option) | Language preferences, user-selected themes. |
| Analytics | Measures user traffic and page performance. | Yes (Opt-in required) | Google Analytics, Hotjar, visitor tracking scripts. |
| Marketing | Tracks behavior to deliver targeted advertising. | Yes (Opt-in required) | Meta Pixel, Google Ads remarketing, tracking beacons. |
How to Set Up Cookie Categories on Your Website
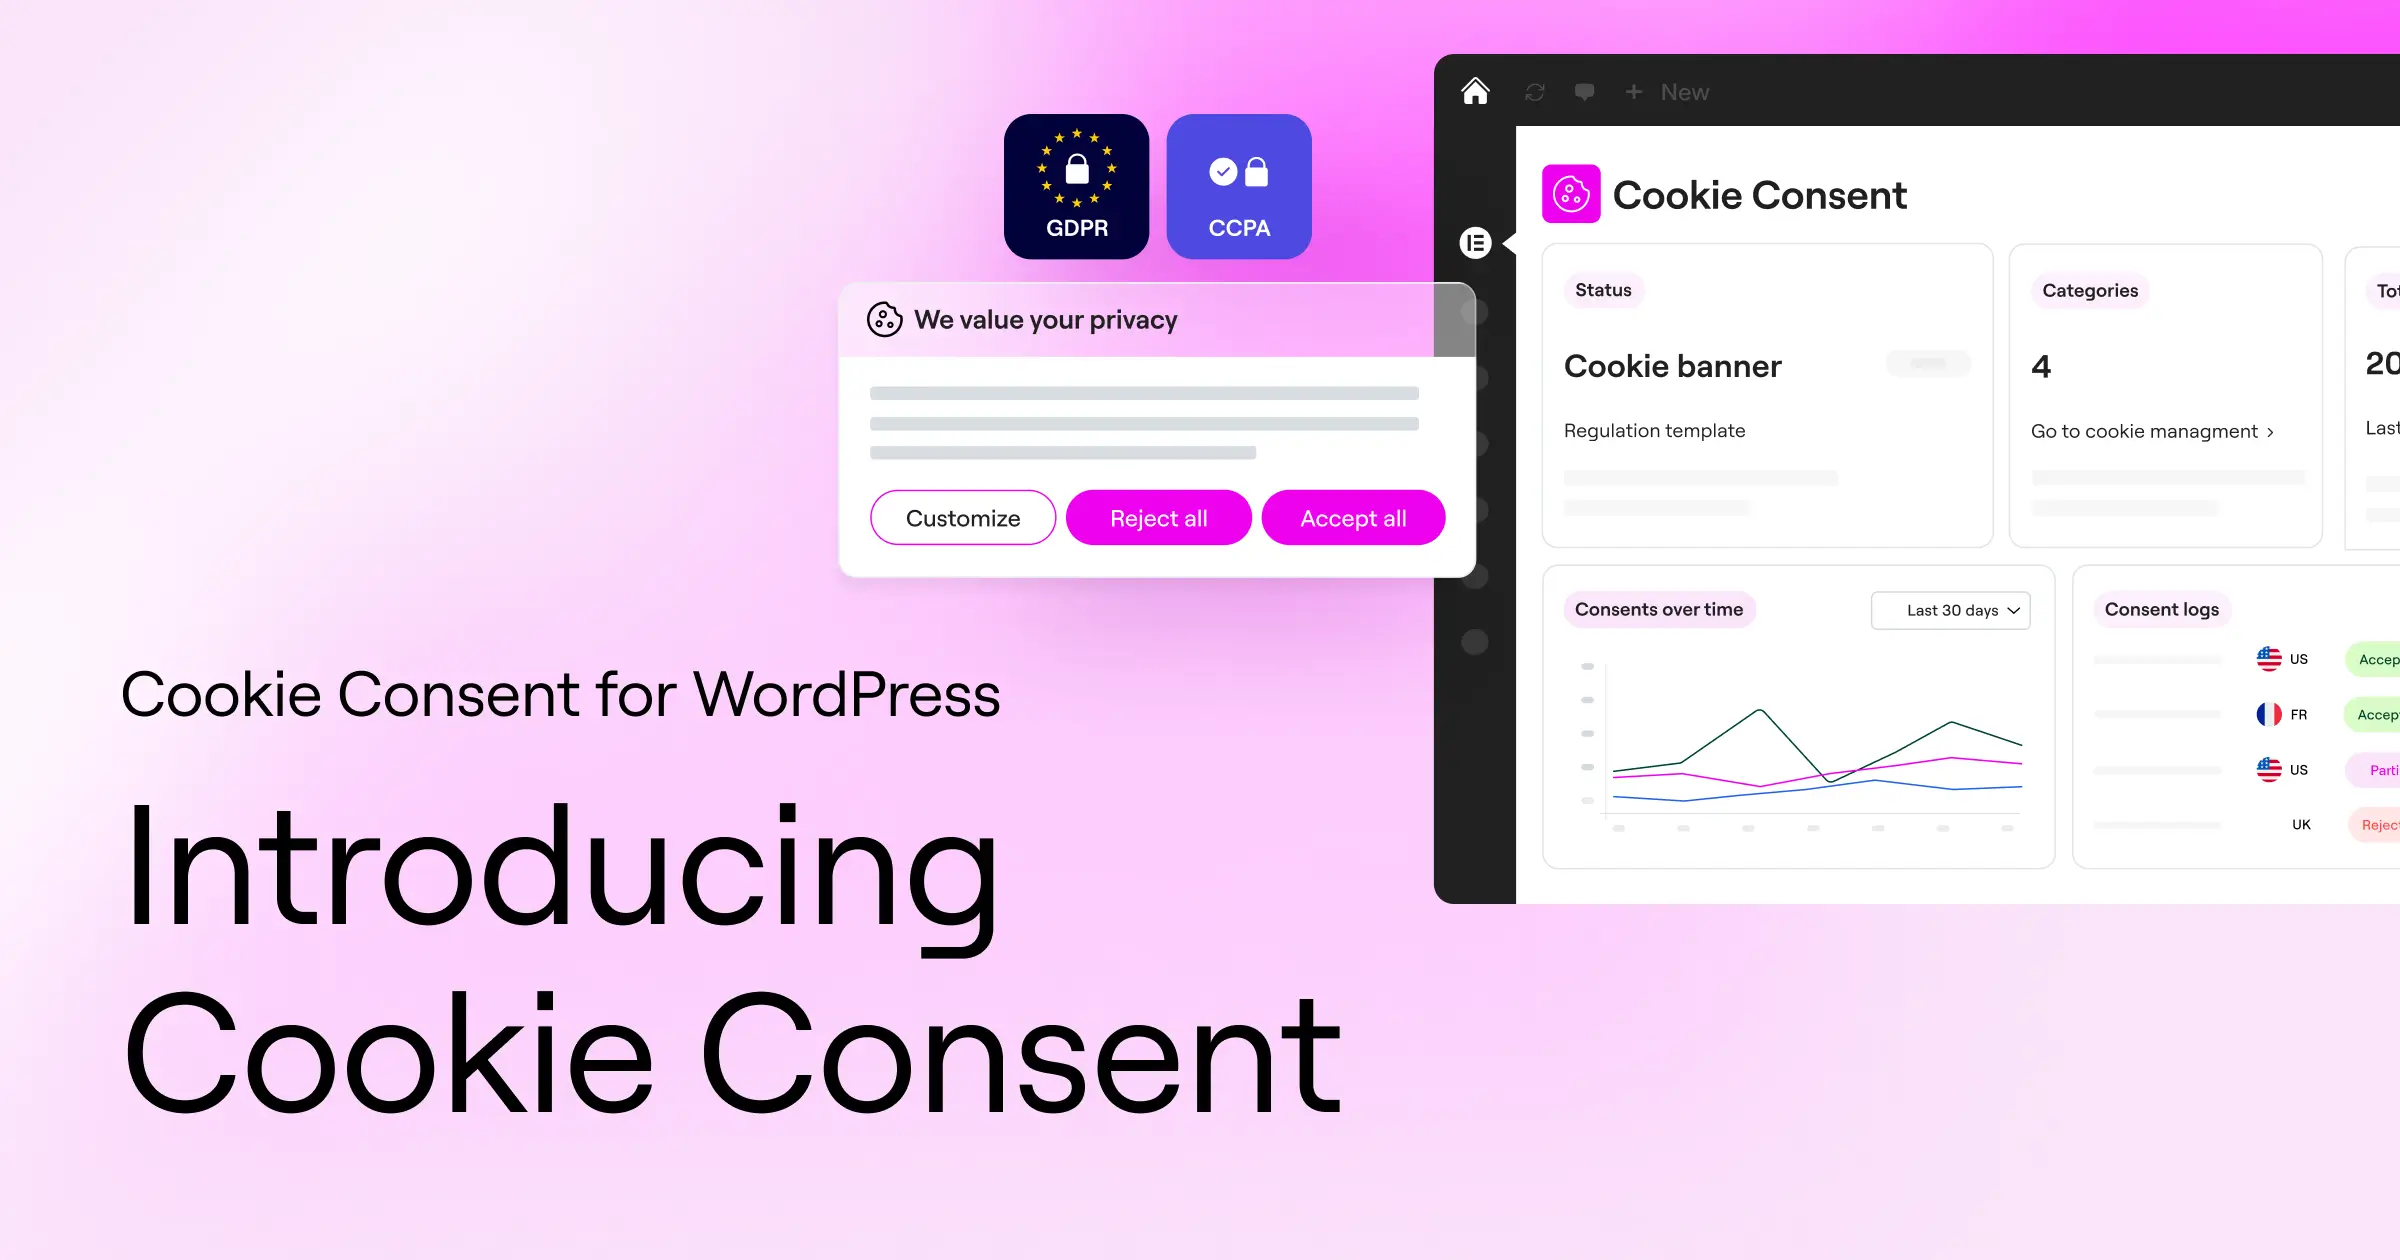
Setting up these rules on WordPress used to mean pasting JavaScript snippets or paying for an external platform. These days you can handle it right inside your workspace. Elementor includes a built-in tool called Cookie Consent that manages the whole process from one dashboard.
Because it lives natively in WordPress, you’re not juggling platforms or API keys. You can get your settings in place in under five minutes. Here’s how.
Step 1: Activate the Cookie Consent Capability
First, make sure the tool’s active. It’s built directly into WordPress as a native capability, so there’s no software to download, it’s already there.
- Log into your WordPress admin dashboard.
- Go to your settings panel and find the compliance area.
- Toggle the Cookie Consent feature to active.
- The native consent dashboard will now appear, ready for configuration.
Keeping compliance tools inside WordPress helps performance too. External platforms often load heavy third-party scripts that slow page loads, while a native setup keeps your code clean and your site quick.

Step 2: Run an Automatic Cookie Scan
You can’t categorize cookies you don’t know you have (this trips up a lot of people). The built-in scanner explores your site and catalogs every active script for you.
- From your dashboard, select the cookie scanning tool.
- Click the button to start a new scan of your entire site.
- Wait a minute or two while the cloud-based system scans your pages.
- Review the list of discovered scripts and cookies the scanner generates.
The scanner picks up common scripts like Google Analytics and Meta Pixels, then sorts them into the right categories using global compliance databases. You get a clear, organized list ready for review, no research required.

Step 3: Manually Adjust and Categorize Custom Scripts
Sometimes you’ll have custom scripts the scanner doesn’t recognize automatically. You can categorize these by hand to keep them lined up with your compliance strategy.
- Look through the “Uncategorized” section in your scan results.
- Select any unclassified cookie to open its properties.
- Assign it to the correct category: Strictly Necessary, Functional, Analytics, or Marketing.
- Add a short, plain-language description of why the script runs.
- Save your changes to update your categorization rules.
Clear descriptions here build real trust. When visitors see plain language instead of technical jargon, they’re a lot more comfortable consenting to your trackers.
Sorting your cookies into clear, accurate categories isn’t just a nice design feature, it’s a foundational legal requirement. When you give users the power to choose what they allow, you protect your business and show genuine respect for their personal data privacy.
– Itamar Haim, Web Compliance Specialist
Step 4: Design and Customize Your Consent Banner
Your consent banner should feel like a natural part of your site, not a pop-up bolted on at the last minute. The built-in customization settings let you match your brand closely.
- Go to the design customizer inside your consent dashboard.
- Choose your layout style, such as a subtle bottom bar, a side box, or a centered modal window.
- Pick your brand colors, typography, and button styles so the banner looks natural on your site.
- Write your own text or use the pre-built templates, with clear buttons for “Accept All,” “Reject All,” and “Manage Settings.”
- Turn on multilingual support if you serve visitors who speak different languages.
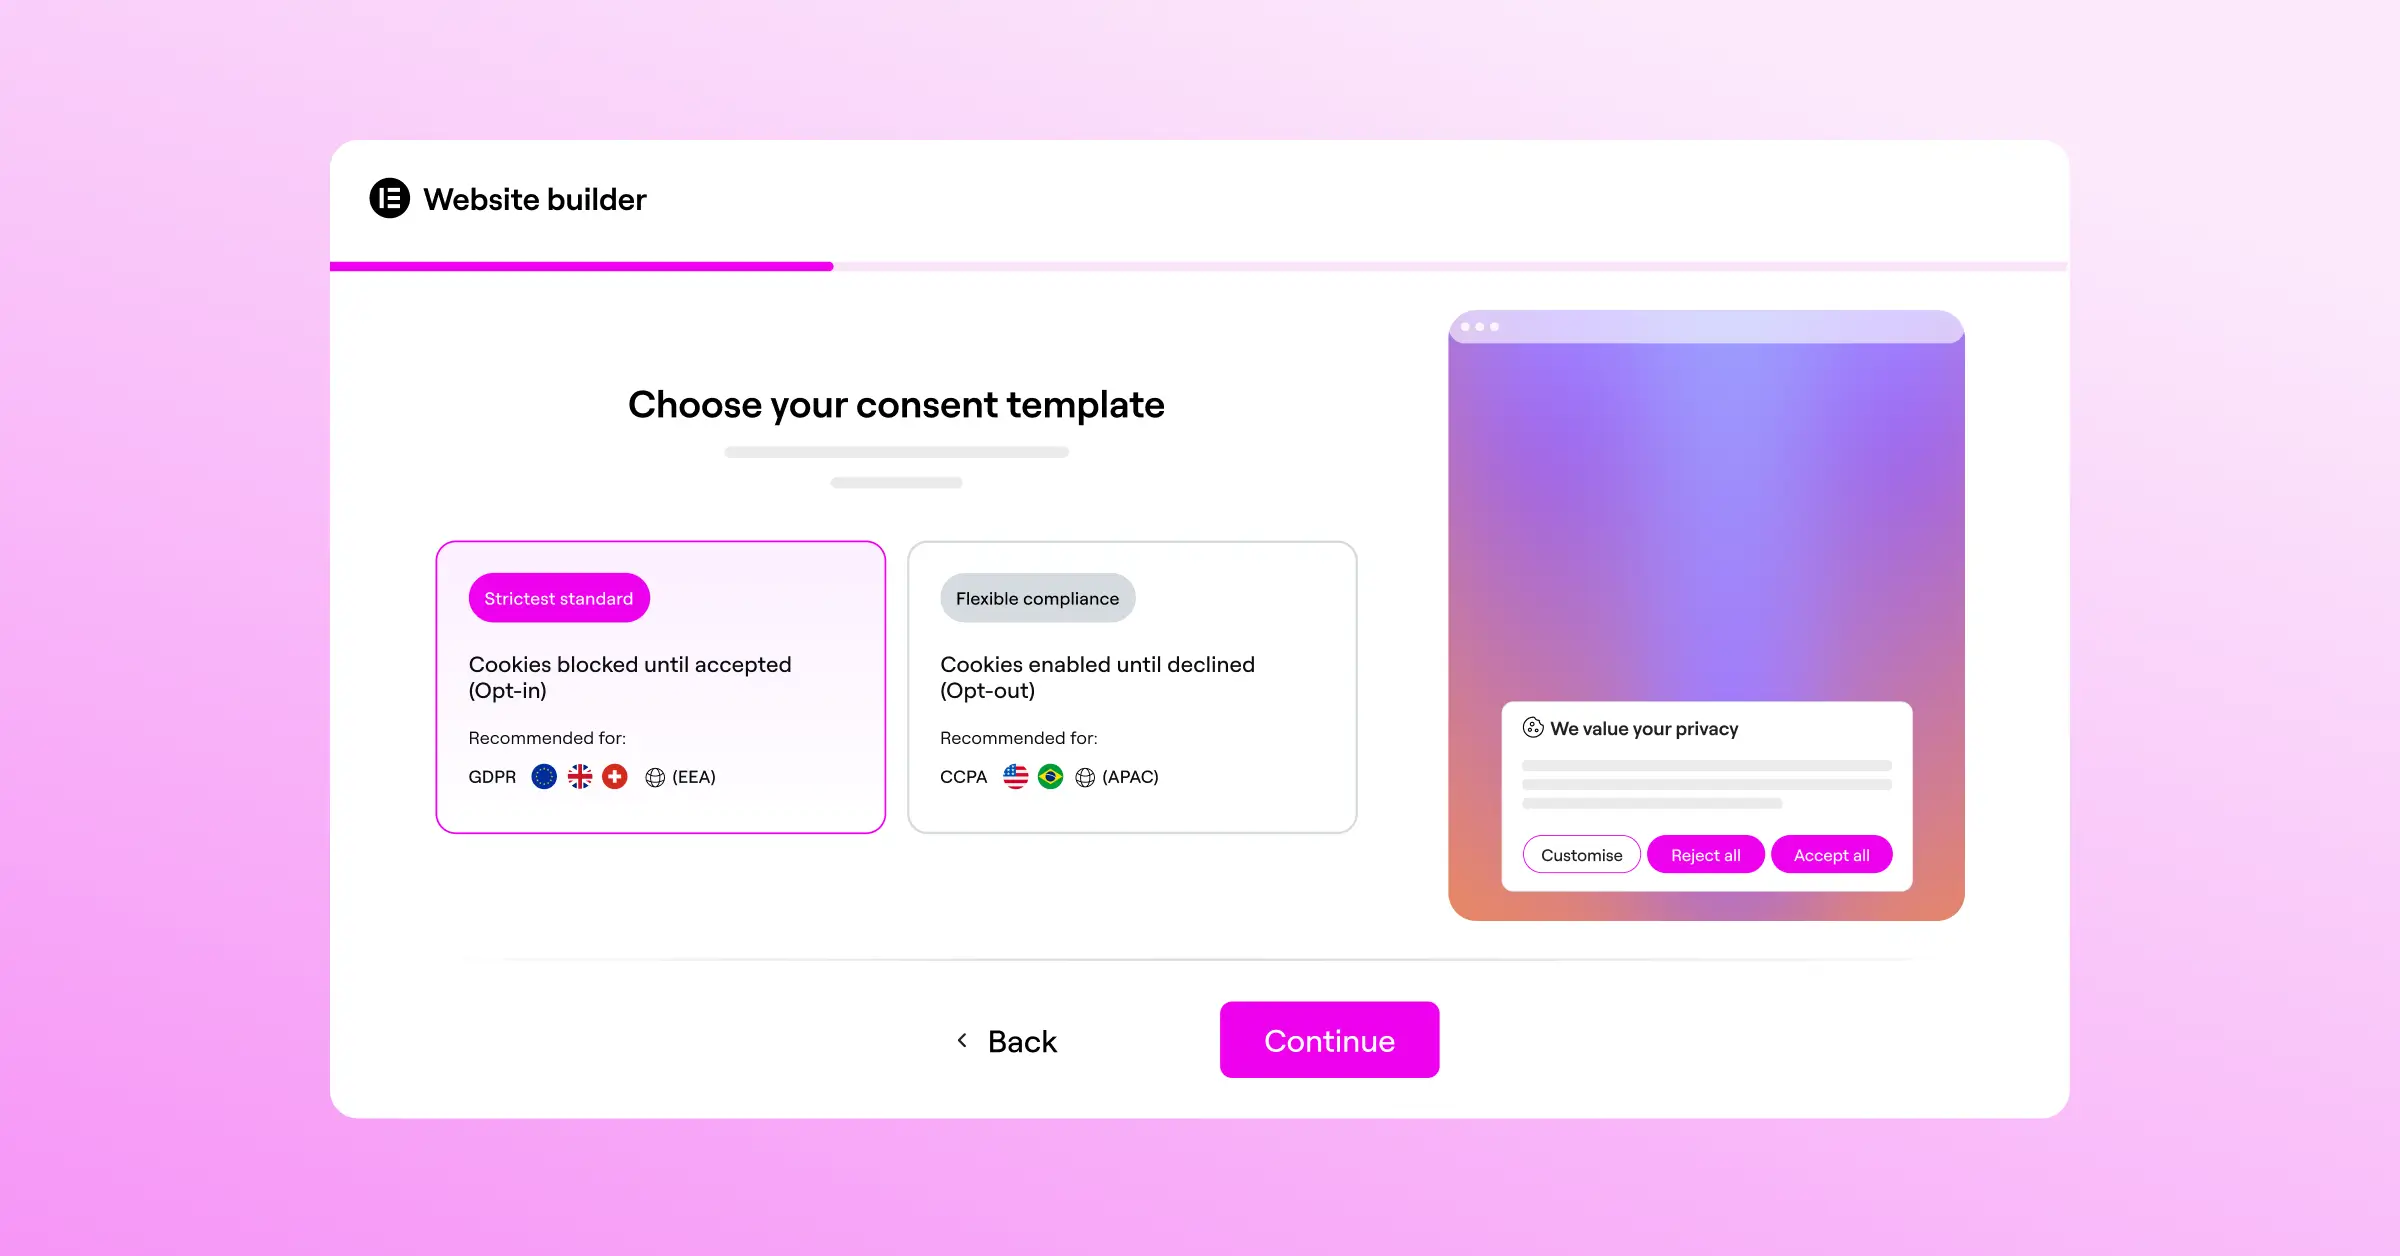
Good design balances usability and legal safety. Don’t hide the “Reject All” button, modern privacy rules require that rejecting cookies be just as easy as accepting them, and keeping things clear keeps you safe in a regulatory audit.
Step 5: Turn on Geo-Targeting and Advanced Settings
You don’t want to annoy visitors from regions that don’t require strict cookie banners with a massive pop-up. Geo-targeting shows different layouts depending on where a visitor’s located.
- Enable the geo-targeting feature in your consent settings.
- Show the strict opt-in banner only to visitors from the European Union, the United Kingdom, or California.
- Set up a simplified notice, or skip the banner entirely, for visitors from countries with more relaxed privacy rules.
- Enable support for Global Privacy Control (GPC) so the banner respects automatic browser privacy settings.
- Save your settings to make it live.
This keeps things smooth for a global audience, lower bounce rates and no unnecessary interruptions for visitors who don’t legally need the banner.
Step 6: Configure Google Consent Mode v2
If you use Google tools like Analytics or Ads, you need Google Consent Mode v2 active to serve traffic in the European Economic Area. It passes your users’ choices straight to Google’s tag system.
- Inside your settings panel, find the integration options.
- Toggle the option for Google Consent Mode v2 to active.
- The system will automatically configure your tracking tags to adjust their behavior based on user consent.
- When a visitor declines cookie tracking, Google’s tags run in a cookieless state, sending anonymous signals instead of personal tracking details.
This lets you collect useful anonymous performance metrics even when someone declines deep tracking, so your data keeps flowing while you stay fully compliant with Google’s requirements.
Alternative Tools for Managing Cookie Categories
A native, built-in option like Cookie Consent is often the simplest path for WordPress users, but several third-party platforms handle cookie categorization too. Here’s a factual look at some common alternatives, depending on your setup.
Cookiebot
Cookiebot is an established compliance tool used by many sites worldwide. It offers automated scanning and a cloud-based consent manager for GDPR and CCPA rules. Settings live on an external platform rather than your WordPress dashboard, adding a separate login to your workflow.
CookieYes
CookieYes is a widely used consent tool that connects to sites through custom code integrations. It includes a banner creator and solid multilingual support, and like Cookiebot, it’s managed from an external dashboard.
Complianz
Complianz is a privacy suite built specifically for WordPress. It handles cookie banners, legal document generation, and automatic script blocking, and it’s highly configurable, though the range of settings and wizards takes some time to learn.
iubenda
iubenda is a compliance platform that generates privacy policies, terms of service, and cookie consent banners. It works well for sites with complex legal needs, though its configuration is fairly technical and geared toward more experienced site owners.
OneTrust
OneTrust is an enterprise-level privacy management platform built for large organizations and legal teams, offering extensive compliance tracking and cookie auditing aimed at deep audit trails across many separate web properties.
Best Practices for Maintaining Cookie Compliance
Setting up your categories is a great first step, but compliance doesn’t stop there. As you update your site or try new marketing tools, your cookie profile shifts. A few habits keep you compliant long term.
- Scan Monthly, Schedule a scan of your site at least once a month, so new trackers added by third-party widgets get caught before they become a compliance issue.
- Block Scripts by Default, Never load marketing or analytics scripts before someone clicks “Accept.” True prior consent means scripts stay paused until they give the green light.
- Log Consent Records, Keep anonymous consent logs. They prove to regulators that visitors actively consented to tracking if your site is ever audited.
- Add Easy Revocation, Place a small footer link so people can change their cookie choices anytime. Withdrawing consent must be just as easy as giving it.
- Link Your Privacy Policy, Include a direct link to your policy in the consent banner, listing every active tracker along with its category and duration.
- Avoid Dark Patterns, Don’t design your banner to nudge people into accepting cookies. Use clear, balanced layouts that give every choice equal weight.
How to Test Your Cookie Categories and Script Blocking
Once you’ve set up your banner and categorized your scripts, test everything to confirm it works. Seeing the banner doesn’t mean scripts are blocked, you need to verify your trackers stay inactive until someone clicks “Accept.”
Here’s a simple way to check, using standard browser developer tools:
- Open a new private browsing window (incognito mode) and navigate to your website. Don’t click anything on your cookie consent banner yet.
- Right-click anywhere on the page and select Inspect or press F12 to open the developer tools console.
- Go to the Application tab (or the Storage tab in Firefox) and look for the Cookies dropdown menu on the left side. Click on your website’s URL.
- Review the cookies stored in your browser. You should only see strictly necessary cookies. Tracking cookies from Google Analytics or Meta mean your scripts aren’t being blocked correctly.
- Click the “Reject” button on your banner, refresh the page, and check the list again. The trackers should still be absent.
- Open your cookie preference settings, toggle on “Analytics” or “Marketing,” then accept. Check the application tab once more, you should now see those tracking cookies appear.
If cookies load before consent is given, check your script integration. Connect your scripts directly to your native consent dashboard or tag manager so they’re held back until someone consents. And for more on how Cookie Consent keeps scripts properly gated, see the Elementor help center.
Frequently Asked Questions
Do I really need cookie categories if my site is small?
Yes. GDPR doesn’t make exceptions for small sites. If you get visitors from the EU, UK, or California and use tools like Google Analytics or marketing pixels, you need categorization to stay compliant.
What is Google Consent Mode v2 and is it required?
It’s a framework that passes your users’ consent choices to Google’s tag system. You need it if you serve European visitors and use Google Ads, Analytics, or conversion tracking.
Can I put all my cookies in the strictly necessary category?
No. Cookies only qualify as strictly necessary if your site genuinely can’t work without them. Putting trackers like Google Analytics or marketing pixels here violates privacy law and can mean real fines.
What happens if a user ignores my cookie banner?
Treat it as a rejection. Keep blocking functional, analytics, and marketing scripts until someone actively accepts them, consent has to be a clear, positive action.
Is Cookie Consent included with Elementor?
Yes. The native Cookie Consent tool is built into WordPress as part of the Elementor ecosystem. It’s included on the Elementor One tier, with a free option to get started right away.
What is the difference between GDPR and CCPA cookie rules?
GDPR uses an “opt-in” model, cookies stay blocked until the user agrees. CCPA (and CPRA) uses an “opt-out” model, you can run cookies right away but need a clear “Do Not Sell My Personal Info” link so users can opt out.
Can I customize my banner to match my website’s design?
Yes. Cookie Consent lets you adjust colors, fonts, layouts, and button styles, so your banner matches your branding instead of looking like a bolted-on add-on.
Do I need to keep logs of user cookie consent?
Yes. Secure, anonymous consent logs are a core part of compliance. If you’re ever audited, they prove people consented before your tracking scripts ran.
How do I handle visitors who speak different languages?
You can set up multilingual banners that match a visitor’s browser language automatically, so everyone can understand your categories and choose knowingly.
Will a cookie banner slow down my website load times?
Some third-party banners slow things down since they load files from outside servers. A native WordPress capability runs locally, so your site stays fast (worth knowing if page speed matters to you).


