Table of Contents
As someone who uses WordPress all the time, you know the WordPress dashboard like the back of your hand.
Your clients? Probably not so much, that’s why they hired you!
To help them get the most from their site, as well as to add a nice personalized touch to the product that you deliver, you can create a custom WordPress dashboard for them.
And in this post, I’m going to show you how to do that using easy visual drag-and-drop editing with Elementor.
Why You Should Take the Time to Create a Custom Dashboard for Your Clients
Creating a custom client dashboard helps both you and your client. It’s a win-win.
You can use your custom dashboard to display:
- A welcome message
- Basic instructions to help clients use their new site
- Answers to common FAQs
- Tutorial videos
- A contact form, in case your client needs help
- News, like updating them on the impending Gutenberg editor
By using elements like those above, you’re able to create a more personalized experience that helps your client navigate relevant areas of the dashboard without running into issues. So that’s the benefit to them.
Now here’s how it benefits you:
By going the extra mile and providing that added information, you can save yourself from taking the time to answer emails or phone calls from your client about how to use their site.
See? It’s good for them and good for you.
Now, how do you do it?
How to Create a Custom WordPress Dashboard With Elementor
Good news, you don’t need to learn some separate WordPress custom dashboard plugin interface. You can actually build your client a custom dashboard using the same Elementor interface that you’re already familiar with.
All you need is the free Dashboard Welcome for Elementor plugin from IdeaBox Creations, the same team behind PowerPack for Elementor.
Beyond integrating with Elementor, the nice thing about this plugin is that you can create different dashboards for different user roles. For example, you could show one dashboard to your client, and another to your client’s content editors or store managers.
Below, I’ll show you step-by-step how you can get started – just make sure you have the Dashboard Welcome for Elementor plugin installed and activated alongside Elementor. This plugin will work with both Elementor and Elementor Pro.
Step 1: Create a New Elementor Template
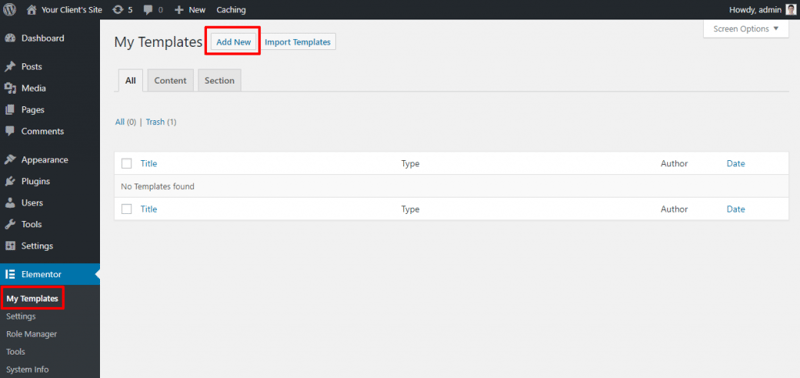
To get started, create a regular Elementor template by going to Elementor → My Templates → Add New in your WordPress dashboard:
On the New Template screen, select Page from the drop-down and then give your template a name. The name isn’t especially important – just make it something that’s easy to remember. “Client Dashboard” is always a good option:
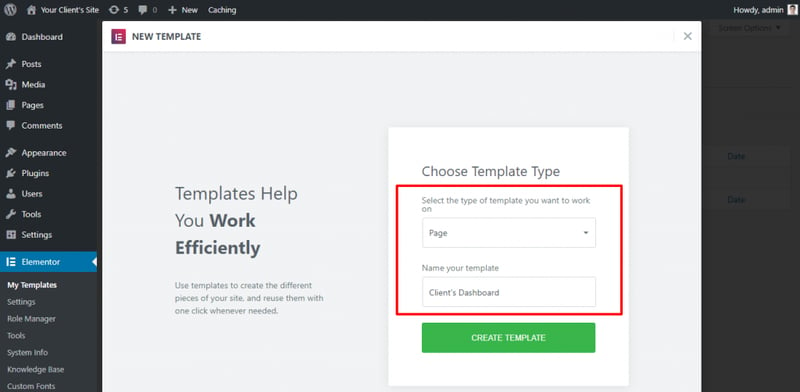
Then, click on Create Template to continue.
Step 2: Change to the Elementor Canvas Template
Because you’re creating a design for your client’s back-end WordPress dashboard, you definitely don’t want your theme’s header and sidebar appearing in your final design!
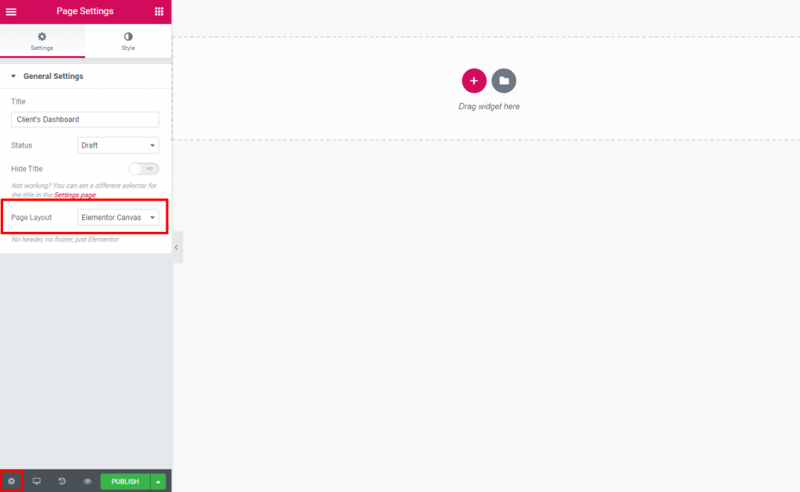
To get around that, choose the Elementor Canvas template by clicking the gear icon in the bottom-left corner of the Elementor interface and then selecting Elementor Canvas from the Page Layout drop-down:
Step 3: Design Your Custom Client Dashboard
Now, for the fun part – it’s time to actually design your client’s dashboard using Elementor.
Because you have free reign over the regular Elementor interface, there are no rules and restrictions about how your custom dashboard page should look. That is, you can use all the Elementor widgets, set up sections and columns, etc.
With that being said – remember that this is still going to sit inside the regular WordPress dashboard, so you don’t want to get too crazy. Some good rules of thumb are:
Use 2-3 columns in most spots. The normal WordPress dashboard uses 2-3 columns for most screen resolutions, so this way your custom dashboard fits right into the existing design.
- Avoid bold backgrounds. While a splash of color here and there is fine, using lots of bold colors will clash with the rest of the WordPress dashboard. Remember – regular dashboard widgets have black text and a white background – nothing too crazy!
- Remember white space. The default WordPress dashboard usually includes plenty of white space, especially on larger screen resolutions. Try to keep that principle in your custom dashboard design.
Here’s an example of how you might want to do it:
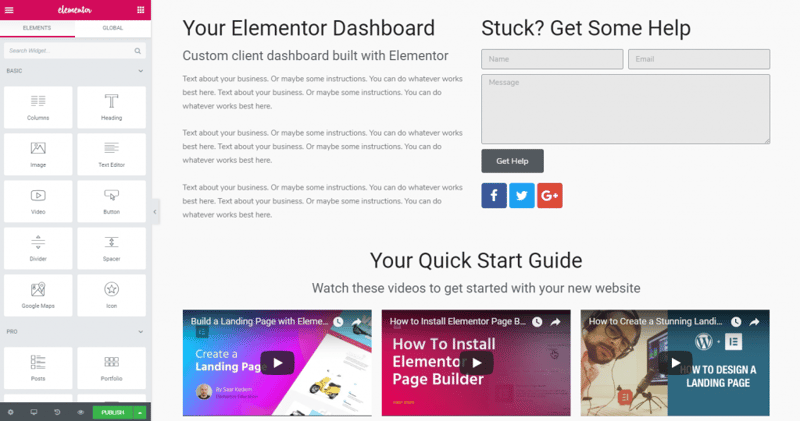
This example includes:
- A welcome message/basic instructions on the left
- A working contact form on the right, along with some social icons
- Three playable videos, which you could use for tutorials
Once you’re happy with how your dashboard looks, go ahead and Publish it.
Step 4: Enable Elementor Template as Custom Client Dashboard
Now that you have your finished dashboard template, all that’s left is to actually make that template display for your clients.
To do that, head back to the WordPress dashboard and go to Settings → Dashboard Welcome Elementor.
For the user roles that you want to target, use the Select Template drop-down to choose the template that you just created. For example, if you’re planning to give your client an Administrator account, you’d select that role:
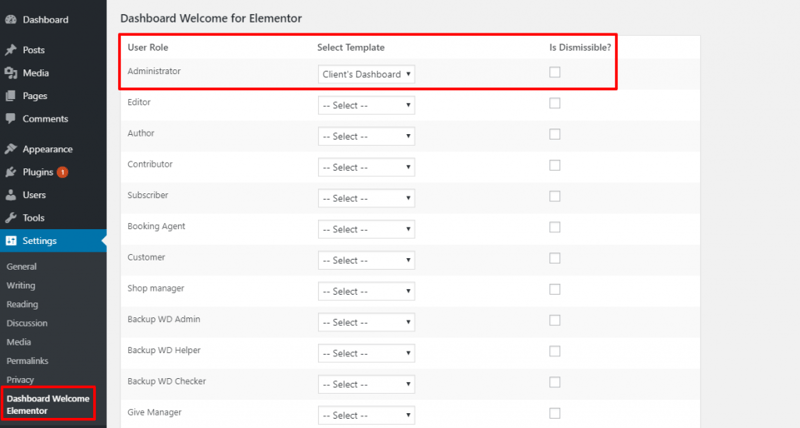
You can also choose whether or not your dashboard screen Is Dismissible. I’ll show you an image of how each option works, but in general:
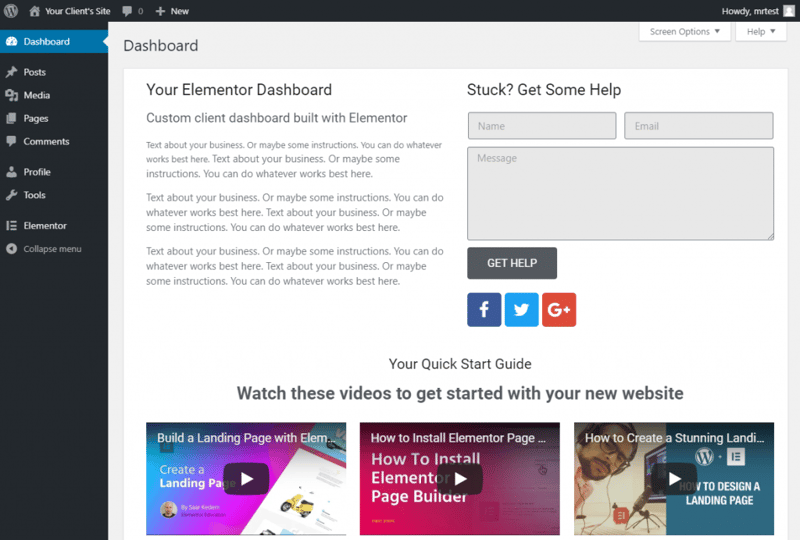
- When the box is unchecked… your custom dashboard will always be there. The user cannot get rid of it unless they access the Screen Options area.
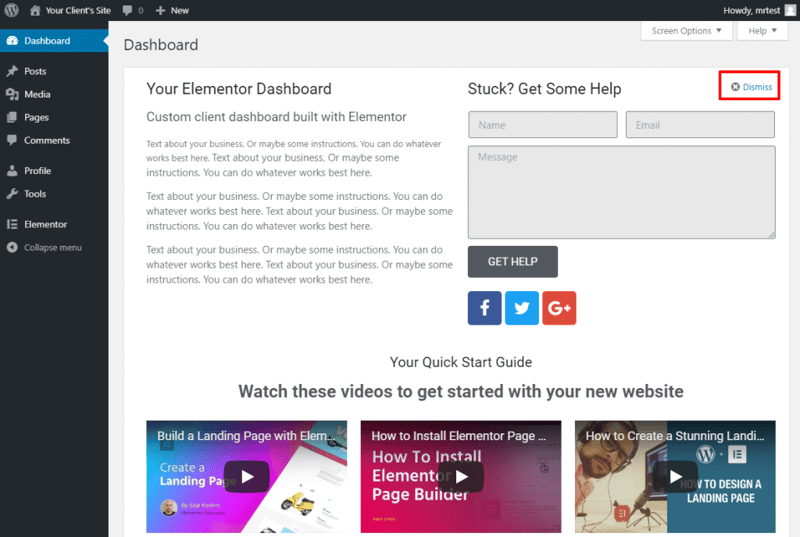
- When the box is checked… users can click on Dismiss in the top-right corner to dismiss the dashboard (this makes a good option for one-time welcome screens).
Once you’re finished, make sure to click Save Changes at the bottom.
Now, when your client logs in or visits the main Dashboard, they’ll see your custom dashboard at the top (the other WordPress dashboard widgets are still there – they’re just pushed down the screen):
Wondering how it works if you check the Is Dismissible? box? Well, everything looks exactly the same, except you get a new Dismiss option in the top-right corner that your client can use to dismiss the dashboard once they’re finished with it:
Step 5: Repeat (If Needed)
If you want to create different dashboards for different user roles, all you need to do is go back and repeat the process for each user role that you want to create a dashboard for.
That is:
- Create a new Elementor template
- Design your alternate dashboard
- Assign that dashboard to another user role
Productivity Tip: Export Your Client Dashboard Template for Easy Reuse Later
If you build a lot of sites for clients, here’s a neat way to speed up the process:
Instead of building a dashboard from scratch for every single client, you can create a base dashboard template, export it, and use it as the starter dashboard template for all your client sites.
Then, whenever you build a new site, all you need to do is:
- Import that template
- Tweak it to add some personalization
- Install the Dashboard Welcome for Elementor plugin and assign that template to the relevant user role(s)
Watch the full video tutorial for importing/exporting Elementor templates here.
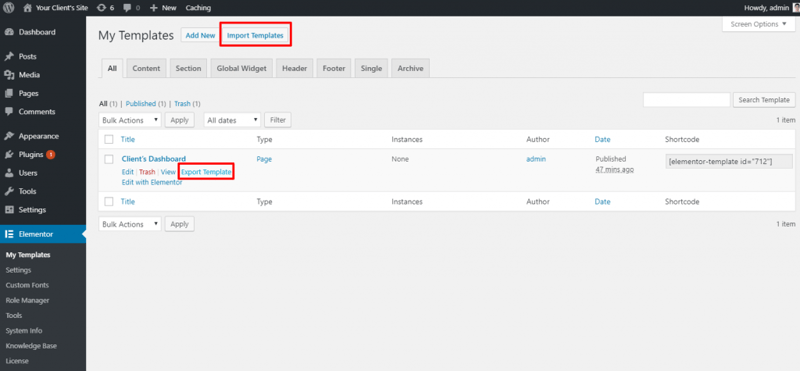
When you do it this way, it should only take you a couple of minutes to create a custom client dashboard going forward.
Updating Your Client's Dashboard is an Ongoing Process
Yes! If you have an ongoing relationship with your client, it’s easy to update your custom dashboard in the future to:
- Provide news updates
- Send a special message (like “Happy Birthday!”)
- Include new video tutorials
- Etc.
All you need to do is edit the Elementor template and the changes that you make will be automatically pushed out to the custom dashboard:
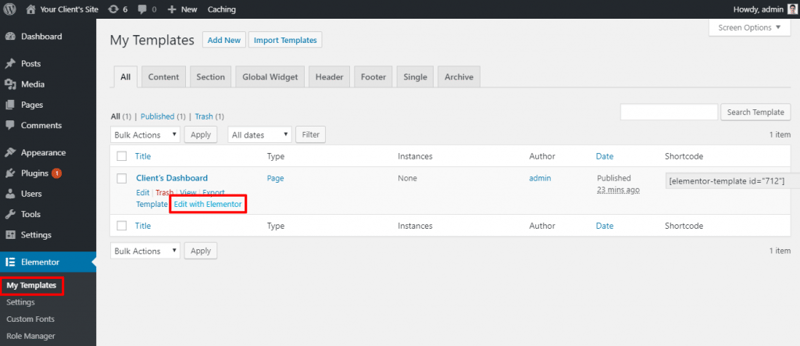
Note – if you’re planning to make updates, you shouldn’t make the dashboard dismissable.
Start Experimenting With Custom Client Dashboards Today
Building a custom dashboard for your client is one of those things that doesn’t take a lot of time, but offers a big payoff in terms of personalization and usability.
Thanks to the free Dashboard Welcome for Elementor plugin, you don’t even need to learn a new tool. Remember, it’s as simple as:
- Design a template using the regular Elementor interface
- Assign that template to the user role(s) for your client’s WordPress account
Give it a try and I bet that your clients will love it!
Looking for fresh content?
By entering your email, you agree to receive Elementor emails, including marketing emails,
and agree to our Terms & Conditions and Privacy Policy.
