Table of Contents
When building rich-content sites, a movie review site for example, many users opt to use a pre-made theme already containing the relevant layout & demo content.
The problem with such an approach is that pre-made themes restrict you to a certain limited design. Instead, we will show you how to use Elementor’s integration with Advanced Custom Fields to create a custom-made movie review site.
The website will feature the archive template, containing a beautiful full-width grid of movies, each with an image and title that is pulled dynamically from our custom post type content.
You will combine the ACF and CPT UI plugins to create a custom post type with relevant custom fields. This content will be displayed using Elementor’s single and archive templates.
For each movie post, you will include the movie title and trailer, followed by the plot and the IMDB rating. Below that, you will set a quote about the movie followed by the written review. Next, you will have a box with the movie image and some general information about the movie like the country, genres, and writers. On the right column, you will have a sidebar showing our latest movies.
Let’s jump into WordPress and build that.
Required Plugins
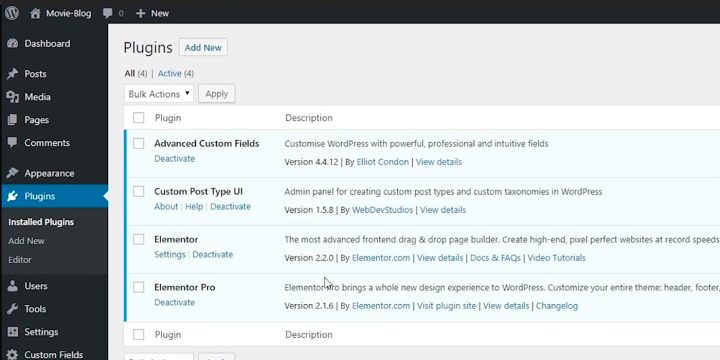
Inside the WordPress dashboard, I already created the header and the footer. In the dashboard, Under ‘Plugins’ > ‘Installed Plugins’, we will see the required plugins for this tutorial:
- Elementor
- Elementor Pro
- Advanced Custom Fields
- Custom Post Type UI
Note that Elementor officially supports Advanced Custom Fields version 5 and up.
Step 1: Create the Custom Post Type in CPT UI
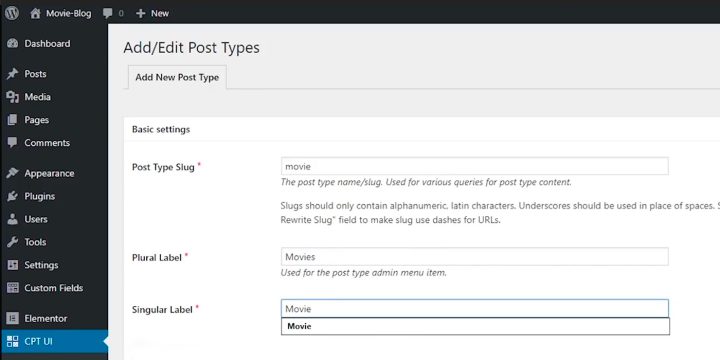
Let’s start with our custom post type. Hover over CPT UI and click on ‘add/edit Post Types’.
On this page, you need to provide some basic information about your custom post type. First off, add the post type slug, which is the internal name WordPress uses for the custom post type. The slug should not contain spaces and should be lowercased. Go ahead and name it ‘movie’.
Next, fill-in the plural and singular label. Name the fields ‘movies’ and ‘movie’. Don’t worry about the other fields below. Those are just some labels and the defaults are perfectly fine here.
Change ‘Has Archive’ from false to true, so you can build an archive for this custom post type. For the ‘Menu Icon’, paste ‘dashicons-tickets-alt’. This is the icon for the custom post type that will be displayed in the left side.
Make sure that the featured image is ticked-on, because it should provide an image for the custom post type. Click ‘add post type’. You will be able to see on the left side that the custom post type movies was added.
Step 2: Set Custom Taxonomy Using CPT UI
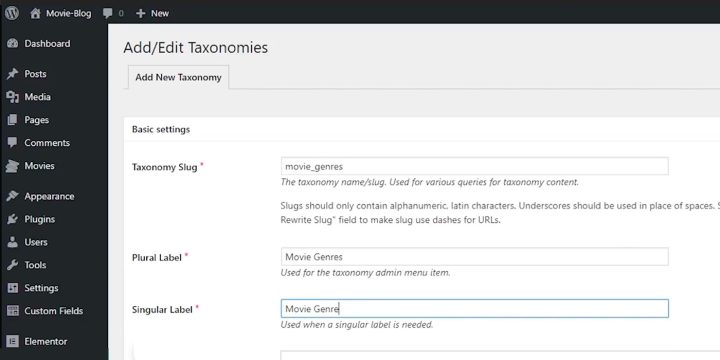
Create a custom taxonomy for your movies custom post type. Taxonomies are like tags or like categories, but in this instance, provide a different name – ‘movie genres’.
Hover over CPT UI and click on add/edit Taxonomies. For the taxonomy slug, write ‘movie_genres’ with an underscore and with lowercase letters. For the plural labels, use ‘movie genres’ again. For the singular label, use ‘movie genre’.
Now attach it to your movies custom post type, and click on ‘Add Taxonomy’. If you hover over Movies you can see the Movie Genres.
Step 3: Create Custom Fields Using ACF
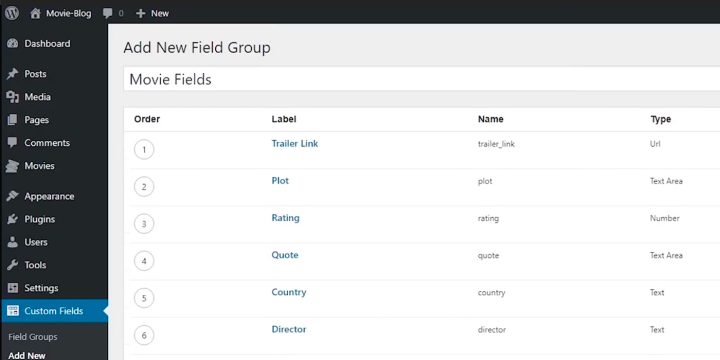
On the Left sidebar, hover over Custom Fields and click on ‘Field Groups’. Click on the ‘Add New’. Call your field group ‘Movie Fields’. Click on ‘add field’. The first field is going to be the trailer link so the trailer will play on the frontend.
Label this as ‘Trailer Link’. The next slot ‘Field Name’ is automatically filled in. For the field type, change it from text to URL. The second field is going to be the plot, which is a short description of the movie.
For the field type, select ‘Text area’, because that’s a small paragraph and it’s better than a single line. For the rows, change it to 4, so it’s a bit smaller. The next field is going to be the IMDB rating. You will later pair this field with an icon box widget (in Elementor) to have an appealing visual presentation of the field.
Name this field ‘Rating’, and change the field type to ‘Number’. Select a minimum value of zero and the maximum value of 10. Now that all your fields are in place, scroll down and set the location rules to ‘Show this field group if the post type is equal to’ > Movie.
To activate the custom field, hit publish.
Step 4: Add Movie Genres Taxonomies & Movie Posts
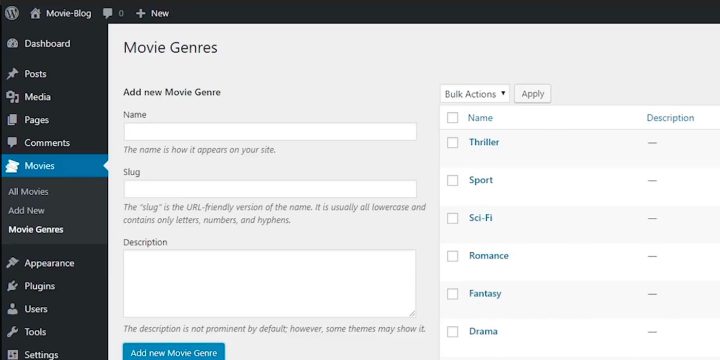
If you add a new movie, you will notice the fields you previously added. Go ahead and add the different genres: Action, Adventure, horror and so on.
It’s time to add a specific movie entry. Under movies, click on ‘Add New’, write the title: ‘Gravity’, and add the rest of the fields. For the movie genres, we choose Drama, Sci-fi and Thriller. Also, set featured image. Then click on publish.
Now if you visit this movie post, you will be able to see that the page was created, but does not display any custom fields. This is because by default your theme does not display custom field. Here is where Elementor and its single post template come into play, allowing us to have an easy way to display custom fields.
Go ahead create a bunch of other movies so you have what to work with.
Step 5: Build the Movie Archive Template
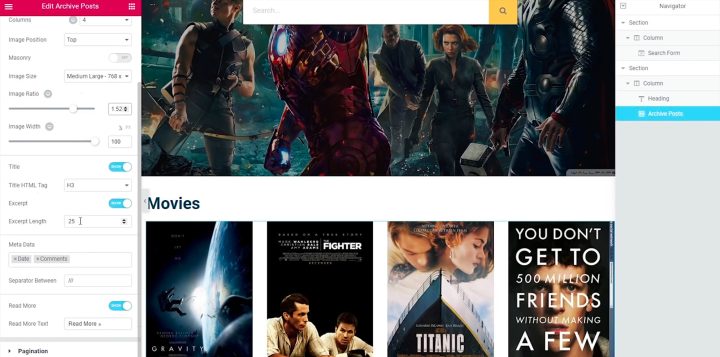
Hover over Elementor and click on My Templates. Click on ‘Add New’ and select ‘Archive’. The library panel opens on the relevant blocks for the archive, but you don’t want to use them.
You need to set the preview for this archive, so click on the eyeball icon > settings. You will preview the dynamic content as your movies archive. Click ‘Apply and preview’.
It’s important to include the Archive Posts widget, which will display our list of Custom Post Types created with CPT UI and ACF. When you hit publish, you will see the display conditions screen. The condition you will use will include the movie archives.
Your archive is live! You can visit the website and see the list of movies.
Step 6: Build the Movie Single Template
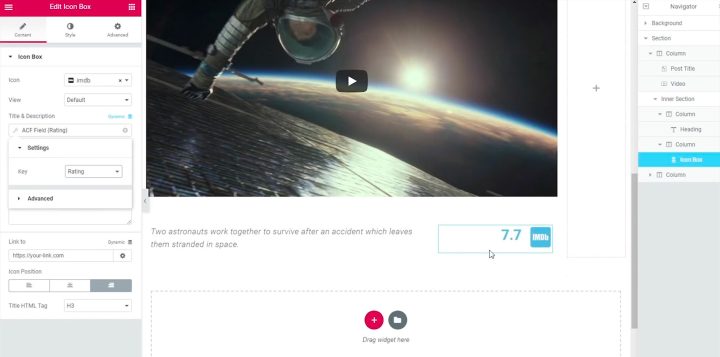
If you click on one of the movies, you will see a page with the default post theme structure. You have to build our single template to display the fields correctly.
Under Elementor > My Templates, click on ‘Add New’. This time select the single template.
You will see a new input for the post types, where you can choose ‘movie’.
The widgets that will integrate with the ACF custom fields include:
- The Post Title widget – Set to default
- Video widget – With the URL set to Dynamic > ACF URL Field. Under Settings, for the key, select ‘Trailer Link’
- Heading widget – With the Title set to Dynamic > ACF Field. Under Settings, for the key, select ‘Plot’.
- Icon box – With the Title & Description set to Dynamic > ACF Field. Under Settings, for the key, select ‘Rating’.
- Heading widget – With the Title set to Dynamic > ACF Field. Under Settings, for the key, select ‘Quote’.
- Post Content widget – Set to default
- Featured Image widget – Set to default
- 6 Heading widgets – Using the rest of the movies custom fields (Country, Director, Writers, Stars, Awards, and Duration).
- Heading widget – With the Title set to Dynamic > ‘Post Terms’. Under Settings, for the Taxonomy, select ‘Movie Genres’.
- Posts widget – Under Query, change Source to ‘Movies’. Exclude the current post and switch on ‘Avoid Duplicates’.
The display condition screen is already set for the movies custom post type. Click on publish and your template is live. When visiting one of the movies, you can see that your template appears, just like you designed it.
As you can see, it’s easy to create a movie review website using ACF and Elementor Pro. If you have any questions, don’t hesitate to leave them in the comments below.
Looking for fresh content?
By entering your email, you agree to receive Elementor emails, including marketing emails,
and agree to our Terms & Conditions and Privacy Policy.
