Table of Contents
While Canva is primarily known for social media graphics and presentations, its website builder offers a streamlined, drag-and-drop experience that appeals to beginners and non-technical creators. This guide will walk you through exactly how to use the Canva Website Builder, from the initial template selection to hitting the publish button. We will also explore where this tool fits in the broader web creation ecosystem and identify the specific moments when a growing business might need to graduate to a more robust platform like Elementor.
Key Takeaways:
- Visual-First Approach: Canva’s builder excels at creating visually stunning, one-page sites like portfolios, event invites, and “link in bio” pages quickly.
- Ease of Use: The interface mirrors the standard Canva editor, making the learning curve nearly non-existent for existing users.
- Responsiveness Limitations: While Canva sites adjust for mobile, they lack the granular, pixel-perfect breakpoint controls found in professional platforms.
- SEO & Scalability: Canva websites are excellent for simple static content but often lack the deep SEO infrastructure, CMS capabilities, and dynamic content features required for complex business sites.
- The Professional Pivot: As business needs grow—requiring managed hosting, professional e-commerce, or dynamic databases—creators often transition to comprehensive platforms like Elementor to maintain design freedom while gaining structural power.
- Integration: You can effectively use Canva to design assets (images, logos, backgrounds) and then import them into a professional builder to get the best of both worlds.
Expert Contributor: Itamar Haim
Understanding the Canva Website Builder Landscape
Before we dive into the buttons and menus, we must understand what the Canva Website Builder actually is. Unlike traditional Content Management Systems (CMS) like WordPress, Canva operates as a visual design tool that publishes to the web. It treats a website much like an interactive presentation. You design “slides” (sections) that stack vertically to form a scrolling webpage.
This distinction is critical. It means you have absolute freedom to place an element anywhere on the canvas without worrying about rigid grid structures initially. However, it also means you are building a static experience. For a freelancer needing a portfolio by tomorrow or a small coffee shop needing a digital menu, this is perfect. For a business planning to publish hundreds of blog posts or run a complex online store, understanding these structural boundaries is the first step to digital success.
Step 1: Setting Up Your Canvas
The journey begins on the Canva homepage. If you already have an account, you are halfway there. If not, signing up is a matter of seconds. Once logged in, you will see the familiar dashboard.
Navigating to the Website Interface
Look for the “Websites” icon in the main visual suite menu. Clicking this transforms the dashboard to focus specifically on web layouts. You aren’t just opening a blank design; you are entering a workspace optimized for browser viewing.
The interface looks deceptively simple, but it hides a few web-specific tools. On the left sidebar, you still have your Templates, Elements, and Uploads. However, the top bar now includes a “Publish Website” button, and the view mode defaults to a desktop-width layout rather than a square social post or A4 document.
Choosing Your Path: Template vs. Blank Slate
You have two distinct choices here:
- Start from Scratch: You get a blank white rectangle. This gives you total creative control but requires a solid understanding of layout principles.
- Use a Template: This is Canva’s superpower. You can browse categories like “Portfolio,” “Business,” “Event,” or “Retail.”
For most users, starting with a template is the most efficient route. Choose a template that structurally resembles the site you want. Don’t worry about the colors or images yet; focus on the layout. Does it have a clear hero section? Is there a designated spot for testimonials? Select a template that does the heavy architectural lifting for you.
Step 2: Customizing Your Design
Once you load a template, the real work begins. This is where you inject your brand identity into the framework.
The Drag-and-Drop Workflow
Canva uses a “free-form” drag-and-drop system. You can click any text box, image, or shape and move it literally anywhere on the page. Guidelines will appear in pink to help you align items to the center or match them with other elements.
Pro Tip: While you can place items anywhere, you should stick to a logical visual hierarchy. Keep your main headlines large and near the top. Group related items (like an icon and its descriptive text) together.
Managing Sections
Your website consists of distinct “pages” or sections that the user scrolls through. You can:
- Add a Section: Click the “+” button between existing sections.
- Resize Sections: Drag the handle at the bottom of a section to make it taller or shorter. This is useful if you need more white space to let your content breathe.
- Reorder Sections: Use the “Up” and “Down” arrows on the right side of the active section to change the narrative flow of your page.
Styling Your Site
Consistency is what separates a professional site from a chaotic one. If you have a Elementor Hosting plan or similar professional setup, you might be used to setting global site styles. In Canva, you can achieve something similar using the “Styles” tab on the left.
- Color Palettes: Click a shuffle button to apply a coherent color scheme across your entire page instantly.
- Font Sets: Choose a pairing of heading and body fonts that are legible and on-brand.
- Backgrounds: You can set videos or images as backgrounds. Be cautious with video backgrounds; they look dynamic but can distract from your text if they are too busy.
Step 3: Adding Content and Interactivity
A website needs to do more than look pretty; it needs to communicate.
Working with Text and Copy
Replace the placeholder “Lorem Ipsum” text with your own. Keep your sentences short and punchy. Web readers scan; they don’t read novels. Use the “Effects” button in the top toolbar to add subtle drop shadows or “Lift” effects to make text stand out against busy backgrounds.
Embedding Media
You aren’t limited to static images.
- Videos: Drag a video file into a frame. It will play automatically (usually without sound) to catch the eye.
- Embeds: You can embed YouTube videos, Google Maps, or Typeform surveys. This is crucial for adding utility. For example, a “Find Us” section is useless without an interactive map.
Creating Navigation (The Menu)
Canva creates a navigation menu automatically based on the titles of your sections.
- Click on the “Notes” icon (or the page title) at the top of each section.
- Rename the section (e.g., “Home,” “About,” “Services,” “Contact”).
- When you publish, checking the “With Navigation” option will generate a clickable menu bar at the top of your site that jumps users to these specific anchors.
Step 4: Optimization and Mobile Responsiveness
This is a critical phase. We live in a mobile-first world. A site that looks great on a laptop but breaks on an iPhone is effectively useless.
The Mobile View Challenge
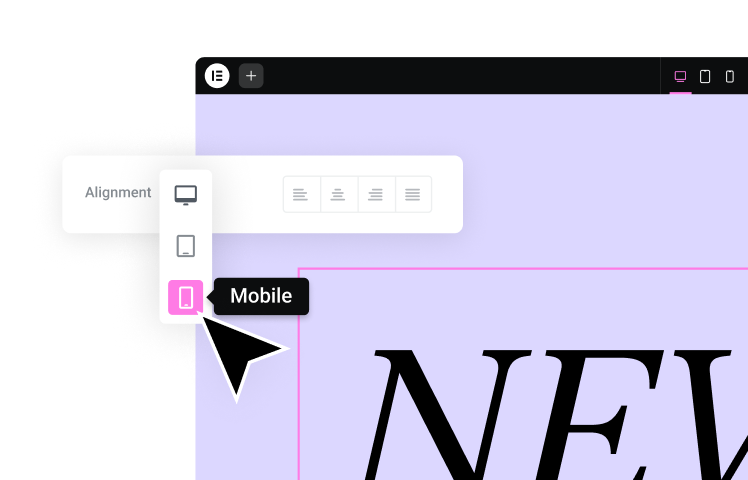
Canva handles responsiveness differently than professional builders like Elementor Pro. In Elementor, you have granular control to hide specific elements on mobile, change font sizes per device, or reverse column orders. Canva uses an automated “stacking” logic.
To ensure your Canva site looks good on mobile:
- Group Elements: Select an image and its caption, then hit “Group.” Canva treats this as a single unit and tries to keep them together when resizing for a phone screen.
- Use the Preview Tool: Click the “Preview” button in the top bar. You will see a desktop icon and a mobile icon. Click the mobile icon.
- Check for “Reflow”: Watch how your text wraps. If a headline breaks awkwardly, you might need to shorten the text or decrease the font size in the main editor.
Important Note: You generally cannot make a change only for the mobile version in Canva without it affecting the desktop version. This is a trade-off of the platform’s simplicity.
Step 5: Publishing Your Website
You have designed, customized, and previewed. Now it is time to go live.
The Publish Button
Click “Publish Website” in the top right corner. A sidebar will slide out with several crucial options.
Domain Options
You will see three choices for your web address:
- Free Domain: Your site will live at yoursite.my.canva.site. This is great for temporary projects, internal presentations, or personal portfolios where branding isn’t the primary concern.
- Purchase a New Domain: You can buy a .com or .net directly through Canva. This adds a layer of professionalism.
- Use an Existing Domain: If you own a domain via GoDaddy or Namecheap, you can connect it here. You will need to update your DNS settings (CNAME records) at your registrar. Canva provides instructions, but it can take up to 48 hours to propagate.
Final Settings
Before confirming, you will be asked to write a Site Description. Do not skip this. This is the meta description that appears in Google search results. Keep it under 160 characters and include your main keywords. You can also choose to password-protect your site if it is meant for a private audience.
The Ceiling: Recognizing the Limitations
While the process above is seamless for creating a beautiful visual document on the web, many users eventually encounter a “ceiling.” As your digital presence matures, you may find that the tools that made Canva easy to start with become the very things that hinder your growth.
The SEO Disadvantage
Search Engine Optimization (SEO) relies on structure. Search engines like Google need to understand the hierarchy of your content—what is an H1, what is an H2, and how pages link together. Canva sites are often single-page applications. They lack the deep technical SEO settings found in dedicated platforms. You cannot easily edit your robots.txt, implement complex schema markup, or create a siloed site structure with parent and child pages. For a business relying on organic search traffic, this is a significant hurdle.
The Content Management Gap
A true website often needs a Content Management System (CMS). Imagine you are a real estate agent. You don’t want to manually drag and drop text boxes every time you get a new listing. You want a database where you upload a photo, price, and address, and the website automatically populates a template. Canva does not have this “Dynamic Content” capability. You must design every instance manually.
E-Commerce Restrictions
Canva allows you to add a “Buy Button” that links to a PayPal checkout or a Stripe payment link. However, it does not offer a native shopping cart, inventory management, customer accounts, or complex shipping logic. If you are selling one e-book, it works. If you are selling a catalog of clothing with different sizes and colors, the manual setup becomes unmanageable.
Moving Beyond Design: The Need for a Platform
When you hit these walls—when you need your site to be a business engine rather than just a digital brochure—it is time to look at the professional standard. This is where the conversation shifts from “page builders” to “website builder platforms.”
The Integrated Ecosystem Approach
A professional website is more than just the frontend design. It is a stack of technologies: hosting, database, security, and design. Elementor represents this shift. It combines the visual ease you enjoy (drag-and-drop) with the structural power of WordPress.
When you use a comprehensive platform, you aren’t just drawing a website; you are engineering it. You gain access to features like Theme Builders, which allow you to design a “Single Post” template once, and apply it to thousands of blog posts instantly. This is the efficiency that scaling businesses require.
Hosting and Performance
With a visual tool, you are often renting space on their server. You have little control over the server’s performance. In a professional ecosystem, hosting is a dedicated product. Elementor Hosting, for example, is built on Google Cloud Platform infrastructure. This ensures that even if your site goes viral, the server can scale to handle the traffic. You also gain enterprise-grade security features and daily backups, providing peace of mind that a simple design tool cannot offer.
Advanced Customization & Professional Workflows
For those who have mastered the basics and are ready to elevate their web presence, the transition to a professional workflow involves understanding the difference between “decorating” and “developing.”
Dynamic Content and Logic
In a professional builder, you can use logic. You can tell your website, “If the user is logged in, show them this welcome message. If they are not, show them a signup button.” This conditional logic creates personalized experiences. You can utilize tools like Elementor AI to not just generate text, but to generate code snippets, custom CSS, and even entire wireframes to speed up this development process.
The “Best of Both Worlds” Workflow
Interestingly, you don’t have to abandon Canva when you upgrade to a professional builder. Many top-tier designers use Canva to create assets—hero images, textured backgrounds, icon sets—and then export those assets to build the actual site in a platform like Elementor.
This hybrid approach leverages Canva’s speed for asset creation and Elementor’s power for site architecture. You might use Image Optimizer by Elementor to ensure those high-quality Canva graphics don’t slow down your professional site, compressing them automatically without losing visual fidelity.
Integrating Marketing & Growth
A website exists to achieve a goal: capturing leads, selling products, or building an audience.
The Email Marketing Connection
On a simple builder, capturing emails might mean embedding a clunky third-party form. In a fully integrated ecosystem, marketing is native. You can drag in a form that connects directly to your CRM. For example, Site Mailer by Elementor ensures that when a customer fills out your contact form, the email actually lands in your inbox, bypassing the common delivery issues associated with basic WordPress setups.
Automated Growth
Growth isn’t manual. You need tools that work while you sleep. Platforms that offer integrated marketing solutions allow for automation. Send by Elementor allows creators to manage email marketing campaigns directly from their website dashboard, creating a unified loop between the visitor arriving on the site and the customer receiving a newsletter. This level of integration is what turns a static portfolio into a business growth engine.
The Verdict: Choosing the Right Tool for Your Journey
Selecting the right tool depends entirely on where you are in your journey and where you intend to go.
Use Canva Website Builder If:
- You need a website up in less than 2 hours.
- The site is for a one-time event (wedding, conference).
- You are a visual artist displaying a portfolio and don’t need a blog.
- You have zero budget and just need a URL to put on a business card.
- You are comfortable with a “what you see is what you get” limit and don’t plan to add complex features later.
Upgrade to a Professional Platform If:
- You are building a business that relies on SEO traffic.
- You need to sell more than a handful of products (e-commerce).
- You plan to blog regularly and need a searchable archive of content.
- You need dynamic features like user logins, real estate listings, or directories.
- You want full ownership of your data and the ability to move your site to any host in the future.
The web is big enough for both. Canva has lowered the barrier to entry, allowing millions to take their first step online. But for those ready to run, professional ecosystems provide the track, the shoes, and the training to win the race.
Frequently Asked Questions
1. Can I use my own domain name with a Canva website? Yes, you can. You have two options: you can purchase a new domain directly through Canva’s interface, or you can connect a domain you already own from a registrar like GoDaddy or Namecheap. Connecting an existing domain involves updating your DNS records, specifically the A record and CNAME record, to point to Canva’s servers.
2. Is a Canva website good for SEO? Canva websites are generally single-page sites, which can be limiting for SEO. While you can edit page titles and meta descriptions, you lack the ability to create a deep site structure, use advanced schema markup, or create separate URLs for different pieces of content (like individual blog posts). For basic local visibility, it can work, but for competitive keywords, dedicated platforms offer significantly better tools.
3. Can I sell products on my Canva website? You can add “Buy” buttons that link to external payment processors like Stripe or PayPal. However, Canva does not have a native shopping cart system, inventory management, or tax calculation tools. For a full online store, you would need a solution like the WooCommerce Builder found in professional platforms.
4. Is the Canva website builder responsive? Canva websites adapt to mobile screens, but the process is automated. You cannot manually adjust the layout for mobile only (e.g., hiding a specific image on phones) without affecting the desktop view. Grouping elements helps maintain structure, but you don’t have the pixel-perfect breakpoint control that professional developers often require.
5. How much does it cost to publish a Canva website? You can publish a website for free on a my.canva.site subdomain. If you want to connect a custom domain or use premium templates and stock assets, you will likely need a Canva Pro subscription. Hosting on Canva’s subdomain is included at no extra cost.
6. Can I transfer my Canva website to WordPress later? No, you cannot directly export the code or file structure of a Canva site to WordPress. Since Canva uses a proprietary visual format, “moving” to WordPress would essentially mean rebuilding the site from scratch using a builder like Elementor Website Builder.
7. Does Canva offer website analytics? Yes, Canva provides basic insights for published sites. You can view metrics like total views, unique visitors, and clicks on your links. This gives you a high-level overview of performance, though it is not as granular as Google Analytics integration found in more robust CMS platforms.
8. Can I add a blog to my Canva website? Not in the traditional sense. Since Canva lacks a CMS (Content Management System), you cannot write posts that automatically archive and categorize. You would have to manually design a new section or page for every single article you write, which is not scalable for active bloggers.
9. How do I make my Canva website private? When you go to the publish settings, there is an option to enable password protection. This allows you to set a password that visitors must enter to view the site, making it an excellent option for internal company newsletters, client-specific portals, or private event invitations.
10. What happens if I cancel my Canva Pro subscription? If you used premium elements (Pro images, fonts, or templates) in your website, your site might revert to the free version standards or show watermarks on those premium assets. You may also lose the ability to use the custom domain connection features depending on the specific terms at the time of cancellation.
Looking for fresh content?
By entering your email, you agree to receive Elementor emails, including marketing emails,
and agree to our Terms & Conditions and Privacy Policy.