How to Connect Elementor With Aweber
AWeber is an email marketing service integrated with WordPress that helps users build and manage email lists, send automated campaigns, and track performance.
If you don’t have the AWeber for WordPress plugin, install it now.
Elementor Pro
With Elementor Pro, you can connect forms created in Elementor with your AWeber account, add tags, and configure custom fields.
Follow the steps below to integrate your Elementor form and AWeber.
Step 1: Launch Your Forms Widget
Drag and drop the Elementor Pro Forms widget onto the widget area in the middle of your screen to create a new form on the page. The form’s options are in the panel to the left.
Step 2: Configure Your Form Fields and Submit Button
From the options panel on the left, you can delete or add fields, or change the types of fields. Click the submit button tab in the options panel to configure the button. You can select the button’s text that will appear, as well as its size, color, and alignment.
Step 3: Set up Action After Submit Button to Select Aweber
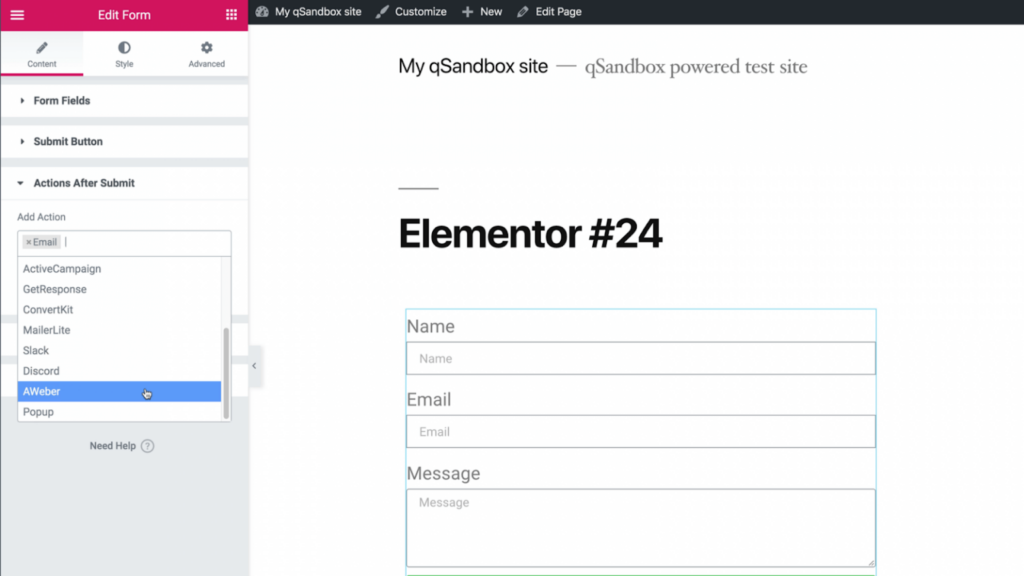
Click Actions After Submit to define which actions will take place when someone clicks the submit button. Click on the Actions drop-down to reveal the options and select AWeber. This will cause AWeber configuration options to appear.

Step 4: Set up Your Aweber Actions.
Now it is time to set up where in AWeber you want the contact information sent.
- Select the AWeber list that you want to use.
- Enter the tags you want to use.
- Go to Field Mapping so you can map the data you want for each custom field.
- Click Publish.
Now anytime any visitor to your website clicks the Submit button, the information on the various fields and custom fields configurations will be sent to AWeber.
If you are moving to AWeber from a competitor, you can also easily reassign your Elementor forms to AWeber by selecting AWeber in the Actions After Submit step.
Elementor Free
If you are using the Elementor Free version, you can quickly and accurately pull over any AWeber form you want to use with no coding or manual copying of HTML. This option is also available to Elementor Pro customers.
The steps below outline how to add any of your AWeber sign up forms into your favorite Elementor landing page.
Step 1: Make Sure the AWeber Plugin Is Installed on Your WordPress Website
When you have the Elementor free plugin and the AWeber WordPress plugin installed, there will be an AWeber icon at the bottom of your Basic elements options.
Step 2: Drag and Drop the AWeber Widget Onto the Widget Area in the Middle of Your Screen
This will place a blank gray area onto the page, and will reveal the Aweber Configuration options in the Options Panel on the left.
Step 3: Select Your AWeber Form.
- From the AWeber Configuration options in the left panel, click the List drop-down and select the AWeber list you want to use from the options in your account.
- In the Sign Up Forms and Split Tests drop-down, select the AWeber form you want to use. The form you selected will load into the widget area on the main screen. The plugin is going into your AWeber account and pulling into Elementor the sign up form that you selected.
For more questions about how to leverage the power of AWeber and Elementor, read their Knowledge Base article.

