Table of Contents
If you want to make changes to your WordPress site’s theme, you’ve probably seen people tell you to use a WordPress child theme.
But what is a child theme, and why are child themes so important?
In this post, we’ll give you the answers to those questions with an introduction to child themes and how they benefit you.
Then, we’ll show you step-by-step how to create and customize your own child theme using plugins or code.
Let’s dig in.
What Is a WordPress Child Theme?
A WordPress child theme is not a standalone theme. It’s a “child” of an existing parent theme, hence the name.
You’ll install it alongside your parent theme, but it gives you a chance to safely make changes to your parent theme without needing to edit the parent theme itself.
The child theme will pull most/all of its design settings from the parent theme. However, in situations where you make a change to the child theme, that change will override the settings in the parent theme.
Advantages of a Child Theme
At this point, you might be wondering why you can’t just make your changes directly to the parent theme?
The main reason why that isn’t a good idea is theme updates.
If you want to keep your WordPress site secure and well-functioning, you need to promptly apply updates as they come out, including updates to your theme.
If you customize your site by directly editing your theme (without a child theme), then that means you will overwrite all of your changes every time you update the theme.
That means you either:
- Update your theme and lose your work. Not a very fun experience, right?
- Don’t update your theme so that you don’t lose your work…which isn’t good for your site’s security and functioning.
With a WordPress child theme, you can make all of your changes in the child theme. Then, you’ll be able to update the parent theme without losing any of your work.
Beyond helping you safely update, using a child theme is also just generally convenient for making customizations. Because it segregates all of your changes in one spot, it’s easy to track all of your edits and tweak them as needed.
It also makes it easy to go in reverse. For example, if you want to stop using your edits and go back to the “vanilla” parent theme, all you need to do is disable your child theme.
Some off-the-rack WordPress themes even use this parent/child approach by default. For example, if you want to use the Genesis Framework, you’ll need both the parent theme (the basic framework) and a child theme to control the design.
When to Use a Child Theme
Other than a few exceptions that we’ll list below, you should always use a child theme if you’re planning to make your own edits to an existing WordPress theme.
When You Don't Need to Use a Child Theme
In general, using a child theme is a good best practice whenever you’re customizing your WordPress theme.
However, there are some exceptions to the rule where there might be a better option than using a child theme.
First, if you just want to make a few minor CSS modifications, it might be overkill to create a child theme just for a few tweaks.
Instead, you can add your custom CSS using the built-in Additional CSS feature in the WordPress Customizer. Or, you can use a free plugin such as Tom Usborne’s Simple CSS plugin.
Second, if you’re making changes that you want to be theme-independent, a child theme might not be the best option.
For example, if you’re registering a custom taxonomy or custom post type, you probably don’t want to use your child theme’s functions.php file (because you’d want to keep those even if you switch themes). Instead, you should just add the code outside of your theme entirely with a plugin such as Code Snippets or your own custom plugin.
How to Create a WordPress Child Theme
- Use a free WordPress child theme generator plugin.
- Manually create your own child theme.
How to Use a WordPress Child Theme Plugin
A child theme generator plugin lets you create a child theme without leaving your WordPress dashboard.
The most popular option here is the free Child Theme Configurator plugin, which is active on over 300,000 sites.
Child Theme Configurator not only helps you create the basic child theme files, but it will also scan whichever theme you’re using and enqueue theme and font style sheets as needed.
It also includes other helpful features if you’re trying to create a child theme on a site where you’ve already added content. For example, it can copy your existing widgets and Customizer options to the child theme.
However, if you’re planning to use the plugin on a live website, we recommend that you take a full backup before proceeding. Or, ideally, set everything up on a staging site.
Once you have your backup ready, get started by installing and activating the free Child Theme Configurator plugin from WordPress.org. Then, go to Tools → Child Themes to create your child theme.
In the Select a Parent Theme drop-down, select the theme for which you want to create your child theme. Then, click Analyze:
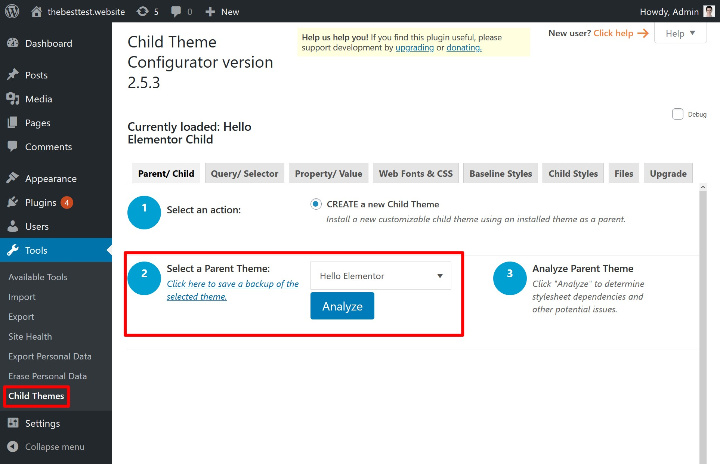
The plugin will then analyze your parent theme for any dependencies.
Once it’s done that, you’ll see some additional options to configure how to create your child theme. If you’re not sure what a specific setting means, you can just leave it as the default:
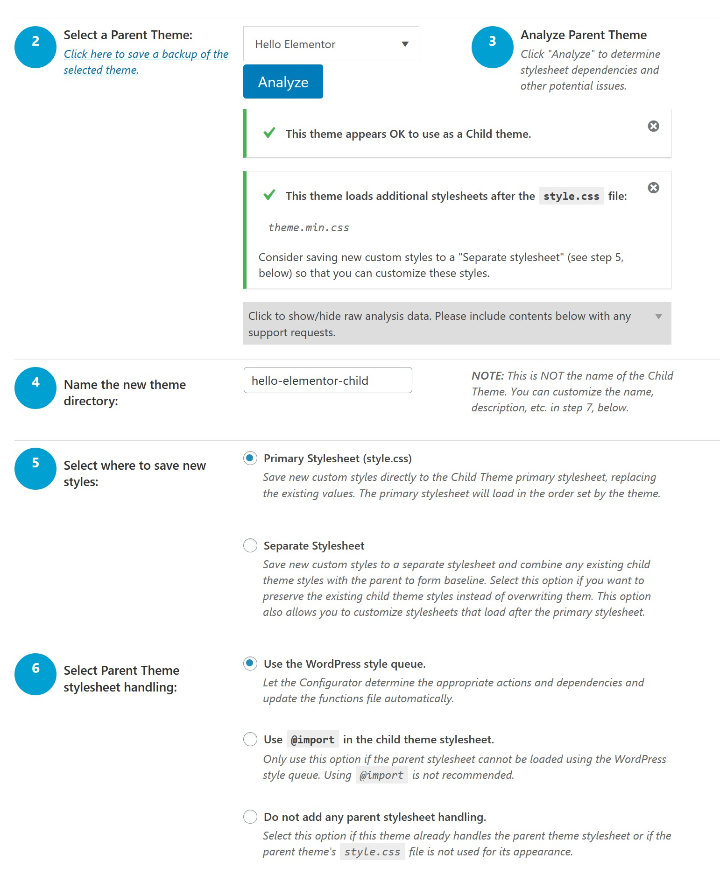
Once you’ve finished making your choices, click the button at the bottom to Create New Child Theme.
And that’s it! The plugin will then create the child theme for you. However, it will not activate the child theme.
To activate it:
- Go to Appearance → Themes.
- Preview what your site looks like with your child theme (to make sure it’s working – if your site looks odd, it’s likely because of a CSS issue).
- Activate your child theme like you would any other WordPress theme. Make sure to leave your parent theme installed, though.
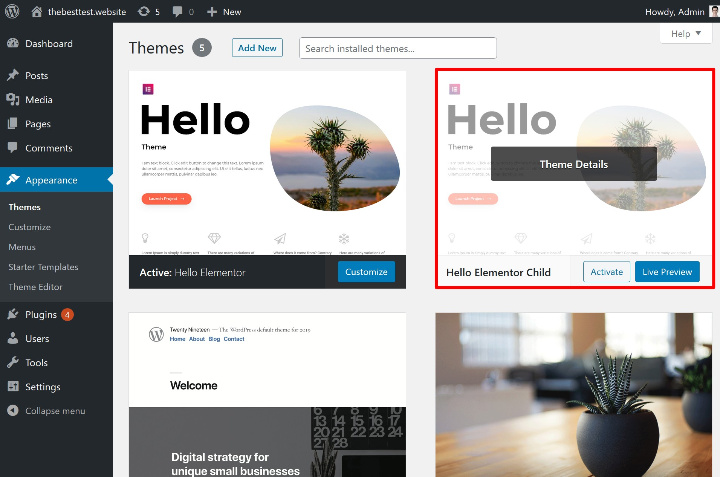
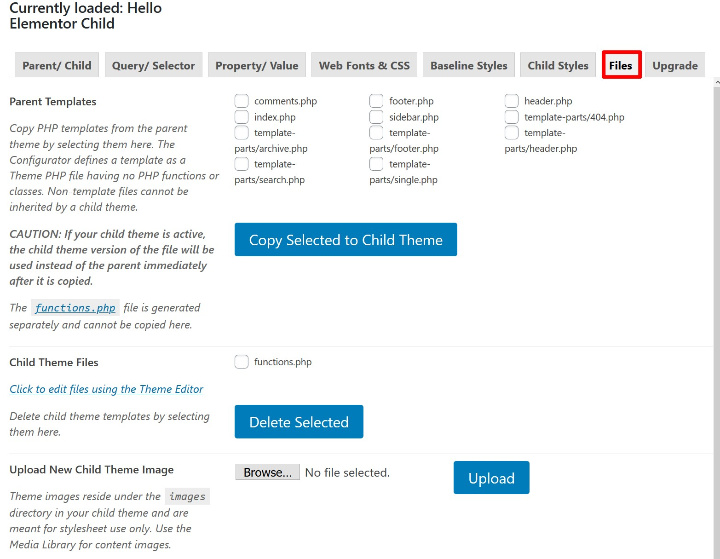
Once you’ve activated your child theme, the Child Theme Configurator plugin also includes some other useful tools to help you manage your child theme. For example, if you go to the Files tab of the plugin’s settings, you can view all of the associated files in both your parent theme and child theme.
Then, you can copy files from the parent theme to the child theme.
For example, if you wanted to make some edits to single.php, you could copy that file to your child theme so that you can safely edit it:
You’ll also find lots of other tools to help you work with CSS.
We’ll cover why these tools are useful later on.
How to Manually Create a Child Theme
For this section, we’ll assume that you know a little bit about PHP and CSS. If you feel overwhelmed by the instructions here, we would recommend sticking with the free plugin from the previous section.
To manually create a child theme, you need to create two files (these are the bare minimum for a child theme):
- style.css – at the beginning, all you need to add is some boilerplate code.
- functions.php – this lets you enqueue the stylesheet from the parent theme. Without this, your child theme wouldn’t be able to apply your parent theme’s CSS, which would make your site look super ugly!
style.css
First, create a file named style.css and add the following code:
					/*

Theme Name: Hello Elementor Child

Theme URI: https://github.com/elementor/hello-theme/

Description: Hello Elementor Child is a child theme of Hello Elementor, created by Elementor team

Author: Elementor Team

Author URI: https://elementor.com/

Template: hello-elementor

Version: 1.0.1

Text Domain: hello-elementor-child

License: GNU General Public License v3 or later.

License URI: https://www.gnu.org/licenses/gpl-3.0.html

*/
Make sure to replace everything that comes after the colons with your actual information:
- Theme Name – the name for your child theme.
- Theme URI – the website for your theme and its documentation.
- Description – a short description of the theme.
- Author – the theme author’s name.
- Author URI: – the theme author’s website.
- Template – the name of your parent theme’s folder (as named inside your wp-content/themes folder). This is the most important line as your child theme won’t work without this.
- Version – the version number of your child theme.
- Text Domain – this is used for internationalization. You can just append “-child” to the end of the template name.
- License – leave this as the default.
- License URI – leave this as the default.
Excluding the Template line, it’s not really important what you enter, so don’t stress too much. Just make sure to properly enter your parent theme’s folder name for the Template.
If you want to add your own custom styles in the future, you can add it to this stylesheet below the boilerplate code.
functions.php
Next, you need to create the functions.php file for your child theme. Again, this is what lets you enqueue the full CSS stylesheet from your parent theme.
In the functions.php file, add the following code:
					<?php

/* Function to enqueue stylesheet from parent theme */

function child_enqueue__parent_scripts() {

    wp_enqueue_style( 'parent', get_template_directory_uri().'/style.css' );

}
add_action( 'wp_enqueue_scripts', 'child_enqueue__parent_scripts' );
Upload Files to WordPress Site
Once you have your style.css file and functions.php file, you need to upload them to your WordPress site as a new theme.
To do so, connect to your WordPress site using FTP.
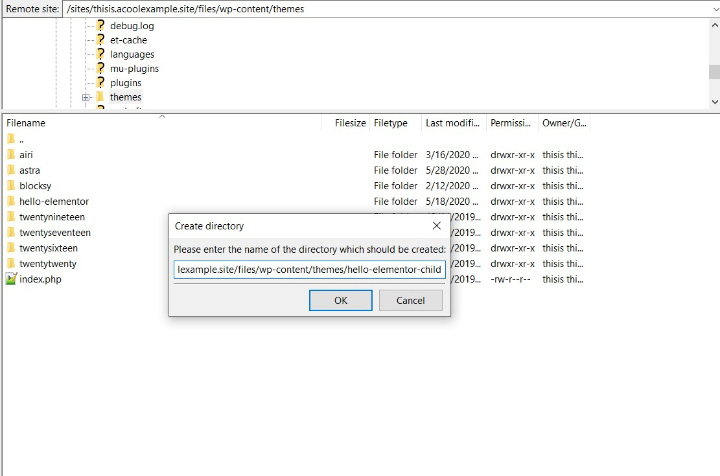
Then, browse to your site’s theme directory (wp-content/themes) and create a new folder for your child theme.
For example, if your parent theme’s folder is hello-elementor, you could name the child theme folder hello-elementor-child to help you remember it.
Then, upload your style.css and functions.php file inside of that folder:
Once you’ve uploaded both files, you can go to Appearance → Themes and activate your child theme just like you would any other WordPress theme.
How to Install a WordPress Child Theme
We touched on some of this above in the specific methods, but let’s go through how to install a WordPress child theme one more time.
This will also be useful if you downloaded a pre-made child theme from your theme’s developer, rather than creating it yourself.
You can install a WordPress child theme just like you would any other WordPress theme:
- Go to Appearance → Themes in your WordPress dashboard.
- Click on Add New.
- Upload the ZIP file for your child theme.
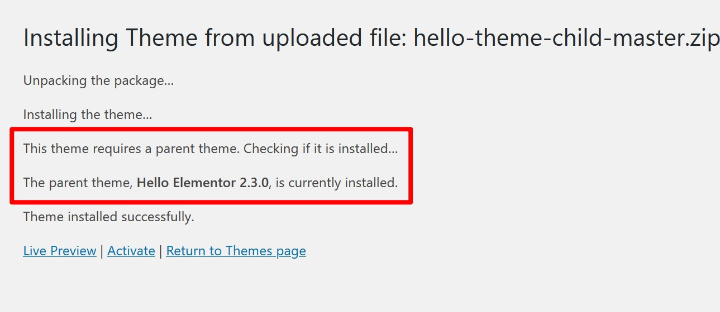
During the installation process, WordPress will detect that you’re uploading a child theme and check to make sure that the parent theme exists:
Once you upload the file, make sure to Activate it.
Remember, in order for your child theme to work, you need to install both your parent theme and the child theme.
Your child theme should be your active theme, but you still need to have your parent theme installed.
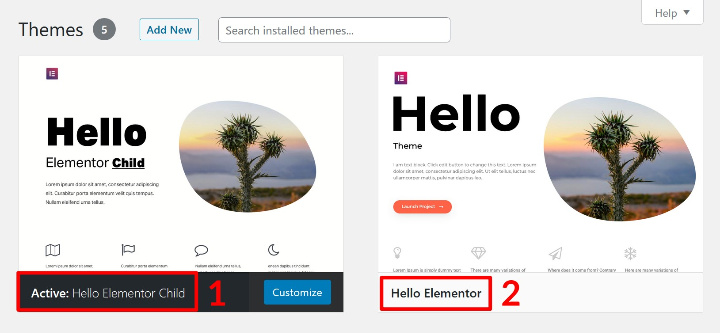
Here’s what it should look like:
- The child theme is the active theme
- The parent theme is still installed, but not active
How to Customize a Child Theme
Just as with customizing a regular WordPress theme, you have multiple options for how to “customize” a child theme.
To be more accurate, you’re not really customizing the child theme
— you’re using the child theme to customize the existing theme (the parent).
First, we’ll show you some ways in which you can use code to customize your child theme. Then, we’ll share a simpler way to customize things with Elementor Theme Builder.
Customize a Child Theme With Code
If you want to customize your child theme with code, you will need to have a good working knowledge of CSS, HTML, and PHP.
Here are some of the things that you can do:
Add Custom CSS
To customize your child theme with CSS, you can add CSS directly to your child theme’s style.css file.
Add CSS below the existing code at the top of the file.
Any CSS that you add to your child theme will override your parent theme as long as you’re using the same selectors.
Override Existing Templates
If you want to override your parent theme’s templates, you can:
- Copy the template file from your parent theme to your child theme.
- Edit the template file in your child theme.
For example, if you want to edit single.php, you would first copy the single.php file from your parent theme to your child theme (making sure to preserve the same directory structure, if applicable).
Then, you can edit the code in your child theme’s version of single.php.
Note: WordPress will use the template from your child theme as long as it has the same name. Because of that, you’re essentially “overwriting” the existing template in the parent theme.
If you use the Child Theme Configurator plugin that we mentioned above, it can help you copy files to your child theme without leaving your WordPress dashboard.
Add New Templates
In addition to copying and editing your parent theme’s existing templates, you can also create new custom templates in your child theme.
For example, if you want to create a template for a custom post type that you added, you could add that template in your child theme.
Customize a Child Theme With Elementor Theme Builder
If you’re not familiar, Elementor Theme Builder lets you customize some or all of your WordPress theme using a visual, drag-and-drop interface.
With Elementor Pro and Theme Builder, you can create custom templates for your site’s:
- Header
- Footer
- Singles (e.g. a single blog post or a page)
- Archives (e.g. the page that lists all of your blog posts)
These templates will work with both your child theme and your parent theme.
With Elementor Theme Builder, you won’t need to work directly with code. There’s no adding custom CSS or copying your PHP template files – you just do everything with drag-and-drop.
For example, let’s say you want to customize the header of your child theme. Instead of needing to copy your header.php file to your child theme and then edit the PHP, you could just design a new header using Elementor’s visual, drag-and-drop interface. Then, you can apply that header everywhere on your site or just to specific parts of your site.
If you don’t know CSS, HTML, and PHP, this code-less approach makes it possible for you to still customize your child theme. And even if you do, this visual approach can still save you a lot of time vs trying to work directly with the PHP in your template files.
For a detailed look at how to use this feature, check out our full guide on how to customize your WordPress theme. Here’s the short version, though.
When you create a new template with Elementor Theme Builder, you’ll be able to choose the type of template. For example, a header.
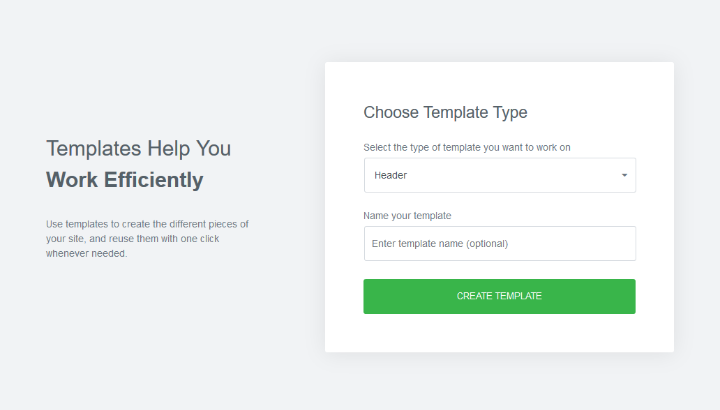
Then, you can either start from a blank slate or choose one of Elementor Pro’s pre-made templates:
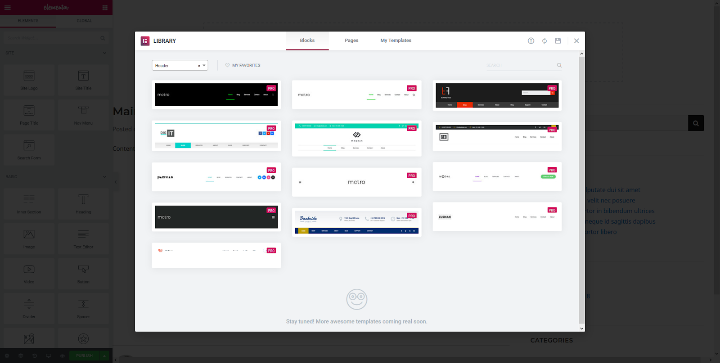
From there, you can use drag-and-drop and the sidebar options to control how your header looks:
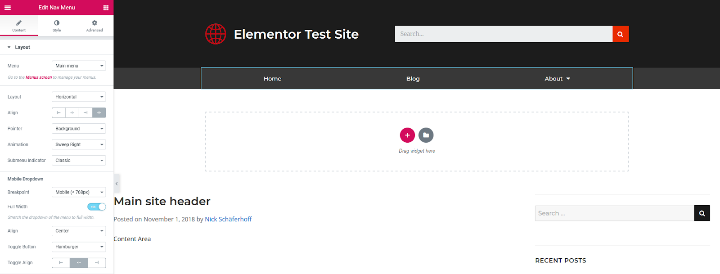
Once you’re finished, you can choose exactly where you want to use this header template:
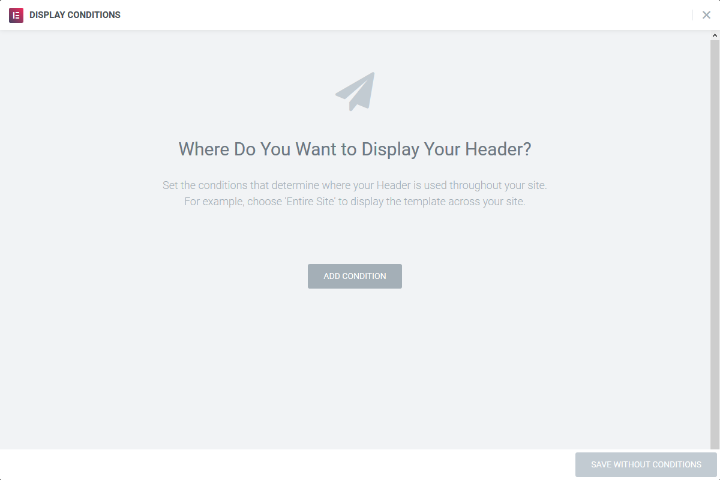
To learn more, check out everything that Elementor Theme Builder can do.
How to Remove a WordPress Child Theme
If you want to stop using your child theme, you can deactivate it just like you would a regular WordPress theme.
That is:
- Go to Appearance → Themes.
- Activate another theme. Either the parent theme or a brand new WordPress theme.
Just remember – if you deactivate the child theme and move back to your parent theme, all of the changes that you added via your child theme will no longer be there.
Instead, you’ll be back to the “vanilla” design of your parent theme.
Start Using a WordPress Child Theme Today
A WordPress child theme helps you safely make changes to your WordPress theme.
Your child theme will inherit all of its styles from your parent theme, but any changes that you make to the child theme will override the parent theme. This means that you can safely update your parent theme without losing the changes that you’ve made in your child theme.
To start using a WordPress child theme, you can:
- Check to see if your theme’s developer already offers a pre-made child theme. If you’re using Hello Elementor, you can download a child theme for it from GitHub.
- Use the free Child Theme Configurator plugin.
- Manually create your child theme.
From there, you can customize your child theme using CSS, HTML, and PHP. Or, you can skip the code and use Elementor Theme Builder to customize your theme using a visual, drag-and-drop interface.
Do you still have any questions about working with a WordPress child theme? Let us know in the comments section and we’ll try to help!
Looking for fresh content?
By entering your email, you agree to receive Elementor emails, including marketing emails,
and agree to our Terms & Conditions and Privacy Policy.
