Table of Contents
The Core Idea: Translating Names into Numbers
At its heart, the internet runs on numbers. Every device connected to the internet, including the servers that host websites, has a unique Internet Protocol (IP) address. This address acts like a specific street address for that device.
What are IP Addresses?
You’ve probably seen IP addresses before. They often look something like this: 192.168.1.1 or 203.0.113.42. This format is called IPv4 (Internet Protocol version 4). It uses four sets of numbers, each ranging from 0 to 255.
Because the internet has grown so massively, we started running out of unique IPv4 addresses. That led to the development of IPv6 (Internet Protocol version 6). IPv6 addresses are much longer and look more complex, like 2001:0db8:85a3:0000:0000:8a2e:0370:7334. They provide an almost unimaginable number of unique addresses, ensuring the internet can continue to expand. Most modern systems support both IPv4 and IPv6.
What are Domain Names?
Now, imagine having to remember 203.0.113.42 every time you wanted to visit a website. Not very practical, right? That’s where domain names come in. Humans are much better at remembering words than long strings of numbers. Domain names like google.com, yourwebsitename.com, or elementor.com provide a user-friendly way to identify resources online.
The Role of DNS
DNS is the essential bridge between human-friendly domain names and computer-friendly IP addresses. When you type a domain name into your browser:
- Your computer needs to find the corresponding IP address for that domain.
- It uses the DNS system to look up the domain name.
- DNS returns the correct IP address.
- Your browser then uses that IP address to connect directly to the website’s server.
Without DNS, navigating the web would be incredibly cumbersome. It’s a fundamental piece of internet infrastructure that makes Browse seamless.
DNS acts like the internet’s phonebook, translating memorable domain names (e.g., elementor.com) into numerical IP addresses (e.g., 192.168.1.1) that computers use to locate websites and other online resources.
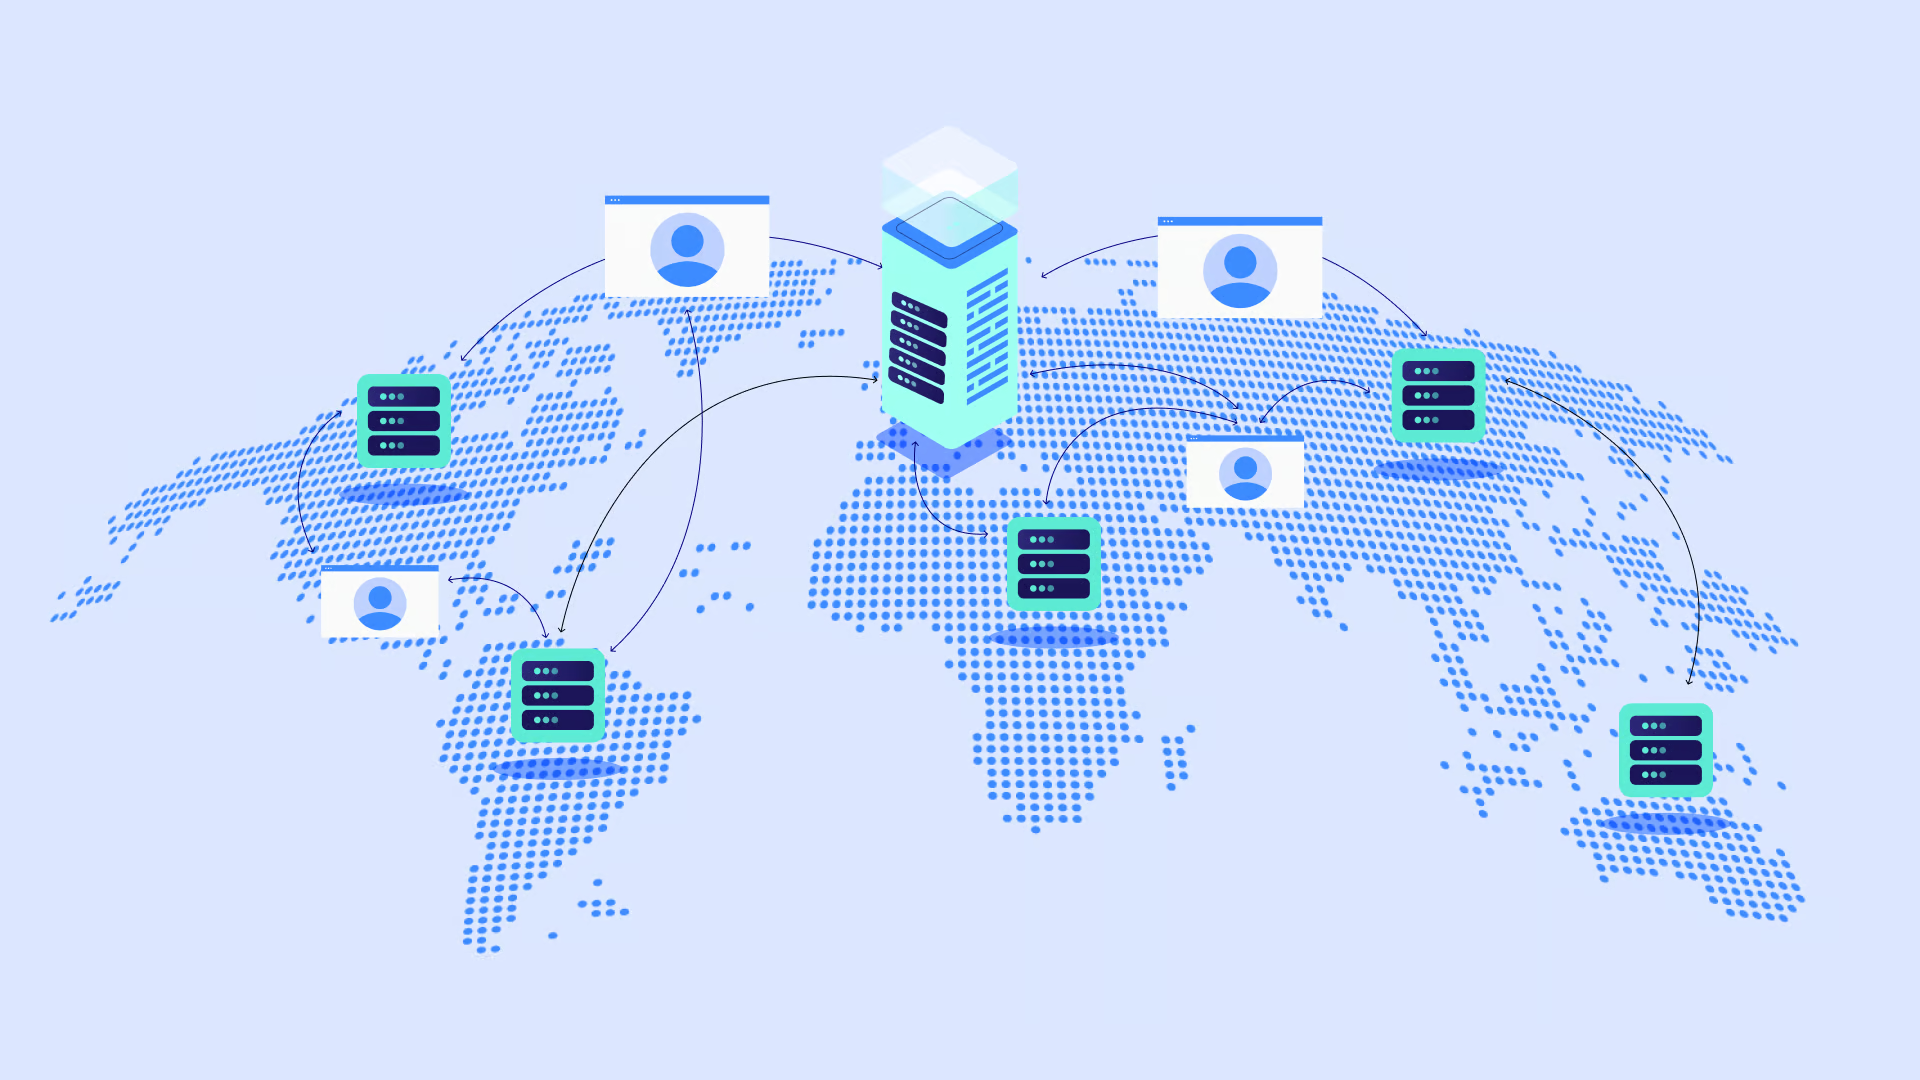
How Does DNS Actually Work? A Step-by-Step Journey
The DNS lookup process might seem instantaneous, but several steps happen in quick succession behind the scenes. Let’s follow the journey of a DNS query from your browser to the final answer.
Imagine you type www.example.com into your browser and hit Enter.
Step 1: You Type, Your Browser Asks
Your web browser (like Chrome, Firefox, or Safari) is the starting point. It sees the domain name you entered and knows it needs an IP address to proceed. The first thing it usually does is check its own internal cache. Browsers often store recently looked-up DNS information for a short period to speed things up. If the IP address for www.example.com is in the browser cache and hasn’t expired, the browser uses it directly, and the DNS lookup process stops here.
Step 2: Checking the Operating System Cache
If the browser cache doesn’t have the answer, the browser asks your computer’s operating system (Windows, macOS, Linux). The OS also maintains a DNS cache (sometimes called the resolver cache). If the OS cache has a valid entry for www.example.com, it sends the IP address back to the browser, and the process ends. This local caching significantly speeds up access to frequently visited sites.
Step 3: The Recursive Resolver Takes Over
If neither the browser nor the OS cache has the IP address, the query moves outside your local machine. Your computer is typically configured to use a specific DNS recursive resolver (often provided by your Internet Service Provider, or ISP). You can also choose to use public resolvers like Google Public DNS (8.8.8.8) or Cloudflare DNS (1.1.1.1).
The recursive resolver acts like a helpful librarian tasked with finding the answer. It doesn’t necessarily know the IP address itself, but it knows how to find it by asking other servers. The recursive resolver also has its own cache. If it recently looked up www.example.com for another user, it might have the IP address cached and can return it immediately.
Step 4: Asking the Root Servers
If the recursive resolver doesn’t have the answer cached, it begins the actual lookup process. It starts by contacting one of the DNS root nameservers. There are only 13 sets of root servers strategically placed worldwide (though each “set” consists of many physical servers).
The root servers don’t know the IP address for www.example.com. However, they know where to find the servers responsible for the top-level domain (TLD) – in this case, .com. The root server responds to the recursive resolver with the address of the TLD nameserver for .com.
Step 5: Querying the TLD Servers
Armed with the address of the .com TLD nameserver, the recursive resolver now sends its query there. It asks, “Where can I find the information for example.com?”
The TLD nameserver manages information for all domains ending in .com. It doesn’t have the specific IP address for www.example.com, but it knows which authoritative nameservers are responsible for the example.com domain. The TLD server responds to the recursive resolver with the addresses of these authoritative nameservers.
Step 6: Finding the Authoritative Nameserver
The authoritative nameservers are the ultimate source of truth for a specific domain. They hold the actual DNS records for example.com, configured by the domain owner or their hosting provider. Typically, there are at least two authoritative nameservers for redundancy.
The recursive resolver picks one of the authoritative nameservers provided by the TLD server and sends its final query: “What is the IP address for www.example.com?”
Step 7: Getting the IP Address
The authoritative nameserver checks its records for example.com. It finds the specific record associated with the www subdomain (often an ‘A’ record, which we’ll discuss later) and finds the corresponding IP address. It sends this IP address back to the recursive resolver.
Step 8: Back to Your Browser and Connection!
The recursive resolver now has the answer! It does two things:
- It caches the IP address for www.example.com for a specific duration (called the Time-To-Live or TTL) so it can answer future requests faster.
- It sends the IP address back to your computer’s operating system, which passes it to your web browser.
Finally, your browser has the IP address it needs. It establishes a direct connection to the server at that IP address, requests the webpage content, and displays the www.example.com website for you.
Whew! That might seem like a lot of steps, but this entire process typically happens in milliseconds. The distributed and hierarchical nature of DNS, combined with caching at multiple levels, makes it incredibly efficient.
The DNS lookup process involves your browser checking local caches, then querying a recursive resolver. The resolver queries root servers, then TLD servers, and finally authoritative nameservers to find the correct IP address. This IP address is then returned to your browser to establish a connection. Caching at various stages speeds up this process significantly.
Key DNS Components You Should Know
Understanding the DNS lookup process is easier when you know the key players and the types of information they handle. Let’s break down the important components.
DNS Servers: The Different Roles
We encountered several types of servers in the lookup process. Each has a distinct role:
- Recursive Resolvers (or DNS Recursor): These are the workhorses your computer usually talks to first (like your ISP’s DNS or Google/Cloudflare DNS). They don’t hold the domain records themselves but perform the full lookup process by querying other servers on your behalf. They also cache results to speed up common queries.
- Root Nameservers: Sitting at the top of the DNS hierarchy, these 13 logical server sets (managed by various organizations) direct queries to the appropriate TLD nameservers. They are essential for starting the entire lookup process.
- TLD (Top-Level Domain) Nameservers: These servers manage information for top-level domains like .com, .org, .net, .gov, or country-specific TLDs like .uk or .ca. They point resolvers toward the authoritative nameservers for specific domains within that TLD.
- Authoritative Nameservers: These servers hold the actual DNS records for a specific domain (e.g., elementor.com). They are the definitive source of information for that domain. When you connect your domain to a hosting provider or platform like Elementor Cloud Websites, you usually point your domain to their authoritative nameservers.
Common DNS Record Types Explained
Authoritative nameservers store information about a domain in the form of DNS records. Each record type serves a different purpose. Here are some of the most common ones you might encounter, especially when managing your website:
| Record Type | Full Name | Purpose | Common Use Cases |
| A | Address Record | Points a domain or subdomain to an IPv4 address. | Pointing your main domain (yourdomain.com) or a subdomain (blog.yourdomain.com) to your web server’s IPv4 address. Fundamental for websites. |
| AAAA | Quad A Record | Points a domain or subdomain to an IPv6 address. | Similar to A records, but for IPv6 compatibility. Increasingly important as IPv6 adoption grows. |
| CNAME | Canonical Name | Points a domain or subdomain to another domain name (not an IP address). Acts like an alias. | Pointing www.yourdomain.com to yourdomain.com. Connecting some third-party services that require pointing to their domain. |
| MX | Mail Exchanger | Specifies the mail servers responsible for handling email for your domain. | Directing emails sent to @yourdomain.com addresses to your email provider (e.g., Google Workspace, Microsoft 365). Essential for custom email. |
| TXT | Text Record | Allows you to associate arbitrary text with a domain. | Verifying domain ownership for services like Google Search Console. Implementing email security measures like SPF and DKIM. |
| NS | Name Server Record | Specifies the authoritative nameservers for a domain. | Tells the internet which servers hold all the other DNS records for your domain. Set at your domain registrar to point to your DNS host. |
| SOA | Start of Authority | Contains important administrative information about the DNS zone, like the primary nameserver and contact details. | Primarily used by DNS servers themselves; rarely edited directly by users but essential for the zone’s function. |
Understanding these record types is crucial when you need to connect your domain to web hosting, set up custom email, or integrate third-party services. You’ll typically manage these records through your DNS hosting provider’s control panel.
Key DNS components include recursive resolvers (query initiators), root servers (top level), TLD servers (.com, .org), and authoritative nameservers (holding the actual domain data). Authoritative servers store various DNS record types (like A, AAAA, CNAME, MX, TXT, NS) that map domain names to IP addresses, handle email routing, provide verification text, and define server authority.
DNS in Practice: Managing Your Domain
Okay, theory is great, but how does this apply to you as a web creator? You’ll interact with DNS primarily when setting up or managing your website’s domain name.
Where Does DNS Live? Registrars and Hosting
Two key players manage different aspects of your domain:
- Domain Registrar: This is where you buy and register your domain name (e.g., GoDaddy, Namecheap, Google Domains). The registrar manages the domain’s registration details and, crucially, controls which nameservers your domain uses.
- DNS Hosting Provider: This is where your domain’s DNS records (A, MX, CNAME, etc.) are actually stored and managed. Often, your web hosting provider (the company hosting your website files) also acts as your DNS hosting provider. Sometimes, the domain registrar also offers DNS hosting. Platforms like Elementor Cloud Websites provide integrated hosting and handle DNS management, simplifying the process.
The key is knowing where your DNS records are managed. It’s determined by the Nameserver (NS) records set at your domain registrar.
Connecting Your Domain: Changing Nameservers
This is one of the most common DNS tasks for website owners. When you sign up for web hosting (or a platform like Elementor Cloud), you need to tell your domain registrar where to find the DNS records for your site. You do this by updating the NS records at your registrar to point to the nameservers provided by your hosting provider.
Here’s the general process:
- Get Nameserver Addresses: Your hosting provider (e.g., Elementor Cloud, SiteGround, WP Engine) will give you two or more nameserver addresses. They often look like ns1.hostingprovider.com and ns2.hostingprovider.com.
- Log in to Your Domain Registrar: Access the account where you purchased your domain name.
- Find Domain Management Settings: Navigate to the settings area for the specific domain you want to connect. Look for options like “DNS Management,” “Nameservers,” or “Manage DNS.”
- Select Custom Nameservers: Choose the option to use custom or external nameservers (not the registrar’s default ones).
- Enter Hosting Provider’s Nameservers: Input the nameserver addresses provided by your hosting provider. Remove any existing default nameservers.
- Save Changes: Confirm and save the updated nameserver settings.
After saving, the change needs to spread across the internet. This is called DNS propagation, which we’ll discuss next.
Editing DNS Records: When and Why?
Once your nameservers are pointing to your DNS host, you might need to add or modify specific DNS records within that host’s control panel. Common scenarios include:
- Pointing Your Domain to Your Website: Usually involves an A record pointing your main domain (@ or yourdomain.com) to your server’s IPv4 address and possibly a CNAME record pointing www to your main domain. Many hosting platforms configure these automatically when you add your domain.
- Setting Up Custom Email: Requires adding MX records provided by your email host (like Google Workspace or Microsoft 365) to direct email correctly. You might also need to add TXT records for SPF and DKIM to improve email deliverability and security.
- Verifying Domain Ownership: Services like Google Search Console, Facebook Business Manager, or email marketing platforms often require you to add a specific TXT record to prove you control the domain.
- Connecting Subdomains: You might create subdomains like shop.yourdomain.com or blog.yourdomain.com and point them using A records (if they go to a specific IP) or CNAME records (if they alias another service or domain).
- Connecting Third-Party Services: Some platforms or services might require specific CNAME or other records to integrate properly.
You typically manage these records through a “DNS Zone Editor,” “DNS Management,” or similar interface provided by your DNS host (which is often your web host). Be careful when editing DNS records, as incorrect entries can make your website or email inaccessible. Always double-check the values, record types, and TTL (Time-To-Live) settings before saving. TTL affects how quickly changes propagate.
Understanding DNS Propagation
After you change your nameservers or update DNS records, these changes aren’t instant worldwide. It takes time for DNS servers across the globe to update their cached information. This update period is called DNS propagation.
- Why does it take time? Recursive resolvers and other DNS servers cache information for a period defined by the Time-To-Live (TTL) value associated with each DNS record. Until this cache expires, servers will continue providing the old information. Lower TTL values mean faster updates, but also more frequent queries to authoritative servers.
- How long does it take? Propagation can take anywhere from a few minutes to 48 hours, sometimes longer in rare cases. Changing nameservers typically takes longer than changing individual records like an A or MX record (which often have shorter TTLs).
- How to check? You can use online tools like DNSChecker.org. Enter your domain name and select the record type (e.g., NS, A, MX) to see if the changes have propagated to DNS servers in different locations worldwide.
Patience is key during DNS propagation. If your website isn’t loading immediately after a change, wait a while before assuming something is wrong.
In practice, you manage DNS through your domain registrar (setting nameservers) and your DNS hosting provider (editing records like A, MX, TXT). Changing nameservers points your domain to your host. Editing records connects services like web hosting and email. Changes require time (DNS propagation), influenced by TTL settings, to spread across the internet, taking minutes to hours.
Common DNS Issues and Troubleshooting
While DNS usually works flawlessly, issues can sometimes arise, preventing access to your website or email. Here are a few common problems and how to approach them:
Website Not Loading? Check DNS!
If your website suddenly becomes inaccessible, DNS is often one of the first things to check, especially if you recently made changes.
- Propagation Delays: If you just changed nameservers or DNS records, the most likely cause is simply propagation delay. Use a tool like DNSChecker.org to see if the changes are visible globally. Give it some time (up to 48 hours) before panicking.
- Incorrect DNS Records: A simple typo in an IP address (A record), hostname (CNAME record), or a wrong record type can break things. Double-check the records you entered against the information provided by your host or service provider. Ensure your main domain (@ or yourdomain.com) and www subdomain are pointing correctly.
- Nameserver Misconfiguration: Ensure the correct nameservers are listed at your domain registrar and that they match exactly what your hosting provider gave you.
- Expired Domain Name: It sounds basic, but make sure your domain registration hasn’t expired! Log in to your registrar to confirm. An expired domain will stop resolving.
DNS Caching Problems
Sometimes, the issue isn’t with the server settings but with outdated information cached on your local computer or network.
- Clear Browser Cache: Your browser might be holding onto old DNS information. Try clearing your browser’s cache and cookies.
- Flush OS DNS Cache: Your operating system also caches DNS. You can manually flush this cache.
- Windows: Open Command Prompt as administrator and type ipconfig /flushdns then press Enter.
- macOS: Open Terminal and type sudo dscacheutil -flushcache; sudo killall -HUP mDNSResponder then press Enter (command might vary slightly by macOS version).
- Try a Different Network/Device: Accessing your site from a different device or network (like your phone using cellular data) can help determine if the issue is local caching or a broader problem.
- Try a Different Recursive Resolver: Temporarily changing your computer’s DNS settings to use a public resolver like Cloudflare (1.1.1.1) or Google (8.8.8.8) can bypass potential issues with your ISP’s resolver.
Email Delivery Issues
If emails sent to your custom domain address aren’t arriving, check your MX records.
- Verify MX Records: Ensure the MX records in your DNS settings correctly point to your email provider’s servers and have the right priority values. Use DNSChecker.org (select MX type) to check propagation.
- Check SPF/DKIM Records: Missing or incorrect TXT records for SPF and DKIM can cause your outgoing emails to be marked as spam or rejected. Verify these records are set up according to your email provider’s instructions.
Troubleshooting DNS often involves careful checking of settings at both the registrar and the DNS host, verifying propagation, and ruling out local caching issues.
Common DNS problems include propagation delays after changes, incorrect record entries (typos, wrong types), misconfigured nameservers, or expired domains. Outdated local DNS caches can also cause issues, requiring flushing browser or OS caches. Email problems often stem from incorrect MX, SPF, or DKIM records.
Enhancing DNS: Speed and Security (Brief Overview)
Beyond the basics, there are technologies and services designed to make DNS faster, more reliable, and more secure. While you might not manage these directly, it’s good to be aware of them:
DNSSEC (Domain Name System Security Extensions)
DNS was originally designed without much security in mind. This makes it potentially vulnerable to attacks like DNS spoofing or cache poisoning, where attackers redirect users to malicious sites by providing false IP addresses.
DNSSEC adds a layer of authentication to DNS lookups. It uses digital signatures to verify that the DNS response received by the resolver actually came from the legitimate authoritative nameserver and hasn’t been tampered with. Many registrars and hosting providers now offer DNSSEC support, adding an important security layer for your domain.
Premium DNS Services
While standard DNS hosting provided by registrars or web hosts is usually sufficient, Premium DNS services offer enhanced performance and reliability. Benefits often include:
- Faster Lookups: Using global networks (like Anycast, see below) for quicker responses worldwide.
- Increased Reliability: Higher uptime guarantees, often using multiple redundant locations.
- Better Security: Enhanced protection against DNS-based Distributed Denial of Service (DDoS) attacks.
Companies like Cloudflare, NS1, or specialized DNS providers offer these services, often for an additional fee.
Anycast DNS
Traditional DNS setups often route queries to specific server locations. Anycast DNS uses a clever networking technique where the same IP address is announced from multiple geographic locations. When a DNS query is sent to an Anycast address, it’s automatically routed to the nearest available server based on network topology. This significantly reduces latency (delay) for users far from the primary server location, resulting in faster DNS lookups and improved website loading times globally. Many Premium DNS providers utilize Anycast networks.
These enhancements work behind the scenes to improve the overall internet experience, making DNS lookups faster and more secure.
DNS can be enhanced with DNSSEC for security against spoofing, Premium DNS services for better speed and reliability, and Anycast routing to direct queries to the geographically closest server, reducing latency.
Conclusion: DNS – The Unsung Hero of Your Online Presence
The Domain Name System might seem technical, but it’s the invisible engine making the user-friendly internet possible. From the simple act of typing a web address to connecting your custom domain to your stunning Elementor site or setting up professional email, DNS plays a vital role.
While much of it works automatically, understanding the basics – the journey of a query, the different server roles, and the common record types like A, CNAME, and MX – empowers you as a web creator. Knowing how nameservers connect your domain registrar to your host, what DNS records do, and why propagation takes time can save you headaches when launching or managing your website.
So, the next time you effortlessly pull up a website, take a moment to appreciate the complex, lightning-fast dance of DNS happening behind the curtain. It truly is the unsung hero ensuring we can navigate the vast digital world with ease.
Looking for fresh content?
By entering your email, you agree to receive Elementor emails, including marketing emails,
and agree to our Terms & Conditions and Privacy Policy.


