Table of Contents
Today we are releasing the new version of Elementor. The new version comes included with a brand new and improved interface, as well as a host of other practical improvements that extend our page builder’s abilities.
Version 1.5 is a major and multi-feature update. It actually took us quite a while to complete. We have also run this version through an extensive one-month testing period, which included three RC versions that were given to our loyal beta testers. This extensive testing was done in order to make sure all the improvements are implemented as smoothly as possible for each and every user.
What you are about to read is a long list of changes and improvements added in this version. The vast majority of updates have been created as a result of our user suggestions. We believe our users have a strong part in making Elementor the absolute best page builder plugin.
Let’s go over the new changes, so you know what to look for.
Spectacular New Editor UI
Just look at it… The clearly defined borders, the subtle menu animation, the improved drag & drop… I apologize for gushing here, but I’m really proud of what our team has accomplished.

Section / Column Separation
In this version, we’ve separated the section settings from the column settings, so users can select different sections and columns much more easily.
The section settings appear at the top middle of each section, and include the Edit, Duplicate, Add, Save and Remove options.
The column settings sit at the top left corner of each column and appear as a single column icon. Hovering over this icon will open the column menu, which includes: Edit, Duplicate, Add and Remove.
Improved Drag & Drop
We completely re-wrote our drag and drop functionality, making it even more precise than before. When you drag a widget, a column or a section, the entire action is done smoothly. Moreover, the blue marker that appears before you drop the element in place is clearer and has a better flow.
Add New Section / Template
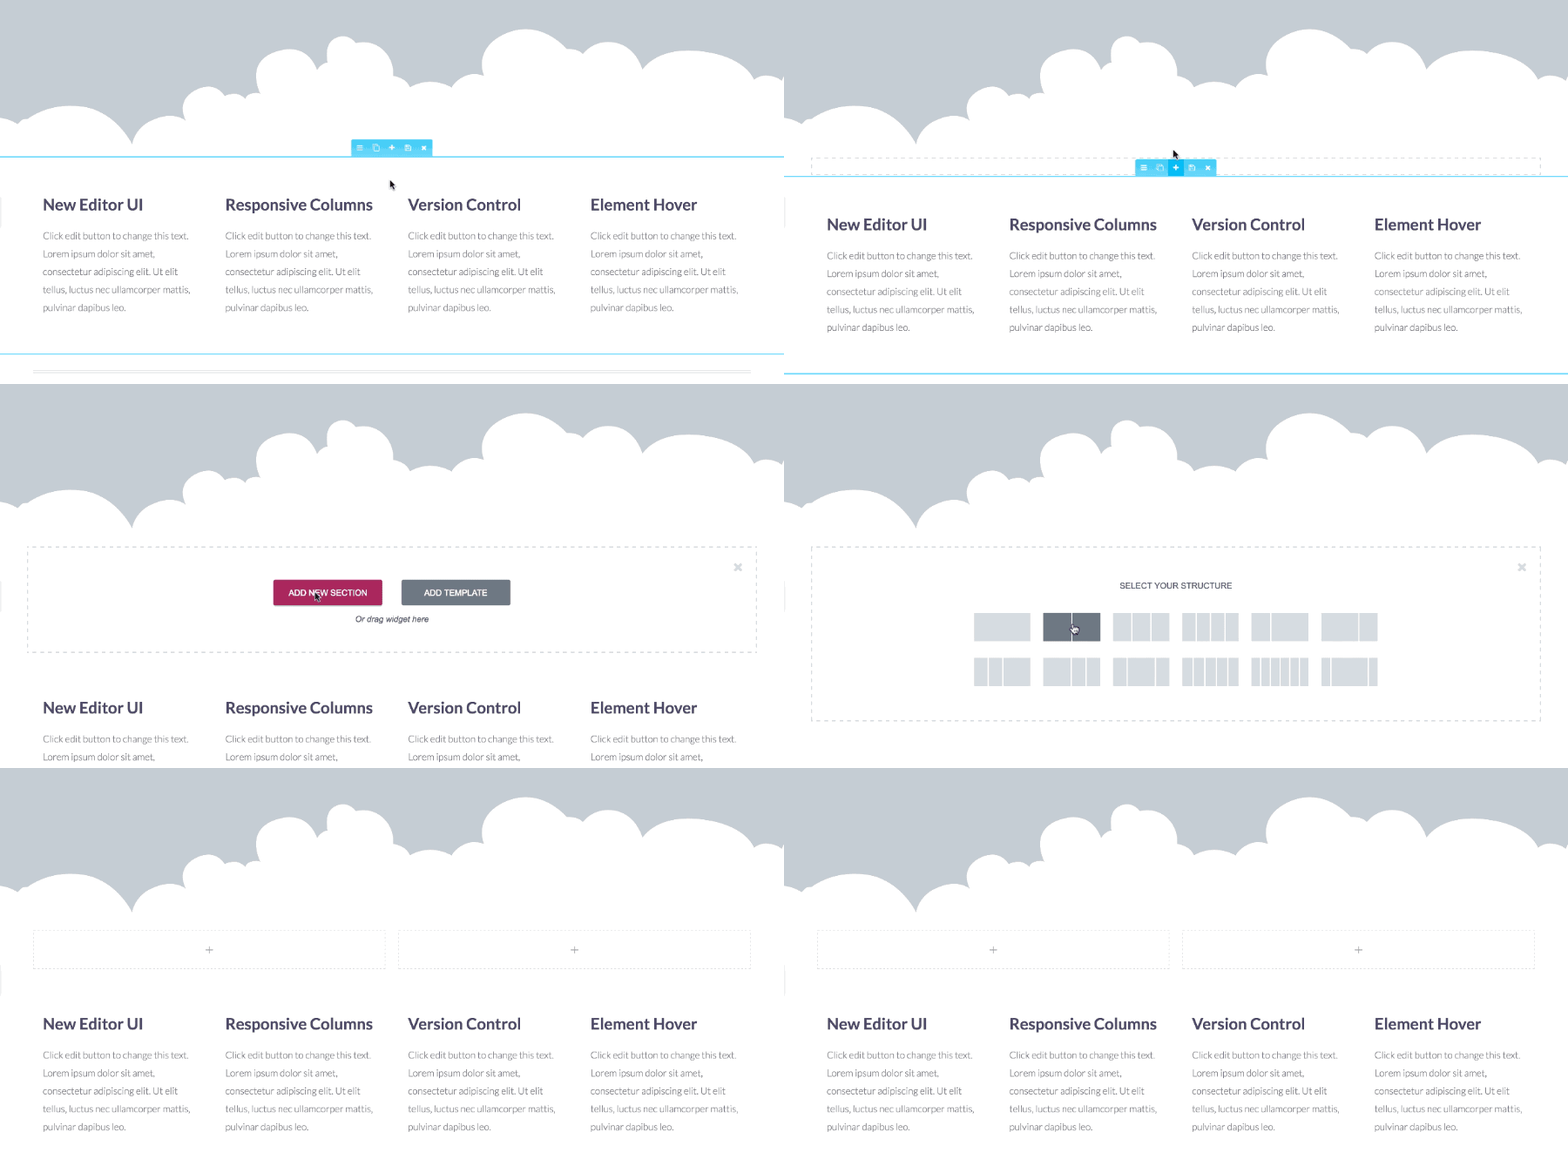
We’ve added an ‘Add’ button to the section settings. This enables users to add a new section or template between existing sections. You no longer need to drag sections up and down the page.
No matter where you are on the page, clicking on this button will open the Add Section / Template option, letting you add sections and templates between existing sections.
Responsive Column Width
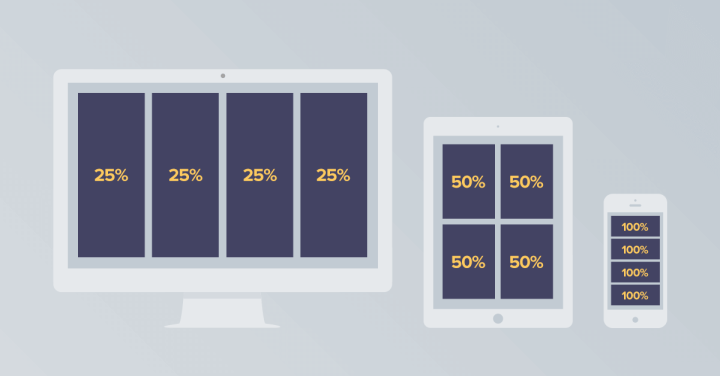
Elementor’s column control has always been one of our strong points. With this newly added feature, you can now customize entirely different column layouts for desktop, tablet and mobile devices.
Want 4 columns on desktop, 3 on mobile and only two on tablet? No problem. Now it is possible using the Responsive Column Width setting.
We also added the option to set a specific numerical value for each column. You can set the column width either by dragging the scale on the screen or by entering the specific value for the column width. Creating different layouts across devices is much easier now, using this option.
Z-Index - Arrange the Layers of Elements
Z-index can sound daunting, but it’s really quite simple. If we imagine your page is like a layer cake, z-index would determine the order of the various layers of the cake. Whipped cream on top, then chocolate, and finally the crust.
In layout design, there are 3 directions on the page. X-axis, which is the direction that goes from left to right. Y-axis, the direction that goes up and down. Finally, there is an invisible Z axis, which goes in and out of the screen. That’s why the z-index can be seen as layers (similar to Photoshop layers).
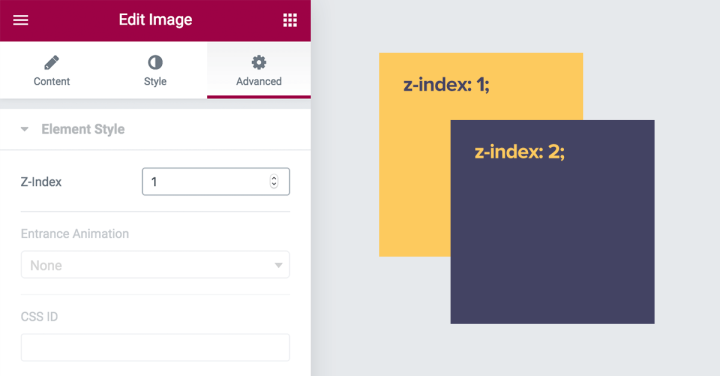
In Elementor, we’ve added control over z-index for each element (Accessible through the Advanced Tab > Element Style > z-index).
This lets you play with each element and its order in comparison to other elements. You can bring it to the front, push it behind and so on.
An example of when you might use this feature is with a 3 column price table, if you want to get the middle price table column in front of the two other price tables, so the middle column seems to cover over them.
Possible Conflicts With Negative Margins
In order to add compatibility to the new z-index option, we had to delete the z-index: 1; from the class .elementor-widget-wrap.
If you’ve used negative margins in the past, you may experience issues with past pages built with Elementor. In order to deal with these issues, you can use the new z-index control.
Element Hover
This feature is huge. It allows you to create a distinct hover style for each element. This makes everything you create with Elementor more engaging because the entire page gets another layer of movement and reaction when the user hovers over elements in the page.
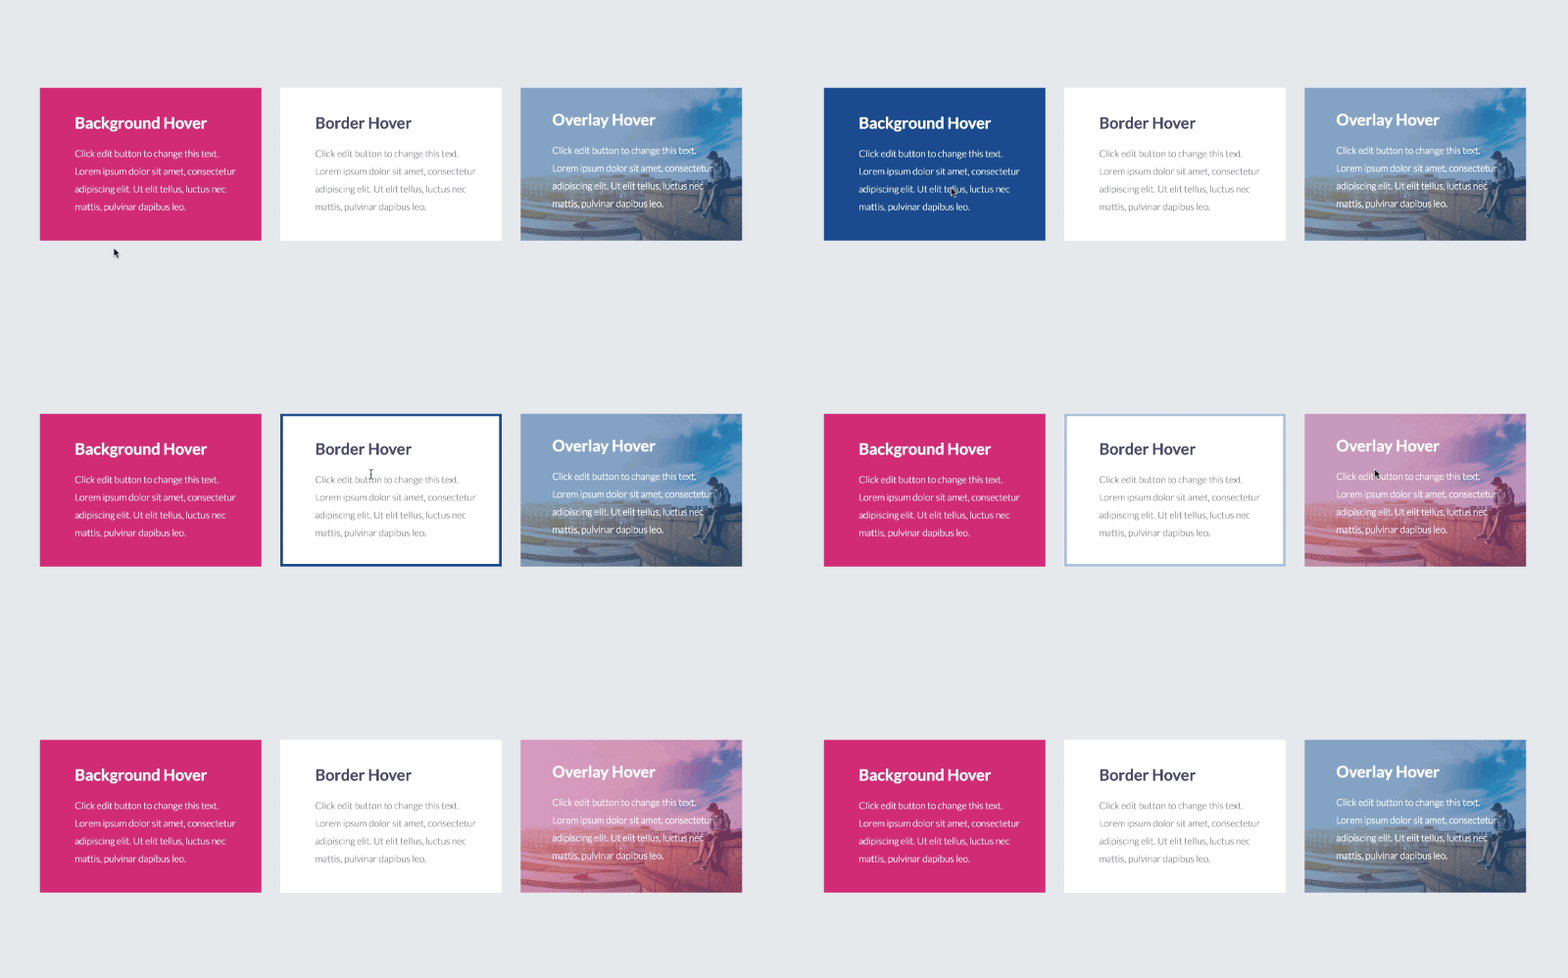
We will be releasing a dedicated post about this feature in the following weeks, so stay tuned for that post to learn more about this feature.
Version Control
Software updates pose a huge dilemma among users of every technological product, whether it’s a smartphone, personal computer, website or any other gadget.
On the one hand, the user wants to keep up and incorporate the new features that are incorporated constantly to the leading products. On the other hand, software updates sometimes lead to bugs and errors. When it comes to WordPress, it can lead to site downtime or design errors.
A top priority for us is providing our users with a smooth transition every time a new version of Elementor comes out. This is why we’ve recently introduced two new features to help make updates easier and safer.
Rollback Option
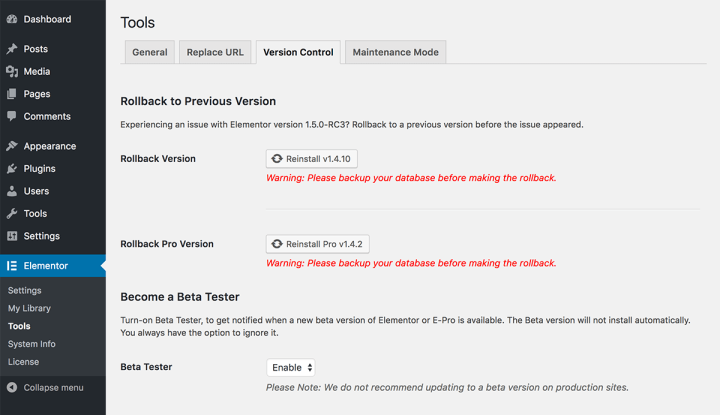
You can now downgrade to a previous version of Elementor and Elementor Pro with a click, from the Elementor settings page (Elementor > Tools > Versions).
You can actually switch back and forth between different versions with this feature. This saves you from finding the source files of the previous version, then uploading them via FTP…
The way it works, after you update to a new version, you should quickly go over your site. On the off chance something goes wrong, you can always switch back to the previous version. This way your live site can rollback to when it was working properly, and you can test what went wrong with the new version in a staging environment.
After you revert to the previous version, you can always upgrade to the newer version with a click.
Beta Testing
We’ve made becoming a beta tester of Elementor that much easier.
In the past, you had to download the beta version and manually install it on your staging environment. This required a new install for every beta release.
Now, you can register to be a beta tester from the Elementor dashboard (from Elementor > Tools > Version Control), and get notified whenever a new beta version is available. This will keep you on the cutting edge of our releases, and help us monitor and fix possible bugs whenever we release a new beta version.
This feature is especially useful for website developers & designers, as well as plugin developers, as they will be able to test the compatibility of the coming up version of Elementor and their website/plugin/addon.
Simplifying the registration process to beta testing is another effort we are making in order to put the focus on user feedback and its role in improving our page builder.
If you want to join our Beta Testers mailing list, go to my.elementor.com/beta and register your details.
Import Page Settings When Adding Templates
Back in March, we added page settings, which let you control various settings of the entire page.
When you save a template, it saves the entire page as a template, including the page settings. If you’ve added custom CSS to the page, this will also be saved to the template.
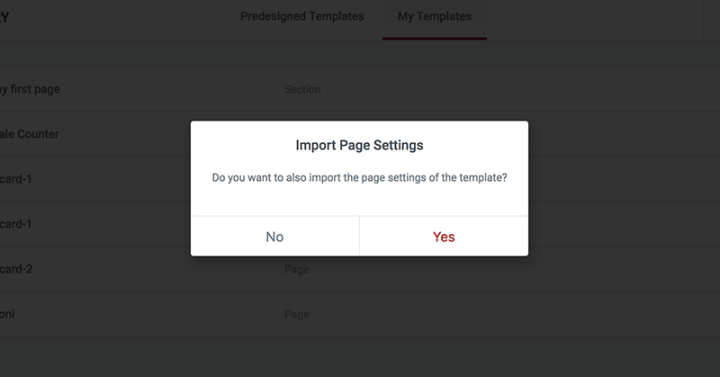
With this addition, we have added the option to import the page settings when you insert a template into the page.
If you insert a template with a certain page setting, you will be asked if you’d like to override the current page settings. Choosing the option to insert the template with its page settings mean the current page you are inserting the template to will lose its previous page settings, so keep that in mind when using this feature.
The question whether to include the page settings will only appear if the template you are inserting includes changes to the page settings. If no changes were made, the template will be inserted immediately.
HTML Tag Control for Section and Column
Until now, you could only change the HTML tag of the title element, appearing in widgets like Heading. For this element, you had the choice of either div, h1, h2 and so on.
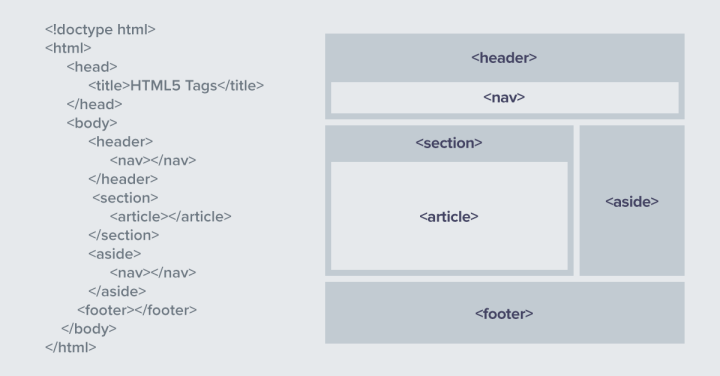
Now, you can control the HTML tag of sections and columns, letting you choose the HTML tag for them.
- Sections have these tags:
header, footer, aside, article, nav, div - Columns have these tags:
div, article, aside, nav
For example, setting a section to have a Header or Footer tag will enable you to create a page that has a complete hierarchical structure.
This is a great advancement in terms of the page semantics and code hierarchy capabilities within Elementor. This is highly significant in terms of making SEO friendly pages and gaining control over how search engines see your pages. You can learn more about HTML Semantic Elements in this W3School guide.
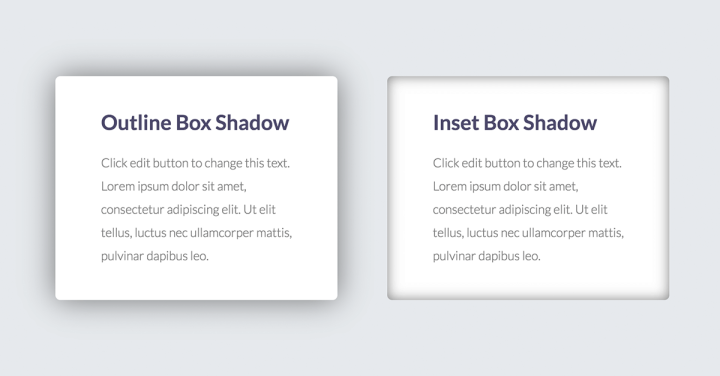
Inset Box Shadow
It’s been almost a year since we released the Box Shadow feature. Box shadows are still a huge web design trend and have also influenced our Cards skin design. We’ve now expanded the box shadow options and added an inset option for box-shadow.
This means the shadow can appear inside the element instead of outside it, opening up a wide array of new design options for box shadows.
No-Follow Links
We’ve been getting a lot of positive feedback from SEO professionals, who appreciate Elementor’s clean code and high speed performance. One of the top requests we’ve been getting from these professionals was to add the ability to define no-follow links, in order to let them control how they spread their ‘link love’ when they add an external link to their site.
We’ve now added the option to make every link rel="nofollow". This option is added to the current ‘open in new browser’ option, and it appears for every widget that has URL control.
Space Between Widgets
Ever since our first version, the default vertical spacing between widgets (widgets that are vertically stacked) has been 20 pixels. This meant that every time our users wanted to have a different default spacing, they had to define it through custom CSS. Now, we’ve added global control over this attribute, under Dashboard > Elementor > Setting > Style tab. You can also control it at the column level.
As an example, this can be a handy feature when you want the page design to have more ‘breathing room’. You can increase the default space between widgets, or change it specifically to a single column.
Mobile Editing Added to More Widgets
As you know, a top priority for us is providing a comprehensive solution for customizing pages to be fully responsive. It’s safe to say we have been leaders in this field, ever since we first introduced it in September 2016.
Now, we’ve added the ability to customize mobile editing for Image, Image Box, Image Carousel, Divider and Minimum Section Height. Our goal is not to leave any element out of reach. Today you can create a completely different style on different devices, with no coding needed.
Added Tabs to the Elementor Settings
The Elementor Settings dashboard is getting more and more controls and options. Even though a lot of users aren’t even aware of this area, it is gaining popularity as we keep adding more possibilities to it, like the version control options I mentioned earlier.
To make it more organized, we’ve separated the settings and tools into tabs, in order to provide a better and more organized user experience when navigating through the various menus.
Conclusion
As you can see, this release is packed with many new features. After upgrading, we recommend you go over your site and make sure no issues or conflicts are raised.
We’ve added both minor and major updates. It was important for us to mention both types of changes in this post. Sometimes the smallest improvement can mean taking a huge load off the user’s back if it is a feature that is being used on a daily basis. Feel free to update your Elementor and share your thoughts in the comments.
Looking for fresh content?
By entering your email, you agree to receive Elementor emails, including marketing emails,
and agree to our Terms & Conditions and Privacy Policy.
