If you’re trying to make sense of web privacy laws without losing your mind, you’re in the right place. Keeping your WordPress site compliant with GDPR, CCPA, and the growing list of global privacy rules can feel like a lot, but the right tool makes it manageable. Two popular options are CookieYes and Cookie Consent, Elementor’s native WordPress compliance capability, and here’s how they compare in 2026 so you can figure out which fits your setup.
Key Takeaways
- Cookie Consent keeps your workflow completely inside WordPress, so you never need to log into an external cloud platform.
- CookieYes offers a centralized cloud dashboard that works across multiple content management systems.
- Both tools support essential modern requirements, including Google Consent Mode v2 and Global Privacy Control.
- Your choice really comes down to whether you prefer a dashboard-native experience or an external cloud-managed platform.
Managing the Privacy Rules of 2026
Web privacy rules have changed a lot over the last few years, and they’re still evolving. A generic banner at the bottom of your homepage doesn’t cut it anymore. Regulators worldwide now enforce these rules actively, so if your site serves visitors in the European Union, the United Kingdom, or states like California, you need to block tracking scripts before a user gives permission.
Meanwhile, browsers are phasing out third-party cookies, so first-party data and consent signals matter more than ever. If you run ads or use analytics, Google Consent Mode v2 is now a strict requirement for European traffic, and without it your measurement tools stop working correctly. A modern cookie consent capability isn’t optional anymore.
Fortunately, you don’t need to be a legal expert to get this right. Modern tools scan your site, categorize cookies, and block scripts automatically, building real trust with your visitors while keeping your site protected, which is exactly where these two options come in.

What Is CookieYes?
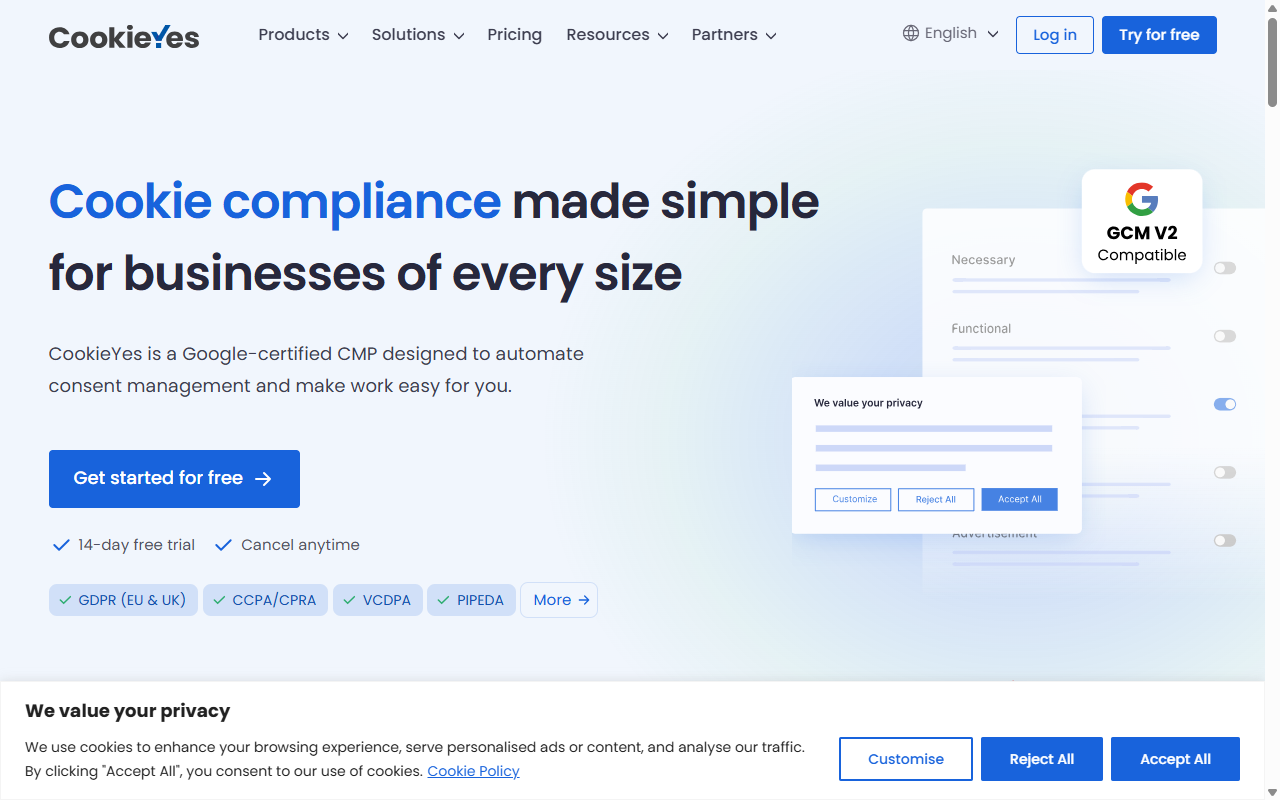
CookieYes is a widely recognized cloud-based consent management platform that works across various website platforms, helping owners set up cookie banners and handle compliance through an external service. Since it runs in the cloud, you configure settings through their portal rather than inside WordPress, handy if you manage sites on different systems, though it adds another login to your day.
If you’d rather have one central hub for compliance across a mixed client portfolio, this cloud-first approach helps: a structured environment to adjust settings, review consent logs, and customize templates. It also means your site relies on external servers to deliver the banner, worth keeping in mind as you plan.
Key Features of CookieYes
- Scans your website to discover and categorize active cookies automatically.
- Displays a customizable consent banner designed for your visitor’s location.
- Records consent preferences in a centralized cloud log for audit compliance.
- Integrates with major platforms, tag managers, and content management systems.
- Translates your privacy banner into dozens of languages based on browser settings.
- Respects Global Privacy Control signals sent by privacy-focused browsers.
For growing sites or agencies that need more, CookieYes offers paid monthly subscriptions unlocking geo-targeting, custom branding, and larger scan capacities. Find their exact, current pricing on the CookieYes website.
Pros and Cons of CookieYes
On the plus side, CookieYes is genuinely flexible. Since it isn’t tied to WordPress, you can use it on nearly any platform, scanning is reliable, and the interface is clean and professional. It also stays current with standards like Google Consent Mode v2, keeping your marketing campaigns running smoothly.
On the other hand, setup can feel disconnected. An external dashboard means copying script codes back and forth between WordPress and the CookieYes cloud app (this trips up a lot of people). And if traffic spikes past your monthly view limit on the entry-level plan, your banner may stop showing, or you’ll need to upgrade quickly to stay compliant.
The Verdict on CookieYes
CookieYes is a solid pick if you run sites across platforms, like Shopify, Webflow, and WordPress, and want one tool to manage them all. It’s mature and specialized, doing exactly what it promises, as long as you don’t mind another external account and recurring fees as your traffic grows.
What Is Cookie Consent?
On the other side, there’s Cookie Consent, Elementor’s native cookie consent capability built for WordPress. It operates entirely within your WordPress dashboard, built for creators who want a simpler setup, manage compliance where they build content, and skip extra subscriptions.
Because it’s WordPress-native, it feels like a natural extension of your website builder, with no external API keys, script insertions, or disconnected dashboards. It’s included as part of the Elementor ecosystem, so it integrates neatly with your design tools. If you’re already building with Elementor, cookie consent is a natural fit.

Key Features of Cookie Consent
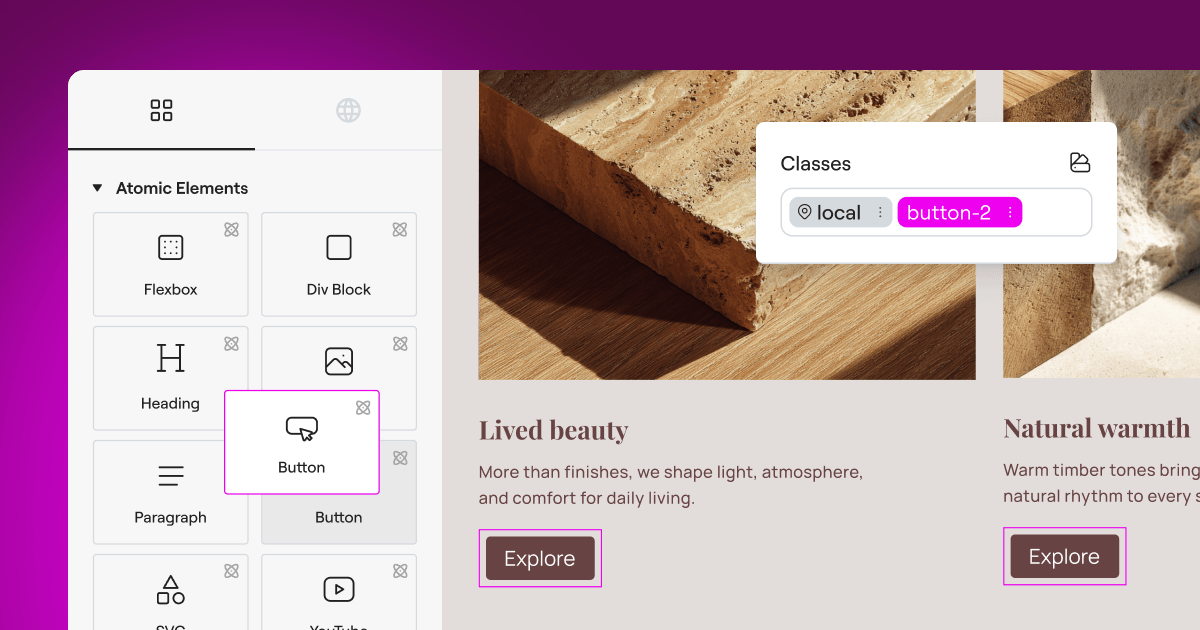
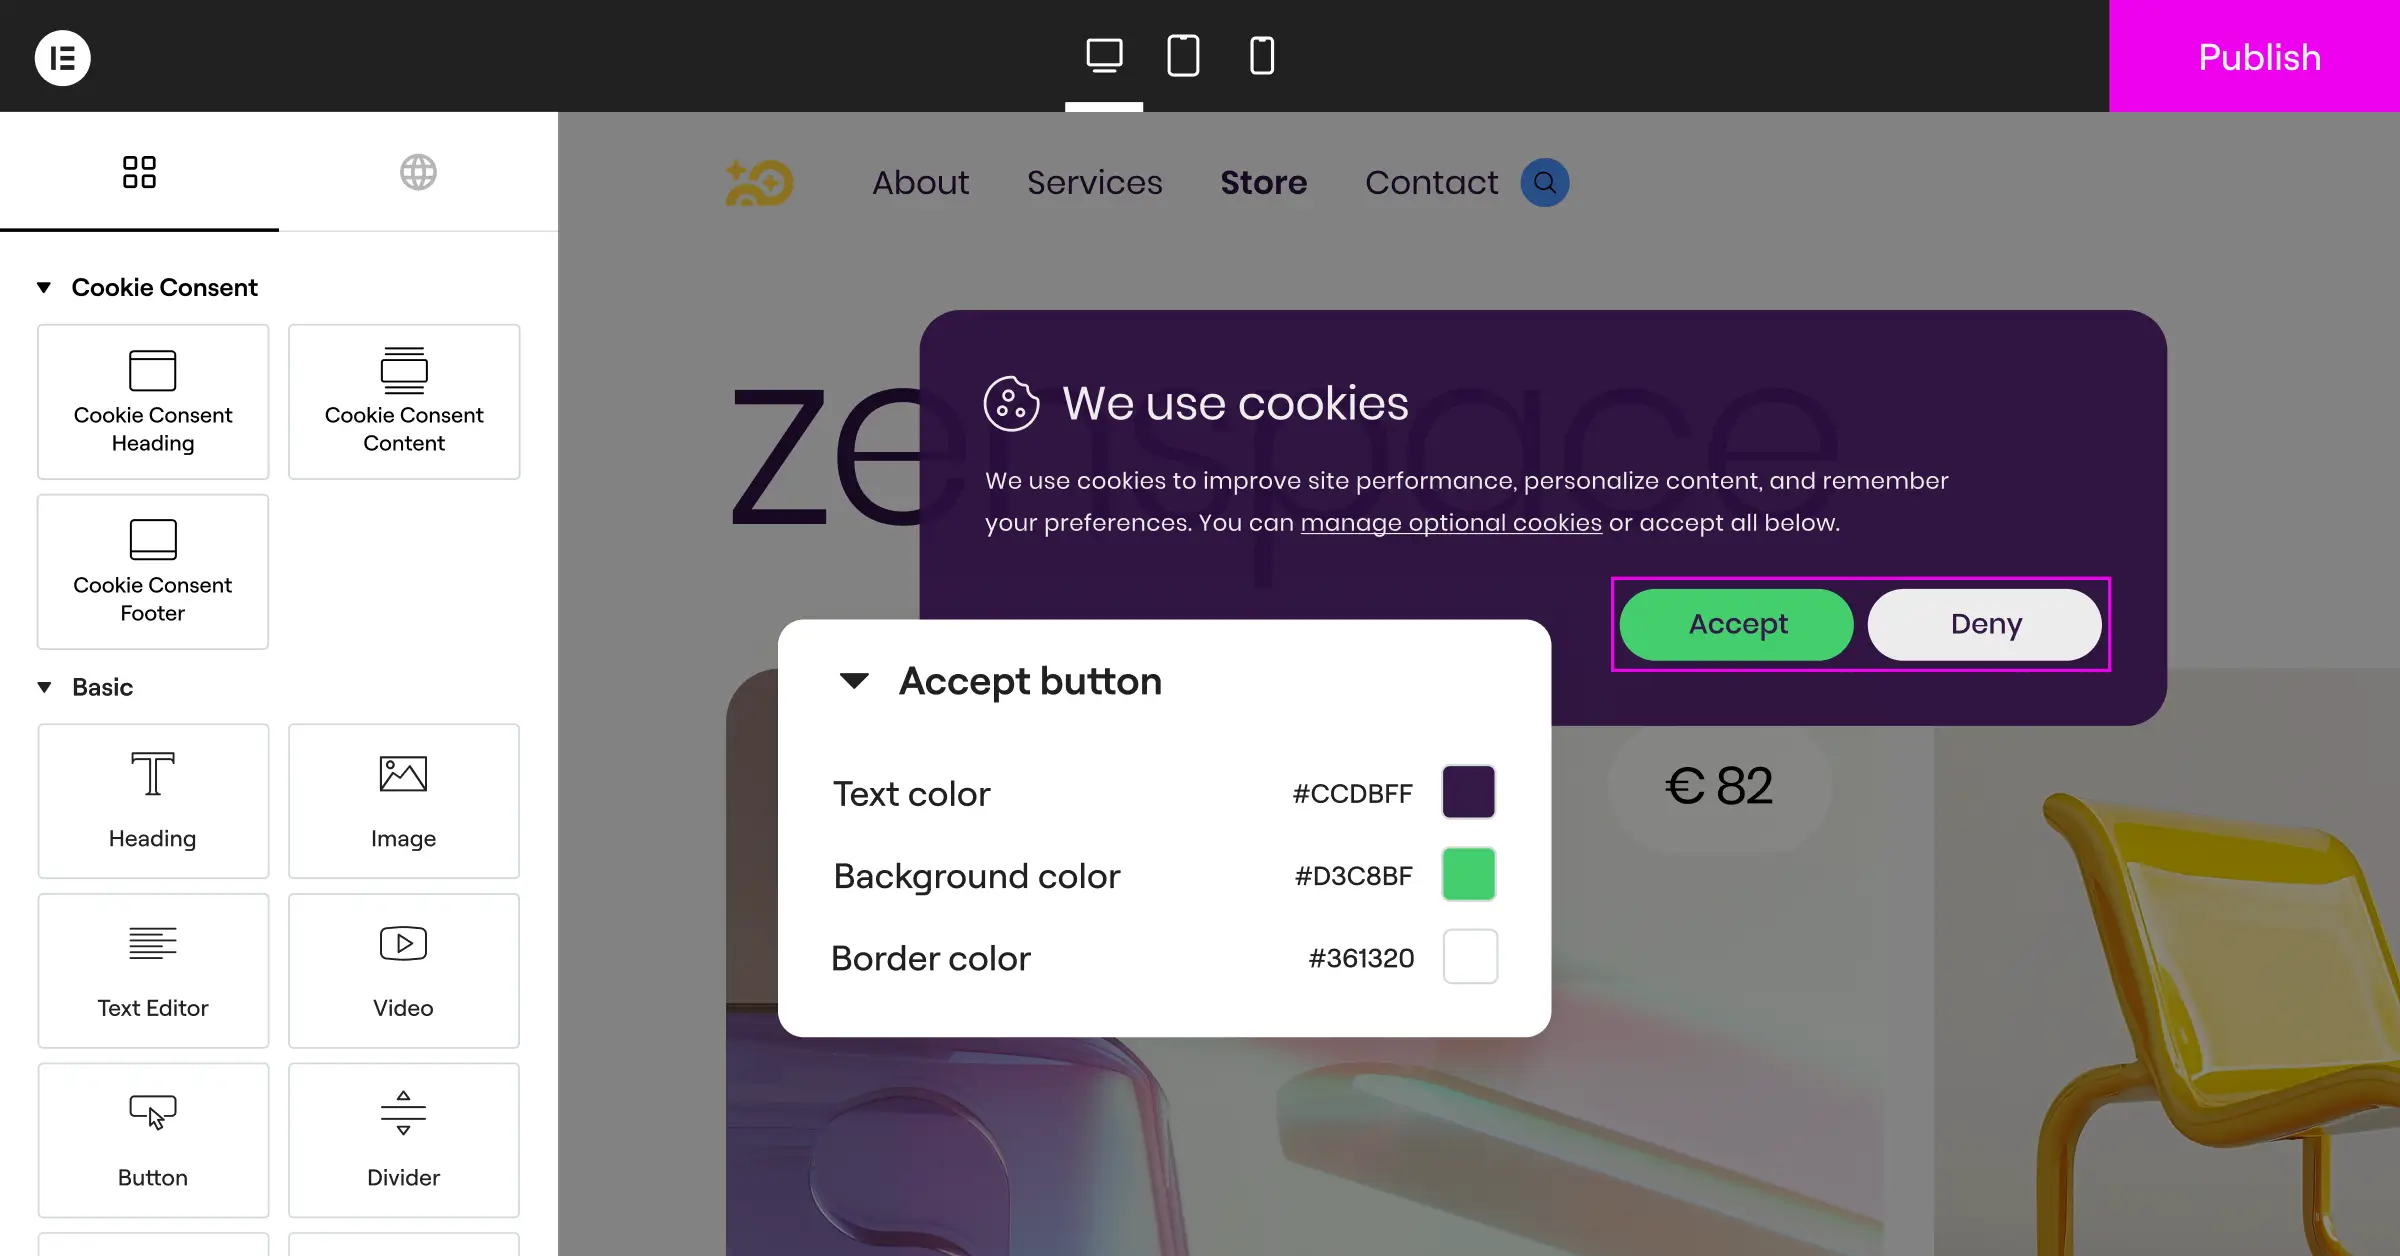
- Manages all consent settings, scripts, and banners directly from the WordPress dashboard.
- Builds beautiful, custom-branded consent banners using your familiar design tools.
- Saves detailed consent logs on your server to keep you ready for audits.
- Enforces compliance with major standards, including GDPR, UK GDPR, and CCPA.
- Connects smoothly with Google Consent Mode v2 to protect your marketing data.
- Deploys targeted banners based on user location using built-in geo-targeting capabilities.
Cookie Consent includes a generous entry-level plan, so you can start with no financial commitment. For professional creators and agencies, it’s part of Elementor One, a complete compliance and performance suite. And since it’s self-hosted, you won’t worry about monthly view limits or overage charges as your content takes off.
Pros and Cons of Cookie Consent
The biggest benefit is how much it simplifies your workflow. Since everything’s native to WordPress, you configure your banner, categorize cookies, and check compliance logs without logging into an external app. It’s fast to set up too, under five minutes start to finish, and the design customization lets you match your banner to your brand perfectly (a relief if stiff templates have tripped you up before).
As for limits, since it’s built specifically for WordPress, it can’t be used on other platforms like Shopify or custom-coded sites. If your whole digital presence runs on WordPress, that’s a perfect match, but a mixed network of platforms means you’ll need other methods for your non-WordPress properties.
The Verdict on Cookie Consent
For WordPress site owners and agencies who want a fast, affordable, deeply integrated compliance solution, Cookie Consent is a fantastic choice. It cuts out the hassle of external accounts, offers unlimited views without extra fees, and fits naturally into your existing creative toolkit.
“Modern privacy compliance is no longer about slapping a simple banner on your site and hoping for the best. It requires clear logging, adaptive setups, and a commitment to visitor trust.”Itamar Haim, Web Compliance Specialist
Feature-by-Feature Comparison
Now that we’ve covered both options, here’s how they compare across what matters most day-to-day, from design to data tracking.
Where Do You Manage Your Settings?
This is the most obvious difference. With CookieYes, you manage banners, cookie categorizations, and consent logs on their cloud platform, then use a WordPress connector or code snippet to display it on your site. It works well, but adds a layer to your workflow.
With native Cookie Consent, everything lives in your WordPress admin menu. Scan your scripts, adjust banner styles, and export compliance logs without leaving your website, keeping your setup clean and easy to manage.
How Does Script Scanning Work?
Both platforms automate finding and blocking cookies. CookieYes scans your site from its cloud servers, sorting known trackers into standard categories like necessary, functional, analytics, and advertisement.
The Cookie Consent tool does this directly within WordPress, scanning your active scripts and plugins so you can organize and block them until visitors give their okay, making it easy to see exactly what’s running on your server in real time.
Is Google Consent Mode v2 Supported?
If you run Google Ads or use Google Analytics 4, this matters. Both CookieYes and the native Cookie Consent tool fully support Google Consent Mode v2, communicating visitor choices directly to Google’s tags so you can collect aggregate, privacy-safe data even when users decline tracking, staying compliant with strict European rules.
Can You Target Banners by User Location?
Not every visitor needs the same banner. A visitor from Germany requires a strict opt-in banner, while one from a region with looser rules might only need a simple notice. Both tools offer geo-targeting: CookieYes through its cloud settings, the native Cookie Consent tool through built-in location detection that shows the right banner automatically, keeping things smooth and professional.

Comparison Matrix
To help you visualize how these two options compare, here’s a quick, factual side-by-side look at their core features, setup workflows, and management models.
| Feature / Capability | CookieYes | Cookie Consent (Native) |
|---|---|---|
| Dashboard Location | External Cloud App | Native WordPress Dashboard |
| Setup Time | Moderate (Requires code/connector) | Very Fast (Under 5 minutes) |
| Google Consent Mode v2 | Supported | Supported |
| Design Customization | Cloud-based templates | Deep design integration |
| Consent Logging | Stored on cloud servers | Stored locally on your server |
| Monthly View Limits | Yes (Varies by plan) | No limits (Self-hosted) |
| Geo-Targeting | Available on paid tiers | Included in premium setups |
Other Notable Tools in the Compliance Space
CookieYes and the native Cookie Consent tool are both strong options, but they’re not the only ways to manage compliance. Depending on your business size and needs, here are a few other established alternatives worth knowing.
Cookiebot
Cookiebot is a well-known cloud-based consent management service recognized for detailed cookie scans and automated reports. Corporate websites needing thorough tracking documentation widely use it. It operates through an external cloud dashboard, similar to CookieYes. Pricing scales with your site’s traffic, so check their current plans as your audience grows.
Complianz
Complianz is a dedicated compliance tool built for the WordPress ecosystem. It focuses heavily on legal localization, helping you generate customized privacy policies and legal documents based on your location and audience. It’s a strong choice for European businesses wanting a step-by-step legal wizard inside their WordPress admin area.
iubenda
iubenda provides a complete, professional suite of compliance tools covering privacy policies, terms and conditions, and cookie consent banners. Legal professionals regard it highly since its templates are regularly updated to reflect changing global laws, a great option if you need a full legal framework beyond just a cookie banner.
OneTrust
OneTrust is an enterprise-grade privacy and risk management platform for large corporations and global organizations. It goes far beyond simple cookie banners, offering data mapping, vendor risk assessment, and user preference management. Given its scale, it’s generally more than most WordPress site owners need, but it’s a recognized enterprise standard.
How to Choose the Best Solution for Your Site
Making your final decision doesn’t have to be difficult. It comes down to how you prefer to build and run your website. Here are three typical scenarios to help you see which path fits.
- The Dedicated WordPress Creator: If you build and manage all your sites on WordPress and like keeping admin tasks simple, the native Cookie Consent tool is the clear winner. It saves you from extra accounts, works beautifully with your design, and has no traffic limits. It’s also part of the broader Elementor ecosystem, alongside tools like Web Accessibility.
- The Multi-Platform Agency: If you run a web design agency managing a mix of WordPress, Shopify, and custom-coded client sites, CookieYes might be more practical. It lets you monitor and update consent banners across your client portfolio from one centralized cloud dashboard, even across different platforms.
- The Budget-Conscious Startup: If you’re starting out and want to avoid recurring software fees, the entry-level plan of the native Cookie Consent capability is a smart pick. It gives you a complete, modern consent setup with Google Consent Mode v2 support and no hidden traffic limits, so you can grow safely and legally.
No matter which option you choose, the important part is taking action. Setting up a reliable, modern cookie consent system protects your business, helps your search performance, and shows visitors you respect their data. It’s a small time investment that pays real dividends in trust and security.
Frequently Asked Questions
Do I really need a cookie consent banner on my WordPress site?
Yes, if you have visitors from the European Union, the United Kingdom, California, or other regions with active privacy laws, since these laws apply based on where visitors live, not where your business is based. And if you use tracking tools, analytics, or run ads, a compliant banner is required to keep your data flowing legally.
What is Google Consent Mode v2 and why does it matter?
Google Consent Mode v2 lets your website communicate users’ privacy choices directly to Google services like Google Ads and Google Analytics. If a visitor declines cookies, the system automatically sends anonymous, privacy-safe signals instead of detailed tracking data. It’s now a strict requirement for running effective ad campaigns in Europe.
Does a native cookie consent tool slow down my website?
Generally, no. A native tool like Cookie Consent runs directly within your existing WordPress environment and doesn’t need external database requests to load banner styles, which keeps page load speeds fast, good for both user experience and search performance.
What does “Cookie Consent” refer to in the Elementor ecosystem?
Cookie Consent is Elementor’s native compliance capability for WordPress, handling everything from banner display to script blocking and consent logging, all from your WordPress dashboard. It integrates naturally with your Elementor workflow and removes the need for any external consent management platform.
Can I customize the design of my cookie banner to match my brand?
Yes, both tools allow customization, but the native Cookie Consent tool has a clear edge. Built directly into your WordPress environment, it lets you use familiar design controls to match your site’s typography, colors, and layout, so the banner feels like a natural part of your site rather than an afterthought.
Is my website’s cookie consent data safe when stored locally?
Storing your consent logs on your WordPress server is a secure practice that keeps you in complete control of your compliance records without sharing visitor data with third-party platforms. It also makes it easy to export audit trails from your dashboard when you need to demonstrate compliance.
What happens if I exceed my monthly banner views on CookieYes?
On the CookieYes entry-level plan, there are limits on page views and scans each month. If your site gets a sudden burst of traffic and goes over those limits, your banner may stop displaying, or you’ll be prompted to upgrade to a paid plan. That’s one reason many growing sites prefer self-hosted, unlimited native solutions.
Does Cookie Consent support Global Privacy Control (GPC)?
Yes, modern cookie consent tools, including CookieYes and the native Cookie Consent capability, are designed to recognize and respect Global Privacy Control signals. When a visitor has GPC enabled in their browser, the system automatically honors their privacy preferences without requiring a manual opt-out on your banner.


