
If privacy regulations feel like a moving target, you’re not alone. The good news: building privacy into your WordPress code from day one is easier than it sounds, and it pays off in real trust with your users, not just a checked legal box. Let’s code with a Privacy by Design mindset, so you’re not rewriting everything later.
Key Takeaways
- Privacy by Design (PbD) means integrating user privacy directly into your system architecture instead of patching it on later.
- Data minimization prevents database bloat and reduces your security liability by only storing what you absolutely need.
- Consent management must be clear, transparent, and easy to configure directly from your main dashboard.
- WordPress core tools can be extended to handle custom data export and deletion requests automatically.
- Third-party dependencies like Google Fonts and Gravatars should be hosted locally to prevent unintended IP leaks.
Understanding Privacy by Design in the WordPress Ecosystem
Building great sites in 2026 means looking past privacy policies and cookie banners. Privacy by Design is an engineering philosophy: privacy isn’t bolted on right before launch, it’s a core structural requirement. Every query, block, or API you wire up shapes how well your users’ data stays protected, and getting those choices right early saves a stressful refactor later.
The core idea: data stays private by default, without users digging through settings pages. That’s what search engines, clients, and regulators expect from a modern build. WordPress gives you a head start, but its themes, third-party code, and database structures mean data can slip through the cracks if you’re not careful. Let’s break this into steps you can use.
Data Minimization: Writing Clean Code That Limits Exposure
The simplest way to protect user data is skipping it. Skip storing an IP address, phone number, or address, and nobody can steal it. Data minimization means collecting only what a feature needs, so ask yourself if you really need every field you’re requesting.
Contact form entries often sit in your database indefinitely unless you clean them up. Here’s a scheduled function that purges old entries automatically using WordPress’s native cron:
// Schedule a daily event to clean up old submission logs
if ( ! wp_next_scheduled( 'my_custom_daily_cleanup' ) ) {
    wp_schedule_event( time(), 'daily', 'my_custom_daily_cleanup' );
}
add_action( 'my_custom_daily_cleanup', 'my_purge_old_submissions' );

function my_purge_old_submissions() {
    global $wpdb;
    $table_name = $wpdb->prefix . 'custom_form_submissions';
    // Set the threshold (for example, delete records older than 30 days)
    $threshold_date = date( 'Y-m-d H:i:s', strtotime( '-30 days' ) );
    // Perform the safe deletion query
    $wpdb->query(
        $wpdb->prepare(
            "DELETE FROM $table_name WHERE submission_date < %s",
            $threshold_date
        )
    );
}
Design your tables with privacy in mind from the start. Keep sensitive information separate from the rest, and clear out old transients and options regularly. (Plenty of sites quietly haul around gigabytes of useless rows.)
Designing Your Database with Privacy in Mind
Follow a few steps to keep new projects aligned with these habits:
- Audit your form fields: Drop non-essential inputs, like a phone number field when email already works.
- Set automatic expiration dates: Use short-lived transients or scheduled cleanups for session data and logs.
- Anonymize user metadata: Strip out names and location details before saving analytics records.
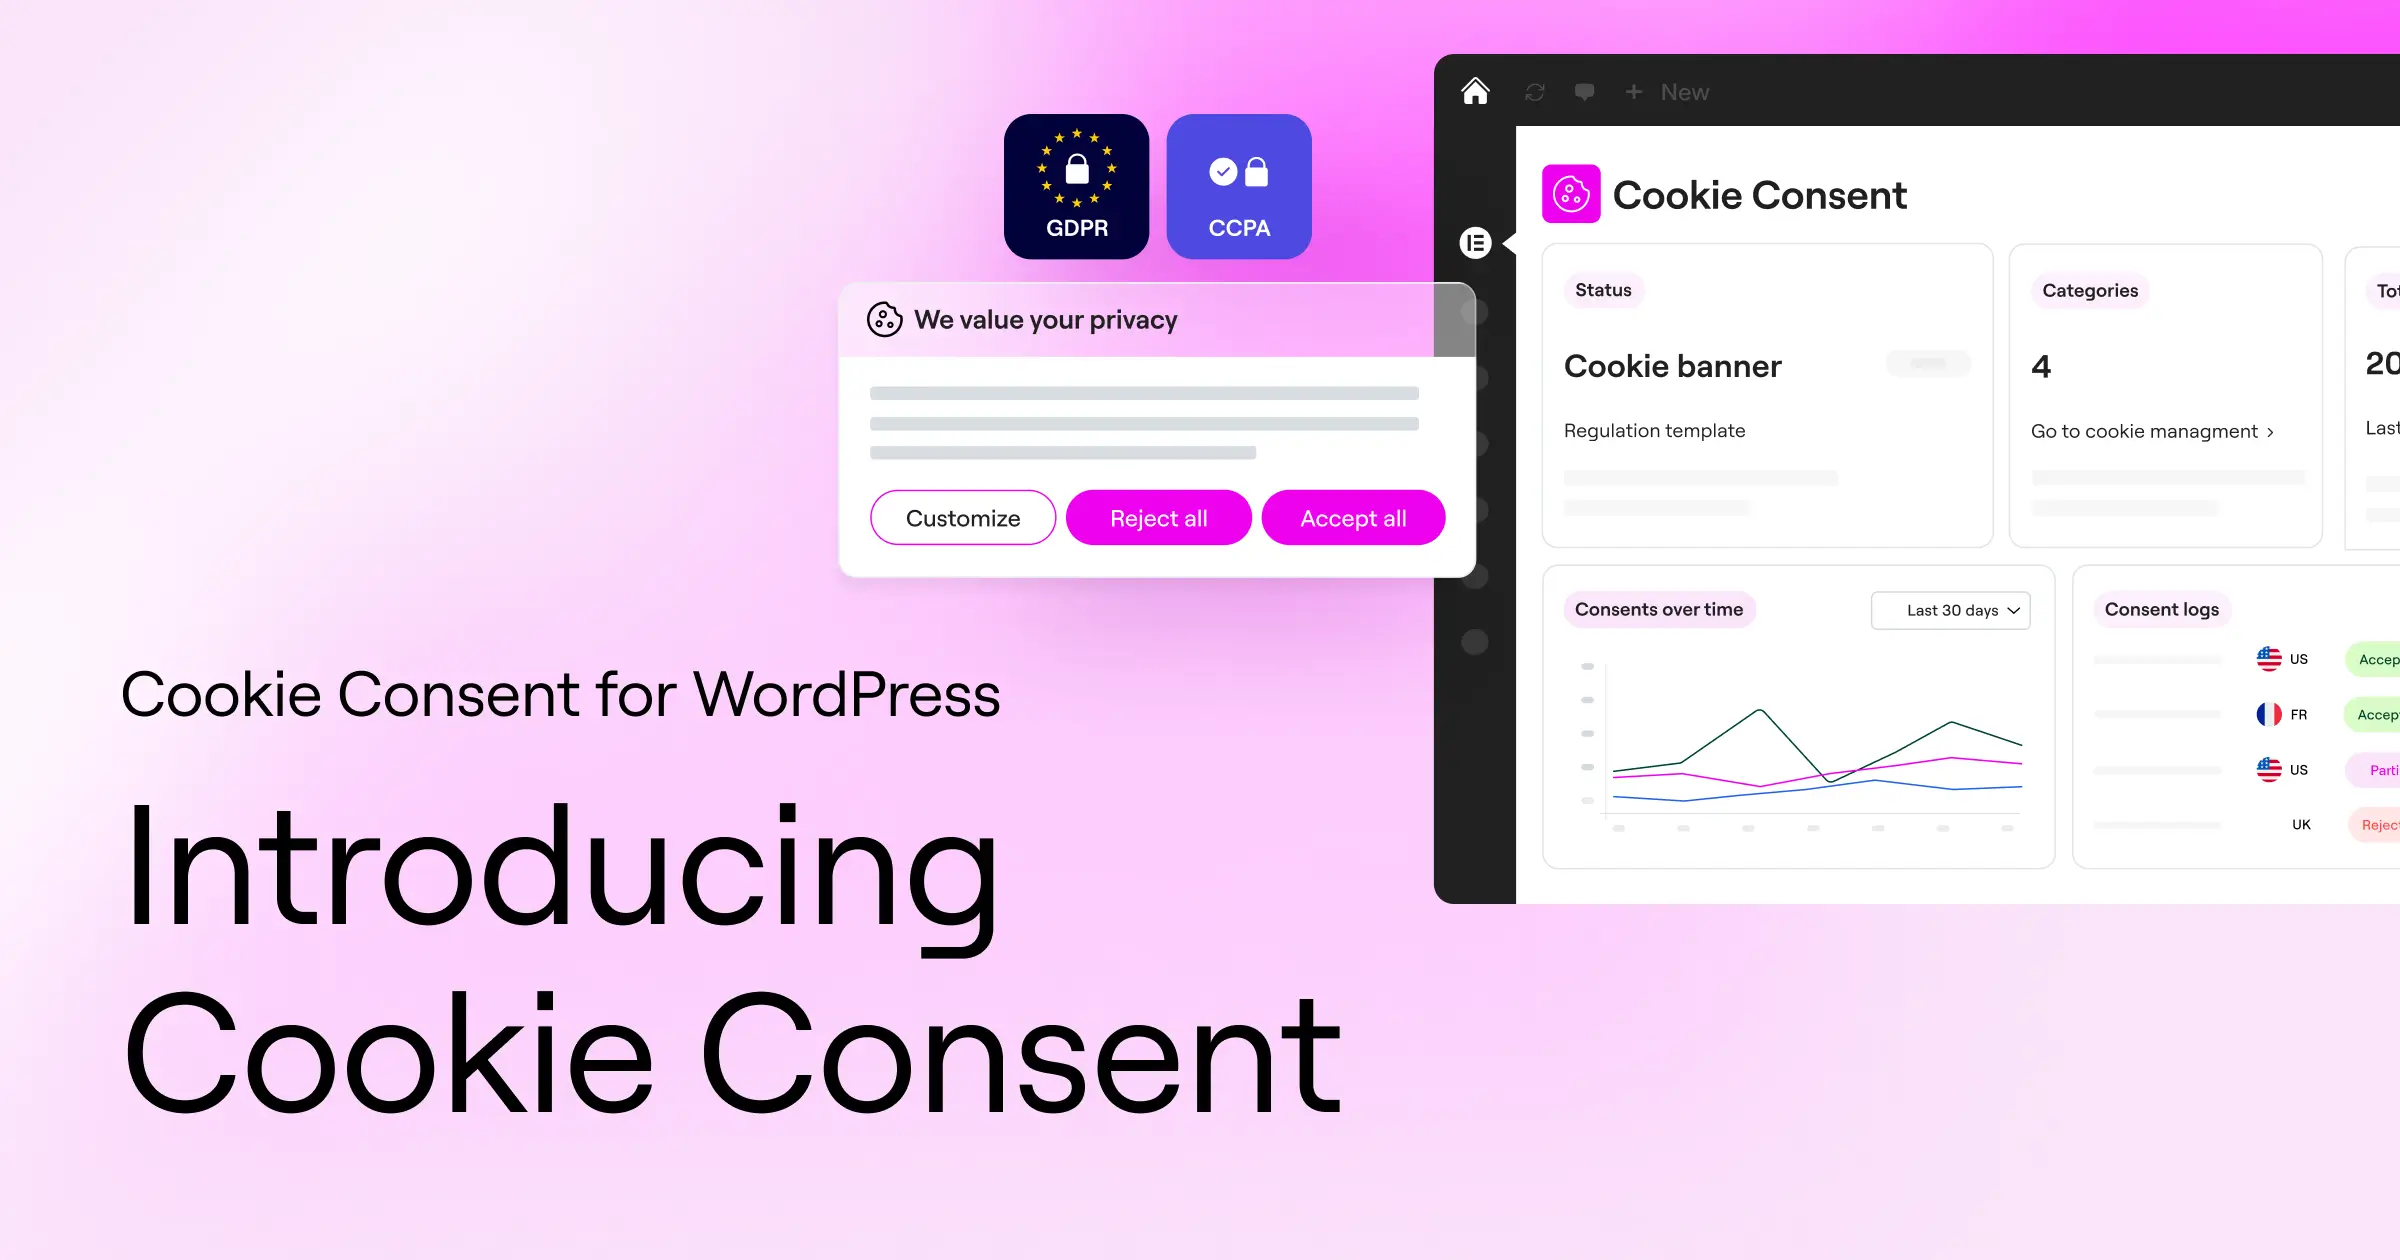
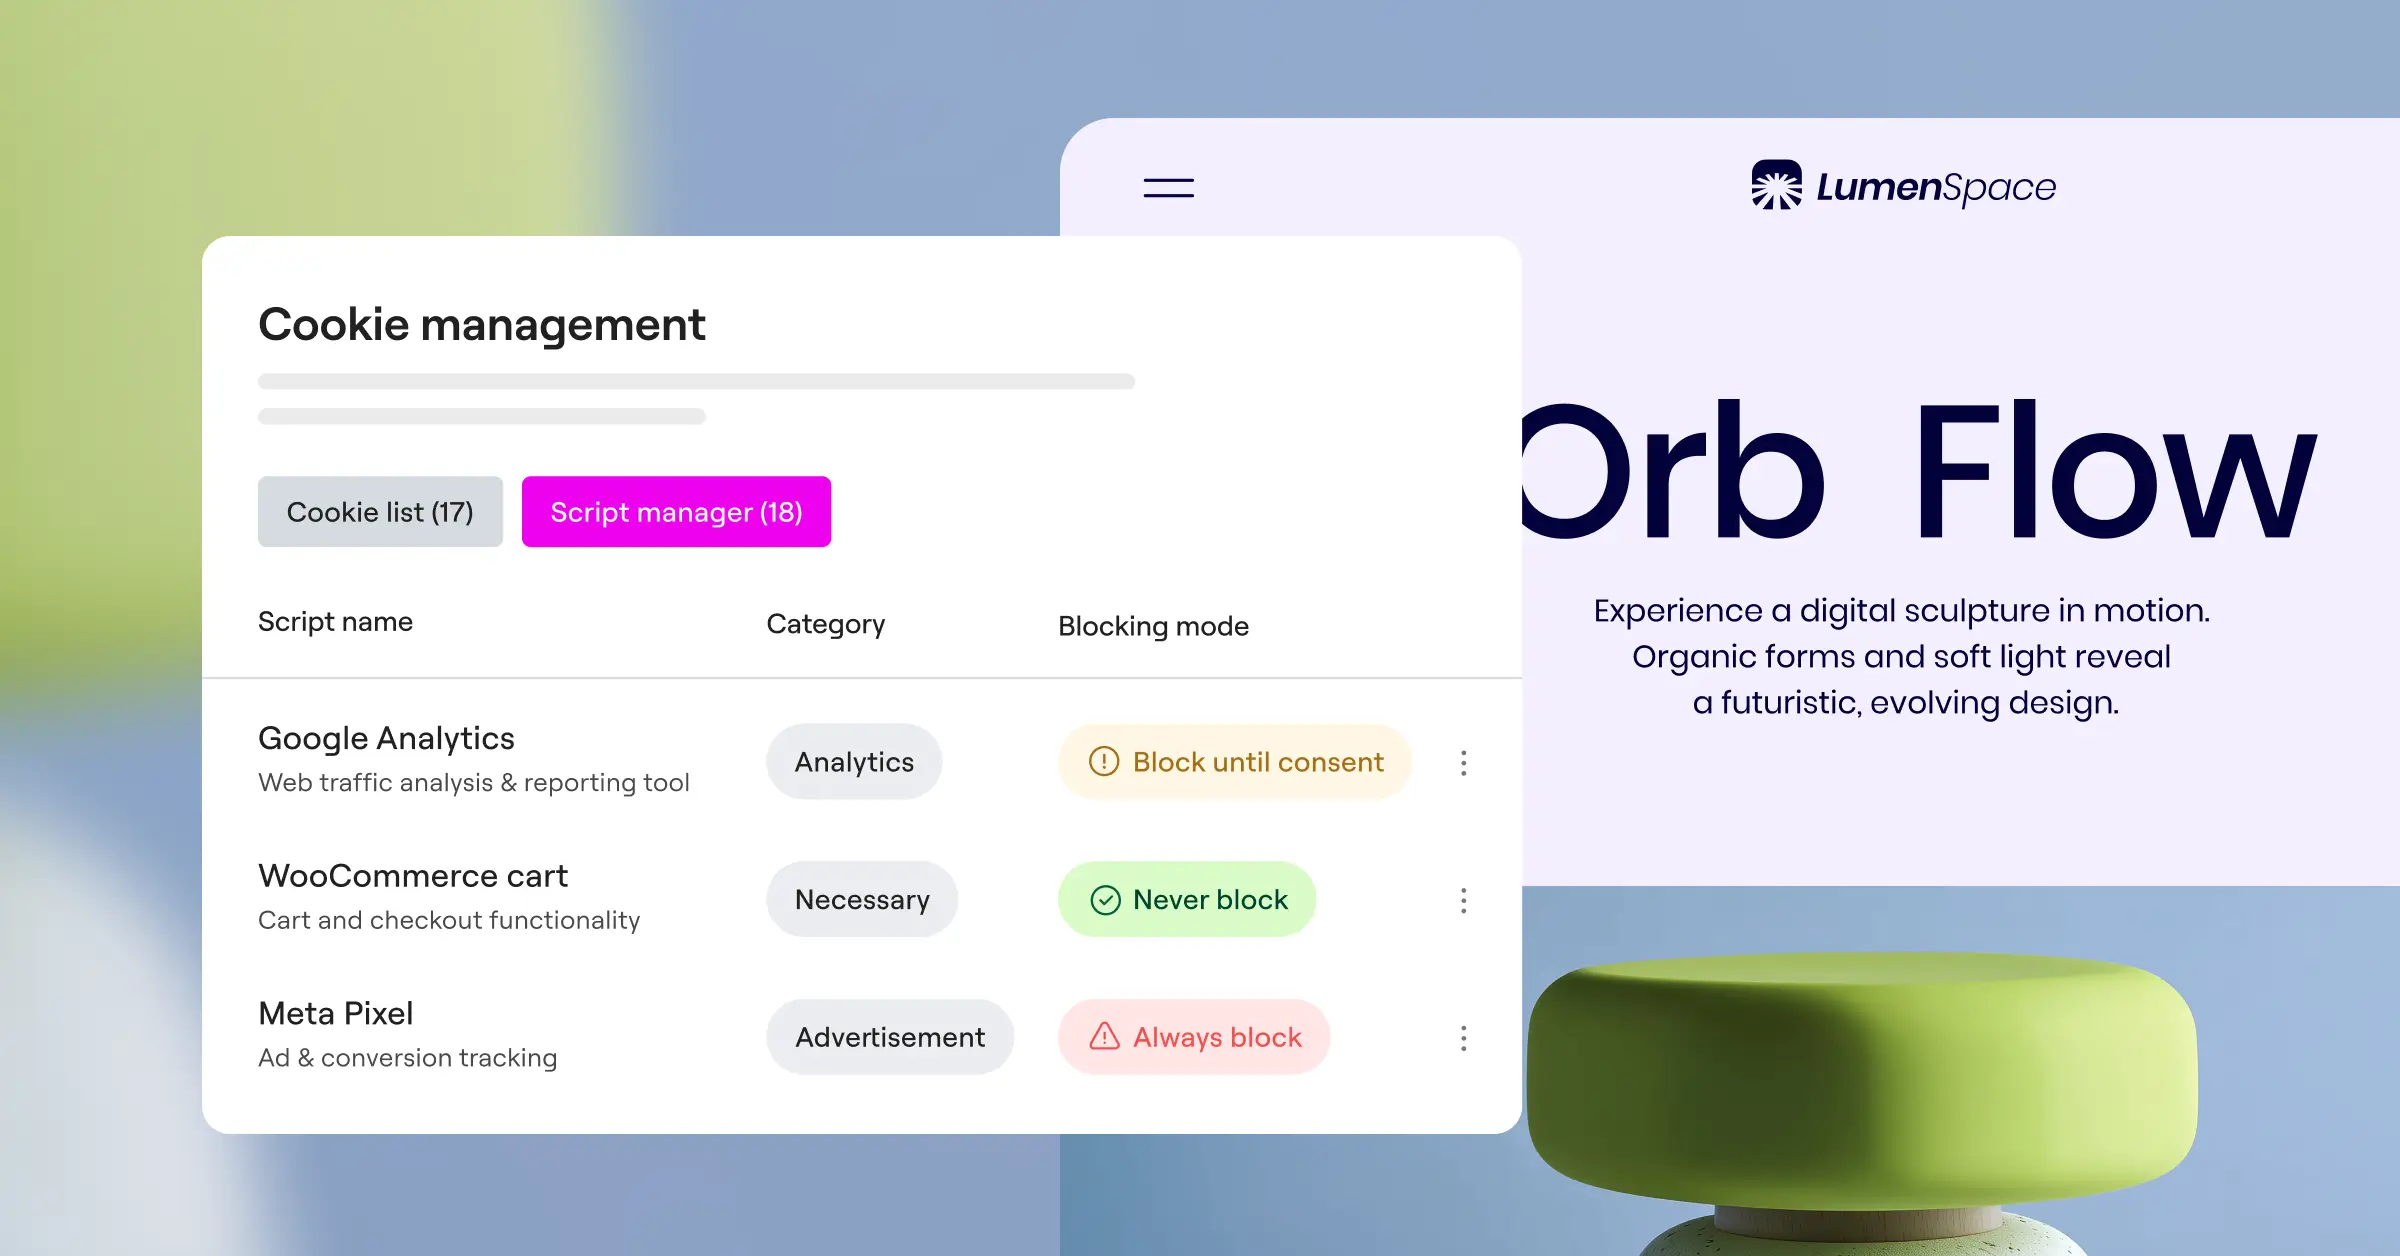
Managing Cookie Consent and Script Executions Safely
Managing how cookies and scripts load is a top technical priority. Users want clear choices, and a solid setup blocks non-essential trackers until someone opts in.
A native dashboard tool is the easiest way to handle this, no bouncing between portals. That’s where Cookie Consent, a built-in privacy capability by Elementor, comes in: it scans cookies, categorizes scripts, and logs consent right in the WordPress dashboard, so the browser never loads trackers before a visitor consents.

“Implementing a native consent process isn’t just a legal checkbox, it’s a real shift in respecting user autonomy. Keeping everything inside WordPress means performance never suffers external latency.”
– Itamar Haim, Web Compliance Specialist
A native cookie consent tool keeps compliance built right into your layout. Here’s what to expect from a solid one:
- Blocks tracking scripts automatically until a user makes their consent selection.
- Scans your pages regularly to identify and categorize new cookies.
- Logs consent events securely for an accurate audit trail.
- Customizes your banner’s styling to match your theme.
- Adjusts visibility by the user’s location using modern IP lookup tools.
- Detects Global Privacy Control (GPC) signals to respect opt-out choices immediately.
Native script handling also skips conflicting integrations: code stays organized, queries stay lean, and one place controls every external connection.
Comparing WordPress Consent Management Approaches
How you manage tracking scripts and cookie banners depends on your team’s size and project complexity. Here’s how native WordPress options compare to external frameworks and manual coding.
| Approach | Dashboard Type | Script Control Method | Setup Speed | Client Maintenance Complexity |
|---|---|---|---|---|
| Cookie Consent (Native) | WordPress Native Dashboard | Built-in core script manager | Under 5 minutes | Very Low (native controls) |
| Cookiebot | External SaaS Dashboard | External cloud injection | Moderate | Medium (requires external login) |
| CookieYes | Hybrid Dashboard | Cloud-managed script blocking | Moderate | Medium |
| Complianz | WordPress Dashboard | Local script wrapper | Slow (complex wizard) | High (many settings screens) |
| Custom Code | None / Hardcoded | Manual theme hooks | Very Slow | Extremely High (requires developer) |
A native WordPress cookie consent system hits the sweet spot for most creators: you keep full ownership of your data, skip subscription dependencies, and your client manages everything from an interface they already know.
Anonymizing User Connections and Eliminating IP Leaks
Every time a browser requests an external asset, it hands the user’s IP address to a third party. WordPress themes have long leaned on CDN fonts and Gravatars. Real privacy by design means hosting assets on your own server instead.
Start with Gravatars: turning them off stops emails and IP data from quietly reaching external avatar networks whenever someone loads a comment section:
// Disable Gravatars and use a safe, local default avatar
add_filter( 'get_avatar', 'my_custom_local_avatar', 10, 5 );
function my_custom_local_avatar( $avatar, $id_or_email, $size, $default, $alt ) {
    // Generate a secure, generic local SVG avatar path
    $local_avatar_url = get_template_directory_uri() . '/assets/images/default-avatar.png';
    // Return a clean, local image tag
    return '<img alt="' . esc_attr( $alt ) . '" src="' . esc_url( $local_avatar_url ) . '" class="avatar avatar-' . esc_attr( $size ) . ' photo" height="' . esc_attr( $size ) . '" width="' . esc_attr( $size ) . '" />';
}
Google Fonts are next. Pulling them from Google’s servers used to be standard, but it costs visitors privacy. Download the WOFF2 files, upload them to your theme folder, and reference them in your stylesheet to stop trackers from seeing who’s browsing.
Step-by-Step Local Font Hosting
Hosting fonts locally is simpler than it sounds (really, it is). Follow these steps to lock down your typography:
- Download your fonts: Grab WOFF2 files from an open-source provider for the families you’re using.
- Upload to your theme folder: Place them in a
/assets/fonts/folder inside your child theme. - Write local CSS rules: Define your font families using a native CSS
@font-facedeclaration pointing to your local file.
Handling Data Portability and Erasure Requests
Modern privacy law gives users the right to a full data copy, or to have it erased. WordPress covers this under the Tools menu (Export Personal Data, Erase Personal Data), but custom tables aren’t included automatically, so you point WordPress to them yourself.
Registering a custom exporter just takes a filter and a callback. Here’s a practical example:
// Register our custom exporter hook into WordPress core
add_filter( 'wp_privacy_personal_data_exporters', 'my_register_custom_exporter', 10 );
function my_register_custom_exporter( $exporters ) {
    $exporters['my-custom-plugin'] = array(
        'exporter_friendly_name' => __( 'My Custom Plugin Data', 'textdomain' ),
        'callback'               => 'my_custom_data_exporter_callback',
    );
    return $exporters;
}

// The callback function that fetches data for the user's email
function my_custom_data_exporter_callback( $email_address, $page = 1 ) {
    global $wpdb;
    $table_name     = $wpdb->prefix . 'custom_user_interactions';
    $data_to_export = array();

    // Query our custom table securely using the provided email address
    $results = $wpdb->get_results(
        $wpdb->prepare(
            "SELECT * FROM $table_name WHERE user_email = %s",
            $email_address
        )
    );

    if ( $results ) {
        foreach ( $results as $row ) {
            $data_to_export[] = array(
                'group_id'    => 'custom_user_interactions',
                'group_label' => __( 'Custom User Interactions', 'textdomain' ),
                'item_id'     => 'interaction-' . $row->id,
                'data'        => array(
                    array(
                        'name'  => __( 'Interaction Type', 'textdomain' ),
                        'value' => $row->interaction_type,
                    ),
                    array(
                        'name'  => __( 'Date Created', 'textdomain' ),
                        'value' => $row->interaction_date,
                    ),
                ),
            );
        }
    }

    return array(
        'data' => $data_to_export,
        'done' => true,
    );
}
Your own exporters and erasers protect clients from liability: an erasure request wipes every trace of that user’s data, no manual searches needed.
Building a Professional Erasure Protocol
Keep these habits in mind so your deletion code behaves reliably:
- Registers custom tables with the default WordPress privacy hooks so nothing gets missed.
- Fetches matching records with clean, prepared SQL statements to prevent injection.
- Formats exported data clearly so non-technical users can read it easily.
- Purges matching rows, or replaces personal details with anonymous values, when someone asks to be forgotten.
- Updates admin logs so you can prove compliance without keeping user data.
- Validates every request with a secure email confirmation before deleting anything.

Hardening Your API Integrations and Webhooks
Talking to an external platform moves data outside your secure environment, a common source of leaks. Real Privacy by Design keeps API calls and webhooks encrypted and minimal.
Instead of sending a marketing API a full profile, pass a unique hash or a few minimal fields, and sign webhooks with a secret key so receivers can confirm the payload’s integrity.
When writing API integration code, follow these steps to secure your connections:
- Verify SSL certificates: Never disable SSL verification in
wp_remote_postorwp_remote_getcalls, leavesslverifyset totrue. - Restrict access keys: Keep API secrets out of your database, store them as constants inside
wp-config.php. - Clean payload contents: Strip sensitive data like billing details or IP logs before sending to external endpoints.
Here’s a secure API post in practice, sending minimal data while keeping credentials safe:
function my_secure_api_post( $user_id, $action_name ) {
    // Retrieve our user email securely
    $user_info = get_userdata( $user_id );
    if ( ! $user_info ) {
        return false;
    }

    // Hash the email to prevent sharing raw PII with third parties
    $hashed_identifier = hash_hmac( 'sha256', $user_info->user_email, wp_salt( 'auth' ) );

    // Build our minimal payload
    $body = array(
        'user_hash' => $hashed_identifier,
        'action'    => sanitize_key( $action_name ),
        'timestamp' => time(),
    );

    // Use WordPress secure HTTP helper functions
    $response = wp_remote_post(
        'https://api.external-service.com/v1/event',
        array(
            'method'      => 'POST',
            'timeout'     => 15,
            'redirection' => 5,
            'httpversion' => '1.1',
            'blocking'    => true,
            'headers'     => array(
                'Content-Type'  => 'application/json',
                'Authorization' => 'Bearer ' . defined( 'MY_API_SECRET_KEY' ) ? MY_API_SECRET_KEY : '',
            ),
            'body'      => wp_json_encode( $body ),
            'cookies'   => array(),
            'sslverify' => true, // Never set this to false in production!
        )
    );

    if ( is_wp_error( $response ) ) {
        // Log the safe error code without exposing personal data
        error_log( 'Secure API connection failed: ' . $response->get_error_message() );
        return false;
    }

    return true;
}
Protecting these integrations builds real trust, your data stays safe whether it’s in your database or moving elsewhere.
Best Practices for Theme and Plugin Development in 2026
Building modern sites means building habits that keep privacy at the forefront, and the most useful ones are often the simplest.
Start with regular local code audits: scan themes and custom code for files loading from third-party servers, and bring any external tracking scripts in-house. (It speeds up load times too.)
Keep these developer-focused habits in mind for your ongoing projects:
- Avoids heavy external frameworks for simple tasks like sliders or search inputs.
- Limits database writes by checking transients and options first.
- Prepares clear documentation showing clients where personal data lives and how to manage it.
- Isolates third-party scripts into hooks that only fire once a user grants permission.
- Explains cookie usage clearly using your native policy generator.
Before handing a project off, test your compliance setup. It’s easy to assume it’s working, but testing confirms your privacy guards are functional:
- Tests consent settings across browsers and private windows to confirm scripts stay blocked until consent is given.
- Documents database changes so future developers can maintain your export and deletion features.
- Updates core systems and capabilities like Elementor Cookie Consent regularly to keep privacy features working.
- Audits access levels on your admin screen so only trusted team members reach user logs.
If you’re on Elementor One, Cookie Consent comes alongside Web Accessibility in the same subscription, so both layers live in one dashboard. You can learn more about Cookie Consent on the Elementor blog.
Frequently Asked Questions
What is the difference between privacy by default and privacy by design?
Privacy by Design is the complete framework of designing systems with security and privacy in mind from the ground up. Privacy by Default is a subset of that framework: a system is pre-configured to protect user privacy automatically, without the user needing to change any settings.
Do I really need to host Google Fonts locally in 2026?
Yes, hosting Google Fonts locally is highly recommended for modern websites. When browsers load fonts from external servers, they pass the user’s IP address and device details directly to those services. Hosting files locally on your own server stops that data transfer and keeps your site faster and compliant.
How does a native cookie consent capability benefit site performance?
A native WordPress cookie consent tool processes consent rules locally instead of waiting for heavy external scripts to load. By handling script blockers directly in your theme hooks, your browser loads only the resources it needs, resulting in faster load times and better performance scores.
Can WordPress handle GDPR data requests automatically out of the box?
WordPress includes built-in export and erase tools under the Tools menu. But these native tools only know about default tables like comments and users. If your custom themes or custom code stores data in separate tables, you must hook into the WordPress privacy system to include that custom data in the native export files.
Does Google Consent Mode v2 require special coding for WordPress developers?
Yes, Google Consent Mode v2 requires scripts to pass consent state flags (such as ad_storage or analytics_storage) directly to Google’s tracking systems. Using a compliant native cookie consent capability makes this straightforward because it automatically maps user selections to Google’s consent framework.
Is it safe to store API credentials inside my theme files?
No. Store API credentials, security tokens, and database passwords as secure PHP constants inside your wp-config.php file, or retrieve them using WordPress transients or options tables that are kept private. Never place them in main theme files or templates.
What is Global Privacy Control (GPC) and why should I support it?
Global Privacy Control is a modern browser setting that lets users set a preference to automatically opt out of sharing or selling their personal data. Supporting GPC means your WordPress site reads this browser signal and applies strict privacy settings without forcing the user to interact with a popup banner.


