
Setting up cookie categories on your site can feel like one more chore on an already long list. Between shifting privacy laws and all the technical jargon floating around, it’s easy to not know where to start. But keeping your site compliant doesn’t have to be a headache, honestly. Whether you run a simple blog or a busy online shop, sorting your cookies into clear categories matters both for staying on the right side of the law and for earning your visitors’ trust. We’ll walk through the whole process step by step, showing you how to group, manage, and display your cookie options. It’s simpler than it looks, promise.
Key Takeaways
- Proper cookie categorization is required by major privacy laws like GDPR and CCPA.
- A WordPress-native compliance tool lets you manage everything right from your dashboard.
- You need to give visitors a clear choice before any non-essential tracking scripts load.
- Automated cookie scanning saves hours of manual work and keeps your lists current.
- Accurate consent logs protect your business if you’re ever audited for compliance.
What Are Cookie Categories and Why Do They Matter?
When someone lands on your website, all sorts of scripts and files get saved to their device. These are cookies, and they do everything from remembering a shopping cart to tracking how someone moves through your pages. Privacy laws require users to agree to these trackers, so you can’t just load them all by default. You need to group them into clear, understandable buckets so visitors can decide what they’re comfortable allowing.
That grouping is what we call cookie categorization. Get it wrong and you risk breaking your site or running afoul of privacy law, though it’s simpler than it sounds once you get the hang of it. Most compliance frameworks sort cookies into four distinct types, and here’s how those groups break down.
- Strictly Necessary Cookies – These keep your site running: logins, cart contents, security features. You don’t need visitor consent for these, but you do need to disclose that they exist.
- Functional Cookies – These remember visitor choices, like preferred language, region, or theme settings. They make the experience smoother but aren’t strictly required for the site to load.
- Performance and Analytical Cookies – These track how people use your site: which pages are popular, where visitors get stuck. Tools like Google Analytics fall here. You need explicit consent before running these in regions covered by GDPR.
- Targeting and Advertising Cookies – These track visitors across different websites to show them relevant ads. Marketing pixels from major social networks and ad platforms live here, and they always require active user consent.
Sorting your cookies properly keeps you compliant with privacy rules worldwide. If you serve visitors in the European Union or California, for example, you’re legally required to give them control over these individual groups. With the right Cookie Consent capability, setting up these groups and showing a banner that matches your site design is genuinely easy.
On WordPress, you can handle this using the built-in tools inside Elementor to manage both your layout and your privacy banner. Here’s how to configure these categories with modern, reliable tools.
“Properly classifying your website cookies is no longer just a technical best practice. It’s a fundamental pillar of user privacy. Getting your categories right keeps you compliant while showing your audience that you value their data security.”
– Itamar Haim, Web Compliance Specialist
How to Set Up Cookie Categories on Your Website
Setting this up doesn’t require a computer science degree. With the native Cookie Consent tool built for WordPress, you can handle the whole process right from your dashboard in just a few steps. Here’s the walkthrough.
Step 1: Scan Your Website for Active Cookies
Before you categorize anything, you need to know what cookies your site is actually running. Most modern tools can scan your site automatically and surface every active script, tracking code, and local storage element, from session trackers to external marketing pixels. Run a full scan first so you’ve got a complete inventory.

Step 2: Assign Each Cookie to a Specific Category
Once the scan finishes, you’ll see a full list of your cookies. The native Cookie Consent feature automatically categorizes the common ones for you, which saves a lot of manual work. For anything unrecognized, you can assign it yourself. Use this as your guide:
- Assign session IDs and security tokens to the Strictly Necessary category.
- Assign language switchers and user preferences to the Functional category.
- Assign Google Analytics and heatmap trackers to the Performance category.
- Assign retargeting pixels and ad network trackers to the Marketing category.

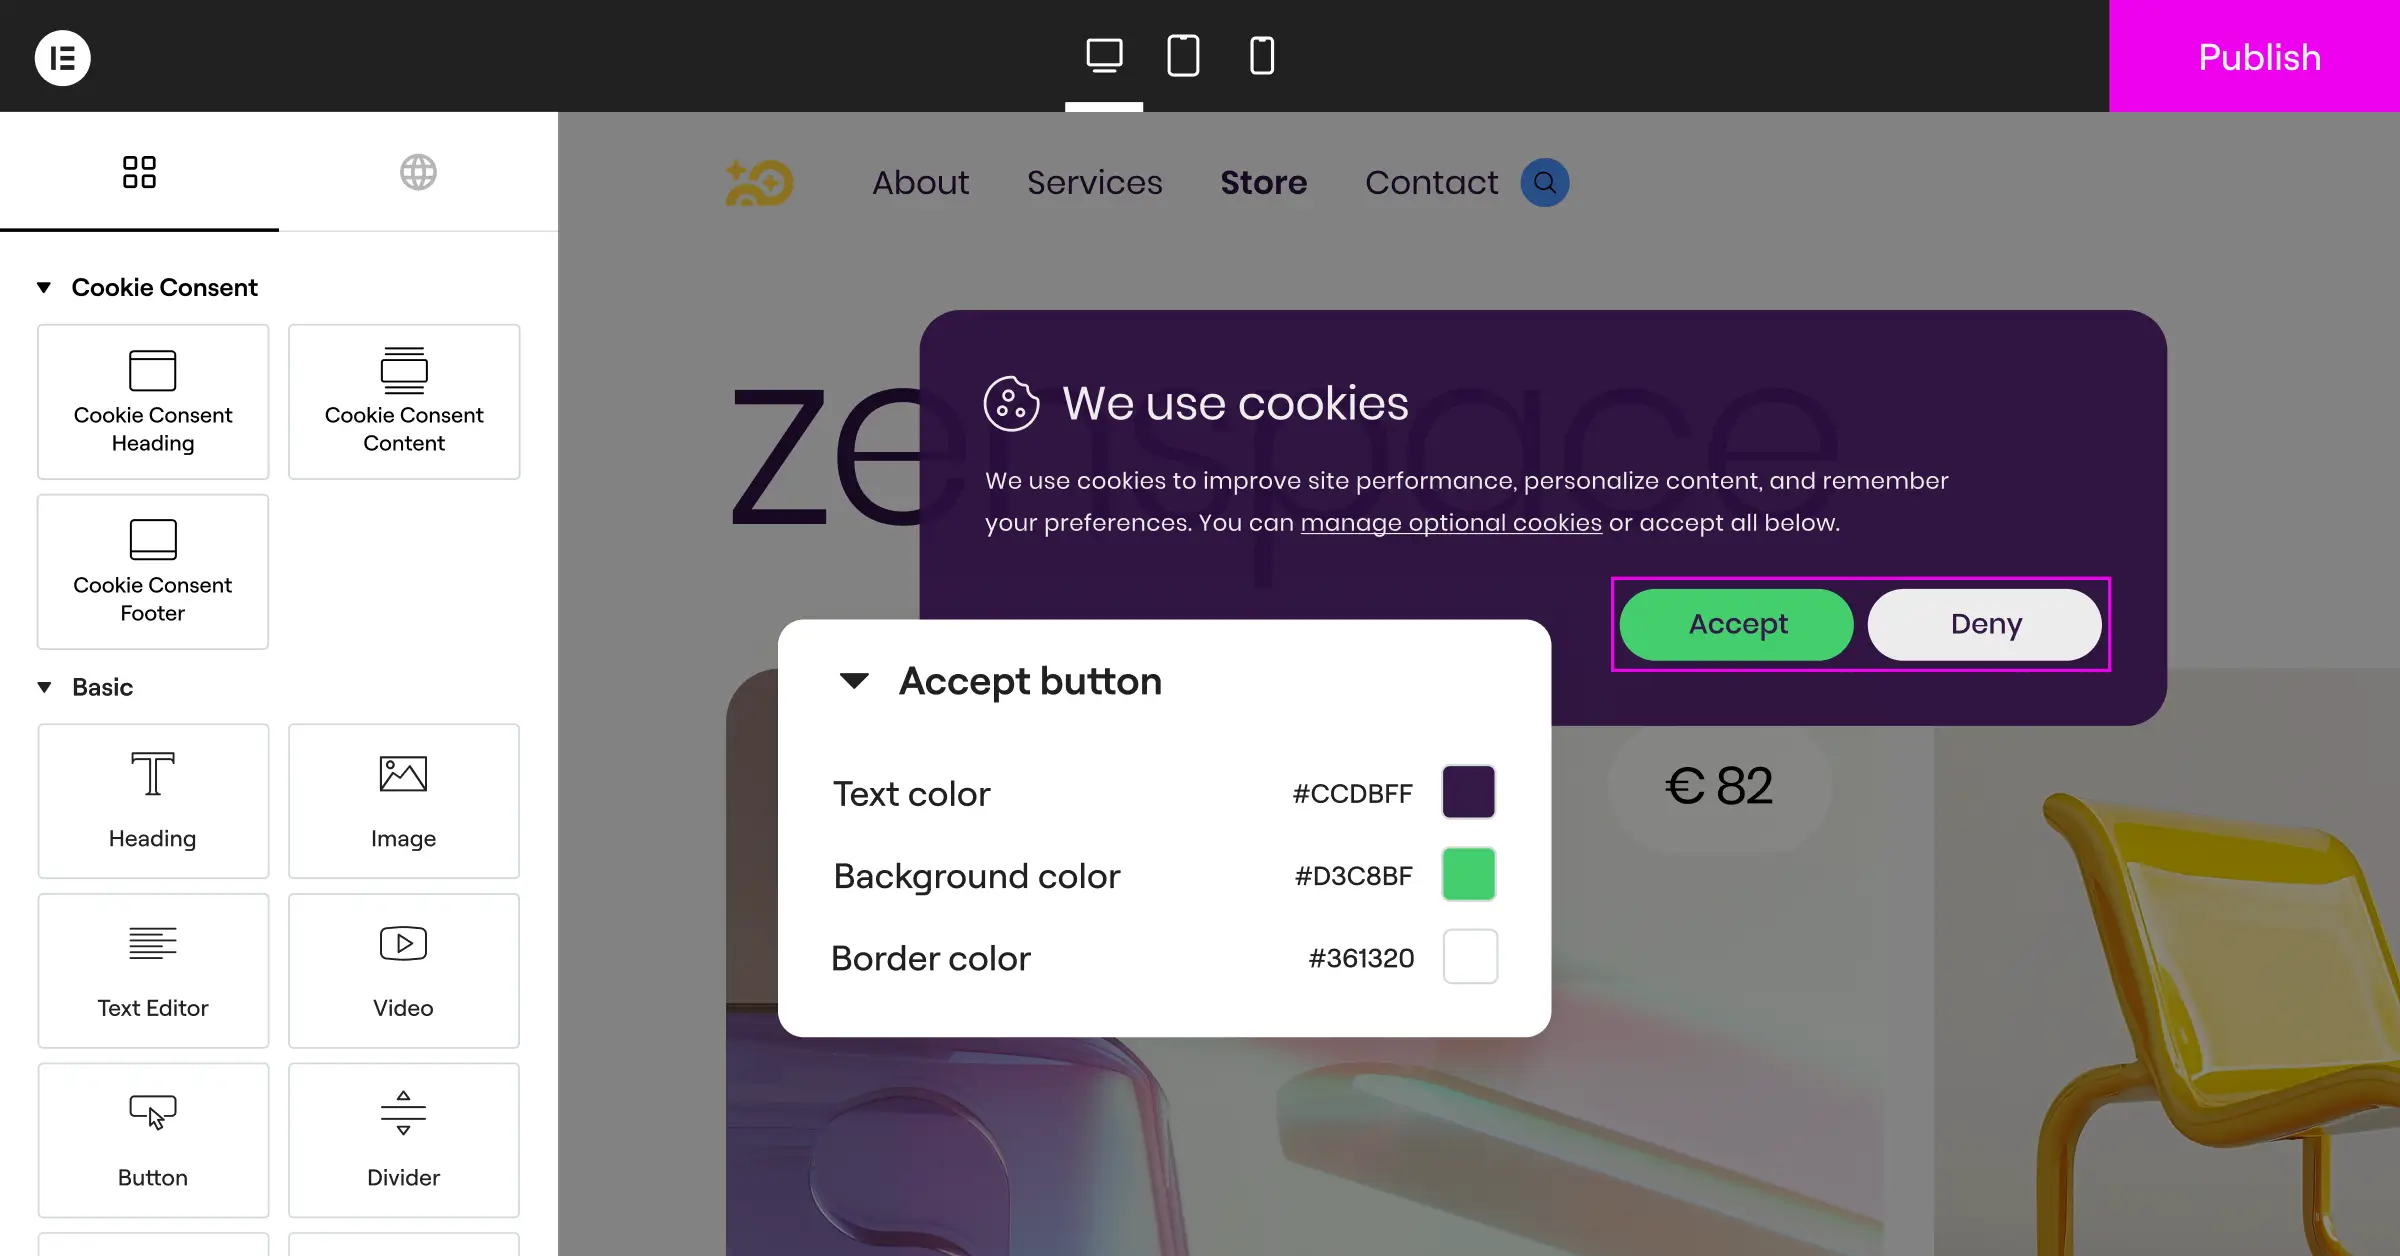
Step 3: Design and Customize Your Consent Banner
With categories in place, you need a way for visitors to interact with them. Design a banner that feels like part of your site, not a cold box bolted on top: your brand colors, clear fonts, friendly copy explaining why you use cookies. It should include a button to accept all, a button to reject non-essential cookies, and an option to manage preferences category by category.
Step 4: Configure Geo-Targeting Rules
Not every visitor needs the same banner. Visitors from the EU face strict GDPR requirements, while visitors elsewhere might not need one at all. Geo-targeting rules keep things clean: the banner only shows up for people who legally require it, so your site stays fast and clutter-free for everyone else.
Step 5: Connect with Consent Protocols and Publish
With your banner designed and cookies categorized, your tracking scripts still need to respect what visitors choose. Modern tools do this by integrating with protocols like Google Consent Mode v2, which tells your analytics and advertising scripts how to behave based on the user’s choice. Once that’s configured, publish your banner and run a quick live test.
10 Best Practices for Cookie Categorization in 2026
Setting up your categories is a great first step, but managing them well takes a little ongoing strategy. Here are ten practices worth following in 2026.
1. Use a WordPress-Native Dashboard
Plenty of compliance tools make you log into a separate platform just to check settings or logs, which slows down troubleshooting. A WordPress-native tool like the Cookie Consent feature inside Elementor keeps banner configuration, scan results, and settings all in one familiar dashboard.
2. Automate Your Cookie and Script Scanning
Your site changes over time. New features, marketing campaigns, and updated tools often bring new cookies with them, and tracking that manually means you’ll fall behind fast. Set your consent tool to run scans on a regular schedule instead, so your category list stays current without constant check-ins.
3. Write Simple, Human-Friendly Descriptions
Most privacy banners are stuffed with dense legal language that confuses everyday visitors. Keep your category descriptions warm and plain. Skip the talk about HTTP headers and data serialization, and just explain what a cookie does, like telling visitors that functional cookies remember their login so they don’t have to retype it every time. Clear language builds trust.
4. Design for Mobile First
A big share of your traffic comes from phones and tablets, and a banner that’s too big can block the whole screen and push visitors to leave. Make sure your banner is fully responsive and test it across screen sizes, so buttons are easy to tap, text stays readable, and nothing blocks your navigation.
5. Support Google Consent Mode v2
If you run Google Analytics or Google Ads and target European traffic, supporting Consent Mode v2 isn’t optional anymore. It lets your Google tags respect user consent choices dynamically: when a visitor declines marketing cookies, it sends anonymous pings instead of full tracking data, so you stay compliant while still gathering useful, aggregate numbers.
6. Set Up Precise Geo-Targeting
Showing a strict banner to every visitor can hurt conversion rates and annoy people in regions without strict privacy laws. Geo-targeting lets you match the experience to the audience: a full banner with category choices where rules demand it, and a simpler notice, or none at all, everywhere else.
7. Enable Global Privacy Control Support
Global Privacy Control, or GPC, is a browser setting that lets people broadcast their privacy preferences automatically. When a visitor has GPC enabled, their browser signals that they want to opt out of tracking, and your consent tool should recognize that automatically and adjust settings without making them click anything. It’s a genuine win for both user experience and CCPA compliance.
8. Keep Detailed, Secure Consent Logs
If a regulator ever audits your site, you need proof that visitors actively consented before you loaded any tracking cookies. Use a tool that logs the date, time, and specific choices for each session while keeping the data anonymous. An organized audit trail buys you real peace of mind.

9. Make It Easy for Users to Change Their Minds
Consent isn’t a one-time decision. Privacy laws require you to let visitors change their minds or withdraw consent just as easily as they gave it. Keep a small, discreet button or footer link that reopens the settings panel, so people can adjust their preferences anytime and you stay compliant without extra effort on their part.
10. Use a Built-In Policy Generator
Your banner and categories need to match the text on your Privacy and Cookie Policy pages. Writing those from scratch can be stressful, and pricey if you hire a lawyer. A built-in policy generator inside your compliance tool helps you produce a professional, legally sound policy in minutes, keeping your documentation accurate and aligned with what’s actually live on your site.
Comparing Top Cookie Consent Tools in 2026
Picking the right tool to manage your cookie categories makes a real difference in your day-to-day workflow. Here’s how some of the most popular consent management options compare, so you can find the best fit for your site.
| Feature / Capability | Cookie Consent (Elementor) | Cookiebot | CookieYes | Complianz | OneTrust |
|---|---|---|---|---|---|
| WordPress-Native Dashboard | Yes (Fully integrated) | No (External dashboard) | No (External dashboard) | Yes (In WordPress) | No (External enterprise platform) |
| Google Consent Mode v2 | Yes | Yes | Yes | Yes | Yes |
| Setup Time | Under 5 minutes | Moderate | Moderate | Moderate to High | High (Complex) |
| Code-Free Customization | Yes (Using native editor) | Limited (Requires CSS) | Limited | Moderate | Complex setup |
| Free Tier Available | Yes | Limited | Yes (Limited) | Yes (Limited) | No (Enterprise pricing) |
| Geo-Targeting | Yes | Yes | Yes | Yes | Yes |
| Built-In Policy Generator | Yes | No | Yes | Yes | Yes |
If you want a fast, simple setup with everything living in one place, the native Cookie Consent capability built by Elementor is a strong choice. It fits naturally into your existing workflow, so design updates and configuration changes stay quick and simple.
Common Mistakes to Avoid When Organizing Cookies
Even with the best intentions, it’s easy to slip up when setting up cookie categories. Knowing what to watch for keeps your site running smoothly and keeps you out of compliance trouble. Here are the most common pitfalls to avoid.
Pre-Ticking Consent Boxes
It’s tempting to pre-check every consent box to boost opt-in rates, but under rules like GDPR that’s not allowed. Consent has to come from an active, clear choice the visitor makes themselves. All non-essential categories, like performance and marketing, need to sit off by default so users can toggle them on if they agree.
Misclassifying Essential Tracker Types
Sometimes site owners label marketing pixels or analytics scripts as “strictly necessary” so they always load. Doing that violates major privacy regulations and can lead to serious fines. Keep your “strictly necessary” category pure, reserved only for what your site genuinely can’t function without.
Forgetting to Block Scripts Before Consent
Just showing a banner doesn’t make your site compliant. Your consent tool has to actually hold back and block every functional, analytical, and marketing script until the visitor makes a choice. If scripts load quietly in the background before someone clicks “Accept,” the banner is just for show.
Keep these rules in mind and you’ll end up with a solid, legally sound privacy setup that protects your visitors and your brand. If you want to round out your site’s compliance and inclusivity, take a look at Web Accessibility features too, which work hand-in-hand with your consent tools to welcome every visitor.
Frequently Asked Questions
What is cookie categorization?
Cookie categorization means grouping the cookies and tracking scripts on your site into clear categories based on what they actually do: usually strictly necessary, functional, performance, and marketing, letting users choose which ones to allow.
Do I really need to categorize cookies on my website?
Yes. If you have visitors from regions with active privacy laws, like the EU (GDPR) or California (CCPA), you’re legally required to group your cookies and get explicit consent before loading any non-essential trackers.
What happens if I don’t set up cookie categories?
Running your site without proper cookie categories and consent mechanisms can expose your business to regulator fines. It can also hurt your brand’s reputation, since today’s users expect clear transparency about how their data is used.
Does Google Consent Mode v2 work with my cookie categories?
Yes. When a user accepts or declines categories like analytical or marketing cookies, your consent tool communicates those choices directly to Google’s tags, so they adjust their tracking behavior accordingly.
Can I manage cookie consent directly from my WordPress dashboard?
Absolutely. Using a native feature like the Cookie Consent tool built by Elementor lets you manage all your scans, categories, banners, and consent logs without ever leaving your WordPress admin area.
How often should I scan my website for new cookies?
Aim for at least once a month, or any time you install new features, add tracking tools, or update your site layout. Automated scanning makes this easy by running the checks on a set schedule for you.
Do strictly necessary cookies require user consent?
No, strictly necessary cookies don’t require prior user consent because your website can’t function safely or properly without them. You do need to list them in your cookie policy, though, so your visitors know they’re there.
What is the difference between GDPR and CCPA cookie requirements?
GDPR runs on an “opt-in” model: you block cookies until the user actively consents. CCPA takes an “opt-out” approach, requiring a clear way to stop the sale or sharing of data, often through a “Do Not Sell My Info” link or Global Privacy Control support.
How do I test if my cookie categories are working correctly?
Open your website in a private or incognito browser window. Open your browser’s developer tools, check the active cookies list, and verify that no tracking or marketing cookies load until you actively accept those categories on your consent banner.


